-
81 SH Something Special
81 frame, 80 tank and side covers, 79 tail light and carbs, 78 engine, 750 final drive mod, Geezer rec/reg, 140 mains, LH wheels
☺
79 SF MEAUQABEAUXS
81SH Nor'eas tah (Old Red)
80 LG Black Magic
78 E Standard Practice
James 3:17
If I can make at least one person smile, or pee their pants a little, or maybe spit out their drink; then my day is not wasted.
“Alis Volat Propriis”
Yamaha XS 1100 Classic
For those on FB -
Nice pictoral Steve. However, I have to say that, IMHO, that method is a bit complicated and there are a LOT of ways to screw up.
Such as, bolts that could come loose, loosing cam timing, not to mention time consuming.
I must have just gotten one of the good ones when it came to the tool but after I figured out how to get just the little tip to catch on just the edge of the shim bucket it was quite easy and quick.
When I first got the okieSPECIAL I had a top end noise it took a while to figure out. turned out all the cam cap nuts were loose and a few had actualy fallen off. I believe the PO had attempted to adjust the valves with this method and things weren't properly retorqued. Luckily there wasn't any mechanical damage.
Just wanted to throw that out for those who may use this method. Be certain EVERYTHING is torqued properly and be CERTAIN the cams are in time before attempting to start the engine. Any of these could cause some expensive damage to your engine.Greg
Everybody is a genius. But if you judge a fish by its ability to climb a tree, it will live its whole life believing that it is stupid.”
― Albert Einstein
80 SG Ol' Okie;79 engine & carbs w/pods, 45 pilots, 140 mains, Custom Mac 4 into 2 exhaust, ACCT,XS850 final drive,110/90/19 front tire,TKat fork brace, XS750 140 MPH speedometer, Vetter IV fairing, aftermarket hard bags and trunk, LG high back seat, XJ rear shocks.
The list changes.")
Comment
-
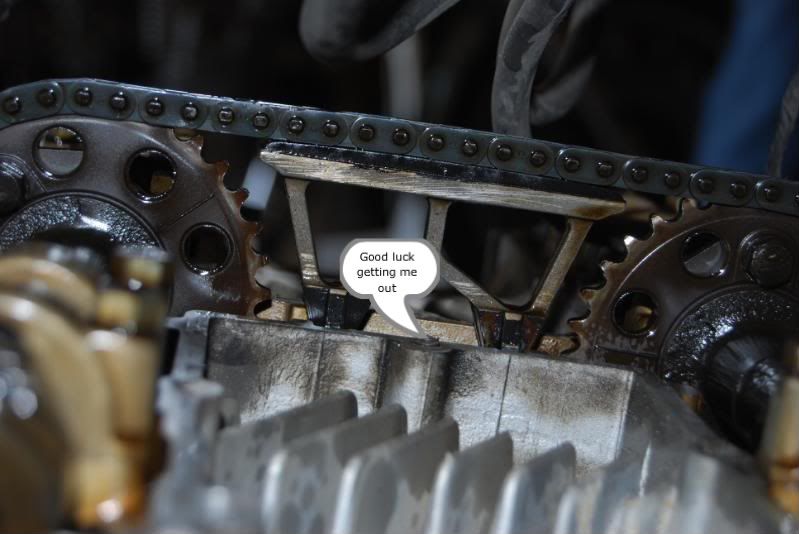
Steve, very nice write up, and nice camera to. I will support the stated idea that a rag of soem type NEEDS to go into that cam chain tunnel in the head PRIOR to removing any bolts or nuts or washers in that area. I recall the thread where one of our members had to dig through his engine and remove every engine cover to find a lost nut or washer from this very same procedure.
I am intrigued by this statement
I only say this because I have never removed the cam, but I do remove the tensioner and all the caps. Once you get that far, the cam WILL be cocked to one side. At least always has been on my motors.taking care not to just take them off, but to loosen them gradually so as to not 'cock' the cam as at least one lobe will be holding a valve openLife is what happens while your planning everything else!
When your work speaks for itself, don't interrupt.
81 XS1100 Special - Humpty Dumpty
80 XS1100 Special - Project Resurrection
Previously owned
93 GSX600F
80 XS1100 Special - Ruby
81 XS1100 Special
81 CB750 C
80 CB750 C
78 XS750Comment
-
Well, thanks guys! I learned something this week. I've checked my valves and I know how the reshim them. I'll likely reshim them next winter. I know of a couple shops that know my bike and have shim libraries. I may decide to do it that way for the sake of expedience. These are little one man operations that I can work with. Now, I am armed with options.
A special thanks to Steve for taking the time to do the pictorial instruction.Marty (in Mississippi)
XS1100SG
XS650SK
XS650SH
XS650G
XS6502F
XS650EComment
-
Shimming
Very good Steve. I went and bought a box of surgical gloves and use one on my left hand and one of the flat fridge magnets down the inside of my left middle finger to keep anything from falling into the motor. Provides you with the same dexterity and catches everything if I get clumsy with my right. Tried having a regular magnet close but it stuck to everything and became a real pain.mack
79 XS 1100 SF Special
HERMES
original owner
http://i946.photobucket.com/albums/a...ps6932d5df.jpg
81 XS 1100 LH MNS
SPICA
http://i946.photobucket.com/albums/ad305/mack-055/2.jpg
78 XS 11E
IOTA
https://youtu.be/wB5Jfbp6SUc
https://youtu.be/RaI3WYHSuWA
Have recovery trailer and shop if you breakdown in my area.
Frankford, Ont, Canada
613-398-6186Comment
-
Excellent write up CRAZ.
Not being a mechanic myself more of a pm type I had one of our SWOXS members do my valves and I think the most non sun sunday verbage came with getting the actual valve cover off
But after all was said and done,valves set and new bolt put in.
 '80 XS1100 SG
Don't let the good times pass you by..grab all you can
https://www.youtube.com/watch?v=x_Z4cjUlIo4Comment
-
Ba80
"I must have just gotten one of the good ones when it came to the tool but after I figured out how to get just the little tip to catch on just the edge of the shim bucket it was quite easy and quick."
I think the problem with the tool is it will not work like the manual says to use it. The OEM Yamaha tool might be different that way. You hit it right on the head If you only open the valve about 1/8th" the thing will drop right in and give you enough roon to R/I any shim
1979 XS1100 Special (Mad Max, OEM) Current
1980 XS1100 Special
1990 V Max
1982 KZ750 LTD Twin
1986 700 FZR Yamaha Fazer (faster then expected)
1979 XS750 Special (my 1st Special)
1974 CB750-Four
Past/pres Car's
1961 Catalina 389/1970 Torino GT 351/1967GTO 12to1 comp./ Roller cam/ T-10/ 456 gear/Tri-power/1967 GTO 400, 1969 Camaro, 1968 Z28, 2001 BMW M Roadster 0 to 60 in 4.5 sec. Jaguar XK8Comment
-
First, thanks to those who posted kind words.
Now, I'm not 'recommending' this method to anyone; I simply posted this to show how it's done if that's how you choose to do an adjustment.
Greg, any valve adjustment method has it's pitfalls. I like this method for several reasons. One, it's a straight-through process; no multiple steps of moving the tool and rotating the motor back-and-forth to remove shims, with multiple chances for mistakes. Two, I like being able to see all the parts, making it easy to check for any problems. Particularly on a motor that I got in a non-running bike with an unknown history; sometimes a little 'extra' work early-on can save you problems later. I'm not known for my good luck (they called me 'Mr Lucky' at the last place I worked, 'cause I ain't... ), so being very meticulous is my defense against that. Three, you don't need to have the 'special' tool or a on-hand supply of shims with this method; not everybody wants to spend the $12 for the tool or $100+ for a 'starter' set of extra shims. I do it this way, I can make one trip to get whatever shims I need (although I'm starting to get a small stock). No small thing when it's a 30 mile trip to the PO or 80 miles to a dealer...
Different people are comfortable with different methods, so pick the one that works for you...Last edited by crazy steve; 01-14-2012, 01:50 PM.Fast, Cheap, Reliable... Pick any two
'78E original owner - resto project
'78E ???? owner - Modder project FJ forks, 4-piston calipers F/R, 160/80-16 rear tire
'82 XJ rebuild project
'80SG restified, red SOLD
'79F parts...
'81H more parts...
Other current bikes:
'93 XL1200 Anniversary Sportster 85RWHP
'86 XL883/1200 Chopper
'82 XL1000 w/1450cc Buell, Baker 6-speed, in-progress project
Cage: '13 Mustang GT/CS with a few 'custom' touches
Yep, can't leave nuthin' alone...Comment
-
Not knocking it Steve, just sayin' that all that work to change 2-5 shims (which is about all that's needed usually) seems a bit counter productive. Paticularly if you miscalculate the shim size and have to go back and correct yourself. Not to mention the other various things that could transpire during the process.
But, to each his own. I'll stick with the tool.
Greg
Everybody is a genius. But if you judge a fish by its ability to climb a tree, it will live its whole life believing that it is stupid.”
― Albert Einstein
80 SG Ol' Okie;79 engine & carbs w/pods, 45 pilots, 140 mains, Custom Mac 4 into 2 exhaust, ACCT,XS850 final drive,110/90/19 front tire,TKat fork brace, XS750 140 MPH speedometer, Vetter IV fairing, aftermarket hard bags and trunk, LG high back seat, XJ rear shocks.
The list changes.Comment
-
To tell the truth, if I only had to change 1-2 shims, I'd 'fix' my MP tool and use it. I only did this one this way to get a look at the cam and cam journals (not knowing any 'history' on this motor) and to do this tutorial
But when I did my SG motor (again, no history), only one valve was within spec; all the rest were too tight. Not having a bunch of shims on-hand, and not wishing to have to remove/reinstall the other seven at least twice (once to find out the size, and again to put in the right size), I pulled both cams. As it turned out, I only needed to buy two shims, but with the cams out it was easy to swap the others around in one operation.
So.... who's going to post the picture tutorial with the MP tool? Fast, Cheap, Reliable... Pick any two
'78E original owner - resto project
'78E ???? owner - Modder project FJ forks, 4-piston calipers F/R, 160/80-16 rear tire
'82 XJ rebuild project
'80SG restified, red SOLD
'79F parts...
'81H more parts...
Other current bikes:
'93 XL1200 Anniversary Sportster 85RWHP
'86 XL883/1200 Chopper
'82 XL1000 w/1450cc Buell, Baker 6-speed, in-progress project
Cage: '13 Mustang GT/CS with a few 'custom' touches
Yep, can't leave nuthin' alone...Comment
-
Greg
Everybody is a genius. But if you judge a fish by its ability to climb a tree, it will live its whole life believing that it is stupid.”
― Albert Einstein
80 SG Ol' Okie;79 engine & carbs w/pods, 45 pilots, 140 mains, Custom Mac 4 into 2 exhaust, ACCT,XS850 final drive,110/90/19 front tire,TKat fork brace, XS750 140 MPH speedometer, Vetter IV fairing, aftermarket hard bags and trunk, LG high back seat, XJ rear shocks.
The list changes.Comment
-
Cs
Hey CS, you know I have said you have been a huge help to me and many others on here But, you are very skilled and know these bikes inside and out. What seems easy to you can be scary to some who aren't, even dangerious to others who don't know all you do about don't skipping a tooth or setting a cct back right Your pic's and tutor's are great Just if some not so skilled tried them and For the pro's no problem, great stuff
1979 XS1100 Special (Mad Max, OEM) Current
1980 XS1100 Special
1990 V Max
1982 KZ750 LTD Twin
1986 700 FZR Yamaha Fazer (faster then expected)
1979 XS750 Special (my 1st Special)
1974 CB750-Four
Past/pres Car's
1961 Catalina 389/1970 Torino GT 351/1967GTO 12to1 comp./ Roller cam/ T-10/ 456 gear/Tri-power/1967 GTO 400, 1969 Camaro, 1968 Z28, 2001 BMW M Roadster 0 to 60 in 4.5 sec. Jaguar XK8Comment
-
Sorry, I couldn't help it, seeing how many people despise using that tool. Actually I use it myself.
2H7 (79) owned since '89
3H3 owned since '06
07 Triumph Tiger 1050 (night rider)
"If it ain't broke, modify it"
☮Comment
 Tweet
Tweet
")


Comment