 Tweet
Tweet
With all this talk about valve adjusting and being in the middle of doing just that on my current project bike, I decided to post a 'how-to' on the 'cam removal' method. I'll note that it's very important that the bike/motor be level side-to-side. So, without further ado, here it is...
[IMG]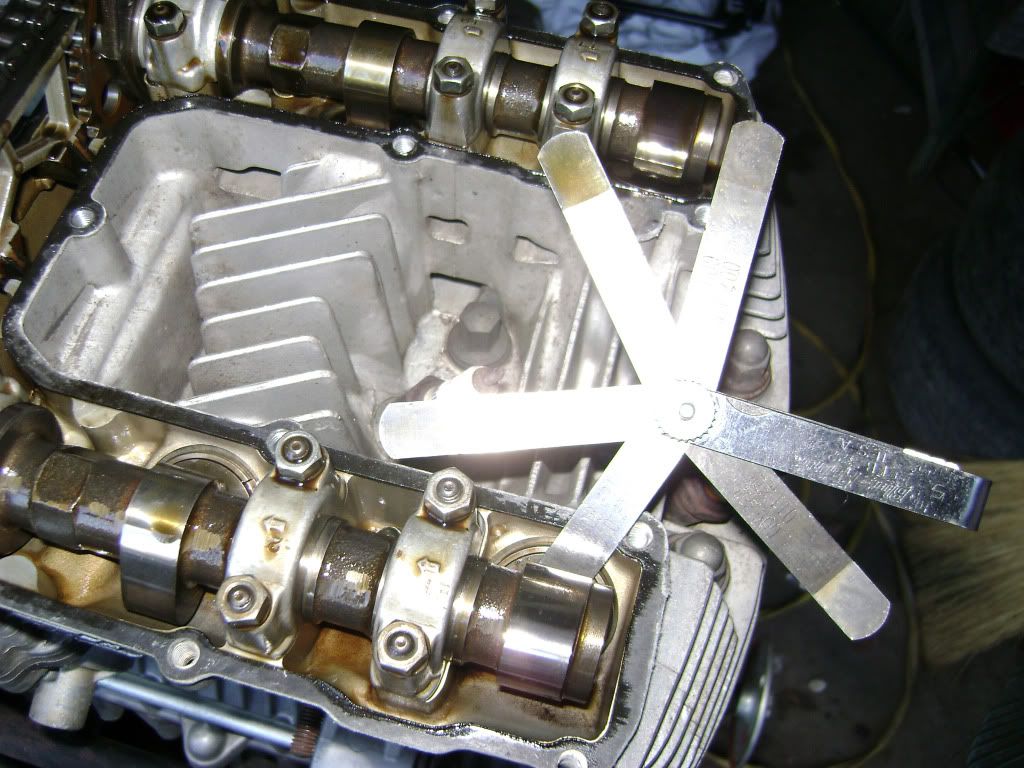 [/IMG]
First things first; check and record your clearances for all valves. Remove the cam and timing covers and rotate the motor clockwise while checking each valve. I use a go/no go set of feeler gauges, really handy...
[IMG]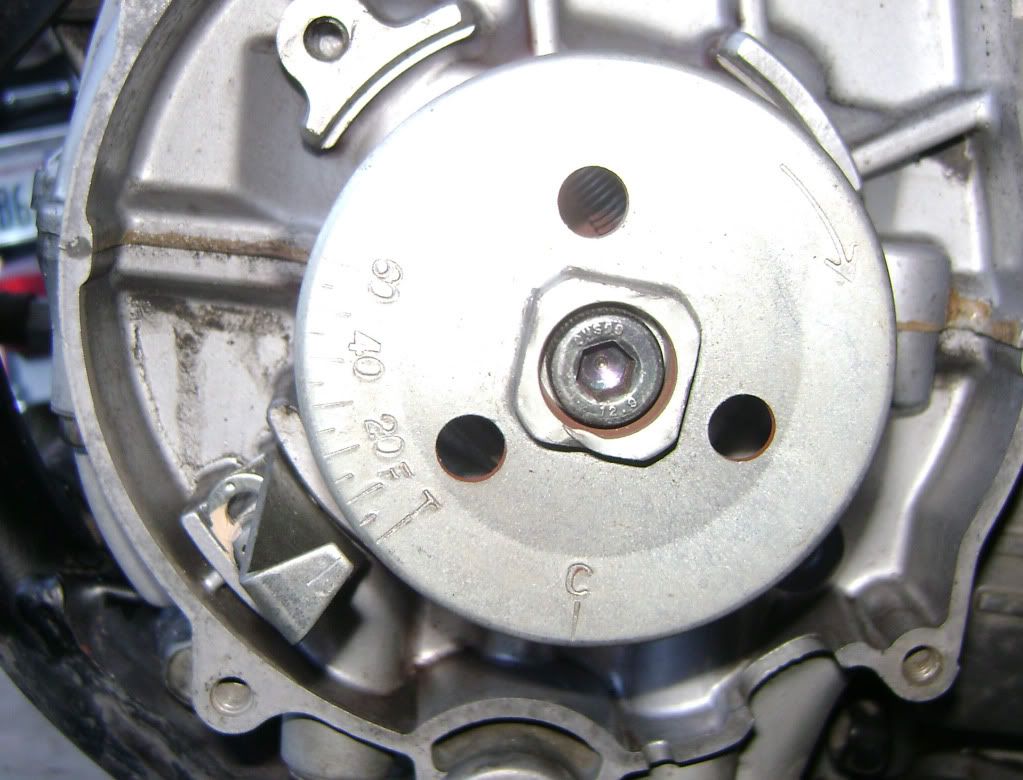 [/IMG]
Once you've got all the measurements, turn the crankshaft (always clockwise) until the pointer is on the 'T'.
[IMG]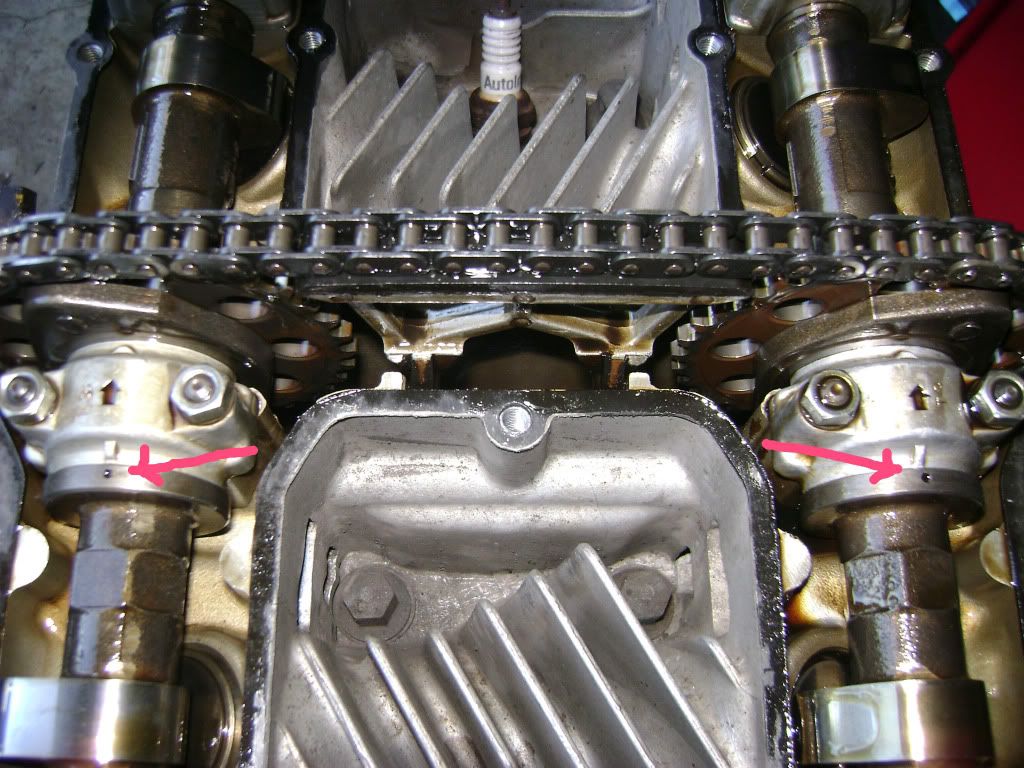 [/IMG]
Do you see these 'dots' on the cams? If you do, they both should line up with the marks on the cam caps, and then turn the crankshaft around one more time (so you can't see them)...
[IMG] [/IMG]
...then remove these two cam sprocket bolts. Turn the crank once more (so you can see the dots again and they line up with the marks on the caps) and remove the other two bolts. Note the little 'points' by the second pair of bolt holes...
[IMG]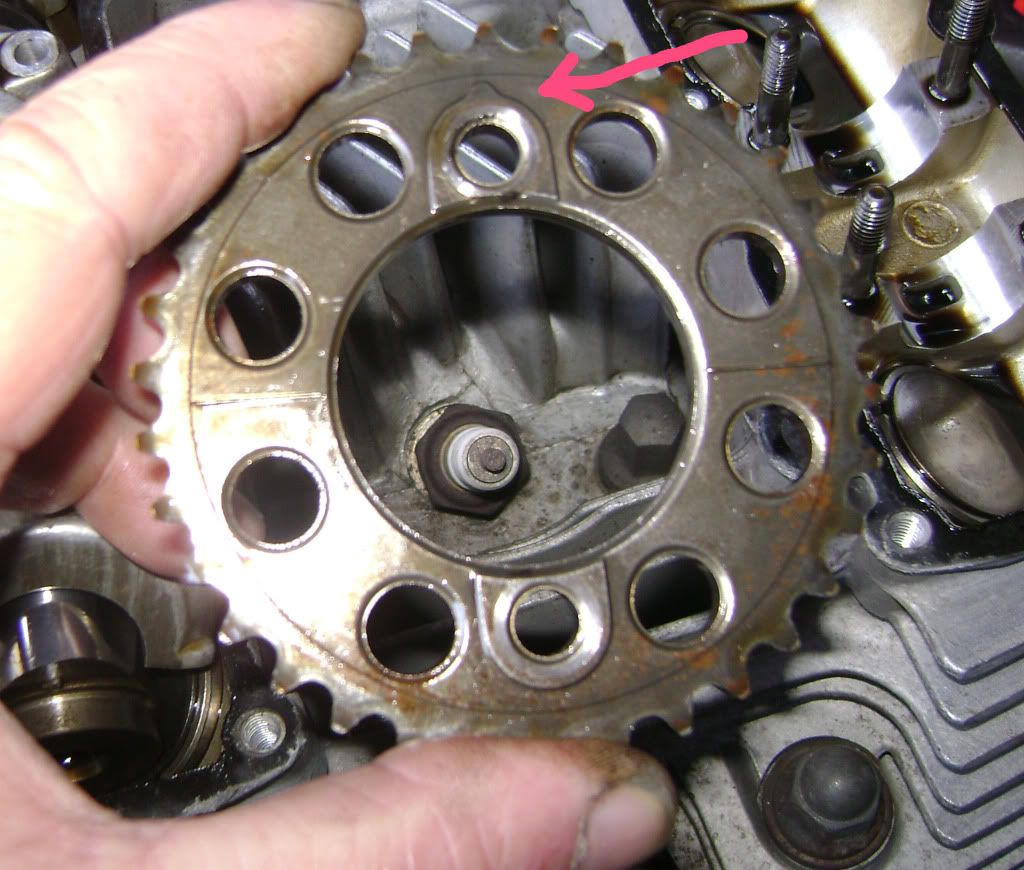 [/IMG]
...as shown in close-up here. These holes must be on the same 'side' of the cam as the dots or your cam timing will be off. DO NOT turn the crankshaft again until you get to the end of the reassembly process!
[IMG]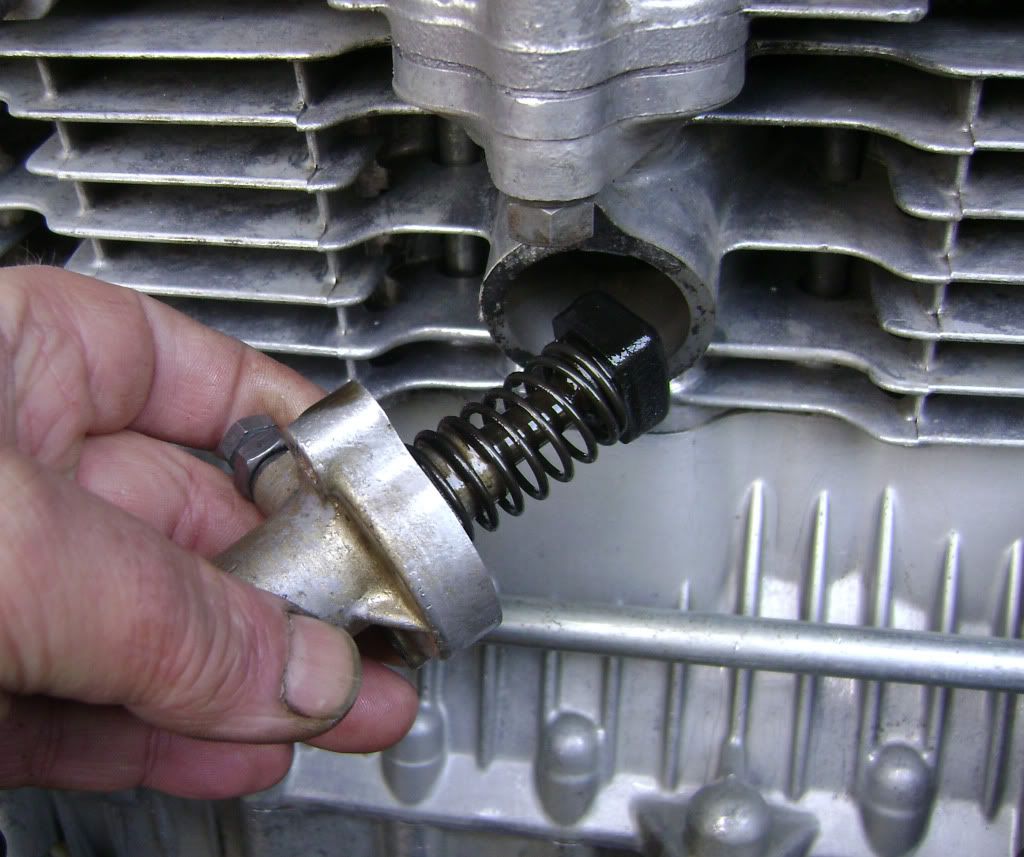 [/IMG]
Remove the cam chain tensioner...
[IMG] [/IMG]
... which will give you slack so you can lift out the top chain guide. Lift/move the chain to one side and lift it out.
[IMG] [/IMG]
Loosen/remove the cam caps, taking care not to just take them off, but to loosen them gradually so as to not 'cock' the cam as at least one lobe will be holding a valve open. Loosen the cap nuts on either side of those lobes about 1/4 turn at a time. Once you have the caps off, lift up and rotate the cam/sprocket until you can pull the cam out through the sprocket. TIP: use a magnet on/near the nuts/bolts so as not to lose any inside the motor; it really sucks trying to fish those out...
[IMG]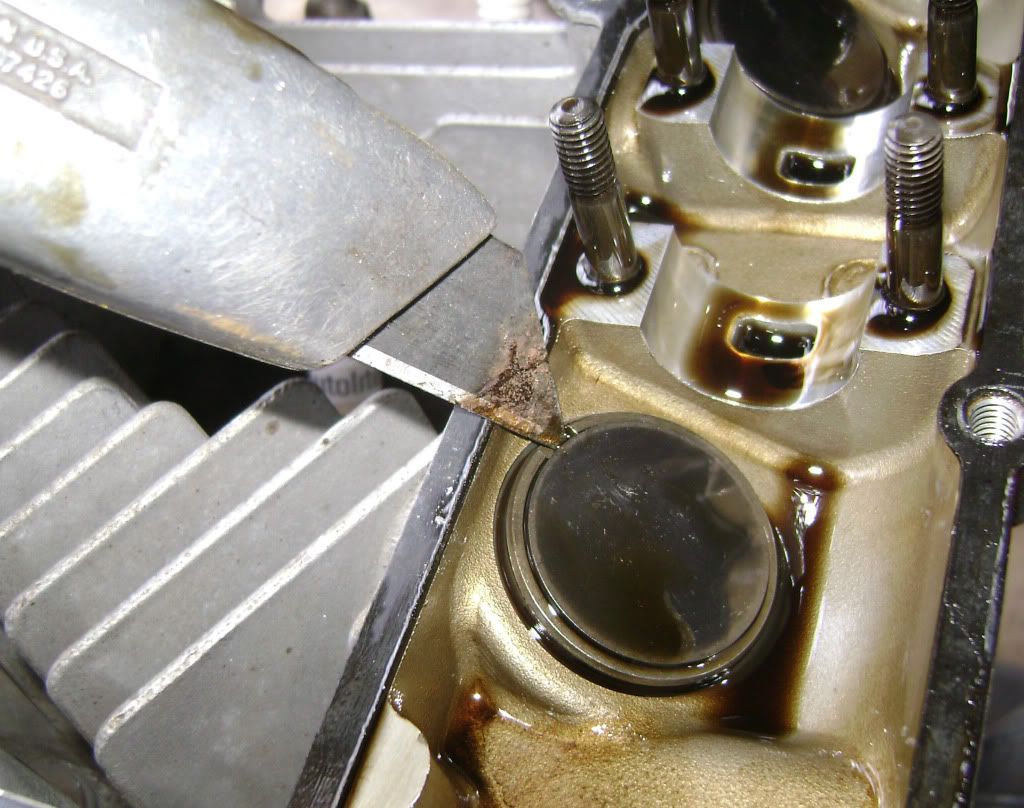 [/IMG]
You now have access to all the shims, simply pop them out. I use a knife edge, some use magnets (but I haven't had any luck with those, the oil 'stiction' is more than the magnet can overcome) to get them out.
End of part 1.....
[IMG]
[/IMG]First things first; check and record your clearances for all valves. Remove the cam and timing covers and rotate the motor clockwise while checking each valve. I use a go/no go set of feeler gauges, really handy...
[IMG]
[/IMG]Once you've got all the measurements, turn the crankshaft (always clockwise) until the pointer is on the 'T'.
[IMG]
[/IMG]Do you see these 'dots' on the cams? If you do, they both should line up with the marks on the cam caps, and then turn the crankshaft around one more time (so you can't see them)...
[IMG]
[/IMG]...then remove these two cam sprocket bolts. Turn the crank once more (so you can see the dots again and they line up with the marks on the caps) and remove the other two bolts. Note the little 'points' by the second pair of bolt holes...
[IMG]
[/IMG]...as shown in close-up here. These holes must be on the same 'side' of the cam as the dots or your cam timing will be off. DO NOT turn the crankshaft again until you get to the end of the reassembly process!
[IMG]
[/IMG] Remove the cam chain tensioner...
[IMG]
[/IMG]... which will give you slack so you can lift out the top chain guide. Lift/move the chain to one side and lift it out.
[IMG]
[/IMG]Loosen/remove the cam caps, taking care not to just take them off, but to loosen them gradually so as to not 'cock' the cam as at least one lobe will be holding a valve open. Loosen the cap nuts on either side of those lobes about 1/4 turn at a time. Once you have the caps off, lift up and rotate the cam/sprocket until you can pull the cam out through the sprocket. TIP: use a magnet on/near the nuts/bolts so as not to lose any inside the motor; it really sucks trying to fish those out...
[IMG]
[/IMG]You now have access to all the shims, simply pop them out. I use a knife edge, some use magnets (but I haven't had any luck with those, the oil 'stiction' is more than the magnet can overcome) to get them out.
End of part 1.....


")


 And one issue with them is the quality control on them seems to be pretty uneven, as more than a few have reported having to do some grinding on them to get them to fit. I've got one, and that's what it needs before it'll fit...
 till I figured out it wont go in if the valve is even half way open
 The 2nd time, knowing how to use it, it took me about 1/2 hour
Comment