Announcement

Collapse
No announcement yet.

What did you do to your bike today?

Collapse
X
 
  • Filter
  • Time
  • Show
Clear All
new posts

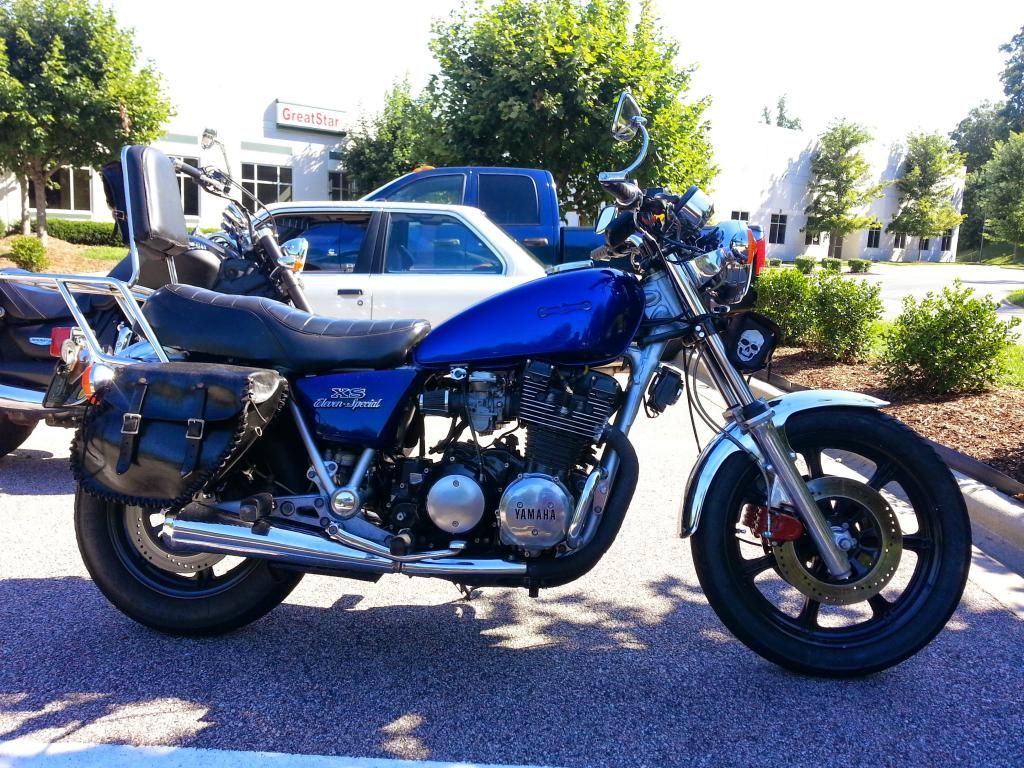
  • Put all my freshly painted bodywork back on and tried firing it up to see if I got the wiring right. Seems good. Next to hook up the tail/turn lights, mount the seatpan to its final resting spot, see if the upholsterer is done with the seat pad, and wait for a buddy to show up and help me swap over from 30+ yr old brake lines to some sweet braided stainless. The pics don't do it justice yet, (as its overcast and rainy), but the color is actually a deep brown with a ton of orange flake in it. Three coats of paint and 6 of clear, sanded and wetsanded from 800 to 1000, 1500, 2000, and finally 3000 grit before three stage power polishing. Smooth as glass and can tell in the reflection if I have food in my stubble...

    81 H "Traumaha"
    06 KLR 650
    06 Katana 600 (Sold)
    05 Star 1100 (Sold)
    78 GS1000 Cafe (Traded for a Chrysler 68 Newport)
    79 RD400 (Stolen)
    78 KE175
    Schwinn Tricycle red (with a loud bell)

    Comment


    • As usual, Gmus, your bike looks great. Well done!
      79 F
      Previously owned: (among others)
      1969 Harley- Davidson Rapido 125 (Aermacchi)
      1967 Suzuki X6 Hustler
      1973 Suzuki TM 125
      1979 XS1100 F
      2005 Kaw. Vulcan VN800
      1991 BMW K75

      Comment


      • Looks good!..........fork brace, suspension and brakes all intact. Nice work on the tank.
        81H Venturer1100 "The Bentley" (on steroids) 97 Yamaha YZ250(age reducer) 92 Honda ST1100 "Twisty"(touring rocket) Age is relative to the number of seconds counted 'airing' out an 85ft. table-top.

        Comment


        • Thanks guys. This will officially be its last color change, (four is enough). The brown was what I really wanted, but couldn't find anything dark enough in a metallic until Ford came out with "Kodiak Brown". Our local bodyshop supplier was able to do me up a couple of rattle cans and some truly amazing 2k clearcoat by SprayMax. There is still of course many sleepless nights ahead regarding graphics combos, but it'll do for now as she sits. Yes, other than freshening it up and topping the fluids, I don't intend on playing with the safety and handling aspects of it. The fender may get shortened, but its staying on, as with the brace and original brake set up.
          81 H "Traumaha"
          06 KLR 650
          06 Katana 600 (Sold)
          05 Star 1100 (Sold)
          78 GS1000 Cafe (Traded for a Chrysler 68 Newport)
          79 RD400 (Stolen)
          78 KE175
          Schwinn Tricycle red (with a loud bell)

          Comment


          • Hi G'mus,
            That fender looks to be in good condition. Have a look on XS650 site for some fairly low cost fender options that may suit the style you are looking for and preserve a good fender that is rare.
            Phil
            1981 XS1100 H Venturer ( Addie)
            1983 XJ 650 Maxim
            2004 Kawasaki Concours. ( Black Bear)

            Comment


            • Pulled the clutch cover to discover the gasket was tore where it was leaking. Took it off and applied some Permatex "The Right Stuff", ran the bike around here and there and parked it. No more leaks, which is a relief. Going to checkbthe other oils tomorrow.
              1979 XS1100F
              2H9 Mod, Truck-Lite LED Headlight, TECHNA-FIT S/S Brake Lines, Rear Air Shocks, TKAT Fork Brace, Dyna DC-I Coils, TC Fuse Block, Barnett HD Clutch Springs, Superbike Handlebars, V-Star 650 ACCT, NGK Irridium Plugs, OEM Exhaust. CNC-Cut 2nd Gear Dogs; Ported/Milled Head; Modded Airbox: 8x8 Wix Panel Filter; #137.5 Main Jet, Viper Yellow Paint, Michelin Pilot Activ F/R, Interstate AGM Battery, 14MM MC, Maier Fairing, Cree LED Fog Lights.

              Comment


              • Fresh Paint too.

                Fresh paint, wet sand and looking great! Waiting for the paint to harden before I put the tank badges back on.


                Oil change done and brake pad retainers installed. No more clicking brake pads! Next weekend tackling the Tail of the Dragon (again) and then to the Devils Triangle in Knoxville. Can't wait!

                1979 XS 1100SF Serenity
                1981 XJ650 Midnight - Black Betty
                Road Dog 4 Life

                Comment


                • quick fix

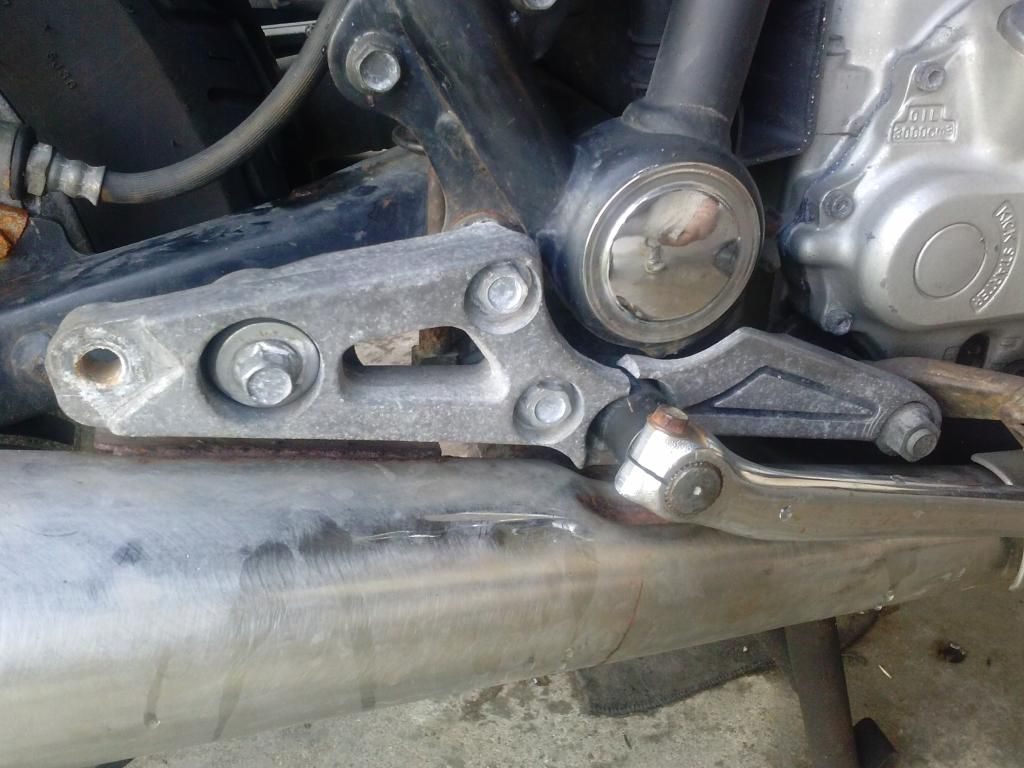
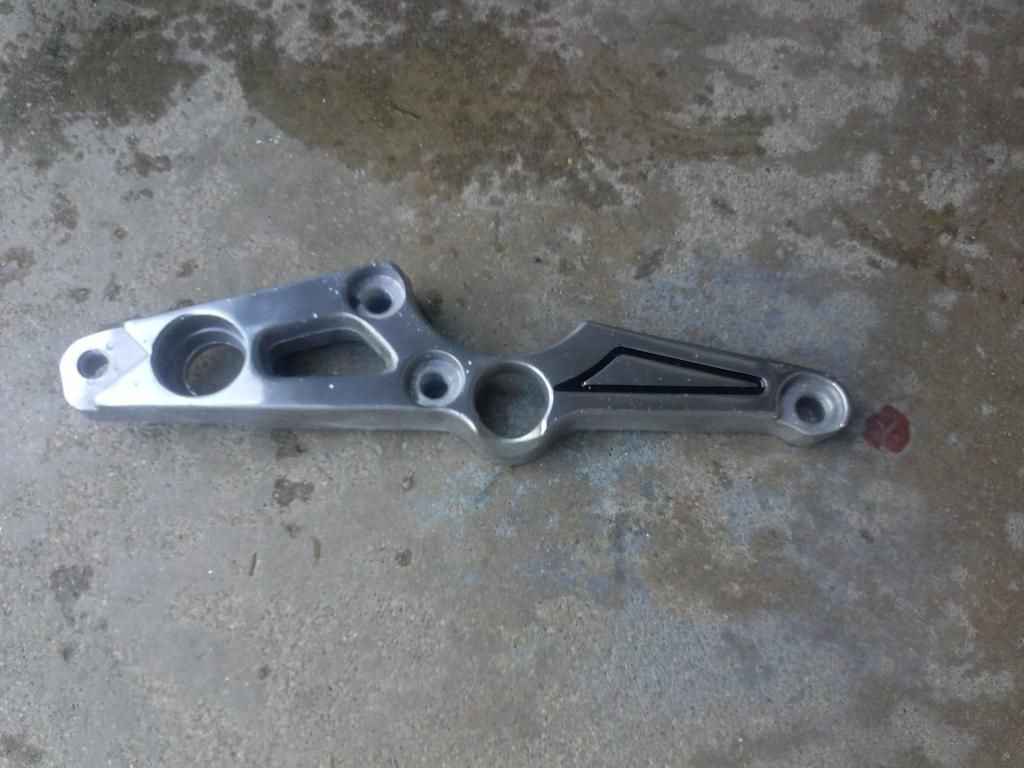
                  Since i got Hugo, I've had to look at this eyesore.


                  I score this on ebay cheap.


                  Couple of minutes later..... done.

                  Note: there's a rubber bushing that goes in the muffler bolt hole. Lol.
                  Hi, my name is George & I'm a twisty addict!

                  80G (Green paint(PO idea))
                  The Green Monster
                  K&N A/F, TC's fuse block, '81 oil cooler, TC's homemade 4-2 w/Mac Mufflers, Raptor 660 ACCT
                  Got him in '04.
                  bald tire & borrowing parts

                  80SG (Black w/red emblems & calipers)
                  Scarlet
                  K&N A/F, TC's fuse block, WJ5, Shoei bags, Raptor 660 ACCT.
                  Got her in '11
                  Ready for the twisties!

                  81H (previously CPMaynard's)
                  Hugo
                  Full Venturer, Indigo Blue with B/W painted tank.
                  Cold weather ride

                  Comment


                  • Originally posted by GLoweVA View Post
                    Since i got Hugo, I've had to look at this eyesore.


                    I score this on ebay cheap.


                    Couple of minutes later..... done.

                    Note: there's a rubber bushing that goes in the muffler bolt hole. Lol.
                    Good fix!.......you may actually notice a slightly improved corner handling.........that's more than cosmetic and a pillion footrest.
                    81H Venturer1100 "The Bentley" (on steroids) 97 Yamaha YZ250(age reducer) 92 Honda ST1100 "Twisty"(touring rocket) Age is relative to the number of seconds counted 'airing' out an 85ft. table-top.

                    Comment


                    • GLoweVA,
                      I would suggest you have a look at any seen gap between footpeg mount and that pretty replacement frame gusset/peg mount.
                      From the decades of compression, the motor mount dampener's outside shoulder get compressed, leaving a shim/washer thickness of a gap. Unnoticed, that piece gets pulled inward at the motor mount when tightened........then, snap, as the right side, by design is the weaker one.
                      Either broke, or stressed being pulled off center, it DOES affect the rear handling of the bike!
                      Just an FYI worth checking so that pretty replacement mount doesn't end up like what you removed.
                      This goes for both sides, and usually they shim the same.
                      Enjoy your upcoming ride, and be safe out there!.

                      Would be curious as to any gap noticed or not when rear portion is tightened and motor mount bolt left loose.
                      Last edited by motoman; 07-28-2014, 11:06 PM.
                      81H Venturer1100 "The Bentley" (on steroids) 97 Yamaha YZ250(age reducer) 92 Honda ST1100 "Twisty"(touring rocket) Age is relative to the number of seconds counted 'airing' out an 85ft. table-top.

                      Comment


                      • Originally posted by motoman View Post
                        GLoweVA,
                        I would suggest you have a look at any seen gap between footpeg mount and that pretty replacement frame gusset/peg mount.
                        From the decades of compression, the motor mount dampener's outside shoulder get compressed, leaving a shim/washer thickness of a gap. Unnoticed, that piece gets pulled inward at the motor mount when tightened........then, snap, as the right side, by design is the weaker one.
                        Either broke, or stressed being pulled off center, it DOES affect the rear handling of the bike!
                        Just an FYI worth checking so that pretty replacement mount doesn't end up like what you removed.
                        This goes for both sides, and usually they shim the same.
                        Enjoy your upcoming ride, and be safe out there!.

                        Would be curious as to any gap noticed or not when rear portion is tightened and motor mount bolt left loose.

                        There was a slight gap. I thought it might have been because a PO had laid it over previously on the right side.
                        I'm gonna look at both sides and see if it might be a mount shim issue. Thanks for that thought.
                        Hi, my name is George & I'm a twisty addict!

                        80G (Green paint(PO idea))
                        The Green Monster
                        K&N A/F, TC's fuse block, '81 oil cooler, TC's homemade 4-2 w/Mac Mufflers, Raptor 660 ACCT
                        Got him in '04.
                        bald tire & borrowing parts

                        80SG (Black w/red emblems & calipers)
                        Scarlet
                        K&N A/F, TC's fuse block, WJ5, Shoei bags, Raptor 660 ACCT.
                        Got her in '11
                        Ready for the twisties!

                        81H (previously CPMaynard's)
                        Hugo
                        Full Venturer, Indigo Blue with B/W painted tank.
                        Cold weather ride

                        Comment


                        • Originally posted by GLoweVA View Post
                          There was a slight gap. I thought it might have been because a PO had laid it over previously on the right side.
                          I'm gonna look at both sides and see if it might be a mount shim issue. Thanks for that thought.
                          Looks like ya' located the stress issue.
                          81H Venturer1100 "The Bentley" (on steroids) 97 Yamaha YZ250(age reducer) 92 Honda ST1100 "Twisty"(touring rocket) Age is relative to the number of seconds counted 'airing' out an 85ft. table-top.

                          Comment


                          • Kill Switch

                            I started on Friday night and finished on Sunday evening
                            I am a bit slow but did manage to put all the pieces of the switch back together. Bike fired up and shuts off in both directions so it functions correctly. Lubed the throttle cable while I was at it.
                            I will need a test ride to see if that made any difference to the headlight low output which is what prompted this.
                            Next up is the fuse panel which was done by PO but I want to clean up and install a TC one.
                            Phil
                            1981 XS1100 H Venturer ( Addie)
                            1983 XJ 650 Maxim
                            2004 Kawasaki Concours. ( Black Bear)

                            Comment


                            • Headlight Ear BROKEN!

                              Well,
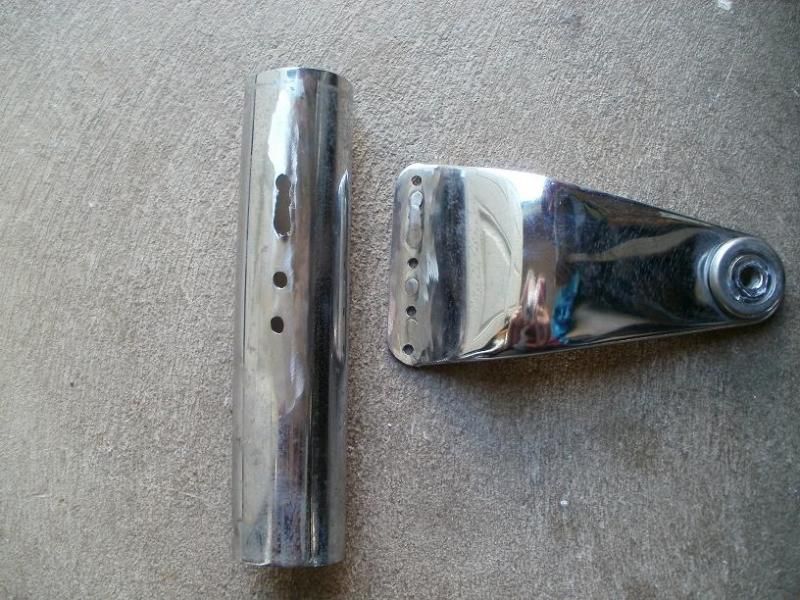
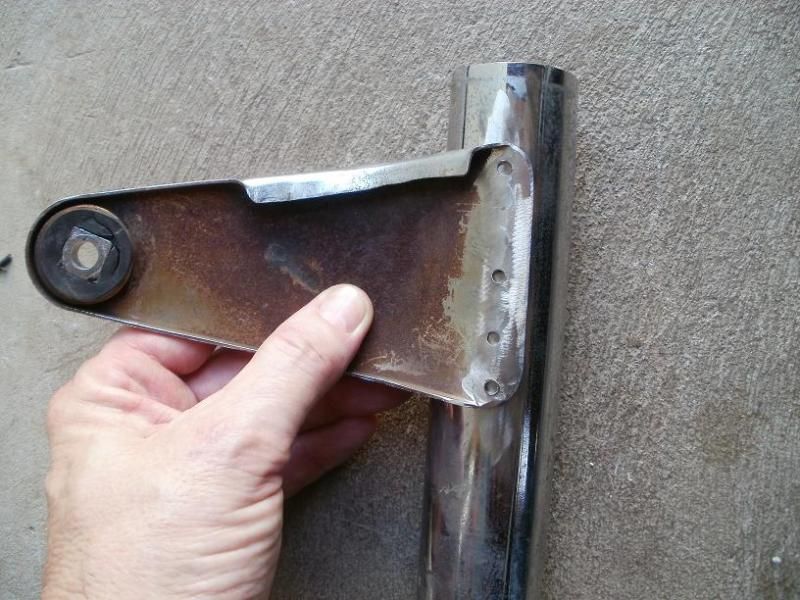
                              I was dredding having to perform this repair! A few weeks ago I took Godzilla out for a ride, and noticed the headlight seemed to be bouncing a bit too much! I inspected closer and found that the right headlight ear had come completely away from the TUBE! Apparently a previous fall some years/decade ago had cracked the welds there, and rust had gotten in and it had finally fractured all the way!

                              The metal is a bit thin, but I had gotten a PEDAL control for my TIG unit this past Xmas, and so I had a reason to finally get out there and try it out!

                              This first photo shows the separate pieces, I had already ground down the metal sections and removed the rust, and tried to remove the surface chrome.


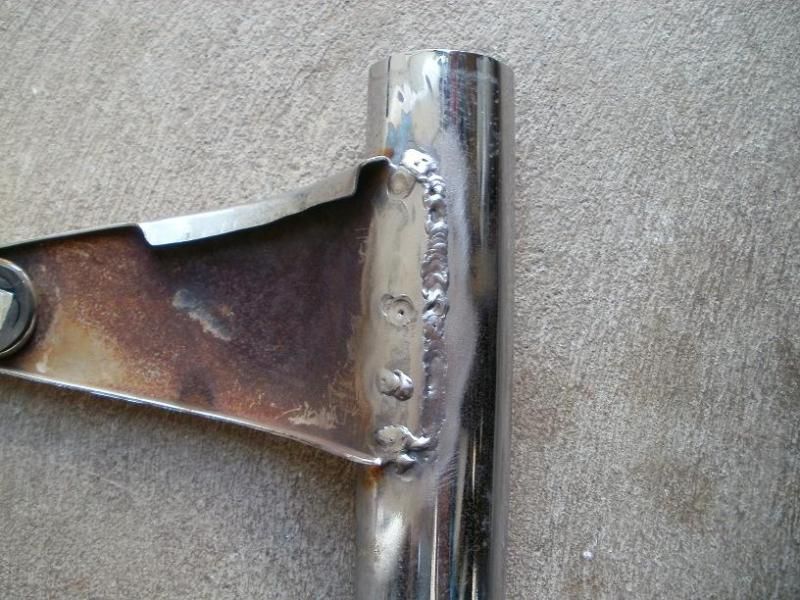
                              This shows how I had drilled several holes in the EAR just like the OEM so that I could then do some button/hole type welds. But because there was so much material that had come off of the tube, I decided to also put a welded seam along the edge.


                              What's that old welder's phrase, if you're not a good welder, weld ALOT!
                              BTW, I know it's not as strong, but I used SS rod instead of the regular mild steel filler hoping for less rusting afterwards!?


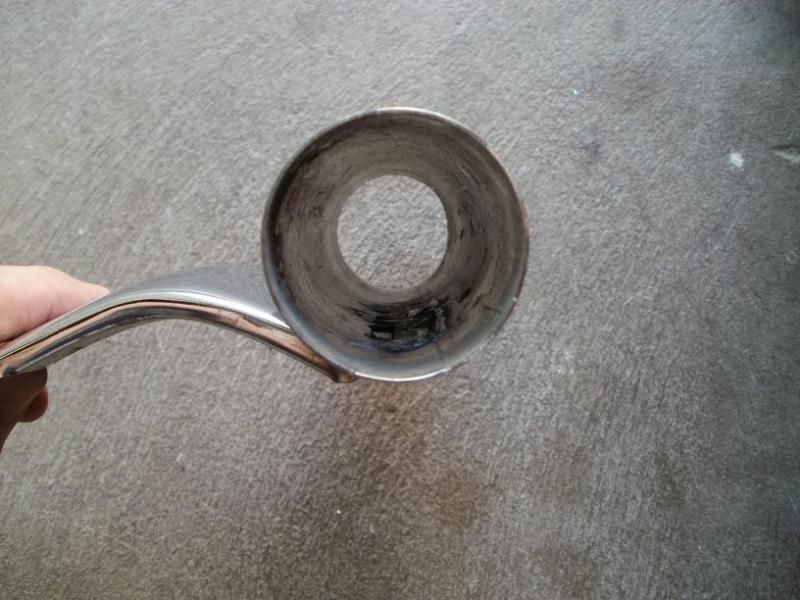
                              Had to use my dremel and a curved file to remove a little of the penetration melt on the inside...but I didn't realize there was more room between the ear tube and the fork tube!


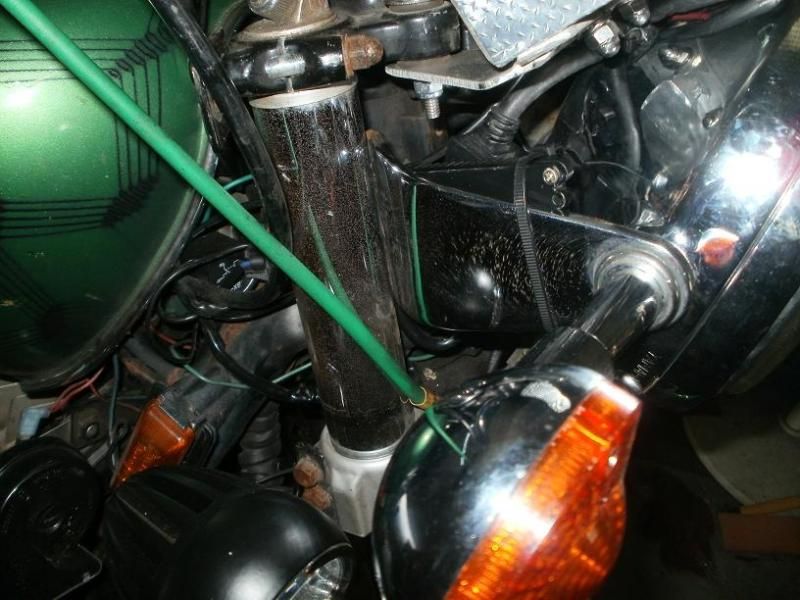
                              And finally it fitted back on the bike, it's a nice hidden area so it looks like it did before it broke!


                              T.C.
                              T. C. Gresham
                              81SH "Godzilla" . . .1179cc super-rat.
                              79SF "The Teacher" . . .basket case!
                              History shows again and again,
                              How nature points out the folly of men!

                              Comment


                              • Looks good TC!


                                I checked the sync on the carbs, put the irridium plugs in, swapped out the resistor for 8 gauge solid copper wire, and installed a rear brake modulator.
                                1979 XS1100F
                                2H9 Mod, Truck-Lite LED Headlight, TECHNA-FIT S/S Brake Lines, Rear Air Shocks, TKAT Fork Brace, Dyna DC-I Coils, TC Fuse Block, Barnett HD Clutch Springs, Superbike Handlebars, V-Star 650 ACCT, NGK Irridium Plugs, OEM Exhaust. CNC-Cut 2nd Gear Dogs; Ported/Milled Head; Modded Airbox: 8x8 Wix Panel Filter; #137.5 Main Jet, Viper Yellow Paint, Michelin Pilot Activ F/R, Interstate AGM Battery, 14MM MC, Maier Fairing, Cree LED Fog Lights.

                                Comment

                                Working...
                                X