Announcement

Collapse
No announcement yet.

Detroit Venturer Project

Collapse
X
 
  • Filter
  • Time
  • Show
Clear All
new posts

  • Detroit Venturer Project

    I have been meaning to start a thread on my Venturer project that I have been working on this winter.

    I hesitated while I struggled to find a service to replace Photobucket. Imgur was NG for the purpose. Postimage works well so far.

    So, here it goes.

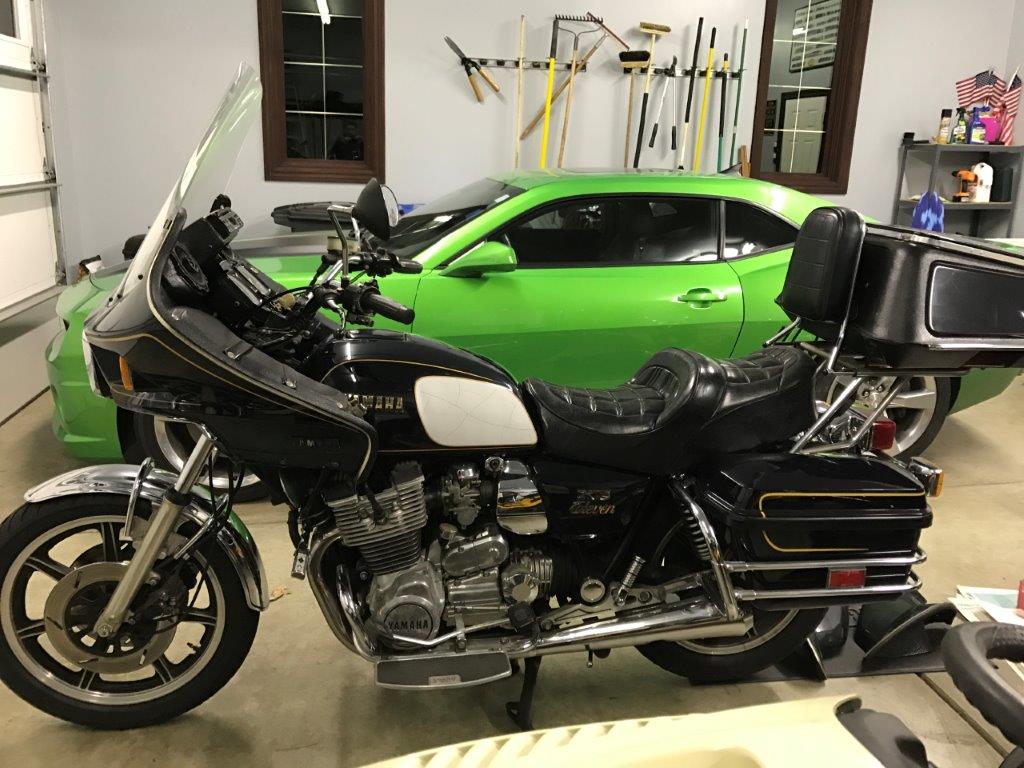
    You remember the beginning:


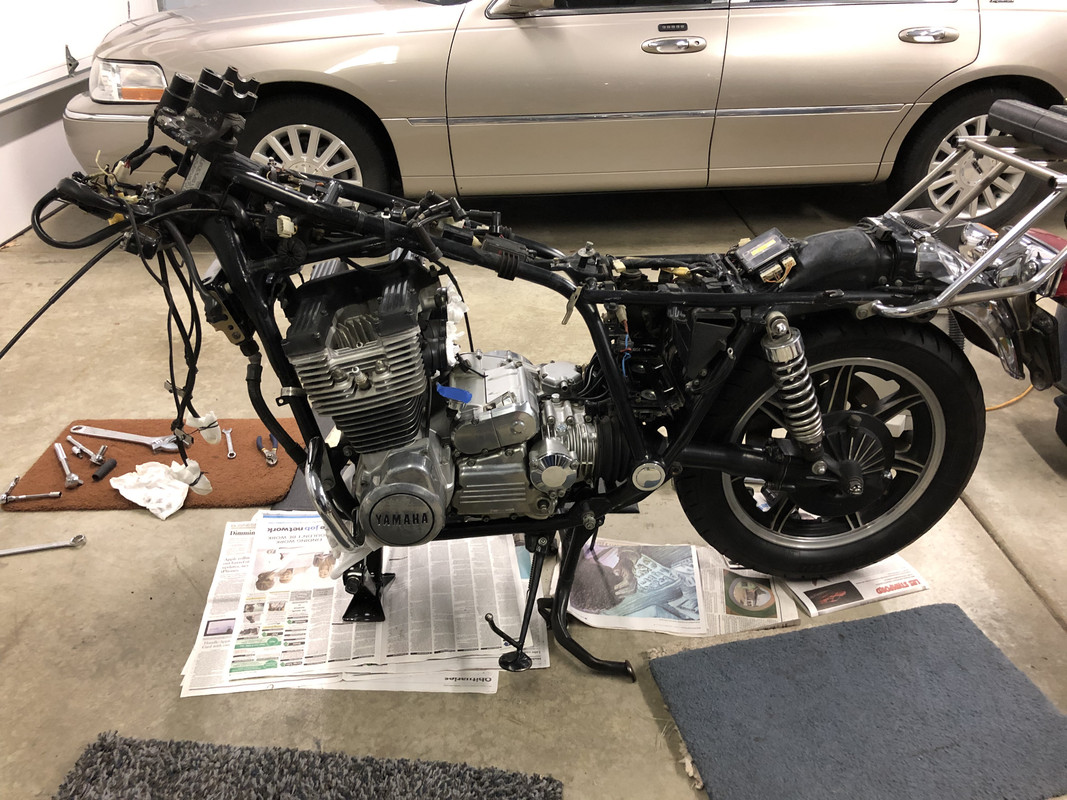
    Not bad at all, compared to my previous projects.

    Triage revealed a lot of modifications. The original owner obviously loved this bike and made several modifications:

    (1) Air horn (covered in engine oil from the leaky CCT, and not working)
    (2) Highway footpegs mounted on an aftermarket bar on the front of the frame
    (3) Headlight ON/OFF switch
    (4) Brackets welded to luggage rack for strength
    (5) Vetter trunk, with lights brake lights and running lights always on
    (6) Kickstand has huge washer neatly welded to the bottom for big footprint
    (7) Starter button epoxied and rewired to a big pushbutton in the fairing
    (8) Radio with rear mounted antenna
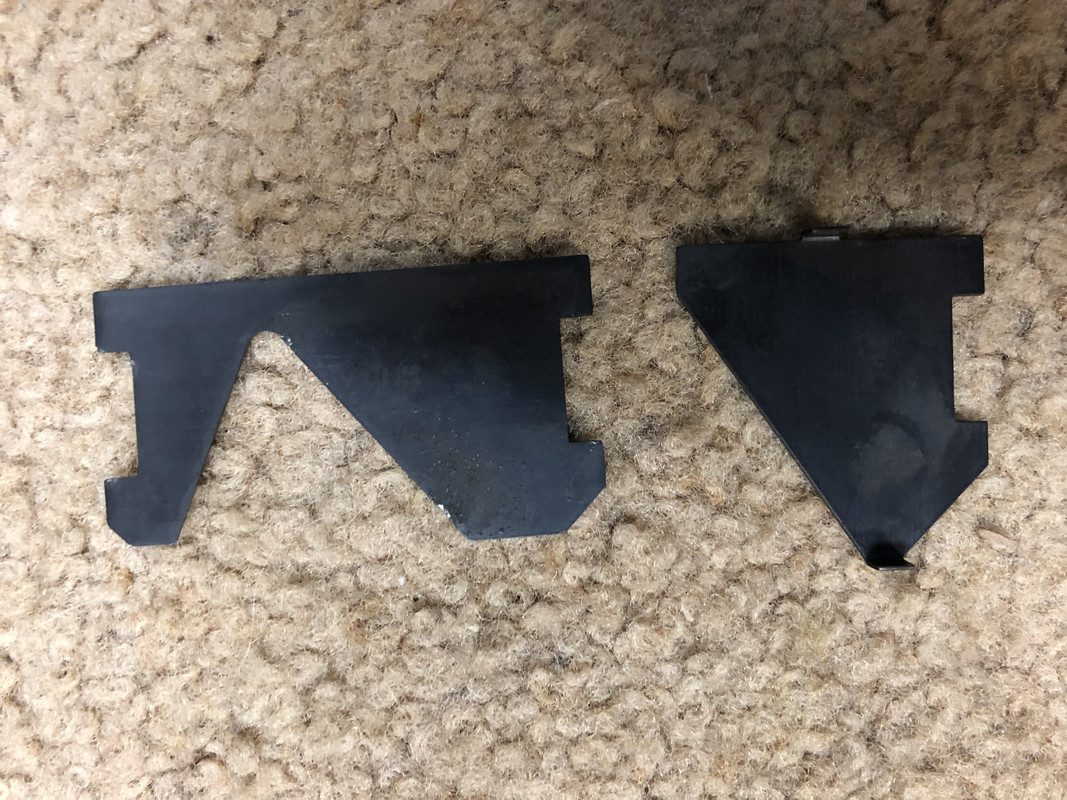
    (9) Nifty, well-made, but funky footrests with forward controls:


    So, I first removed the things I didn't want to keep, (1),(2),(3),(7), and (9).

    I drained the fluids and found the original owner or his son (my age) over-tightened and buggered the fill plugs. I had to buy new filler plugs plugs for the Final Drive and Middle Gear Case. I had to buy a new Oil Filter Bolt.

    I adjusted the Valves and found they had been done before (minor scrape marks), and the generally one size tight. However the #4 Intake Valve had almost no clearance at all. Maybe the last person made a mistake?

    When I put the Valve Cover back on, one of the Valve Cover bolts stripped and I had to install a Heli-coil Previous owner seems to have a habit of over-tightening fasteners- I hope I don't find worse things later.

    I pulled the Oil Pan and cleaned it out. I peeked at the Transmission. Everything looks good for 38k miles.

    So, I decided to do the Front Wheel and Steering next:


    I put in new Steering Bearings, new Wheel Bearings/Seals, and a new tire. It was painful to throw out a tire with almost no miles on it circa 2004.

    I cleaned out the Front Forks, installed new Seals and polished the lowers.

    For a bike without a Fairing, the front wiring is in the Headlight. Since this bike has a Fairing, the wiring is stuffed into a vinyl bag. My PO liked to wash and wax his bike regularly. The bag got water in it and it stayed in there and corroded a couple of connectors badly. Also, the IGN Switch connector was cracked and held on with a zip tie; effective, but not good workmanship. I'll buy new connectors/terminals and make it like new again.

    There's lot's of other stuff I can bore you with later.

    Today's big questions:

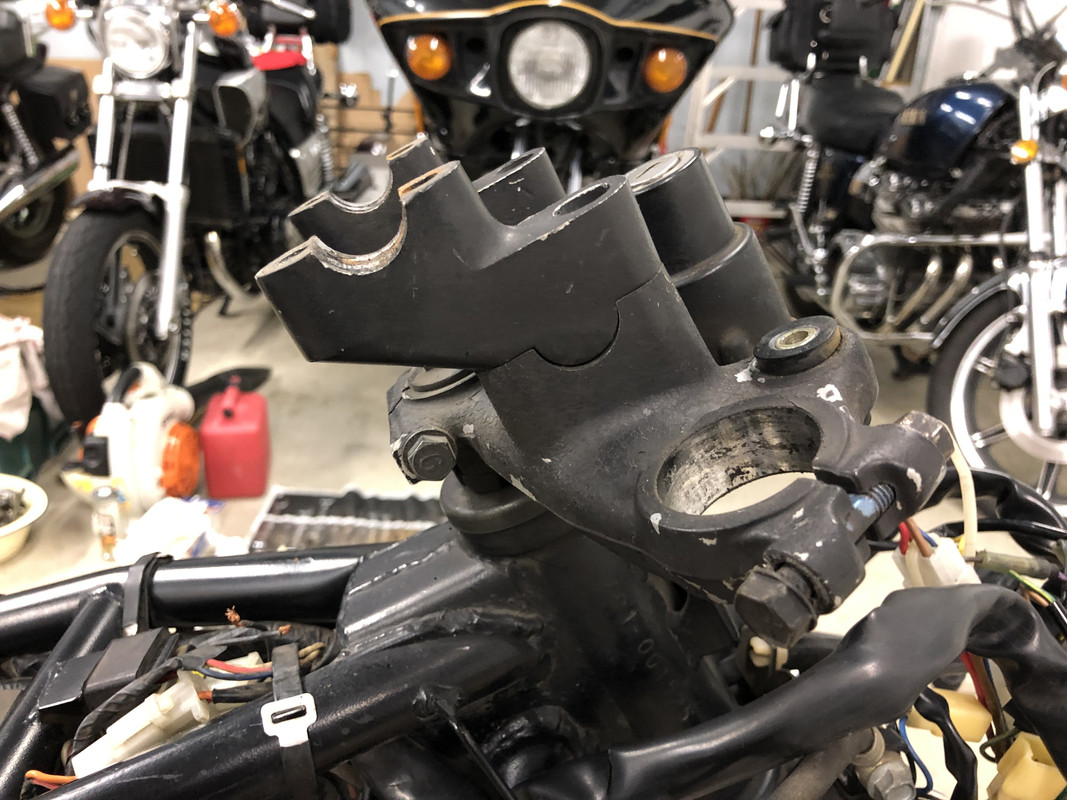
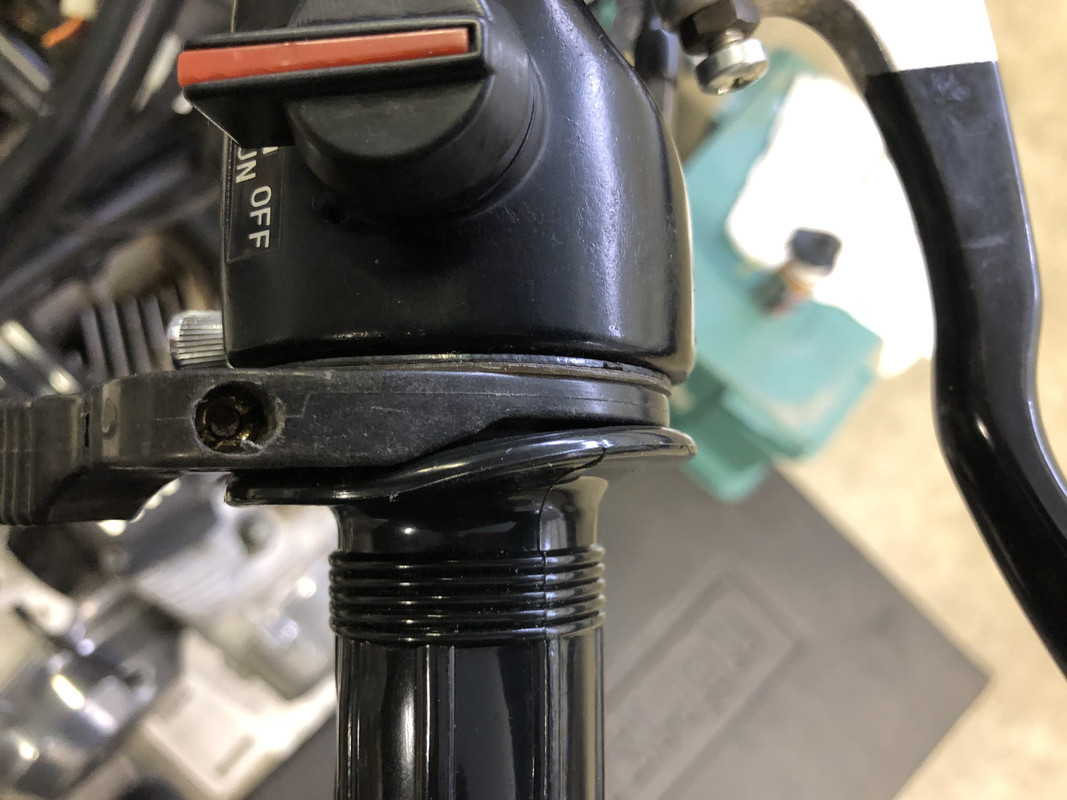
    (1) Did the Venturer come with these risers on the handlebars:


    I am thinking to delete them.

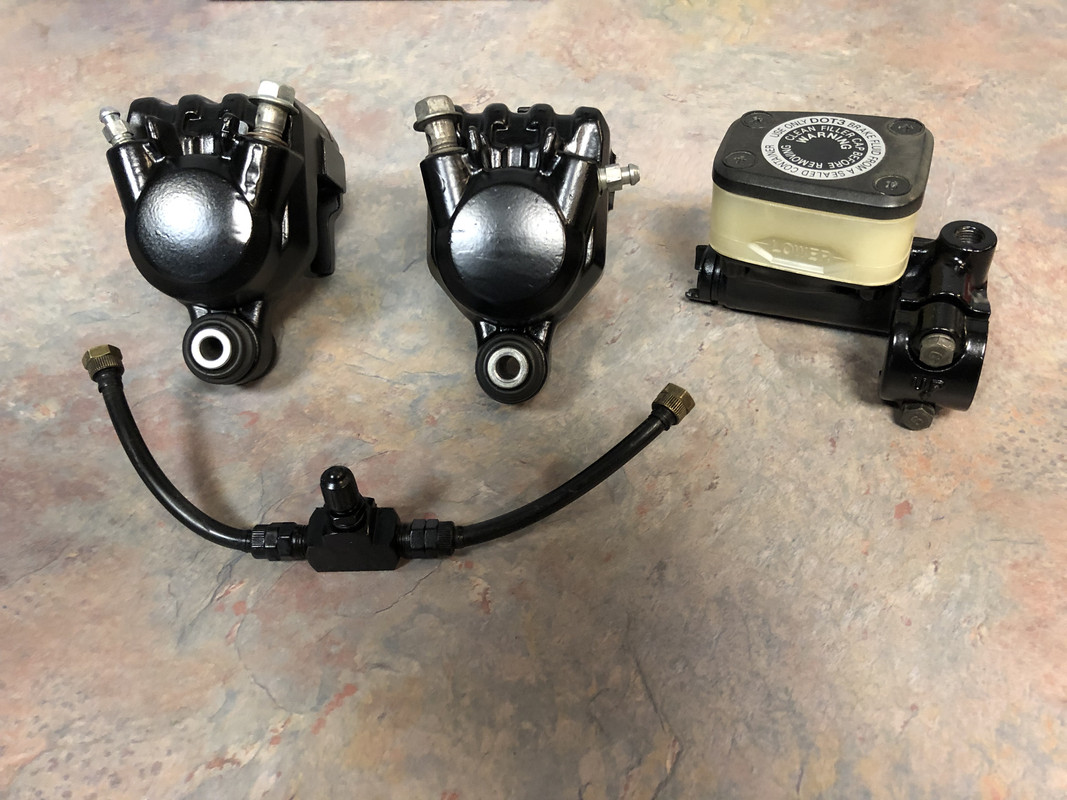
    (2) There are shims in each of the three Brake Calipers. The FSM suggests they are to prevent brake squeal. Mine don't looks so good and they are NLA. Nothing on eBay. Here is what they look like:


    This is the nice-est example. I am thinking to delete them because the coating is worn badly where the Piston touched them, and there is rust in places. They just don't seem like something I want to put back into service. I've never had these shims on my Specials. I was able to find replacements for the Vmax. What do you guys do? Is it OK to delete them if I am using semi-metallic Volar pads, not screechy sintered pads?

    (3) Did the Venturer come with an Oil Pressure Gauge? Mine has one but the plastic lens is cloudy from UV exposure. I wonder if it works. I hope to get it working and steal a lens from a flashlight or something similar. BTW, it is protected by the blue tape next to the Starter in the picture above.


    That's enough to get my thread started. Maybe next time I can post some more pictures to get you up to speed with my project. Help is appreciated with my three questions.
    -Mike
    _________
    '79 XS1100SF 20k miles
    '80 XS1100SG 44k miles
    '81 XS1100H Venturer 35k miles
    '79 XS750SF 17k miles
    '85 Honda V65 Magna ~7k miles
    '84 Honda V65 Magna 48k miles (parts bike)
    '86 Yamaha VMAX 9k miles

    Previous: '68 Motoguzzi 600cc + '79 XS750SF 22k miles +'84 Honda V65

  • #2
    Answer to first question is NO. Personally, I installed a set of fully adjustable Heli-Bars(plug'n'play), which were originally intended for my 1992 Honda ST1100.
    Answer to second question would be, that is up to you as they are not necessary.
    81H Venturer1100 "The Bentley" (on steroids) 97 Yamaha YZ250(age reducer) 92 Honda ST1100 "Twisty"(touring rocket) Age is relative to the number of seconds counted 'airing' out an 85ft. table-top.

    Comment


    • #3
      Venturer

      Mike, Venturer is looking good. You bringing it south in September? I've seen those pad shims on several xs11s. Oil pressure gauge is an add-on. The trunk is the only piece that the Venturer did not come with. But is very handy. There was a spacer added to my kick stand too. Plus my stand rod was bent. Another Venturer I had did not have anything added to the stand. But it certainly asked for one. The bike would go too far over on the stock stand making it a real chore to stand it back up. I don't recall any other year model Standard having that issue.

      The Venturer paint color (indigo blue) was an available color also on the 1979 Standard. It is not difficult to find touch up.

      I think you will like it when completed. But it is a behemoth compared to the Special.
      1981 XS1100H Venturer
      K&N Air Filter
      ACCT
      Custom Paint by Deitz
      Geezer Rectifier/Regulator
      Chacal Stainless Steel Braided Brake Lines
      Chrome Front Rotor & Caliper Covers
      Stebel Nautilus Horn
      EBC Front Rotors
      Limie Accent Moves On In 2015

      Mike

      Comment


      • #4
        Venturer

        Mike, I forgot to mention that the bag over the wiring up front can be positioned so that the open end is down. You can close the original headlamp mounts toward it to help hold in position. I add zip ties as well. It has never been wet.

        Having been on a Special, you will most certainly enjoy that 6 gallon gas tank.
        Last edited by MPittma100; 02-21-2020, 09:07 PM.
        1981 XS1100H Venturer
        K&N Air Filter
        ACCT
        Custom Paint by Deitz
        Geezer Rectifier/Regulator
        Chacal Stainless Steel Braided Brake Lines
        Chrome Front Rotor & Caliper Covers
        Stebel Nautilus Horn
        EBC Front Rotors
        Limie Accent Moves On In 2015

        Mike

        Comment


        • #5
          Thanks Guys!

          Thanks Brant and Mike P. As fellow Venturer owners, your help is valuable to me.

          Now I can delete the Handlebar Risers and Brake shims without any big worries.

          I didn't realize the Venturer paint was same as the original Indigo Blue on my '79 Triple. It registers now that you mention it.

          Originally posted by MPittma100 View Post
          Mike, Venturer is looking good. You bringing it south in September?
          You bet. Nick's daughter is getting married during the really weekend, so I'll have space for 2 bikes this year. I haven't decided which bike will accompany the Venturer yet, but I'm thinking to pick one of the V4's.
          -Mike
          _________
          '79 XS1100SF 20k miles
          '80 XS1100SG 44k miles
          '81 XS1100H Venturer 35k miles
          '79 XS750SF 17k miles
          '85 Honda V65 Magna ~7k miles
          '84 Honda V65 Magna 48k miles (parts bike)
          '86 Yamaha VMAX 9k miles

          Previous: '68 Motoguzzi 600cc + '79 XS750SF 22k miles +'84 Honda V65

          Comment


          • #6
            Originally posted by MPittma100 View Post
            Mike, I forgot to mention that the bag over the wiring up front can be positioned so that the open end is down. You can close the original headlamp mounts toward it to help hold in position. I add zip ties as well. It has never been wet.
            I was hoping to position the bag upside down or punch holes in it. I'm glad to know it can be positioned upside down so I don't have to mutilate it.

            The Headlight mounting ears are not on my bike. I remember others discussing the ears in the past. My PO must have removed them. I can see someone fixed some really leaky fork seals not too long ago. I bet it was the son. That's likely when the ears were removed.
            -Mike
            _________
            '79 XS1100SF 20k miles
            '80 XS1100SG 44k miles
            '81 XS1100H Venturer 35k miles
            '79 XS750SF 17k miles
            '85 Honda V65 Magna ~7k miles
            '84 Honda V65 Magna 48k miles (parts bike)
            '86 Yamaha VMAX 9k miles

            Previous: '68 Motoguzzi 600cc + '79 XS750SF 22k miles +'84 Honda V65

            Comment


            • #7
              The H model has taller handlebars to clear the bigger gas tank. You might want to keep those risers around until you are sure the bars are right, or in case you ever bend the bars. I think the bars for the H model are pretty rare.
              Skids (Sid Hansen)

              Down to one 1978 E. Stock air box with K&N filter, 81H pipes and carbs, 8500 feet elevation.
              03 Honda ST1300 ABS

              Comment


              • #8
                Missing Ears

                Originally posted by Radioguylogs View Post
                I was hoping to position the bag upside down or punch holes in it. I'm glad to know it can be positioned upside down so I don't have to mutilate it.

                The Headlight mounting ears are not on my bike. I remember others discussing the ears in the past. My PO must have removed them. I can see someone fixed some really leaky fork seals not too long ago. I bet it was the son. That's likely when the ears were removed.
                No problem with ears gone. Still can mount bag in a manner to avoid water intrusion. Good luck with this project. Venturers are the elite of the Standards. Let me know if I can help. Will gladly do so.
                1981 XS1100H Venturer
                K&N Air Filter
                ACCT
                Custom Paint by Deitz
                Geezer Rectifier/Regulator
                Chacal Stainless Steel Braided Brake Lines
                Chrome Front Rotor & Caliper Covers
                Stebel Nautilus Horn
                EBC Front Rotors
                Limie Accent Moves On In 2015

                Mike

                Comment


                • #9
                  Hi Radiologs,
                  Looks like a fine example of the H I am envious of the original paint. Takes 2 men and a boy to get mine on the centre stand and it leans over further than I like on the side stand. As mentioned check clearance before removing risers.

                  Phil
                  1981 XS1100 H Venturer ( Addie)
                  1983 XJ 650 Maxim
                  2004 Kawasaki Concours. ( Black Bear)

                  Comment


                  • #10
                    Moving Forward

                    Thanks guys.

                    Good advice to hang onto the Risers and pay attention to preserving the Handlebars.

                    The Handlebar Risers before I took them off:


                    Phil: The original paint is really good, but I will have a challenge to refinish the Gas Tank:


                    Thanks to the link from BillyRok, I have the decals, but I'll have to decide the best way to repaint it. I am thinking to do it myself.

                    I am also worried about getting the Yamaha emblems to stick to the tank and follow the curve of the tank tightly without a big gap. They are straight pieces attached with thick double-sided tape.


                    I'm gong to leave the kickstand modification for now. It will look unusual on my otherwise stock bike, but it seems to be a good idea for better functionality:


                    Over the weekend I got the front end mostly back together:


                    I haven't put the Gauges back in yet, but I had trouble with the Gauge gaskets. They were collapsed. No OEM or eBay or aftermarket place seems to have them:


                    So, I measured them and ordered some adhesive backed EPDM foam from McMaster-Carr. The profile looks good:


                    One problem I anticipate is that the Gauges may be hard to remove from the Cover without tearing the foam., The foam is in two pieces. The inside of the Gauge Cover opening is curved inward, and I expect it will get stuck between the two pieces of foam. The foam will get probably get chewed up to remove the Gauge. Since McMasters-Carr sells the foam in 50' lengths, I can expect a problem after....

                    [50' x 12"]/ [4" x 4 sides x 2 gauges] = 18 times to remove both Gauges!


                    Reminds me of the O-ring in the Brake Master Cylinder. I wanted a new O-ring. Yamaha never sold it as a service part, but I measured it and looked for a replacement. They are sold in lots of 25 at https://www.oringsandmore.com/ (for only a few dollars plus shipping!). If anyone needs one, I can send you one. NOTE: These are a different size than the O-ring in my Specials. The Special MC has a barb on the barrel where the O-rings seats. The Venturer has a straight cylinder shape with different dimensions. I don't know if the Venturer is the same as other Standards.

                    That's all for now, except to show you my helper that showed up on a cold winter night:

                    -Mike
                    _________
                    '79 XS1100SF 20k miles
                    '80 XS1100SG 44k miles
                    '81 XS1100H Venturer 35k miles
                    '79 XS750SF 17k miles
                    '85 Honda V65 Magna ~7k miles
                    '84 Honda V65 Magna 48k miles (parts bike)
                    '86 Yamaha VMAX 9k miles

                    Previous: '68 Motoguzzi 600cc + '79 XS750SF 22k miles +'84 Honda V65

                    Comment


                    • #11
                      U have a trash panda as a pet!?!? My spirit animal!! I love 'em! I cannot get enough of how cute they are.
                      1979 XS1100F
                      2H9 Mod, Truck-Lite LED Headlight, TECHNA-FIT S/S Brake Lines, Rear Air Shocks, TKAT Fork Brace, Dyna DC-I Coils, TC Fuse Block, Barnett HD Clutch Springs, Superbike Handlebars, V-Star 650 ACCT, NGK Irridium Plugs, OEM Exhaust. CNC-Cut 2nd Gear Dogs; Ported/Milled Head; Modded Airbox: 8x8 Wix Panel Filter; #137.5 Main Jet, Viper Yellow Paint, Michelin Pilot Activ F/R, Interstate AGM Battery, 14MM MC, Maier Fairing, Cree LED Fog Lights.

                      Comment


                      • #12
                        Just passin' thru

                        He followed me to the garage. Very unusual.

                        Never saw him before or after. They are usually shy around here.
                        -Mike
                        _________
                        '79 XS1100SF 20k miles
                        '80 XS1100SG 44k miles
                        '81 XS1100H Venturer 35k miles
                        '79 XS750SF 17k miles
                        '85 Honda V65 Magna ~7k miles
                        '84 Honda V65 Magna 48k miles (parts bike)
                        '86 Yamaha VMAX 9k miles

                        Previous: '68 Motoguzzi 600cc + '79 XS750SF 22k miles +'84 Honda V65

                        Comment


                        • #13
                          Last night I was gung-ho to bleed the Front Brakes. I noticed my DOT3 brake fuild was slightly yellow, so I decided I should postpone it and get some fresh fluid. There are plenty of other things to work on....

                          So I decided to work on the Handgrips and Front Controls/Switches.

                          I always liked the factory Handgrips, so I had purchased a set that were supposed to be the factory grips. Can't remember where I bought them, but they seem "plastic-y", not like rubber originals. I decided to proceed anyway. I can change them later if I wish.

                          There are two cruise controls on the bike:


                          There is the (a) normal black lever, and (b) the silver knob. The silver knob pushes on a leaf spring inside the switch assembly. It rubs on the nylon throttle sleeve to cause resistance to throttle movement.

                          Is this silver knob stock? If it was added by the PO, it is a nice job because the leaf spring inside appears to be tooled to fit the space perfectly and it engages nicely in the drain hole to stay in place.

                          I've been leading up the problem. The black cruise control is not supposed to rotate with the throttle. It has a tab on the bottom that keeps it stationary relative to the switch assembly.

                          However, the Handgrip rubs on the black cruise control and makes too much friction:


                          This is not safe, as the throttle should spring back to idle when the cruise is not set.

                          My possible solutions are:
                          (a) Delete the black Cruise Control- There would be an awkward gap where one would see the white nylon throttle sleeve. The silver knob doesn't seem adequate by itself.
                          (b) Cut the flange on the Handgrip. If the diameter was reduced, it fits the profile of the black cruise control better. May or may not solve the problem.
                          (c) Look for another Handgrip- It's doubtful any other grip would have a flange diameter small enoungh to avoid the interference.
                          (d) Look for another Cruise Control- Might be a good solution, even though the existing cruise is a nicer model.
                          (e) Slide the Handgrip outboard- See if it feels OK at the unsupported end.

                          It seems obvious (e) is the low hanging fruit. I guess I'll try that first. Don't know if I can do it without damaging the grips I'm not satisfied with.
                          Last edited by Radioguylogs; 02-25-2020, 01:27 PM.
                          -Mike
                          _________
                          '79 XS1100SF 20k miles
                          '80 XS1100SG 44k miles
                          '81 XS1100H Venturer 35k miles
                          '79 XS750SF 17k miles
                          '85 Honda V65 Magna ~7k miles
                          '84 Honda V65 Magna 48k miles (parts bike)
                          '86 Yamaha VMAX 9k miles

                          Previous: '68 Motoguzzi 600cc + '79 XS750SF 22k miles +'84 Honda V65

                          Comment


                          • #14
                            Venturer

                            Mike, hopefully the kick stand mod is the only one required. Time will tell. I've not seen any gauge isolators that were not shriveled up. The cruise control takes some finesse to get working. Sometimes you have to modify the grip. The thumb screw is not an OEM part. LOOKING GOOD!
                            1981 XS1100H Venturer
                            K&N Air Filter
                            ACCT
                            Custom Paint by Deitz
                            Geezer Rectifier/Regulator
                            Chacal Stainless Steel Braided Brake Lines
                            Chrome Front Rotor & Caliper Covers
                            Stebel Nautilus Horn
                            EBC Front Rotors
                            Limie Accent Moves On In 2015

                            Mike

                            Comment


                            • #15
                              Hi Mike,

                              Bikes lookin' good.

                              Here's a link to a CC that may work better for ya :

                              https://lockitt.com/NEP-Sound-Off-Cruise-Control.html
                              1980 XS1100G "Dolly G" Full Dresser (with a coat of many colors )
                              1979 XS1100SF (stock-euro mods planned)
                              1984 XV700L Virago (to be hot-modded)
                              1983 XJ750MK Midnight Maxim (semi-restored DD)
                              1977 XS650D ( patiently awaiting resto)

                              Sometimes it takes a whole tank of gas before you can think straight.

                              Comment

                              Working...
                              X