Announcement

Collapse
No announcement yet.

1980 XS11 Special - Ugly Duckling Rebuild

Collapse
X
 
  • Filter
  • Time
  • Show
Clear All
new posts

  • #91
    Originally posted by TopCatGr58 View Post
    Hey Kurt,
    I'm posting a photo from our Brochures section, showing the left side of your bike/year/model, but the sidestand is down. T.C.
    T.C.,
    Thank you for posting this photo/ad. I will adjust the height of the stand by trimming a tiny bit off my addition until I get there. I found that because of where I put it, a tiny bit off makes a BIG difference.

    Looking at that advertisement......WOW! I'm still amazed at how good these bikes look! They were absolutely ahead of their time and so much nicer than ANYTHING in today's showrooms! That is a brochure I remember from my days in the Yamaha dealership when I hadn't a chance of owning one. Why did they ever stop making these bikes and shift over to "V" everything! I bet this bike would sell out in minutes if they put 'em on the showroom floor!! Yamaha are you listening??????

    I can only HOPE that my XS11 will look that good! (I'm working on it....see next post)

    I'll cut the post in a minute.....Thanks again T.C.
    Sincerely,
    Kurt Boehringer
    Peachtree City, Georgia

    1970 - CT70K0 - Mini-Trail
    1978 - SR500 - Thumper
    1979 - CT70H - Mini-Trail
    1979 - XS1100SF - Pensacola
    1980 - XS850SG - Rocky
    1980 - XS1100SG - The Ugly Duck
    1980 - XS1100SG - Mayberry Duck
    1981 - XS1100SH - DEAD Duck Cafe'
    1981 - XJ550 Maxim - Nancy's Mini-Max
    1982 - XJ650 SECA - Hurricane
    1986 - FJ1200 - Georgia Big Red
    1992 - FZR1000 - Genesis
    2016 - FJR1300A - Montgomery

    Comment


    • #92
      Picking away at the black... Cheating on my agreement with the bride!

      XS Folks,
      I've been; making small improvements, cleaning, polishing, and replacing small items trying to keep myself busy with my favorite toy. I promised I'd lay off the purchases until July.

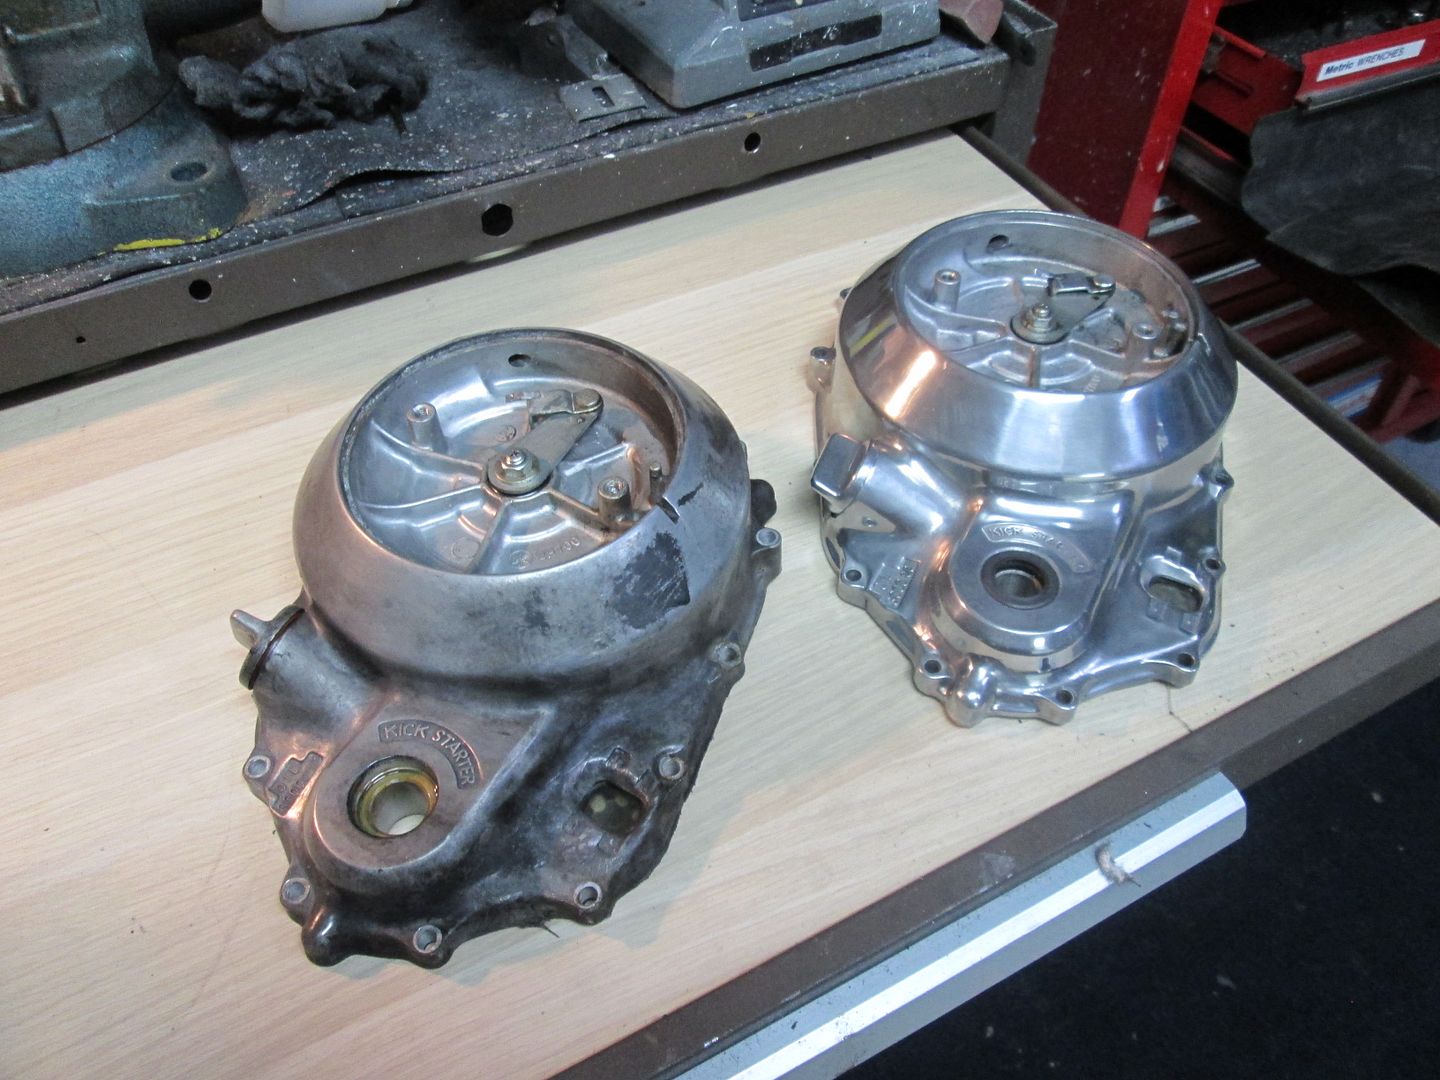
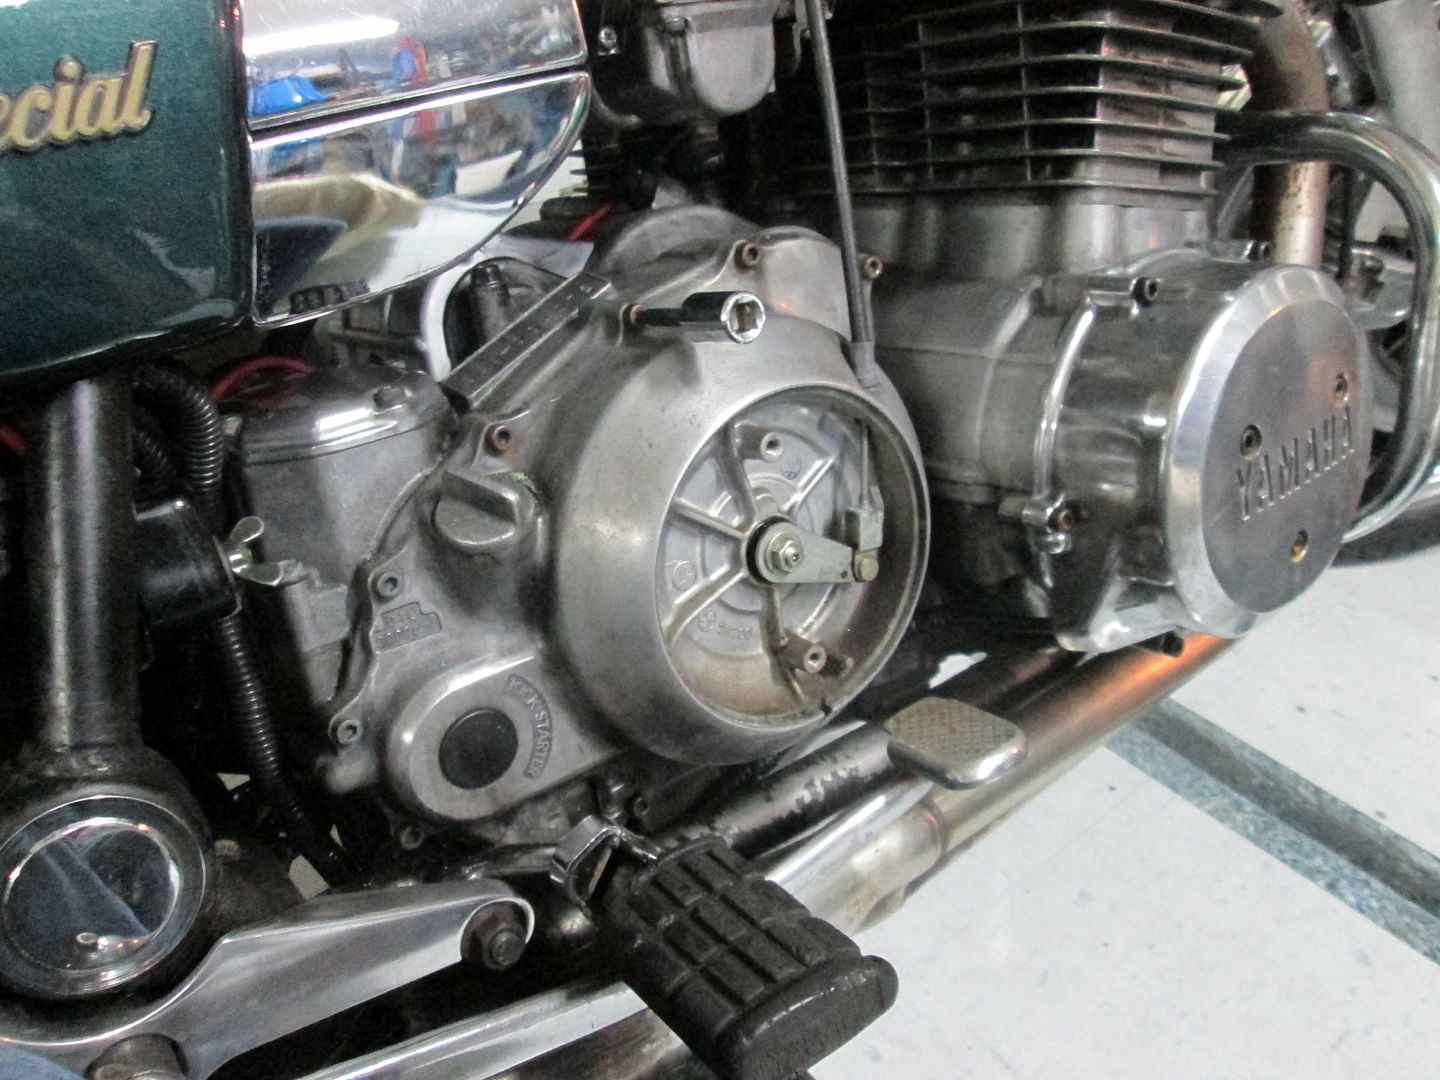
      I purchased a bunch of XS11 parts a few weeks ago and the guy was selling a '79 side cover for $5 so I added it to the purchase and got it for basically no shipping when combined with the other stuff. I've been polishing it ever since.......

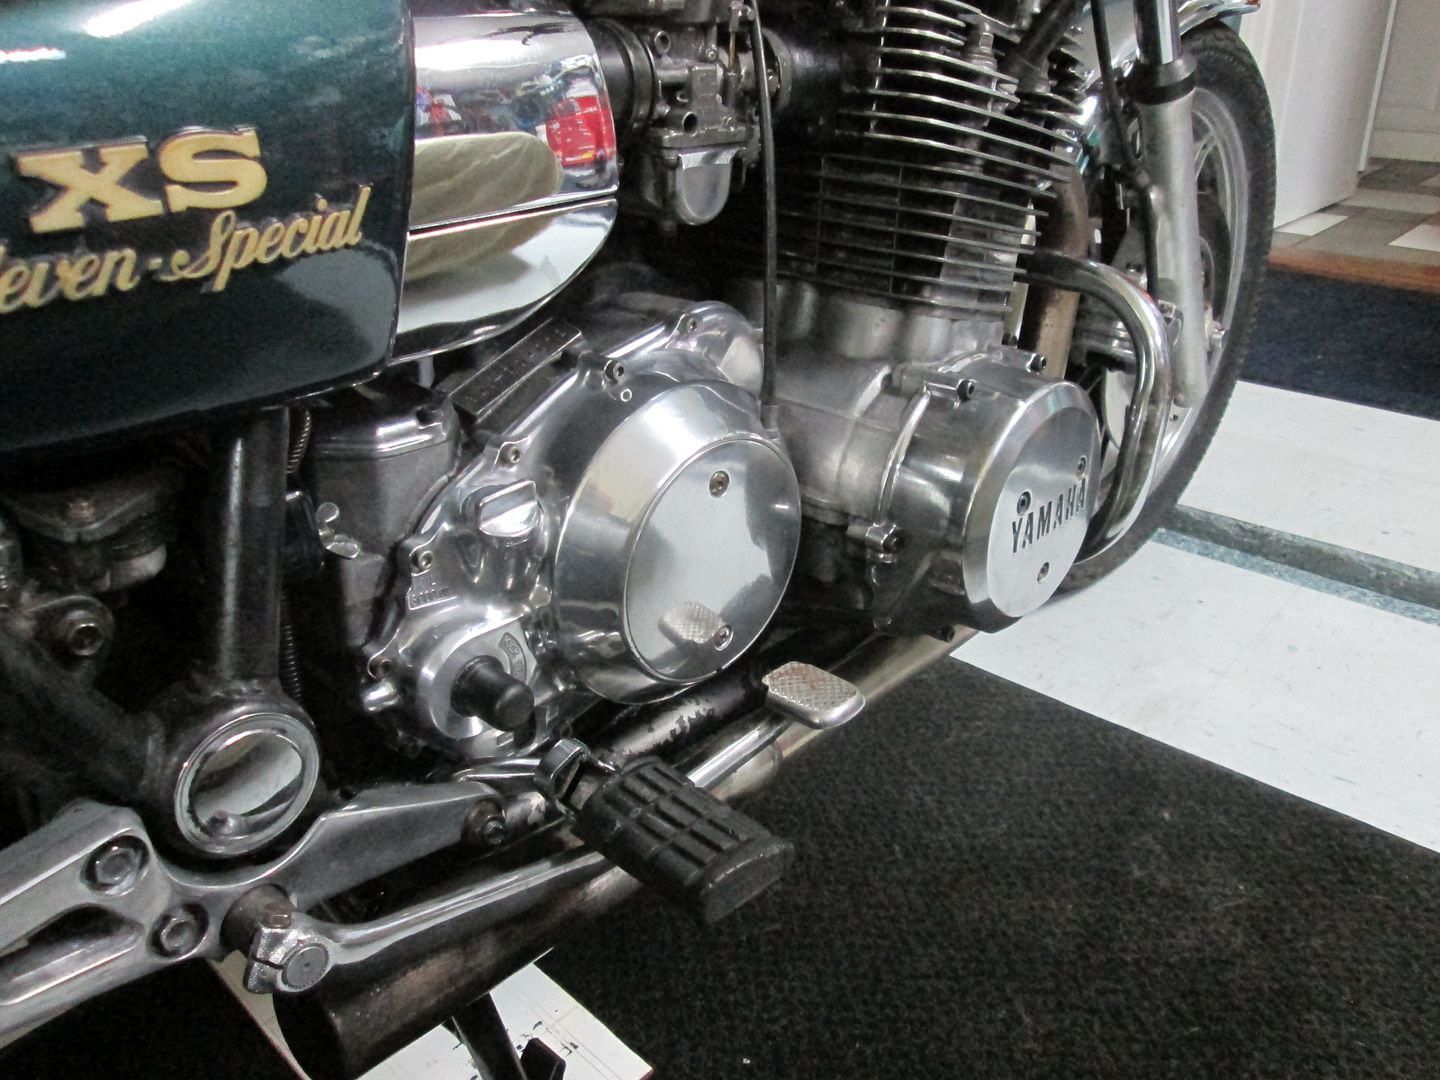
      Today, I decided to make the switch as I had the gasket and the cover is as shiny as it's ever gonna get......


      This side cover had been spray-bombed with black paint in some sort of an attempt to avoid actual cleaning & polishing or to be stylish. I had great difficulty getting it properly cleaned on the bike.


      Side-by-side one can see how nasty the old one really was.....


      Although I'll have to take her apart again (once I acquire a idler gear for the kick start) the appearance improvement is significant. When that happens I'll change the clutch springs as recommended in several other threads here on the forum. I took the plates out and inspected them and they look nearly perfect. I suspect this bike may have had at least one actual maintenance item completed by the PO as I suspect the clutch disks are new (or newish). The cover had some aftermarket sealant on it giving some credibility to the idea that the clutch discs were replaced.

      I'm going to continue to look for inexpensive covers & etc. that I can clean-up and replace the spray bombed crap I started with.

      Kurt.

      P.S. I broke my deal with the Bride and purchased a complete gasket set (and some other stuff too... There should be some more significant progress before the end of the big holiday weekend.
      Kurt Boehringer
      Peachtree City, Georgia

      1970 - CT70K0 - Mini-Trail
      1978 - SR500 - Thumper
      1979 - CT70H - Mini-Trail
      1979 - XS1100SF - Pensacola
      1980 - XS850SG - Rocky
      1980 - XS1100SG - The Ugly Duck
      1980 - XS1100SG - Mayberry Duck
      1981 - XS1100SH - DEAD Duck Cafe'
      1981 - XJ550 Maxim - Nancy's Mini-Max
      1982 - XJ650 SECA - Hurricane
      1986 - FJ1200 - Georgia Big Red
      1992 - FZR1000 - Genesis
      2016 - FJR1300A - Montgomery

      Comment


      • #93
        Center stand

        When you ride this thing hard, keep in mind that the center stand will be the first thing that touches down in a steep left turn. If your suspension compresses, it happens pretty early. It appears your stop will have no give at all. This will need serious consideration once you start tweaking this thing to ride. You'll want it sucked up as close to the pipe as possible. Mine striking the ground was alleviated considerably when I upgraded the suspension. It even changed the point on the stand where it hits the ground. Now I have a rusty scrape mark and a shiney scrape mark farther outboard.
        Marty (in Mississippi)
        XS1100SG
        XS650SK
        XS650SH
        XS650G
        XS6502F
        XS650E

        Comment


        • #94
          What a MESS! The RedNeck Strikes Again!

          XS Folks,
          The day started pretty decent and I got all my house chores done so I could play with the XS11. It's been needing a head gasket as compression is way down on #2 & #3 and the head is leaking oil significantly from the head at the cam chain area at the front of the motor. You can hear it "popping" when I give her a little gas.

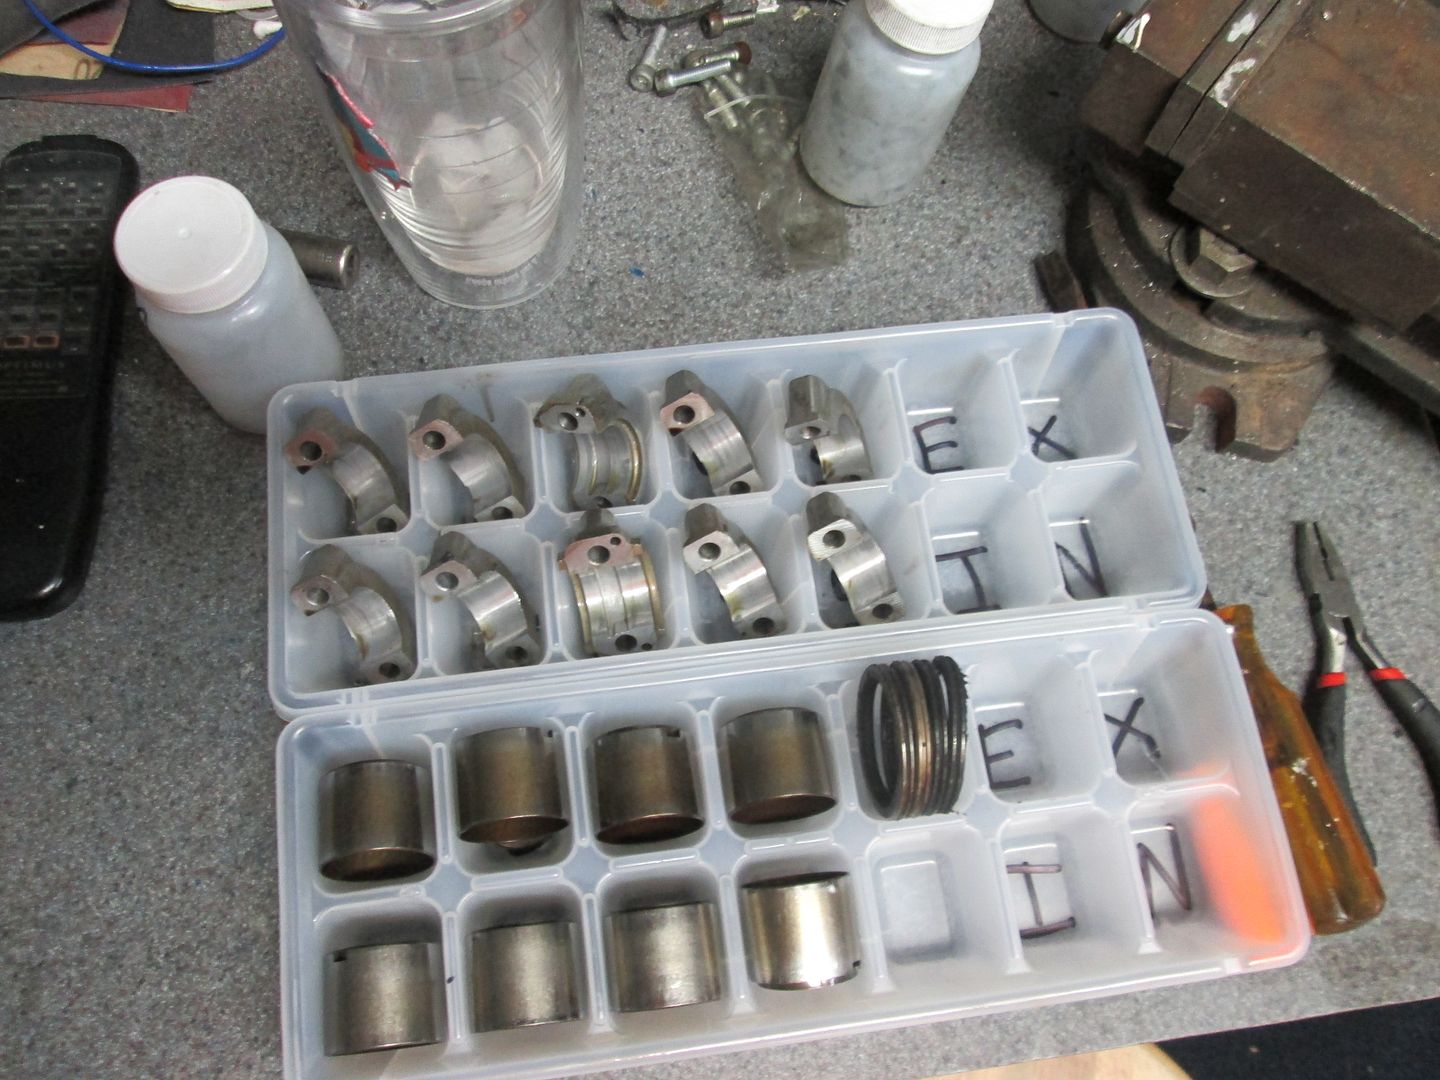
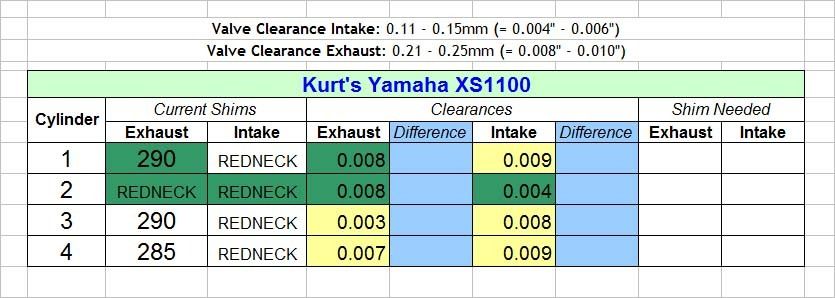
          I decided to check all the clearances before the tear down and found only three within specification:


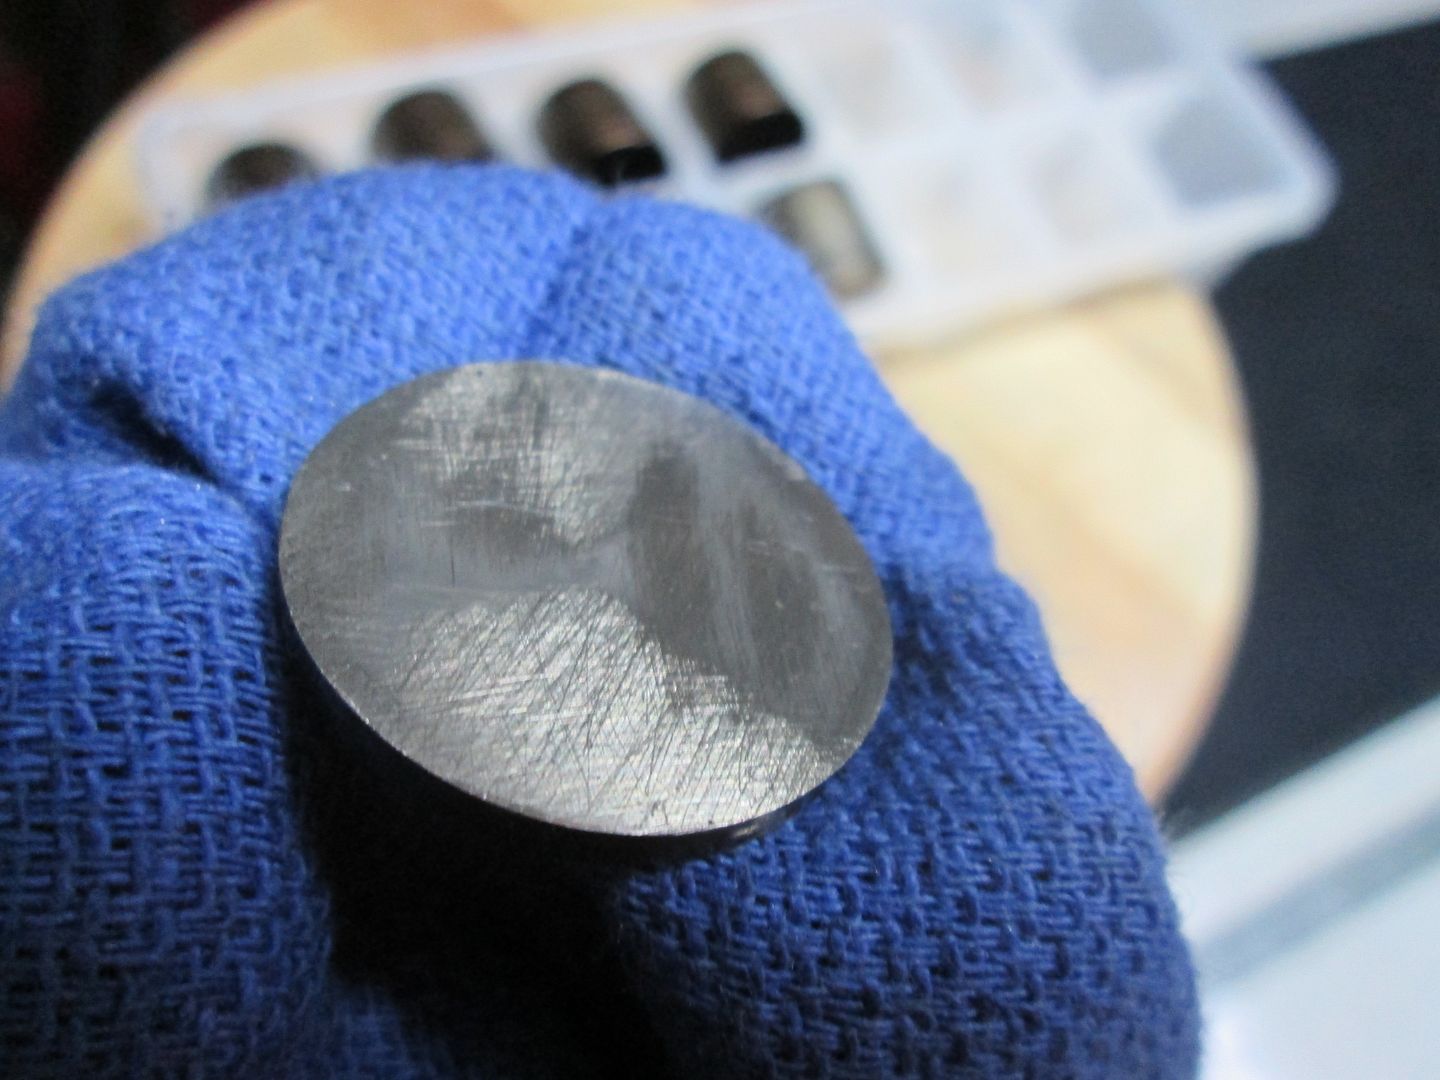
          After the cams were removed, I pulled each shim and flipped it to get the number. Obviously, I was going to try to determine which shims were needed to get within proper spec and keep track of what came from where.


          LOOK WHAT I FOUND!


          APPARENTLY, THE PO "RedNeck" DID A VALVE ADJUSTEMENT BY FILING THE BACKS OF THE SHIMS! WTF was this guy thinking. I have NO IDEA what size these were to begin with. SOMEHOW... He managed to get TWO of them within spec.

          I am sooooo darn discouraged.... UGH! What a PILE! What a mess to deal with....

          Respectfully,
          KURT
          Kurt Boehringer
          Peachtree City, Georgia

          1970 - CT70K0 - Mini-Trail
          1978 - SR500 - Thumper
          1979 - CT70H - Mini-Trail
          1979 - XS1100SF - Pensacola
          1980 - XS850SG - Rocky
          1980 - XS1100SG - The Ugly Duck
          1980 - XS1100SG - Mayberry Duck
          1981 - XS1100SH - DEAD Duck Cafe'
          1981 - XJ550 Maxim - Nancy's Mini-Max
          1982 - XJ650 SECA - Hurricane
          1986 - FJ1200 - Georgia Big Red
          1992 - FZR1000 - Genesis
          2016 - FJR1300A - Montgomery

          Comment


          • #95
            Kurt, do not despair. If you have a micrometer, you can measure the thickness, do the math, and come up with what you have. I have a surface grinder to do mine with, and after I get them ground, I take a toothpick and use it as a paint brush to paint the size on the ground side, using battery or muratic acid. Let it set for a while, rinse it off, and you are good to go.
            The up side is that you can get all the valve clearances closer together that way, since you can avoid the .002 step difference in clearance that the stock shims have.

            CZ

            Comment


            • #96
              Red-Neck Shim Adjustment.

              Originally posted by CaptonZap View Post
              Kurt, do not despair. If you have a micrometer, you can measure the thickness, do the math, and come up with what you have. I have a surface grinder to do mine with, and after I get them ground, I take a toothpick and use it as a paint brush to paint the size on the ground side, using battery or muratic acid. Let it set for a while, rinse it off, and you are good to go.
              The up side is that you can get all the valve clearances closer together that way, since you can avoid the .002 step difference in clearance that the stock shims have.
              CZ
              CZ,
              Thanks for the input. I'm a little less overwhelmed this morning and trying to see the "shiny side of the coin" or the "Glass Half Full". I suppose I could mimic the PO's work, done significantly better, and "re-adjust" the two out-of-spec exhaust shims but then I would be messing with the two "Stock" and "non-rednecked" Shims.

              Unfortunately, the intakes are too loose and all "Red-necked" and I'll need new shims for three of them. I'm really not comfortable with leaving ANY of the red-necked shims in there.

              The photo I posted is not really able to show everything but the PO's "Filing" is somewhat uneven making measurement of what is existing much more difficult. I suppose I could take several reading and get the average.

              I'm bead-blasting the head now and hope to post photos in a little bit.

              Sincerely,
              KURT
              Kurt Boehringer
              Peachtree City, Georgia

              1970 - CT70K0 - Mini-Trail
              1978 - SR500 - Thumper
              1979 - CT70H - Mini-Trail
              1979 - XS1100SF - Pensacola
              1980 - XS850SG - Rocky
              1980 - XS1100SG - The Ugly Duck
              1980 - XS1100SG - Mayberry Duck
              1981 - XS1100SH - DEAD Duck Cafe'
              1981 - XJ550 Maxim - Nancy's Mini-Max
              1982 - XJ650 SECA - Hurricane
              1986 - FJ1200 - Georgia Big Red
              1992 - FZR1000 - Genesis
              2016 - FJR1300A - Montgomery

              Comment


              • #97
                I know the purchasing is off until July... and I understand the situation.

                I had remarks like "Wow, there are packages coming almost every day? What's going on with that"?...."They are motorcycle parts"....."Is this going to go on indefinitely?"....time to lay low.

                BUT, maybe you could invest in a shim kit and sell the balance of the shims when you done?:

                http://www.motoparthub.com/13_7653_K...FQ-raQodQzYLig
                -Mike
                _________
                '79 XS1100SF 20k miles
                '80 XS1100SG 44k miles
                '81 XS1100H Venturer 35k miles
                '79 XS750SF 17k miles
                '85 Honda V65 Magna ~7k miles
                '84 Honda V65 Magna 48k miles (parts bike)
                '86 Yamaha VMAX 9k miles

                Previous: '68 Motoguzzi 600cc + '79 XS750SF 22k miles +'84 Honda V65

                Comment


                • #98
                  BOUGHT 'EM! - Another Foul Up?

                  Originally posted by Radioguylogs View Post
                  BUT, maybe you could invest in a shim kit and sell the balance of the shims when you done?
                  Thank you for the LINK. BOUGHT 'EM the heck with waiting for July. They won't get here 'til July that's close enough!!!!

                  XS Folks,
                  Looks like I found yet another example of Red-Neck Engineering....

                  I've been working on little prep items, bead blasting the head, chasing all the threads, etc.

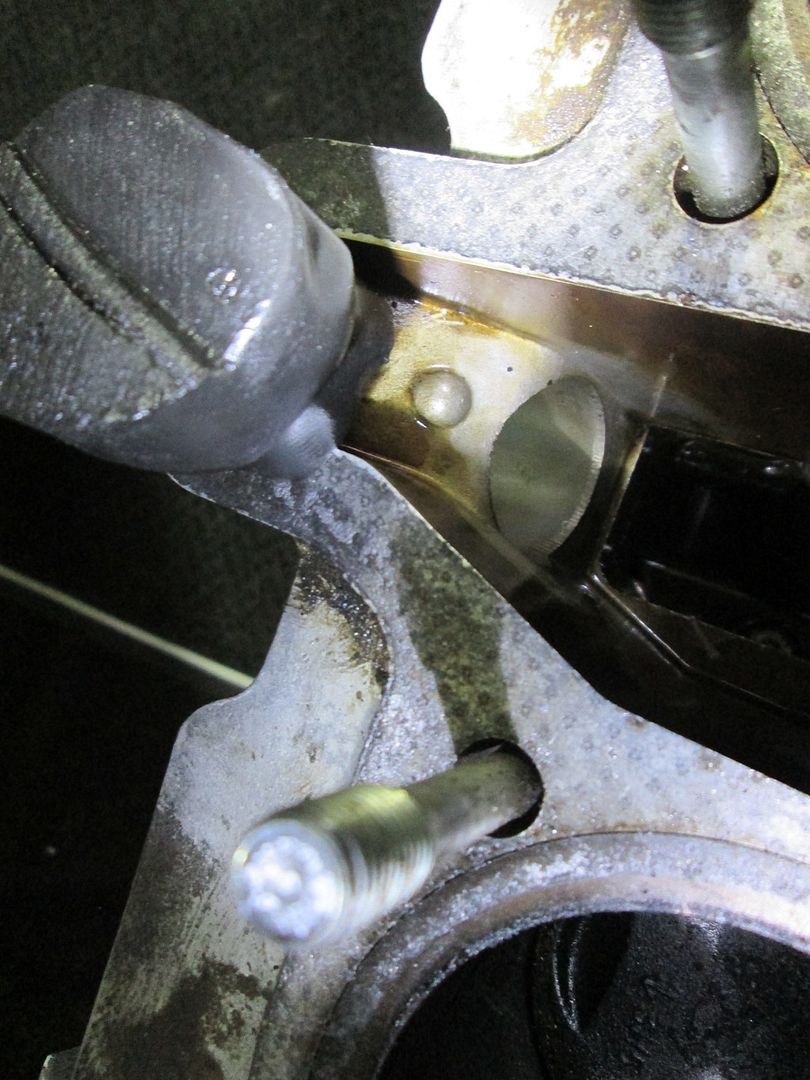
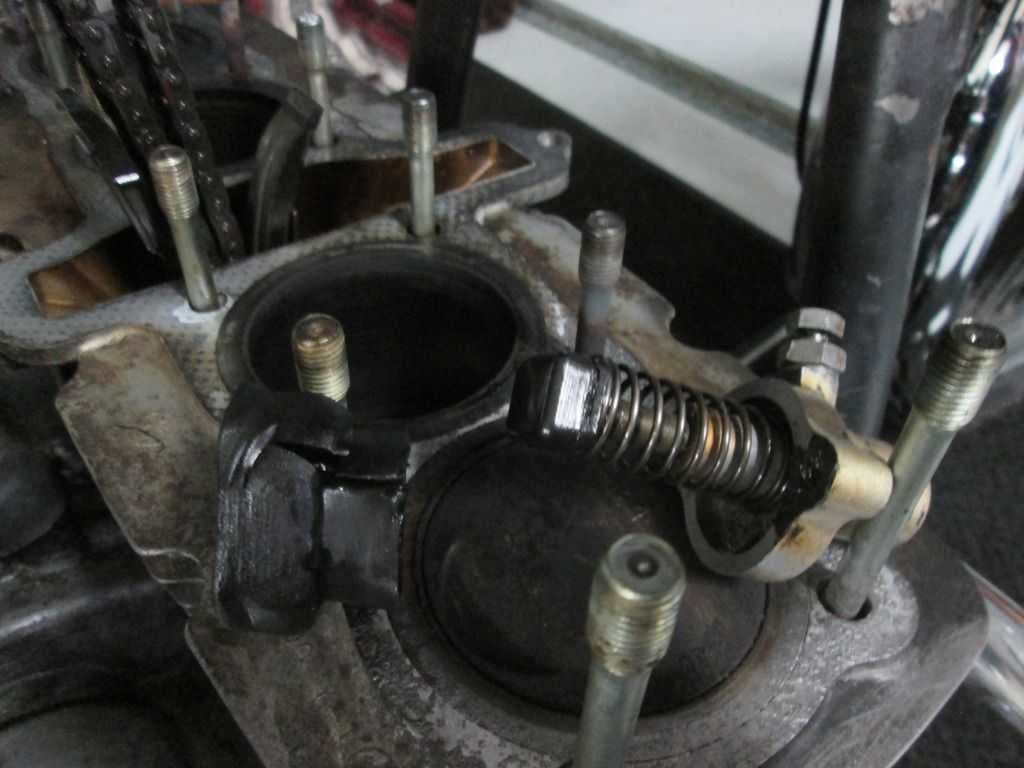
                  I decided to start working on getting the old gasket off the Jugs and noticed something weird looking in the cam chain valley. There is a huge rubbery stopper jammed in the chain adjuster hole from the inside? WTF is this?


                  This does not look like any Yamaha item I've ever seen and homemade looking?

                  This "Thing" would have been like a bumper on the back side of the cam adjuster between the adjuster and the chain guide. It may also have been an attempt to stop leaking from the chain adjuster. The indentations on the "Thing" are from the guide which was apparently being offset to the side by this rubbery thing.

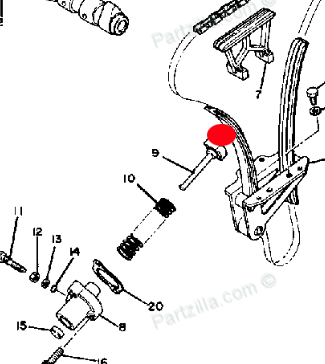
                  I've checked the Partzilla web-site to see if there is anything like this in the chain valley..... The "red dot" is where I found the thing.


                  Has anyone ever seen any crap like this in the chain valley of an XS11?

                  The Red Neck Strikes again.... I sure wish I hadn't bought this pile of poooo. What the heck am I gonna find next? Probably a piston filled with JB Weld!

                  Respectfully,
                  Kurt Boehringer
                  Peachtree City, Georgia

                  1970 - CT70K0 - Mini-Trail
                  1978 - SR500 - Thumper
                  1979 - CT70H - Mini-Trail
                  1979 - XS1100SF - Pensacola
                  1980 - XS850SG - Rocky
                  1980 - XS1100SG - The Ugly Duck
                  1980 - XS1100SG - Mayberry Duck
                  1981 - XS1100SH - DEAD Duck Cafe'
                  1981 - XJ550 Maxim - Nancy's Mini-Max
                  1982 - XJ650 SECA - Hurricane
                  1986 - FJ1200 - Georgia Big Red
                  1992 - FZR1000 - Genesis
                  2016 - FJR1300A - Montgomery

                  Comment


                  • #99
                    There is supposed to be a rubber cap on the end the cam adjuster where it touches the cam chain guide.

                    I can't tell from your picture whether or not it is the original rubber cap or a 'redneck substitute', but it might be the correct part- just deteriorated.

                    The following eBay listing has a decent picture to show the correct cap:
                    http://www.ebay.com/itm/YAMAHA-XS110...b6adbf&vxp=mtr

                    PS: Keep the faith- you are doing such a nice job.....it hard to feel the light at the end of the tunnel and trust it will be worth it when you get done- but it certainly is worth it....polishing the covers and all the details....it's all worth it!
                    -Mike
                    _________
                    '79 XS1100SF 20k miles
                    '80 XS1100SG 44k miles
                    '81 XS1100H Venturer 35k miles
                    '79 XS750SF 17k miles
                    '85 Honda V65 Magna ~7k miles
                    '84 Honda V65 Magna 48k miles (parts bike)
                    '86 Yamaha VMAX 9k miles

                    Previous: '68 Motoguzzi 600cc + '79 XS750SF 22k miles +'84 Honda V65

                    Comment


                    • Head Cleaned - Like the day it was born!

                      XS Folks.
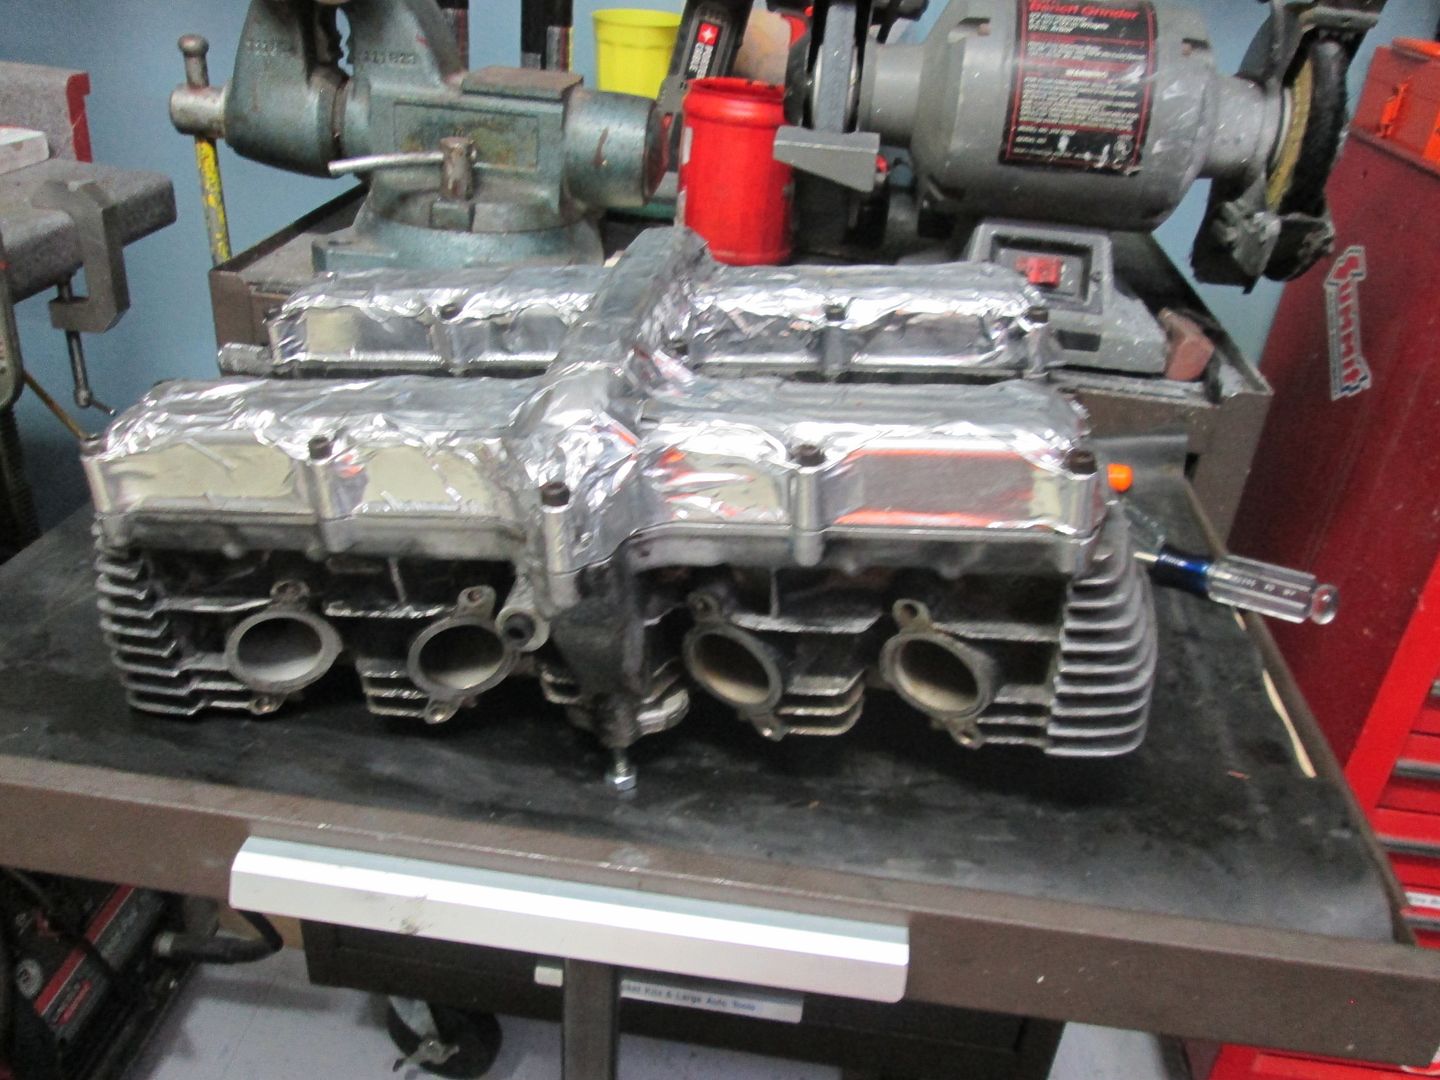
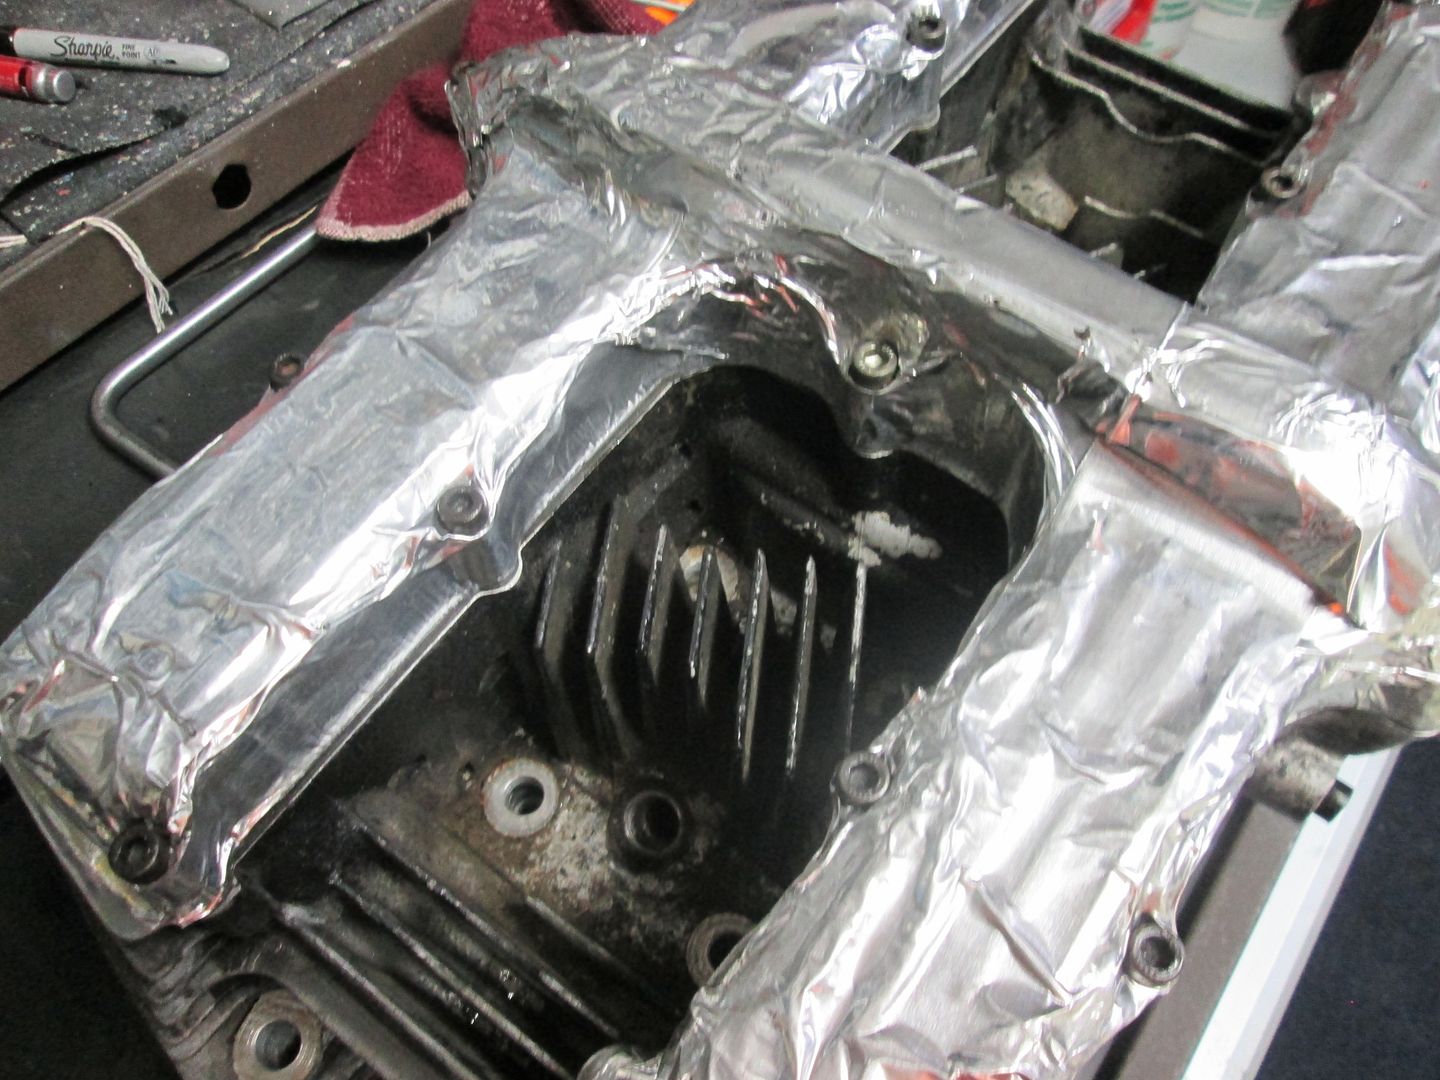
                      Well I got the head all cleaned up and all the rattle can black and crud off of it. I had to blast it with the valve cover on to keep the beads out of the valve areas and avoid damage to the cam bearing points. The only thing I had was some aluminum HVAC tape and it worked well to protect the polished valve cover:


                      This is a before picture: NASTY...

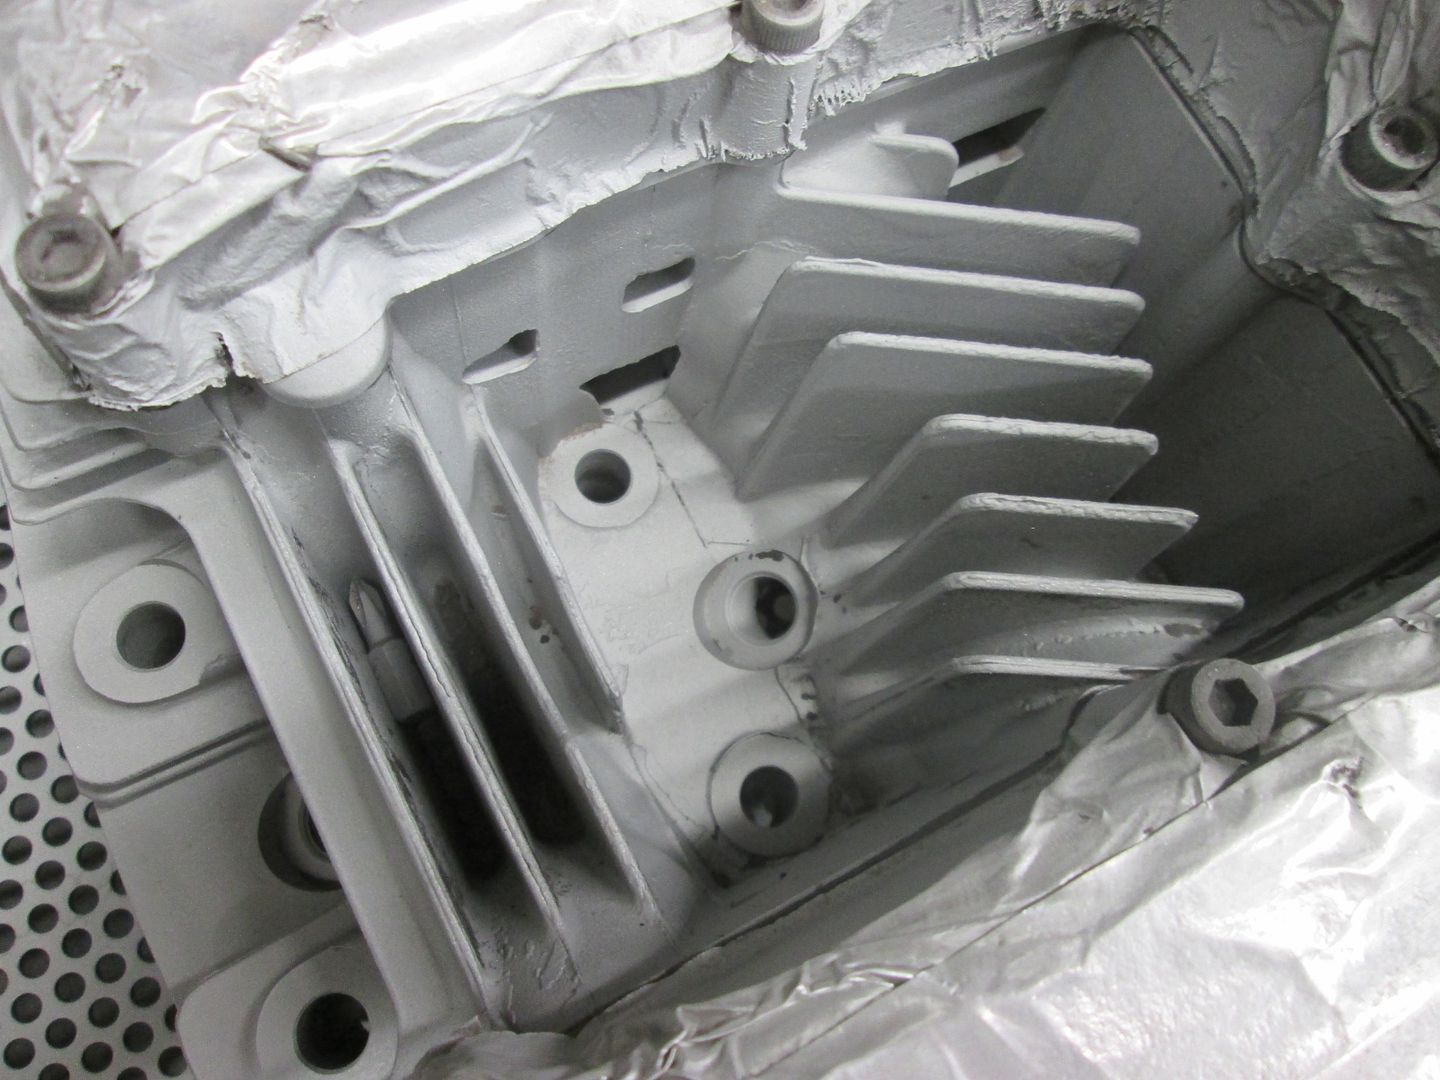
                      This is the after:

                      A close eye will not the Phillips bit between the fins. I never even saw it in there until it was clean. There was also a sheet metal screw jammed in between a couple fins. The thing was so dirty I couldn't see 'em until it was cleaned.

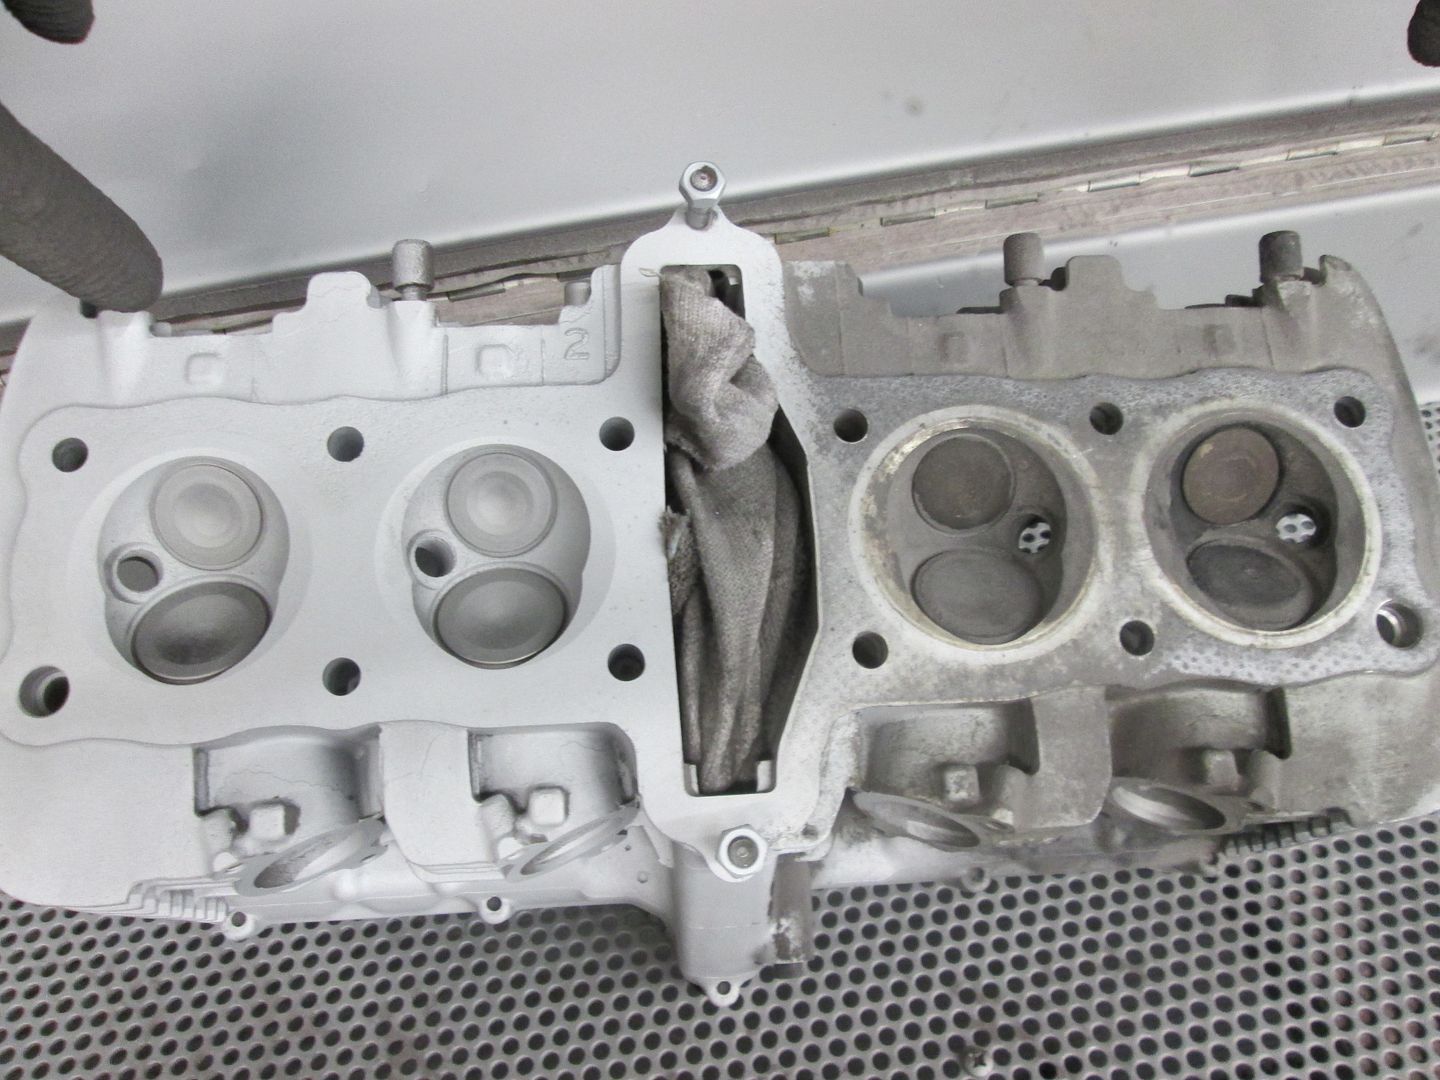
                      The combustion chambers haven't look this good since the day this head was cast:


                      Fortunately, the several rags I had stuffed in the chain valley and the protected valve cover kept all the beads out of the cam area. I didn't find a single trace of them in there. The whole unit looks like the day it was born!

                      I put a straight edge across the head in several areas and found no warping. There are no "visible" cracks and the unit looks good. Before I install it I'm going to sand the face with a long board with 2000 grit and light oil. I do this with my Hot Rod heads to make sure I have a nice clean surface and it works well.

                      I've also chased all the threads for the intakes and cleaned up all the exhaust studs as well. I'm waiting for the gasket kit to show and I will replace all the valve seals one-at-a-time. The CCT has been rebuilt with new o-ring and new washer. I need to order the end plug which I missed ordering. Might make a temp plug out of a air cap (reversed). I'll look at the ACCT at a later time.

                      Unfortunately, the new shim kit and tool probably won't show until Monday. I can get the head on and almost all the work done this weekend. I'll get the valve adjustment done next week when the shims arrive.

                      Respectfully,
                      Kurt
                      Kurt Boehringer
                      Peachtree City, Georgia

                      1970 - CT70K0 - Mini-Trail
                      1978 - SR500 - Thumper
                      1979 - CT70H - Mini-Trail
                      1979 - XS1100SF - Pensacola
                      1980 - XS850SG - Rocky
                      1980 - XS1100SG - The Ugly Duck
                      1980 - XS1100SG - Mayberry Duck
                      1981 - XS1100SH - DEAD Duck Cafe'
                      1981 - XJ550 Maxim - Nancy's Mini-Max
                      1982 - XJ650 SECA - Hurricane
                      1986 - FJ1200 - Georgia Big Red
                      1992 - FZR1000 - Genesis
                      2016 - FJR1300A - Montgomery

                      Comment


                      • Bead blasting anything but outer covers on engines makes me really nervous after hearing horror stories.

                        If you have to blast Soda Bic sounds the best method as it can be disolved and washed away, I have a bag of Soda Bic waiting but have never used it.
                        Tom
                        1982 5K7 Sport, restored to original from a wreck
                        1978 2H9 (E), my original XS11, mostly original
                        1980 2H9 monoshocked (avatar pic)http://i145.photobucket.com/albums/r...psf30aa1c8.jpg
                        1982 XJ1100, waiting resto to original

                        Comment


                        • Duckling

                          I suggest that you purchase an ACCT for your engine and toss the CCT. It is a much better alternative to the original (manual) CCT. Do a search on the site here and you will find the exact item to purchase (used). Some clear coat or aluminum paint will help keep the head looking good for a long time rather than leaving it natural after the bead blast. JAT

                          Are you re-seating the valves while you have the head off?
                          Last edited by MPittma100; 07-02-2015, 07:01 AM.
                          1981 XS1100H Venturer
                          K&N Air Filter
                          ACCT
                          Custom Paint by Deitz
                          Geezer Rectifier/Regulator
                          Chacal Stainless Steel Braided Brake Lines
                          Chrome Front Rotor & Caliper Covers
                          Stebel Nautilus Horn
                          EBC Front Rotors
                          Limie Accent Moves On In 2015

                          Mike

                          Comment


                          • Valves, Polishing, Upgrades, Etc.

                            Originally posted by MPittma100 View Post
                            I suggest that you purchase an ACCT for your engine and toss the CCT. .......Are you re-seating the valves while you have the head off?
                            MPittman,
                            Thank you for the response. I'm going to perform the ACCT upgrade as well as several other upgrades (SS Brake Hoses, New Front Master, Possible rear shock upgrade, ignition coil upgrade, etc.). For now, getting all the stock parts working correctly, even if only temporary, frees up a little $$$ for all the missing, broken, and worn out parts that are still needed: exhaust, tires, handle grips, mirrors, etc.

                            I'm considering trying to "Polish" the exterior of the head with Mothers Mag (or similar). I don't know how well a clear coat will hold up to the heat of the head? I'm thinking it will bubble right off? I've done similar polishing work with Edelbrock Intakes and Heads on my hot rods. Although, the detail of this XS11 head makes polishing an entirely different challenge.

                            Because of the semi-limited funds I did not pull the Jugs. I would have preferred to pull them and blast them as well. At the very least (assuming the slugs were within spec) I would have replaced the rings as a minimum. Hopefully, my #2 & #3 compression will jump up to within an acceptable range of #1 & #4. If not, I'll be pulling it apart again. The bores looked extremely clean without any scars so I'm hopeful I can skip the slugs & rings until AFTER the SE Region XS event.


                            It is my intention to thoroughly inspect all the; valves, seats, & guides. If no problems are found, I'll do a LIGHT lapping with valve compound to shiny up the seats and valves. It should not take much effort on the XS11 head.

                            Kurt
                            Kurt Boehringer
                            Peachtree City, Georgia

                            1970 - CT70K0 - Mini-Trail
                            1978 - SR500 - Thumper
                            1979 - CT70H - Mini-Trail
                            1979 - XS1100SF - Pensacola
                            1980 - XS850SG - Rocky
                            1980 - XS1100SG - The Ugly Duck
                            1980 - XS1100SG - Mayberry Duck
                            1981 - XS1100SH - DEAD Duck Cafe'
                            1981 - XJ550 Maxim - Nancy's Mini-Max
                            1982 - XJ650 SECA - Hurricane
                            1986 - FJ1200 - Georgia Big Red
                            1992 - FZR1000 - Genesis
                            2016 - FJR1300A - Montgomery

                            Comment


                            • If doing the valves fit new guide seals, it makes a big difference to oil use in these old motors, regardless of mileage.
                              Tom
                              1982 5K7 Sport, restored to original from a wreck
                              1978 2H9 (E), my original XS11, mostly original
                              1980 2H9 monoshocked (avatar pic)http://i145.photobucket.com/albums/r...psf30aa1c8.jpg
                              1982 XJ1100, waiting resto to original

                              Comment


                              • Duckling

                                Quote:

                                "It is my intention to thoroughly inspect all the; valves, seats, & guides. If no problems are found, I'll do a LIGHT lapping with valve compound to shiny up the seats and valves. It should not take much effort on the XS11 head".

                                You can actually pre-assemble the head prior to installing on the engine and do your valve adjustment on the bench.

                                A knowledgeable machine shop does it in this manner. When the seats (head and valve) wear, the valve lash lessens and/or disappears. You can lightly grind the valve tip to make final valve adjustments without needing shims.

                                Put one cam at a time in the head. Push a valve into the guide using original bucket and shim. Check your clearance. You can remove a few thousandths off of the stem tip, but not a lot, to obtain proper lash. If uncomfortable with this method, simply purchase shims.

                                Beware that there is mechanical interference when both cams are installed and are not in time. Cams have to be removed prior to assembly onto the engine.
                                Last edited by MPittma100; 07-02-2015, 11:39 AM.
                                1981 XS1100H Venturer
                                K&N Air Filter
                                ACCT
                                Custom Paint by Deitz
                                Geezer Rectifier/Regulator
                                Chacal Stainless Steel Braided Brake Lines
                                Chrome Front Rotor & Caliper Covers
                                Stebel Nautilus Horn
                                EBC Front Rotors
                                Limie Accent Moves On In 2015

                                Mike

                                Comment

                                Working...
                                X