Announcement

Collapse
No announcement yet.

Time to wake her up...

Collapse
X
 
  • Filter
  • Time
  • Show
Clear All
new posts

  • Time to wake her up...

    Hi All,

    I've been lurking and reading for a while.

    A voice from deep in the garage was calling me.
    I answered by moving the life collection of stuff and taking the blanket off of the bike (yet to be named).
    There sits my 1980 XS11. She has sat covered in the garage for ~15 years - not prepped for storage.
    16K miles and basically stock.

    I followed the advice found on the site to triage her condition.
    - pulled the plugs. All looked great, check the gap and ready to go. No rust or crud.
    - removed the crank cover and easily turned the motor a complete revolution (per the directional arrow )
    - opened the tank. Around 1/2 full of "fuel" or whatever it chemically morphs to over the years. No visible rust, even on the exposed "cross-over".
    - quick peek at the battery and only some minor corrosion at the terminal.
    - breaks are spongy - at best
    - needs a bath and some additional looking around (fuse block, leakages etc)

    Gonna need over time:
    Tires, battery, break lines/rebuild, full fluid changes, fork/shock checking, electrical checking/troubleshooting and of course any other issues as they arise.
    So....

    What to do next - fuel system?
    I had read about de-rusting the tank and the "3 pass" carb clean/rebuild.
    Do I need to travel down that path initially?
    Can I get by/try running some Yamaha carb clearner in the carbs after draining the tank (and cleaning it with a recommendation)?
    I will get some inline filters and hose.

    Thanks for listening and in advance, for your guidance.

    Edit: Pictures soon
    1980 XS1100 Standard (G)
    Original Owner
    Stock plus:
    K&N air filter, Supertrapp 4x1, Techna-fit SS brake lines, TC Fuse Block, TKAT Fork Brace
    ...dirt and grime from several states.
    -------------------
    2011 FJR1300
    1978 SR500

  • #2
    Best not to get your hopes up running with dirty carbs, clean them well (read the write-up), clean all connectors, re-build brake system, and follow your own advice on fluid changes (middle and final as-well). Post some pics as-well!
    1979 XS1100F
    2H9 Mod, Truck-Lite LED Headlight, TECHNA-FIT S/S Brake Lines, Rear Air Shocks, TKAT Fork Brace, Dyna DC-I Coils, TC Fuse Block, Barnett HD Clutch Springs, Superbike Handlebars, V-Star 650 ACCT, NGK Irridium Plugs, OEM Exhaust. CNC-Cut 2nd Gear Dogs; Ported/Milled Head; Modded Airbox: 8x8 Wix Panel Filter; #137.5 Main Jet, Viper Yellow Paint, Michelin Pilot Activ F/R, Interstate AGM Battery, 14MM MC, Maier Fairing, Cree LED Fog Lights.

    Comment


    • #3
      I would at least flush the brake fluid with fresh fluid. You might get lucky. Dump the old gasoline out of the tank. Give it a rinse with fresh gas and dump that too. Look in there with flashlight and dental mirror. Maybe you got lucky there too! You're going to have to pull the carburetors and clean them. You can't escape that.

      Motorcycle Mikuni CV Carburetor Cleaning for Suzuki, Honda, Yamaha Tutorial
      Marty (in Mississippi)
      XS1100SG
      XS650SK
      XS650SH
      XS650G
      XS6502F
      XS650E

      Comment


      • #4
        Remove/fully disassemble/clean the brakes now. You shouldn't need any parts (well, the brake lines need to have a good look), but I'll just about guarantee that you've got congealed brake fluid in there somewhere now. Flushing the system will get some but not all of it out, cleaning it now may save you a cooked rotor, melted caliper, or burned clutch...
        Fast, Cheap, Reliable... Pick any two

        '78E original owner - resto project
        '78E ???? owner - Modder project FJ forks, 4-piston calipers F/R, 160/80-16 rear tire
        '82 XJ rebuild project
        '80SG restified, red SOLD
        '79F parts...
        '81H more parts...

        Other current bikes:
        '93 XL1200 Anniversary Sportster 85RWHP
        '86 XL883/1200 Chopper
        '82 XL1000 w/1450cc Buell, Baker 6-speed, in-progress project
        Cage: '13 Mustang GT/CS with a few 'custom' touches
        Yep, can't leave nuthin' alone...

        Comment


        • #5
          In my personal opinion you should get it running before doing anything else. If it won't run you don't need to do anything else. I would suggest replacing those 15 year old plugs, They may look fine but will have deteriorated internally over time and could drive you nuts getting it running right.

          Besides, hearing it run will motivate you for the other repairs.

          Do ONE THING AT A TIME and get it right before moving on to something else. That way you don't get scattered.
          Last edited by BA80; 10-01-2014, 12:59 PM.
          Greg

          Everybody is a genius. But if you judge a fish by its ability to climb a tree, it will live its whole life believing that it is stupid.”

          ― Albert Einstein

          80 SG Ol' Okie;79 engine & carbs w/pods, 45 pilots, 140 mains, Custom Mac 4 into 2 exhaust, ACCT,XS850 final drive,110/90/19 front tire,TKat fork brace, XS750 140 MPH speedometer, Vetter IV fairing, aftermarket hard bags and trunk, LG high back seat, XJ rear shocks.

          The list changes.

          Comment


          • #6
            Originally posted by jetmechmarty View Post
            I would at least flush the brake fluid with fresh fluid. You might get lucky. Dump the old gasoline out of the tank. Give it a rinse with fresh gas and dump that too. Look in there with flashlight and dental mirror. Maybe you got lucky there too! You're going to have to pull the carburetors and clean them. You can't escape that.

            Motorcycle Mikuni CV Carburetor Cleaning for Suzuki, Honda, Yamaha Tutorial
            As jetmechmarty stated, you may get fortunate just dumping the gas and replentish with new. To bad, as that old gas, when new would have a better burn than the new. As a sidenote, had an old mower that had set besides the house covered for some 8yrs. It started on second pull and ran fine afer all that time. Attribute that to the old non-alcohol fuel. Definitely would make it run before tackling the other neglected items.
            81H Venturer1100 "The Bentley" (on steroids) 97 Yamaha YZ250(age reducer) 92 Honda ST1100 "Twisty"(touring rocket) Age is relative to the number of seconds counted 'airing' out an 85ft. table-top.

            Comment


            • #7
              Agree

              with all that has been said. I would also spend the time now to check all your electrical connections for oxidation. Doesn't take that long and will give you piece of mind as you tackle the other obvious things to get it running. Like was mentioned by Greg, once you hear it run after all these years it is definitely a motivator to move on to the other things that need to be addressed in both labor and money. Are you the original owner of the bike? The reason I ask is getting to know the history of the bike and what you know for sure about it and what may have been done to it in the past by PO's.
              2 - 80 LGs bought one new
              81 LH
              02 FXSTB Nighttrain
              22 FLTRK Road Glide Limited
              Jim

              Comment


              • #8
                Ekim-- for future reference-- Have a look at this carb video, it is very helpful.

                https://www.youtube.com/watch?v=95nlrP-yn2I

                Good luck with your bike!
                79 F
                Previously owned: (among others)
                1969 Harley- Davidson Rapido 125 (Aermacchi)
                1967 Suzuki X6 Hustler
                1973 Suzuki TM 125
                1979 XS1100 F
                2005 Kaw. Vulcan VN800
                1991 BMW K75

                Comment


                • #9
                  Originally posted by MarkD View Post
                  Ekim-- for future reference-- Have a look at this carb video, it is very helpful.

                  https://www.youtube.com/watch?v=95nlrP-yn2I

                  Good luck with your bike!
                  LOL! That video is linked in post #3.
                  Marty (in Mississippi)
                  XS1100SG
                  XS650SK
                  XS650SH
                  XS650G
                  XS6502F
                  XS650E

                  Comment


                  • #10
                    Hey there "MIKE" ,

                    With only 16K miles, IMHO the engine IS going to run. We've often commented about folks carbs having electrical problems.... and so doing a little bit of cleaning just to see if it will run.... . Until you clean all of the harness electrical connections to ensure proper current flow, it may not run right and can mimmick a carb problem. Don't forget the ALT connectors behind the fuseblock mounting plate, also the multiple grounds and frame contacts at the Reg/Rect, as well as the FRAME grounds behind the carbs/below the battery. Also the main ignition and emergency shut off switch, as well as the handlebar switches.

                    The carbs will need a very thorough cleaning..whether you accomplish it in 1 or 3 attempts is up to you. Do a search for Carb anatomy and view the intricate passages visible in the split views and you'll better understand why you need to tear them down to be able to properly clean ALL of the passages.
                    Don't forget to replace the rubber vac. synch port caps, may also need to replace the vac. adv. hose.

                    The master cylinders may work properly with just a good flushing of fluid....check out the spooge hole tech tip....but DO tear apart the calipers. Corrosion builds up behind the caliper piston O-ring which makes to too tight and will not allow the piston to retract properly, causing overheating of the pads/rotors and possibly even a lock up! After removing the O-ring, a good scraping of the O-ring groove to remove the corrosion is needed. Also checking the pistons for severe rusting/pitting. And we recommend putting on Stainless Steel Braided brake lines to greatly improve the performance of the OEM brakes.
                    Hopefully the fuel in the tank kept water vapor from condensing and so you may not have much/any rust inside the top of the tank, and if so....then just clean as directed and then just use...but you will probably need to rebuild the petcocks...the rubber valve disc and other seals will probably get destroyed when used. You'll also need to have access to the petcock filter towers to clean them so fuel will flow thru them.

                    Aside from the fluids, drop the Final Drive and clean/regrease the driveshaft and splines, as well as the wheel rim/hub/splines while you change the tires, also the left rear wheel bearing...inspect/clean/regrease. Would also suggest checking/cleaning and regreasing the steering head bearings. Lube the throttle/clutch cables. Speaking of clutches, due to the years/decades, the oem clutch springs are probably shot so replacing them with a set of Barnett's would be good, as well as pulling the clutch basket, clean the steels and frictions...they are probably still well within spec thickness.

                    Pull the valve cover and check the valve clearances and adjust as needed. You probably still have the OEM cam chain tensioner, now would be a good time to swap it out for an ACCT or modded manual one.

                    Take your time, do this over the winter months, and you'll have a reliable machine by spring.

                    T.C.
                    T. C. Gresham
                    81SH "Godzilla" . . .1179cc super-rat.
                    79SF "The Teacher" . . .basket case!
                    History shows again and again,
                    How nature points out the folly of men!

                    Comment


                    • #11
                      Thanks for the generous wisdom folks!

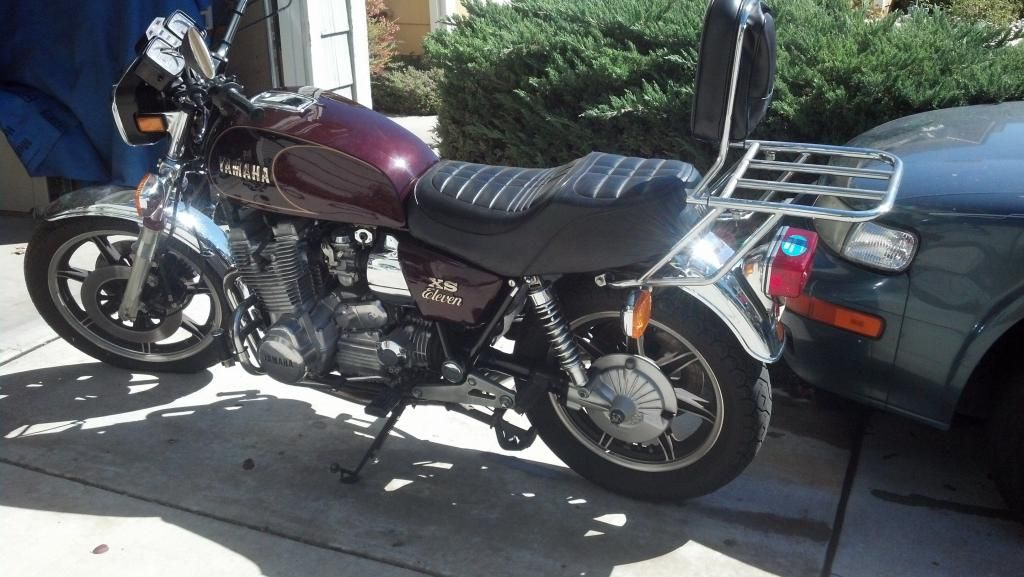
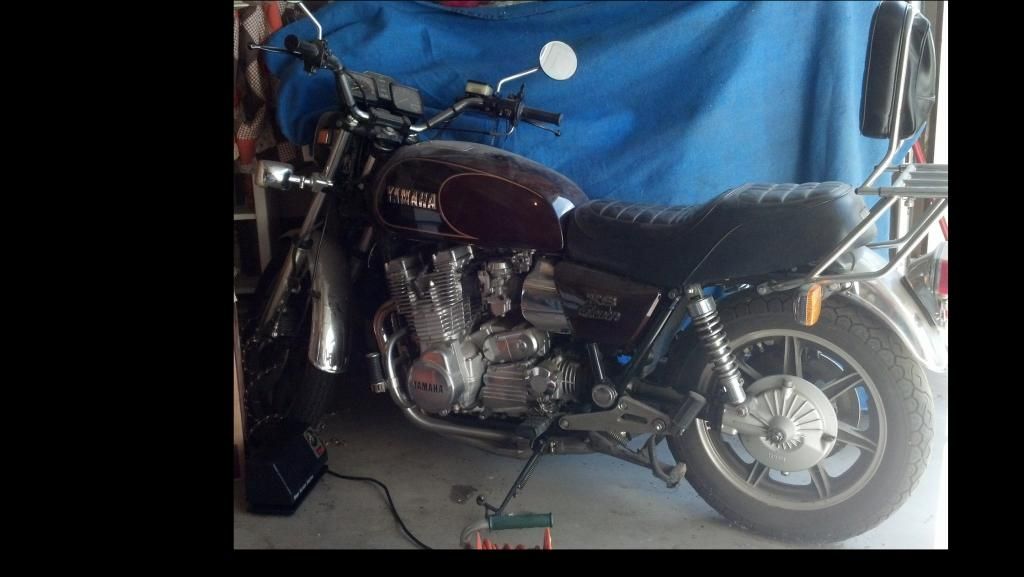
                      Before forgetting here are a couple pics:

                      The unveiling:


                      Cleaned up:


                      I need to re-read and absorb your responses.
                      Not to mention watch that video twice, if not more.

                      And yes I am the original owner.

                      In the video after removing the carb bank he takes it for cleaning.
                      What is that process?
                      Put in a pan of gas and brush off the exterior gunk?

                      He also does not disassemble the float valves. If I get some carb cleaner in there can I follow suit?

                      After the carbs will be the tank/petcocks - drain and gas rinse. In my free moments I will do electrical connectivity inspection .

                      As for finishing by spring...
                      Here in drought forsaken California - there will be no 'winter'.

                      No to see if my pics posted.
                      1980 XS1100 Standard (G)
                      Original Owner
                      Stock plus:
                      K&N air filter, Supertrapp 4x1, Techna-fit SS brake lines, TC Fuse Block, TKAT Fork Brace
                      ...dirt and grime from several states.
                      -------------------
                      2011 FJR1300
                      1978 SR500

                      Comment


                      • #12
                        Absolutely beautiful bike sir! Can't wait to hear about your Spring adventures
                        1979 XS1100F
                        2H9 Mod, Truck-Lite LED Headlight, TECHNA-FIT S/S Brake Lines, Rear Air Shocks, TKAT Fork Brace, Dyna DC-I Coils, TC Fuse Block, Barnett HD Clutch Springs, Superbike Handlebars, V-Star 650 ACCT, NGK Irridium Plugs, OEM Exhaust. CNC-Cut 2nd Gear Dogs; Ported/Milled Head; Modded Airbox: 8x8 Wix Panel Filter; #137.5 Main Jet, Viper Yellow Paint, Michelin Pilot Activ F/R, Interstate AGM Battery, 14MM MC, Maier Fairing, Cree LED Fog Lights.

                        Comment


                        • #13
                          Beautiful bike. I would be very careful with the carbs. All too often carbs are destroyed in earnest attempts at cleaning. If he carbs were not drained of all gas before the long storage then in all likelihood you are going to have varnish in them and more then likely the pilot jets are going to be gummed up pretty bad with the stuff. First thing you need to do is get them apart to examine them. Be careful when doing this. Once apart you can make the determination as to how to proceed as explained in the video. Keep in mind that video is in relation to his daily rider. He only has to do a light cleaning. Yours may or may not be more involved depending on their internal condition. If you find buidup in the jets then you are more then likely going to need to remove the floats and float needles and seats to check and clean. One thing that you don't need to do is disassemble the carbs from the rack. Keep them intact and you may get away without having to resynch them.

                          If you just get thoruoughly frustrated just give up and sell the bike to me. Just kiddng .... good luck and ask plenty of questions if you need to. Be sure to read through he carb 101 cleaning thread.
                          2 - 80 LGs bought one new
                          81 LH
                          02 FXSTB Nighttrain
                          22 FLTRK Road Glide Limited
                          Jim

                          Comment


                          • #14
                            Wow-- what a beauty. For my carbs, I carefully removed floats, jets, etc, and thoroughly cleaned all passages. I did not soak them, just used carb cleaner and carefully applied elbow grease. I replaced the pilots and mains with original sized Mikunis, although your jets won't need replacing if they're originals. Afterwards, the enrichener (choke) circuit would still not work, so I had to re-clean the passage in the bottom of the float bowls. Mine runs likea dream, with help from the guys on this forum.
                            79 F
                            Previously owned: (among others)
                            1969 Harley- Davidson Rapido 125 (Aermacchi)
                            1967 Suzuki X6 Hustler
                            1973 Suzuki TM 125
                            1979 XS1100 F
                            2005 Kaw. Vulcan VN800
                            1991 BMW K75

                            Comment


                            • #15
                              The cleaning of every orifice and passage is the key. Then, of course, proper synchronization and mixture adjustment.

                              The triple clean is a kind of a joke on here but it holds true to even the most experienced owners. Generally EVERYONE misses a little something in there when cleaning the first, even the second round.
                              Greg

                              Everybody is a genius. But if you judge a fish by its ability to climb a tree, it will live its whole life believing that it is stupid.”

                              ― Albert Einstein

                              80 SG Ol' Okie;79 engine & carbs w/pods, 45 pilots, 140 mains, Custom Mac 4 into 2 exhaust, ACCT,XS850 final drive,110/90/19 front tire,TKat fork brace, XS750 140 MPH speedometer, Vetter IV fairing, aftermarket hard bags and trunk, LG high back seat, XJ rear shocks.

                              The list changes.

                              Comment

                              Working...
                              X