Originally posted by BA80
View Post
Announcement
Collapse
No announcement yet.
Time to wake her up...
Collapse
X
-
Matt
81H Rebirth/Custom Build
1st Gen RX7; Audi quattro; Wrangler JK
PanikSwitch Cycles - Brewer ME
http://s48.photobucket.com/user/Arth...201100%20Build
-
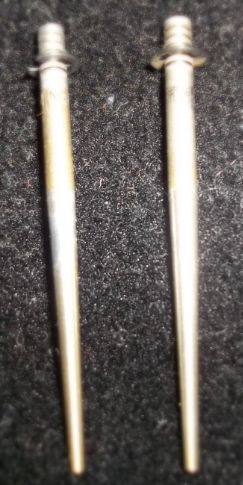
Originally posted by Arthur_of_Hex View PostTC is correct, the needles do rub the needle jet and eventually "oval" the jet and wear the needle. Straight pull carbs didn't have this problem as much as the cv due to the fact that the cv piston and needle "pulse" up and down with every intake cycle, the straight pull needles moved only with the throttle twist, so a fraction of the friction and overall movement. I've personally replaced needles and needle jets here at the shop after troubleshooting a rich condition that couldn't be put at bay with all other adjustable means. New needle and needle jet, perfect color brought back to the plugs :Greg
Everybody is a genius. But if you judge a fish by its ability to climb a tree, it will live its whole life believing that it is stupid.”
― Albert Einstein
80 SG Ol' Okie;79 engine & carbs w/pods, 45 pilots, 140 mains, Custom Mac 4 into 2 exhaust, ACCT,XS850 final drive,110/90/19 front tire,TKat fork brace, XS750 140 MPH speedometer, Vetter IV fairing, aftermarket hard bags and trunk, LG high back seat, XJ rear shocks.
The list changes.
Comment
-
Originally posted by BA80 View PostHmmmm.......seems if the needles were worn the jets would be too.
Pics?
76 XS650 C ROADSTER
80 XS650 G Special II
https://ibb.co/album/icbGgF
80 XS 1100 SG
81 XS 1100LH/SH DARKHORSE
https://tinyurl.com/k6nzvtw
AKA; Don'e, UD, Unca Don'e
Comment
-
Pre-cleaning
An update...
I removed the carbs from the bike with many thanks to the engineer that validated the clearances to facilitate the process - NOT!
I removed the float bowls and top/diaphram covers. The bike was stored on the side stand so the filth is greatest on #1 carb (float and float bowl) it lessens as you work across the bank. A couple of the floats are so gummy they do not move easily.
I am currently doing a 2 hour pre-soak. I will then do a water rinse and remove the jets, float etc. We will see how that goes per the previous discussion in the thread. When all is dis-assembled I will do a longer soak, rinse, clean and compressor cleaning. I will post an update as the process evolves.
I am going to try and clean and reuse my parts. If the needles/jets in the rebuild kit may be problematic then I would avoid them if possible. It seems the needles and jets are matched together within a carb. My gaskets look good (and so do the diaphragms BTW). The kits can be returned if unused and the $100 go towards other stuff.
My carbs are plastic float with no rubber plugs BTW.
More later...1980 XS1100 Standard (G)
Original Owner
Stock plus:
K&N air filter, Supertrapp 4x1, Techna-fit SS brake lines, TC Fuse Block, TKAT Fork Brace
...dirt and grime from several states.
-------------------
2011 FJR1300
1978 SR500
Comment
-
Originally posted by BA80 View PostSeems the needles would have to be bent pretty good to create the friction needed to cause wear as they are in a fixed position in the slide.Matt
81H Rebirth/Custom Build
1st Gen RX7; Audi quattro; Wrangler JK
PanikSwitch Cycles - Brewer ME
http://s48.photobucket.com/user/Arth...201100%20Build
Comment
-
Originally posted by ekim View PostAn update...
I removed the carbs from the bike with many thanks to the engineer that validated the clearances to facilitate the process - NOT!
I removed the float bowls and top/diaphram covers. The bike was stored on the side stand so the filth is greatest on #1 carb (float and float bowl) it lessens as you work across the bank. A couple of the floats are so gummy they do not move easily.
I am currently doing a 2 hour pre-soak. I will then do a water rinse and remove the jets, float etc. We will see how that goes per the previous discussion in the thread. When all is dis-assembled I will do a longer soak, rinse, clean and compressor cleaning. I will post an update as the process evolves.
I am going to try and clean and reuse my parts. If the needles/jets in the rebuild kit may be problematic then I would avoid them if possible. It seems the needles and jets are matched together within a carb. My gaskets look good (and so do the diaphragms BTW). The kits can be returned if unused and the $100 go towards other stuff.
My carbs are plastic float with no rubber plugs BTW.
More later...
I thought the 80 still had the metal floats, maybe a mid year or late year up grade ? Or the carbs have been changed out for the 81s ? I could be wrong.
Which carb dip are you using, if the auto type it's too strong to leave the carbs in for more than a hr. or two but can be repeated after a rinse with fuel or carb cleaner, even WD40, it's a water displacer. I've never used water on my carbs, but if they are dried well don't think a problem. If you using the Yamaha carb dip I've always mixed it 50/50 with good fuel ( non E10 ).76 XS650 C ROADSTER
80 XS650 G Special II
https://ibb.co/album/icbGgF
80 XS 1100 SG
81 XS 1100LH/SH DARKHORSE
https://tinyurl.com/k6nzvtw
AKA; Don'e, UD, Unca Don'e
Comment
-
First off, if it was extremely difficult to remove the carburetors, you're doing it wrong. Somebody made a video of the whole process. It takes ten minutes by the third time you do it.
Done,
The mfg date on my bike is 08/79. The carburetors have no passage, no plugs, and plastic floats. The Yamaha carburetor cleaner that you mix with gasoline is no longer available. The new stuff mixes with water.
ekim,
Get four little bowls for your parts. Keep everything with the carburetor it came from.Marty (in Mississippi)
XS1100SG
XS650SK
XS650SH
XS650G
XS6502F
XS650E
Comment
-
Originally posted by donebysunday View PostekiM, Can you see a passageway down in the pilot jet tower that goes from the main jet tower to the pilot ? If so it should have the rubber plugs in the towers of the pilot jet inside the bowls.
I thought the 80 still had the metal floats, maybe a mid year or late year up grade ? Or the carbs have been changed out for the 81s ? I could be wrong.
Which carb dip are you using, if the auto type it's too strong to leave the carbs in for more than a hr. or two but can be repeated after a rinse with fuel or carb cleaner, even WD40, it's a water displacer. I've never used water on my carbs, but if they are dried well don't think a problem. If you using the Yamaha carb dip I've always mixed it 50/50 with good fuel ( non E10 ).81H Venturer1100 "The Bentley" (on steroids) 97 Yamaha YZ250(age reducer) 92 Honda ST1100 "Twisty"(touring rocket) Age is relative to the number of seconds counted 'airing' out an 85ft. table-top.
Comment
-
JetM,
Sounds like 2 more tries and I will have the carb removal technique down. I'd be interested in seeing the video - have a link?
I have been collecting/using several sets of 4 containers: Clean, in-process, dirty, set this somewhere and remember for which carb. The dollar store is your friend (grin).
So the pre-clean of the bank is done. I also cleaned the float bowls, screws.
I am taking my time and being thorough. I was able to get the float pins out with a combo of PB blaster and diagonal pliers (dykes). Lots of squeezing then "snap" ("Oh my God, what did I just break?"). It was a good sound repeated 4 times.
Tomorrow will be:
removal and cleaning of the jets, hand cleaning of the assembled diaphragm needles and one more short bath of the rack in the cleaner.
Yes I am using the new formula of the water based Yamaha carb dip.
No plugs to be found and I have plastic floats.1980 XS1100 Standard (G)
Original Owner
Stock plus:
K&N air filter, Supertrapp 4x1, Techna-fit SS brake lines, TC Fuse Block, TKAT Fork Brace
...dirt and grime from several states.
-------------------
2011 FJR1300
1978 SR500
Comment
-
Good job
thus far. It is good to hear the float pins came out so easily. I have always had good success with patience and the diagonals. Just make sure the pins are not warped or bent in any way while you have them out. Also you might want to soak the removed parts in a stronger dip such as berryman's or the like. Just don't soak the whole carb bodies in the stuff for fear of damaging the butterfly seals or other rubber parts. The stronger dip will aid in breaking down deposits in the jets etc... You might also invest in some good carb cleaner spray to use in spraying out all the orifices and passages while you have the carbs apart then follow that with a good burst of air. All of this will help dissipate the water from the Yamaha dip.
By the way how is that dip working for you? I was interested to know as I have never used the stuff... just saw it at the bike shop. I have several spare sets of carbs that need a good going over this winter and was thinking of trying it on them.
Sounds like you are well on your way to a nice running machine.2 - 80 LGs bought one new
81 LH
02 FXSTB Nighttrain
22 FLTRK Road Glide Limited
Jim
Comment
-
XS1100 Carburetor Install
This may help you get the carburetors back on.
XS1100 Carburetor Install
If those clamps are all bent up, you can get new ones from OEM suppliers. Mike's XS and Parts n' More have less expensive replacements. If you go to Mike's, I believe BS38 clamps fit the airbox.Marty (in Mississippi)
XS1100SG
XS650SK
XS650SH
XS650G
XS6502F
XS650E
Comment
-
update
As for the carb dip I would use it again. It is nice not worrying rubber etc when you want to leave the rack/bank assembled. If you are going to try it get a pan/container which is: (13" L) x (5" w) x ("6" h)
- I think a "mud pan" in building supplies is that size.
This size will hold an unassembled carb rack, completely submerged and I think the final mixed volumne of the dip (1qt + 2 pts water) will be enough.
I had a wider, shorter plastic cake pan which required turning/rotating the rack during soaking.
Some detailed scrubbing around the linkage springs and such was required for aesthetic cleaning. I think the varnish removal was complete
As for breakage during the process...
I destroyed (1) screw for a diaphram cover and (1) pilot jet.
Both were on the #1 carb and remember the bike was left on the side stand.
#1 was also the dirtiest inside.
If I have time later today (Sunday) I will finish cleaning the small parts - jets etc and use the compressor on every thing. All else is clean.
-> then reassembly!
I have a question prior...
I did not disassemble/clean the pilot screw.
Mine are visible (no cap or seals).
If memory serves I had the dealer tune the carbs after bringing it from 3000 feet to sea level and having replaced the stock exhaust with the Supertrapp 4x1.
I am under the impression this is the "mixture" adjustment requiring more knowledge/tools/confidence than I have.
Thoughts from the experts?1980 XS1100 Standard (G)
Original Owner
Stock plus:
K&N air filter, Supertrapp 4x1, Techna-fit SS brake lines, TC Fuse Block, TKAT Fork Brace
...dirt and grime from several states.
-------------------
2011 FJR1300
1978 SR500
Comment
-
I believe
you are referring to the idle mixture screws. They come into play when setting the idle/pilot circuit. These are the screws that a lot of folks ask about concerning how many turns from seated they need to be out etc... Bottom line is how was the bike running / idling before it sat up all those years. There are some small rubber o ring type seals in each on the end of each screw and unless those have deteriorated over time I would not worry about messing with them. There is the screw, a spring, a washer and the small rubber o ring to be exact. Take a look at this thread http://www.xs11.com/forum/showthread.php?t=38. There is a good picture included of the assembly.
Bottom line is if the bike was idling ok before and based on what you are finding as far as varnish etc... in what you have seen so far you may or may not need to remove inspect the idle mixture screws. I will confess though that I always remove them during my initial clean after such a long storage. It has been suggested that you should first screw it in counting the number of turns before disassembly. That way when you reassemble you know approximately how many turns out each on is at. Just be careful when turning them in so that you only lightly seat them so you don't break a tip off. I always use a very small light screw drive which helps me feel when seated lightly. Once you get everything back together you will need to set them individually by cylinder/carb to get the idle just right before synching the carbs. You might have to go through that process a few times before you get them right. Plug color is a good indicator once you have them right. There are several threads concerning the proper way to proceed with this in the tech section. Spend a little time reading all of that then proceed on your bike. From what you have described so far I don't think you are too far off from having the carbs right.2 - 80 LGs bought one new
81 LH
02 FXSTB Nighttrain
22 FLTRK Road Glide Limited
Jim
Comment
-
Progress...
Putting the carbs back on was a chore requiring help.
Aside from learning the positioning puzzle, was the actual seating of the carbs into the head. Perhaps my manifolds are so old and dry they wouldn't "pop in".
It took 2 neighbors (younger than me construction workers) significant effort to get them to seat.
I dread ever having to pull and reinstall the carbs again with these manifolds.
I will replace them during the "next time".
As for progress...
I ended up not removing/cleaning the the mixture jets. I think I may have dodged another bullet. I spent many days soaking, cleaning, disassembling and compressor action on the carbs.
She fired up, but grumpy after being comatose for years.
The next day she wouldn't fire up at all. I replaced vacuum lines, spark plugs, fuel lines (added filters too) but still had issues.
Long story short - It appears now to be an electrical connection issue.
Yes I know connections need cleaning but wasn't expecting it now.
It appears that there is a connection to the left of the large fuse block that when accidentally bumped during troubleshooting the starting problem, clicked and she started to fire.
Tomorrow that is one of several connections getting attention.
She runs but still not quite right.
There is a load clicking - like a knock at the bottom of the left side.
- at or near the pickup coils/vacuum advance cover.
I think the question below is related...
My question for the day is:
On an 80 STD regarding vacuum hoses - what goes where?
I can NOT find data in the shop manual or my Clymer book. Site searching always addresses an OCTY setup.
So...
I have 3 vacuum lines: 1 for the ignition and 1 each for the 2 petcocks.
The 3 connection options are (2) on the carbs and (1) on the manifold.
Does it matter where the ignition advance sources its vacuum?
Symmetry would suggest both petcocks are sourced from the carbs and the ignition advance from the manifold.
=> what is the correct configuration?
(and where is it documented - if so)1980 XS1100 Standard (G)
Original Owner
Stock plus:
K&N air filter, Supertrapp 4x1, Techna-fit SS brake lines, TC Fuse Block, TKAT Fork Brace
...dirt and grime from several states.
-------------------
2011 FJR1300
1978 SR500
Comment
-
On your "G" the vacuum lines to the petcocks go to 1 & 4, carb to engine, boots and the vacuum advance line goes to # 2 carb.1980 XS1100G "Dolly G" Full Dresser (with a coat of many colors )
1979 XS1100SF (stock-euro mods planned)
1984 XV700L Virago (to be hot-modded)
1983 XJ750MK Midnight Maxim (semi-restored DD)
1977 XS650D ( patiently awaiting resto)
Sometimes it takes a whole tank of gas before you can think straight.
Comment
Comment