Announcement

Collapse
No announcement yet.

Time to wake her up...

Collapse
X
 
  • Filter
  • Time
  • Show
Clear All
new posts

  • #16
    Well I am a smarter fellow after watching the video, reading the faqs and replies from you all.
    A thorough carb cleaning is in my near future.

    And thank you all for the compliments on the bike!

    Today I spent prepping for the forthcoming tasks.
    First order of business was converting part of the garage from "warehouse" to man cave (cavity actually).
    => Must ... throw ... more ... things .. away.

    When that got boring I went to Harbor Freight and purchased a couple tools;
    - compressor (pancake, oil-less)
    - motorcycle dolly
    I need to be able to push the bike to the side of the garage easily when access is not needed. Something about being able to park a vehicle inside

    Both were purchased at a discount - on-sale, coupon code etc.
    Putting the dolly together took some time.
    If you are interested the dolly is:

    http://www.harborfreight.com/low-pro...lly-95896.html

    The bike JUST fits on the dolly (length).

    I also checked on local pricing for carb kits and petcock kits - should they be needed. All are available either at local Yamaha shop or at a cycle accessory store. Both can order and have them in a day or 2.

    Once I get my work area squared away the carb tear down and rebuild is first. Then I will attend to the tank/petcocks.

    Because pictures are always good...
    I grabbed a picture of the view into the tank still containing the old fuel.
    The tank is 1/2 - 2/3 full.
    The light area at the top, inside the opening is above the fuel level.
    I don't see any rust etc. I think I have dodged another bullet.
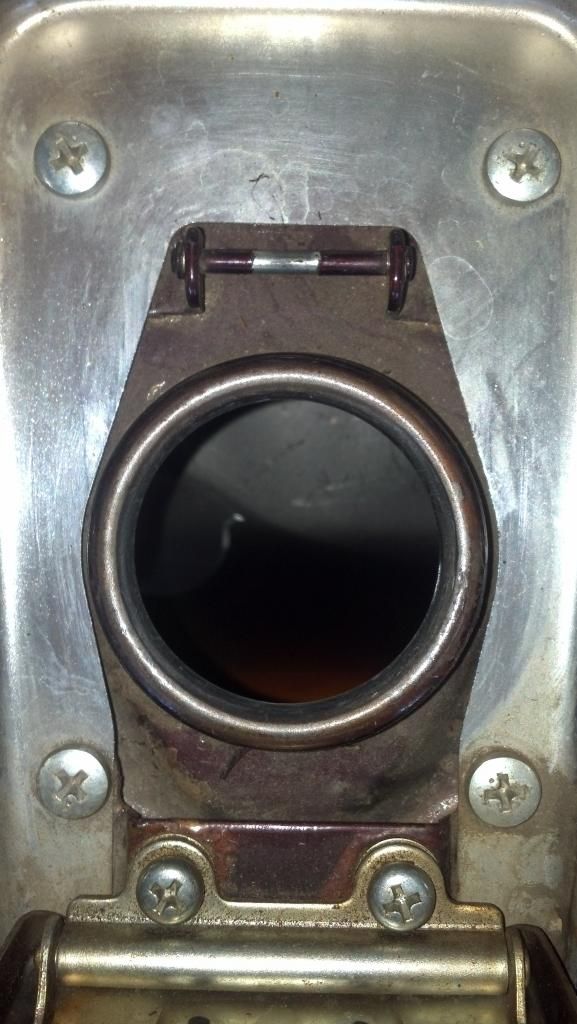


    Again thanks for all the help!
    1980 XS1100 Standard (G)
    Original Owner
    Stock plus:
    K&N air filter, Supertrapp 4x1, Techna-fit SS brake lines, TC Fuse Block, TKAT Fork Brace
    ...dirt and grime from several states.
    -------------------
    2011 FJR1300
    1978 SR500

    Comment


    • #17
      ekim, you may have from the looks in the pic. Of course, since heavier, any condensation/moisture will reside in the bottom which may require petcock removal, dissassembly and cleaning of the parts for correct functioning.
      81H Venturer1100 "The Bentley" (on steroids) 97 Yamaha YZ250(age reducer) 92 Honda ST1100 "Twisty"(touring rocket) Age is relative to the number of seconds counted 'airing' out an 85ft. table-top.

      Comment


      • #18
        Real nice looking bike, like a time capsule! And you know that nothing has been screwed up by a prior owner. Still got the original exhaust?
        Billy

        1982 XJ1100, Ceramic Coated Headers, Raptor ACCT, Barnett Clutch Springs, Dremmel Fix, TC's Fuse Block, De-Linked S/S Brake Lines, 850 Final Drive, Yahman's YICS Eliminator, Pods, stock jets

        Comment


        • #19
          The level of gunk at the bottom of the tank will become obvious when I dump it out and clean the petcocks.

          I replaced the original exhaust when the bike was a few years old - one of the mufflers was rusting if memory servers correctly. The old ones were tossed out.
          - had I known then ...

          I am still 'reorganizing' my garage. Slow going in the 90 degree heat wave.
          There was a bonus find though...
          I had forgotten that I'd purchased carb manifolds, when I first noticed the cracking. Got all 4 still in their boxes/bags !
          1980 XS1100 Standard (G)
          Original Owner
          Stock plus:
          K&N air filter, Supertrapp 4x1, Techna-fit SS brake lines, TC Fuse Block, TKAT Fork Brace
          ...dirt and grime from several states.
          -------------------
          2011 FJR1300
          1978 SR500

          Comment


          • #20
            Originally posted by ekim View Post
            The level of gunk at the bottom of the tank will become obvious when I dump it out and clean the petcocks.

            I replaced the original exhaust when the bike was a few years old - one of the mufflers was rusting if memory servers correctly. The old ones were tossed out.
            - had I known then ...

            I am still 'reorganizing' my garage. Slow going in the 90 degree heat wave.
            There was a bonus find though...
            I had forgotten that I'd purchased carb manifolds, when I first noticed the cracking. Got all 4 still in their boxes/bags !
            The cracking you may find to be only external/cosmetic once you pull the carb bank off, and get to shelve those new ones for a few yrs. longer.
            81H Venturer1100 "The Bentley" (on steroids) 97 Yamaha YZ250(age reducer) 92 Honda ST1100 "Twisty"(touring rocket) Age is relative to the number of seconds counted 'airing' out an 85ft. table-top.

            Comment


            • #21
              Originally posted by motoman View Post
              The cracking you may find to be only external/cosmetic once you pull the carb bank off, and get to shelve those new ones for a few yrs. longer.
              Sorry to barge in but what if anything would keep these intake manifolds good/from aging while in storage ?
              76 XS650 C ROADSTER
              80 XS650 G Special II
              https://ibb.co/album/icbGgF
              80 XS 1100 SG
              81 XS 1100LH/SH DARKHORSE
              https://tinyurl.com/k6nzvtw
              AKA; Don'e, UD, Unca Don'e

              Comment


              • #22
                No one can stop time or aging, I'm a shining example

                But, what you see on the exterior and what's inside can be two different realities.
                Greg

                Everybody is a genius. But if you judge a fish by its ability to climb a tree, it will live its whole life believing that it is stupid.”

                ― Albert Einstein

                80 SG Ol' Okie;79 engine & carbs w/pods, 45 pilots, 140 mains, Custom Mac 4 into 2 exhaust, ACCT,XS850 final drive,110/90/19 front tire,TKat fork brace, XS750 140 MPH speedometer, Vetter IV fairing, aftermarket hard bags and trunk, LG high back seat, XJ rear shocks.

                The list changes.

                Comment


                • #23
                  Saw this stuff

                  at a motorcycle shop and was wondering if anyone has ever used it.... https://www.yamahapartsandaccessorie...Search&d=33|33. I also thought if someone had that it might be something that Ekim could use on his tank if need be and or carb parts.
                  2 - 80 LGs bought one new
                  81 LH
                  02 FXSTB Nighttrain
                  22 FLTRK Road Glide Limited
                  Jim

                  Comment


                  • #24
                    Yup, used it before. It's their equivalent to Berryman's. I prefer the chem dip cuz of the dip basket included in the gallon pail.
                    1979 XS1100F
                    2H9 Mod, Truck-Lite LED Headlight, TECHNA-FIT S/S Brake Lines, Rear Air Shocks, TKAT Fork Brace, Dyna DC-I Coils, TC Fuse Block, Barnett HD Clutch Springs, Superbike Handlebars, V-Star 650 ACCT, NGK Irridium Plugs, OEM Exhaust. CNC-Cut 2nd Gear Dogs; Ported/Milled Head; Modded Airbox: 8x8 Wix Panel Filter; #137.5 Main Jet, Viper Yellow Paint, Michelin Pilot Activ F/R, Interstate AGM Battery, 14MM MC, Maier Fairing, Cree LED Fog Lights.

                    Comment


                    • #25
                      An update...

                      She is AWAKE !!!
                      - Boy I forgot how great they sound.

                      After dumping the old gas, rinsing the tank with fresh gas, an oil change and a battery I tried starting her.

                      After a few tries she started and while I futzed with the choke etc. It is running a little rough but I didn't have time to really warm it up.
                      I put some B12 in the tank and will fire it again in the morning and see if the remaining sleep is rubbed from her eyes.

                      The short term plan is to try some more minimal work such that I can go around the block.
                      I need a front tire and to fill/bleed the brakes to have a maiden voyage.

                      Thereafter I will start with the full restoration (in no order): carb deep cleaning/rebuild, brake clean/rebuild with SS lines, electrical inspection, forks, middle/final drive oil changes etc, etc, etc...
                      (yes I have the Yamaha carb cleaner)

                      The bike preserved/aged well - I got lucky (thus far with fingers crossed).

                      I am jazzed.
                      Thanks for the support then and forthcoming.
                      1980 XS1100 Standard (G)
                      Original Owner
                      Stock plus:
                      K&N air filter, Supertrapp 4x1, Techna-fit SS brake lines, TC Fuse Block, TKAT Fork Brace
                      ...dirt and grime from several states.
                      -------------------
                      2011 FJR1300
                      1978 SR500

                      Comment


                      • #26
                        Very cool thread. I'm partial to the standards, and it excites me that another beauty will be on the road.
                        1979 XS1100F
                        2H9 Mod, Truck-Lite LED Headlight, TECHNA-FIT S/S Brake Lines, Rear Air Shocks, TKAT Fork Brace, Dyna DC-I Coils, TC Fuse Block, Barnett HD Clutch Springs, Superbike Handlebars, V-Star 650 ACCT, NGK Irridium Plugs, OEM Exhaust. CNC-Cut 2nd Gear Dogs; Ported/Milled Head; Modded Airbox: 8x8 Wix Panel Filter; #137.5 Main Jet, Viper Yellow Paint, Michelin Pilot Activ F/R, Interstate AGM Battery, 14MM MC, Maier Fairing, Cree LED Fog Lights.

                        Comment


                        • #27
                          Ekim-- recent post ( Thanks to Ian for doing the leg work on these lines).

                          http://www.xs11.com/forum/showthread...ght=techna-fit
                          79 F
                          Previously owned: (among others)
                          1969 Harley- Davidson Rapido 125 (Aermacchi)
                          1967 Suzuki X6 Hustler
                          1973 Suzuki TM 125
                          1979 XS1100 F
                          2005 Kaw. Vulcan VN800
                          1991 BMW K75

                          Comment


                          • #28
                            original owner, running

                            yes you are hooked now. Nothing like hearing them run again after a long sleep. At least now you know what you are dealing with and it will truly become a labor of love. Glad to hear the good news and look forward to updates as you move forward with the restoration. Another one on the road.
                            2 - 80 LGs bought one new
                            81 LH
                            02 FXSTB Nighttrain
                            22 FLTRK Road Glide Limited
                            Jim

                            Comment


                            • #29
                              Hello again

                              My carb kits arrive tomorrow - so the carb clean/rebuild is in sight.
                              My game plan is:
                              - Remove the rack and give it a quick exterior brushing with gas.
                              - Follow the combined instructions from carb 101 and the recommended youtube video on dissassembly
                              - Soak the rack and parts in a pan of Yamaha Carb Dip (water based - rubber safe)
                              - Air dry then go to town with the compressor.
                              - Reassemble with new parts from the kits and the clean re-used pieces.
                              - Check the float levels
                              - Reinstall and fire it up
                              - Come back here to whine, moan and ask for help (grin)

                              A couple questions:

                              How long do I soak parts in the dip? I can not find info anywhere?
                              (I probably will need to rotate the carb rack to clean the whole thing.)

                              I'm a little scared on removing the floats. I don't want to break the posts so I guess I will see if it is easy once I am at that part. Is the removal of the float/needle crucial?

                              The 80 XS (G) appears to have differing jets: early and late models and also inner carbs vs outer carbs. What should I check before swapping in new jets from a kit?
                              (I *think* I am getting 2 different kits (each kit x 2))

                              TIA

                              edit:
                              And yes I have seen the posting for those SS lines. They will be a future purchase.
                              Last edited by ekim; 10-13-2014, 10:04 PM. Reason: I forgot to mention the SS brake lines...
                              1980 XS1100 Standard (G)
                              Original Owner
                              Stock plus:
                              K&N air filter, Supertrapp 4x1, Techna-fit SS brake lines, TC Fuse Block, TKAT Fork Brace
                              ...dirt and grime from several states.
                              -------------------
                              2011 FJR1300
                              1978 SR500

                              Comment


                              • #30
                                Hey Ekim

                                First and foremost don't replace the jets with the ones supplied in the kits unless you absolutely have to. If you are able to clean the old ones making sure all the holes are clear and clean you really don't need to replace them. On the other hand if one gets damaged in the disassembly cleaning process and you have to replace one make sure that the replacement jets are mikuni jets. There have been reported problems with anything but original oem jets. As for the floats if you are going to replace the float needles and seats then obviously you have to remove the float pins to get at them. Again this may or may not be necessary depending on the condition of the old ones. With patience and the right tools and process the floats can be removed with no damage to afford a thorough inspection. If it were my bike and had sat as long as you describe with gas in the carbs I would plan on removing them to make sure you have cleaned that area. As for how long to let the carbs soak that is a call you will have to make based on how effective the carb dip is.
                                When cleaning the jets it has been suggested that the use of a toothpick to clean the orifices is good and you do not risk damage. I use small needles as well. The key being to not enlarge any of the orifices as that would actually enlarge the jet. I believe the video briefly shows you how to use a socket to brace the float post when removing the pins. If you do decide to remove the floats I have found that a set of diagonals are good. Once you get the float pin moving you can sometimes catch the beveled end of the pin with the diagonals and just by applying closing pressure on the diagonals you can move the pin out a bit further without doing any prying. Find something a bit smaller in size then the pin that you can then use to tap the pin out the rest of the way, again using a socket as a brace. Just never force anything or use any large tapping tools that might break the post. I am sure you will get it done and good luck.
                                2 - 80 LGs bought one new
                                81 LH
                                02 FXSTB Nighttrain
                                22 FLTRK Road Glide Limited
                                Jim

                                Comment

                                Working...
                                X