If this is your first visit, be sure to
check out the FAQ by clicking the
link above. You may have to register
before you can post: click the register link above to proceed. To start viewing messages,
select the forum that you want to visit from the selection below.
Are your covers supposed to look like this? XS650 covers are still available and cross to 78-79 XS1100 in the US. In a pinch, perhaps you may swap to US footrests? (just the rest, as to maintain Euro position)
A little update on the new project. I'm waiting for a valve depressor tool so I can change three shims on the inlet, so the engine isn't ready for cosmetic improvement yet. I measured all the clearances and used the replacement charts, removed the camshafts and did them that way...but, despite my best efforts, three of the inlet clearances are still not correct. I did hear that sometimes shims are not accurately marked?? Who knows, but I'm just going to use the little tool instead of raving the camshafts off again.
So, in the meantime, I did a bit of messing about with other things and here's a few pix...
Footrest plates stripped and re lacquered, with newly zinc-plated brake assembly....
Other side....
Top yoke, stripped and coated with PJ1 Satin Black Case paint..... I've stripped the switch, treated it with De-Oxit and greased the lock assembly..
I stripped and PJ1'd the front master cylinder. New seal and piston kit. Stainless countersunk bolts in the lid, new metal decal from Yambits, zinc-plated seal retainer and DeOxit on the brake switch.... I also sorted out a tired lever return spring and zinc-plated the adjuster bolt (which has a very fine thread, I discovered). The lever itself is the original with PJ1 on it and then baked at 200 degrees C for an hour. The rubber shroud is brand-new and available on eBay for only $8 for two of them..... It's a neoprene material and every bit as good as OEM, of not better. It's an exact copy too....
I cleaned up the rear master cylinder and installed a seal kit init, of course...
I'm now on with the footrests and got the brackets stripped, de rusted and painted with Xylene-based enamel. Our Euro footpegs differ from the USA and I'm having a problem finding replacement footrest rubbers....I can't remember where I got them from last time! All the other footrest bits are bathing in acid right now.....
So, things are moving on. I'm somehow dreading trying to get the engine back in the frame! I'm going to wrap the frame with bandages, like an Egyptian mummy, in order to minimise damage to the lovely new powder coating..... Any ideas anyone??
Works continues apace, XSives. I've had the camcovers off and the cams look excellent. Two valves need replacement shims to get the gaps correct.
I dipped the fork sliders in phosphoric acid alloy cleaner....
They came out like this...
Then I gave one a preliminary polish one with a buffer....
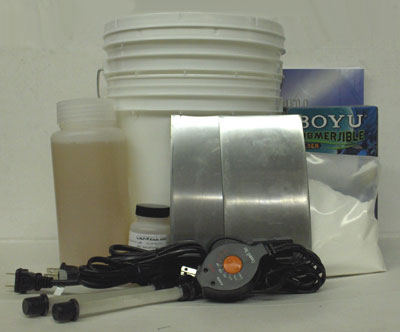
The wheels that came on the bike had been powder coated in silver and would have been incredibly difficult, time-consuming and, in all likelihood impossible, to get to look original. So I sold them on eBay and offset the cost of two replacements from a breaker in Germany. I refurbed the brake discs that came with my bike and you can see the results of the zinc plating kit in these pix...
That thing looked like a beauty! I can't wait to see it once it's gotten the full resto!
the plan is to get it looking like the last one I did.....
There's a way to go yet but, in terms of completeness, this latest project is a better start than the last one. All of the fiddly, expensive bits are not missing this time.
Well, I do hope I'm not getting to be a bore, Ian. I tend to type quickly and post pix etc, mainly so that other people can learn from my mistakes or experience with the rebuild. Not to crow about doing a good job (or not). Eg..mentioning the pickup wire in this thread..I know it's well known but someone new may be reading and notice it. And it reinforces the fact that this is a common fault on the bike. And so on.....
Yes, untreated zinc plating goes grey but that is where 'passivators' come in. Unpassivated plating will actually 'grow' to cover over a scratch, for example. Eventually the zinc plating will, given time, disappear entirely. By dipping plated parts into a passivating solution, the zinc remains stable and shiny. BZP (bright zinc plate) is always passivated.
Zinc plating can be painted and doesn't rust, so even if unpassivated dull pieces get grey, it's a good base for painting. I've done that on parts where BZP might look out of place...
One of the problems with zinc plating is that after a period of time, quicker in humid weather, the zinc corrodes and turns a dull grey.
The aluminum boat owners in the Pacific North West use some stuff called SharkHide to coat a new or repolished aluminum boat, and very year or two put another coat on.
I don't know if it is available over there, but it might be sent through the post.
It costs about $80 a quart here, but I see they have dealers in Canada, and you might be able to have some shipped from there, since you all speak the same language.
Sort of,
A quart would do all the bikes you and your friends could find.
I've just about zinc plated everything that needs to be done. Here's a shot of the external oil feed pipe and banjo bolts.....
I also had a look under the ignition cover and removed everything. As is fairly normal, the bob-weight assembly under the rotor was slightly rusty and dry, so I greased the moving parts with a tiny quantity of grease..not enough to get flung all over the inside of the casing. A quick suck on a piece of vacuum tubing attached to the advance showed it's working fine.
I also checked the pickup wires and, yep, sure enough, one of them had fractured inside. Only one of the four though. This really is an essential first check for any ignition problem, IMHO. As usual, the wires all looked fine but a reasonably strong tug on one of them was just like pulling an elastic band. The core of the wire had obviously been broken a long time as the broken ends were dirty and dark in colour, presumably due to current arcing across the break and annealing the copper over the years. I fixed it as in this pic...
The engine itself is pretty rough looking on the outside, especially after degreasing and wire-brushing it. The black coating, peculiar to the European models, looks very nice until it reaches the stage in the pix. PJ1 Satin Black Case Paint will sort it out but the preparation is a pain unless the engine is stripped and blasted. I'm reticent to do this though, as it doesn't seem mechanically necessary. A long-term leak on the CCT and a dubious 'repair' involving a rubber cap, mean that there was a lot of gunged up oil on the middle cylinder fins. It's going to take a lot of shifting........
The steering head beating races were worn enough to warrant getting them out and not doing the tempting little cheat of leaving the races in the steering head. I used a small, primitive stock welder and welded an old bolt across each race. The heat from the welder helps and then a whack on the bolt from the opposite side with a metal rod popped them right out....(Quote)
Hi James, Bike is looking very good. Nice touch with anodizing. Can't wait to see the final assembly.
Another method for bearing race removal is to run a bead with your welder along the inside of the race 1/4 to 1/2 way around it. As it cools off, the press fit is gone and the race(s) will usually fall out with no added persuasion.
Here's a quick update on the new project. I refurbished the airbox and used the little zinc plating kit. The shiny bits make it look much better than before......



Leave a comment: