Announcement

Collapse
No announcement yet.

30 minute cam chain tensioner mod

Collapse
X
 
  • Filter
  • Time
  • Show
Clear All
new posts

  • 30 minute cam chain tensioner mod

    Leave it to the Airborne to come up with a great mod for an XS. Tadracer (101st) had an excellent modification for a cam chain tensioner in a previous post. Unfortunately it involved machining a block of aluminum. I kept looking at it and wondering how I (2/75th) was going to turn a piece of aluminum down to make my own housing. Then I stripped my tensioner locking bolt, and suddenly it hit me - I already had a housing.

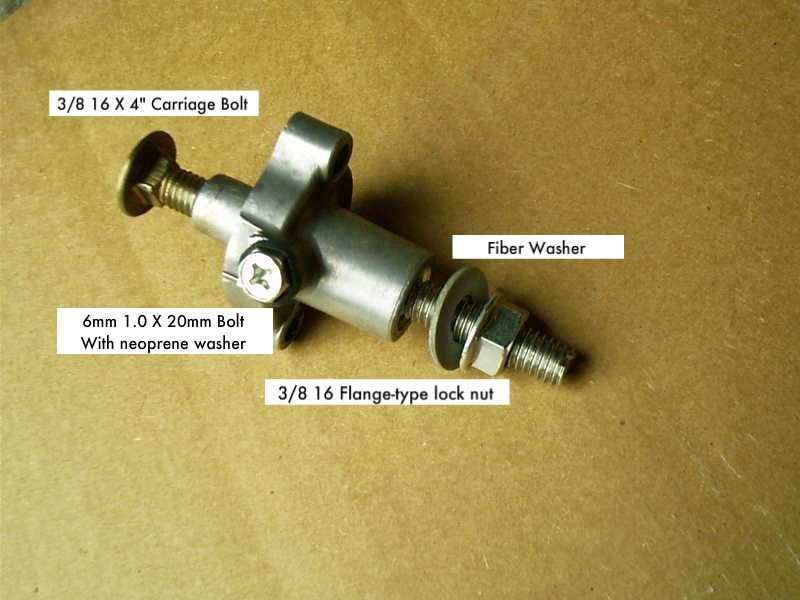
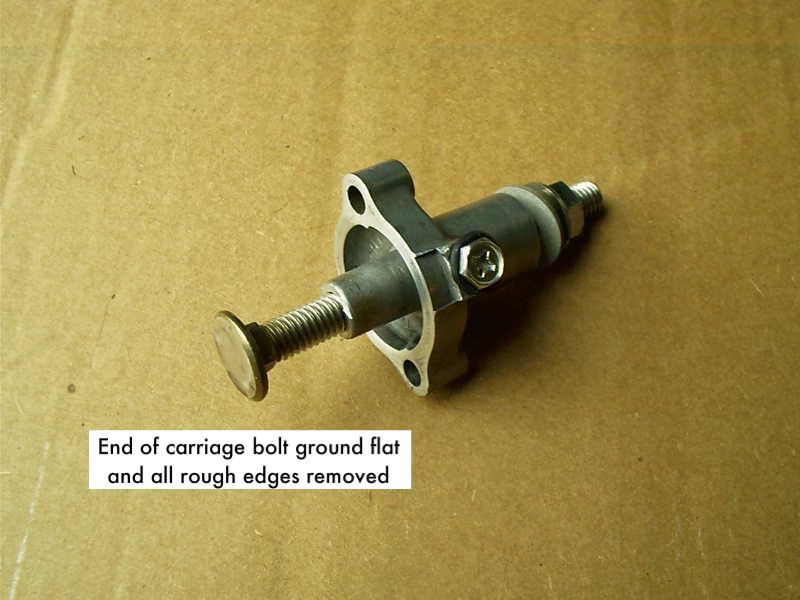
    I took the existing tensioner, tapped the tensioner shaft tunnel and installed a 4" stainless steel carriage bolt with the face ground flat. The tunnel is the perfect size for a 3/8 16 tap with no drilling required. I know what your going to say - 'That ain't metric, you savage.' I looked high and low for a metric carriage bolt, but couldn't find one in the right size, so I just went with sae. My appologies. Make sure the tap you use has teeth that overhang the shaft such that you can run it all the way through - it's a deep tapping operation. I took one and ground the shaft down so that it would work.

    I took a locking flange nut, held it with a deep socket, and ground the ridges off the face and installed with a fiber washer.

    I tapped out the stripped locking bolt hole and installed a bolt with a neoprene washer. Filling it with JB Weld would work just as well, and the next time I have it off that's what I intend to do.

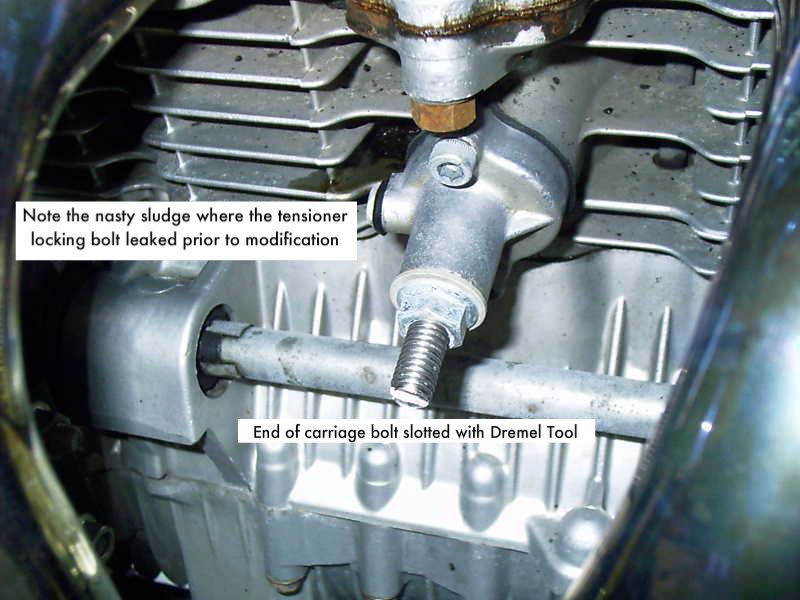
    I cut a slot in the end of the carriage bolt to accomodate a flat-bladed screwdriver.

    To tension the chain, set the timing plate to 'C', loosen the locking nut, turn the stem in hand tight, hold the stem with a screw driver to prevent it from turning and re-tighten the locking nut. Doesn't need to be too tight. If you're going to try this on a hot motor, I recommend using a screwdriver to adjust, turning with the shaft not the handle to avoid over tightening, and a crowfoot wrench for the locking bolt - unless you like muffler burns. Or just do what I do, and adjust it cold.

    Originally I wrapped the threads with teflon tape to avoid any possibility of leaks. It made it too difficult to turn by hand, so I took it off and reassembled without it. I doesn't leak at all, so the teflon tape wasn't needed. You want the carriage bolt to turn easily so you can get the correct tension on it.

    This mod works GREAT. It doesn't slip, and it doesn't leak. Total expense was about $6, not counting tools.

    As there may be some legs reading this post, I better add some pics (that was for your amusement, Mike Giroir)


    And here it is installed:
    Last edited by dbeardslee; 09-23-2008, 10:14 AM.
    I think I have a loose screw behind the handlebars.

    '79 XS11 Standard, Jardine 4/1, Dyna DC1-1 Coils, 145 mains, 45 pilots, plastic floats - 25.7mm, XV920 fuel valves, inline fuel filters, speed bleeders, Mikes XS pods, spade-type fuse block, fork brace, progressive fork springs/shocks, manual petcocks, 750 FD, Venture cam chain tensioner, SS brake lines

  • #2
    XSelent

    Great Idea. Is over tightening of the bolt that pushes the cam chain guide an issue? The spring rate from the factory housing is set, which is great, but I never have liked the idea that my whole engine depends on that one little locking nut on the side that everybody seems to be stripping out lately........Nice mod for sure
    MDRNF
    79F.....Not Stock
    80G......Not Stock Either....In the works

    Comment


    • #3
      Chop - I've run it about 400 miles with this mod (flogging it like crazy, due to a new fuel mix ), and no problems. When I adjusted it I just turned it in finger-tight. I think you would have a hard time over-tightening if you just use your finger tips. I was somewhat concerned that the metal against the teflon runner could cause some wear. I'm looking for a little plastic cap to put over the end of the carriage bolt just to satisfy my anal-retentive tendencies I think if you did over tighten it would probably just cause the chain to stretch a little, but I don't know. Besides, I doubt whether thirty-year-old springs still have the same tension they did when new.

      After all the work I did on Betsy, and the corresponding HP gains, she just kept shoving the old tensioner back when I'd put the coal-oil to her. Doesn't happen anymore, so for me, this is the bomb.

      Mike Giroir, the inventor of the original mod, could probably offer better advice on this, as his has been on longer.
      Last edited by dbeardslee; 09-23-2008, 11:04 AM.
      I think I have a loose screw behind the handlebars.

      '79 XS11 Standard, Jardine 4/1, Dyna DC1-1 Coils, 145 mains, 45 pilots, plastic floats - 25.7mm, XV920 fuel valves, inline fuel filters, speed bleeders, Mikes XS pods, spade-type fuse block, fork brace, progressive fork springs/shocks, manual petcocks, 750 FD, Venture cam chain tensioner, SS brake lines

      Comment


      • #4
        tensioner

        Very nice mod Db. Looks rock solid. Peace of mind rules!
        2H7 (79)
        3H3

        "If it ain't broke, modify it"

        ☮

        Comment


        • #5
          Phil - glad you like it.

          I got thinking about my previous post regarding wear on the teflon chain guide. Suddenly the thought hit me that, on the other side of the guide, there's a cam chain rubbing up against it at a million miles an hour! Something tells me I'm not going to have a problem with wear
          I think I have a loose screw behind the handlebars.

          '79 XS11 Standard, Jardine 4/1, Dyna DC1-1 Coils, 145 mains, 45 pilots, plastic floats - 25.7mm, XV920 fuel valves, inline fuel filters, speed bleeders, Mikes XS pods, spade-type fuse block, fork brace, progressive fork springs/shocks, manual petcocks, 750 FD, Venture cam chain tensioner, SS brake lines

          Comment


          • #6
            Very nice job db. I now have another mod. to put in this winter. Looks real solid!
            1979XS1100SF
            K&N's and drilled airbox
            Jardine 4in1
            Dunlop Elite 3's
            JBM slide diaphragms
            142.5 main jets
            45 pilot jets
            T.C.'s fusebox & SOFA
            750/850 FD mod.
            XV 920 Needle Mod.
            Mike's XS plastic floats set at 26mm
            Venture Cam Chain Tensioner

            Comment


            • #7
              Good thinking on this one. The only thing I would add personally to it, is that I would double-nut that carriage bolt. Again, you are back to trusting your whole upper engine to that single nut staying tight.... kinda like before. Just a thought for what it's worth.


              Tod
              Try your hardest to be the kind of person your dog thinks you are.

              You can live to be 100, as long as you give up everything that would make you want to live to be 100!

              Current bikes:
              '06 Suzuki DR650
              *'82 XJ1100 with the 1179 kit. "Mad Maxim"
              '82 XJ1100 Completely stock fixer-upper
              '82 XJ1100 Bagger fixer-upper
              '82 XJ1100 Motor/frame and lots of boxes of parts
              '82 XJ1100 Parts bike
              '81 XS1100 Special
              '81 YZ250
              '80 XS850 Special
              '80 XR100
              *Crashed/Totalled, still own

              Comment


              • #8
                Tod - Not a bad idea....not bad at all. I think I'll do that.

                I was trusting it before to a steel bolt screwed into aluminum or potmetal or whatever that housing's made of - which never was a good idea. A little extra prophylaxis for the valve train seems prudent.

                Of course that means when I get down to the nitty gritty on the now-new cam chain I may have to switch to a 4.5" carriage bolt as I measured the existing one against another tensioner to guage the length of the bolt needed.

                Good call. Thanks.
                I think I have a loose screw behind the handlebars.

                '79 XS11 Standard, Jardine 4/1, Dyna DC1-1 Coils, 145 mains, 45 pilots, plastic floats - 25.7mm, XV920 fuel valves, inline fuel filters, speed bleeders, Mikes XS pods, spade-type fuse block, fork brace, progressive fork springs/shocks, manual petcocks, 750 FD, Venture cam chain tensioner, SS brake lines

                Comment


                • #9
                  You should be able to get by with a couple regular nuts, not the washered type. With all this though... if you have this much adjustement.. at what point is the cam chain stretched too far??

                  Tod
                  Try your hardest to be the kind of person your dog thinks you are.

                  You can live to be 100, as long as you give up everything that would make you want to live to be 100!

                  Current bikes:
                  '06 Suzuki DR650
                  *'82 XJ1100 with the 1179 kit. "Mad Maxim"
                  '82 XJ1100 Completely stock fixer-upper
                  '82 XJ1100 Bagger fixer-upper
                  '82 XJ1100 Motor/frame and lots of boxes of parts
                  '82 XJ1100 Parts bike
                  '81 XS1100 Special
                  '81 YZ250
                  '80 XS850 Special
                  '80 XR100
                  *Crashed/Totalled, still own

                  Comment


                  • #10
                    Tod - Right now I've got a new-in-march cam chain with maybe 6k miles on it, and you can see from the pics how much adjustment is left. If I just add another nut I'll be down to about 1/2" adjustment. Since the existing one has about an inch, an extra 1/2" of bolt should be just about right. For right now I'm just going to put another nut on it as it should be a while before it becomes and issue. Also, even though it's stainless steel, I'm still anticipating eventual rust on the end of the carriage bolt. So by that time I should be due for a new carriage bolt anyway. That's the beauty part of this setup - it's cheap and easy (kinda like me ) to install new parts.

                    As it sits I haven't had leak one out of it, so I don't want to change the existing setup. A nut without the flange on it might not sit across the opening right. But as you suggested, another nut - just a regular nut - is definately in order.
                    I think I have a loose screw behind the handlebars.

                    '79 XS11 Standard, Jardine 4/1, Dyna DC1-1 Coils, 145 mains, 45 pilots, plastic floats - 25.7mm, XV920 fuel valves, inline fuel filters, speed bleeders, Mikes XS pods, spade-type fuse block, fork brace, progressive fork springs/shocks, manual petcocks, 750 FD, Venture cam chain tensioner, SS brake lines

                    Comment


                    • #11
                      That is a great mod I have very little faith in a thirty year old spring still having enough push in it.
                      http://farm2.static.flickr.com/1241/1480921818_241eade448_s.jpg

                      Comment


                      • #12
                        nice mod Db, :-)
                        specially since ive stripped that side bolt
                        on previous occassions.
                        pete


                        new owner of
                        08 gen2 hayabusa


                        former owner
                        1981 xs1100 RH (aus) (5N5)
                        zrx carbs
                        18mm float height
                        145 main jets
                        38 pilots
                        slide needle shimmed .5mm washer
                        fitted with v/stax and uni pod filters

                        [url]http://www.youtube.com/watch?v=3pA8dwxmAVA&feature=mfu_in_order&list=UL[/url]

                        Comment


                        • #13
                          Nice job, Doug.

                          The reason I used a piece of aluminum was simply because I had it and I also had a drill press. I did use two nuts on the end of the bolt to lock it down though. I got two jam nuts from the hardware store as they were a little bit thinner than a standard hex nut.

                          I was unsure how to correctly tension the thing so as not to overtighten so when I first installed it I removed the valve cover and tensioned the stock adjuster per the factory routine. I noticed that I could move the cam chain up and down about 1/4" between the cam sprockets when the bridge was removed. After I installed the solid tensioner I adjusted so there was the same 1/4" play and voila, it turned out to be just finger tight plus about 1/8 turn on the adjusting bolt.

                          I made mine because I saw evidence of the plunger on the stock adjuster being pushed in slightly over a period of time causing slack in the chain. I have been running with my manual adjuster for three years now and every time I check it is still dead on with no evidence of guide wear, no oil drips and the cam chain runs quietly. I can honestly say I have had no cam chain tensioner problems since.

                          Geronimo!
                          Mike Giroir
                          79 XS-1100 Special

                          Once you un-can a can of worms, the only way to re-can them is with a bigger can.

                          Comment


                          • #14
                            Mike - I was hoping you'd check this thread so I could say a proper thank you for your great work. Genius. Airborne all the way. Huah! Thanks for the update on the tensioning method as well.

                            Pete - Had the same problem, which I attribute to dissimilar metals (locking bolt and housing), and a generally poor design. I like it this way MUCH better.
                            Last edited by dbeardslee; 09-24-2008, 09:13 AM.
                            I think I have a loose screw behind the handlebars.

                            '79 XS11 Standard, Jardine 4/1, Dyna DC1-1 Coils, 145 mains, 45 pilots, plastic floats - 25.7mm, XV920 fuel valves, inline fuel filters, speed bleeders, Mikes XS pods, spade-type fuse block, fork brace, progressive fork springs/shocks, manual petcocks, 750 FD, Venture cam chain tensioner, SS brake lines

                            Comment


                            • #15
                              Simple, yet effective. I like it!
                              Skids (Sid Hansen)

                              Down to one 1978 E. Stock air box with K&N filter, 81H pipes and carbs, 8500 feet elevation.

                              Comment

                              Working...
                              X