Announcement

Collapse
No announcement yet.

So ...need a bit of direction-was carbs, not coil pick up

Collapse
X
 
  • Filter
  • Time
  • Show
Clear All
new posts

  • #76
    And hell if I ain't having difficulty removing the #3 float pin ( what I meant by "post". Now I understand when all the warnings about breaking a post isn't referring to the pin...which is what I thought. I also understand what "post" means now too. I'm giving up for tonight on #3 pin. The fuel line is in the way of getting a good angle with a punch. I've seen some guys just turning the line end but I'm leery it ain't the same year carb and the fuel lines might be fixed with no wiggle room to maneuver 'em. The other ones didn't give me the trouble it is. I'f got the head of the pin out enough to possibly pull from that side.
    Click image for larger version

Name:	aacarbneedle.JPG
Views:	62
Size:	127.9 KB
ID:	883592 Click image for larger version

Name:	aacarbneed1.JPG
Views:	64
Size:	161.2 KB
ID:	883593
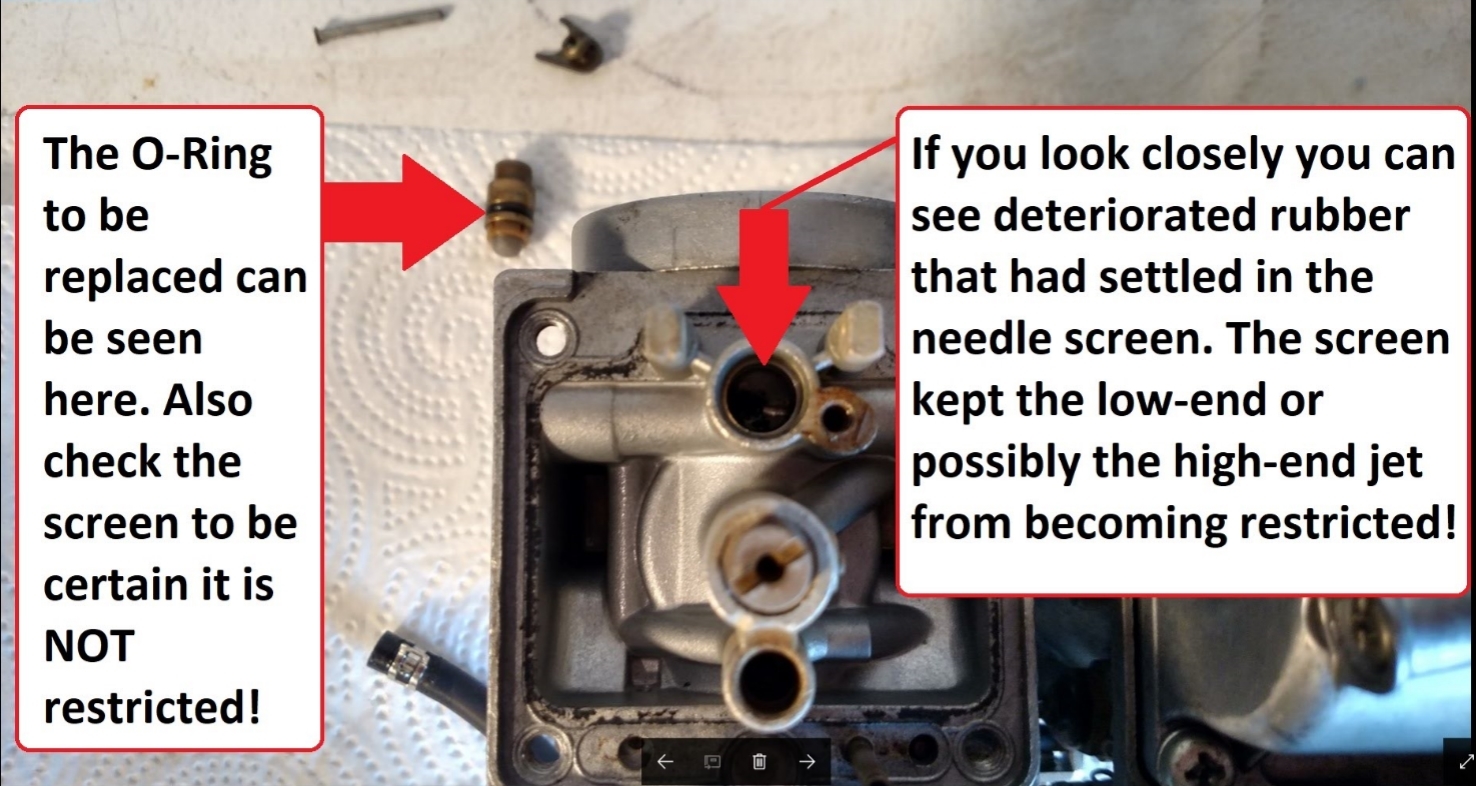
    I presume it's around the head of the needle valve set I was admonished to soak the head out of by BikerPhil. And how do those actually come out by the way? I've got some PB blaster on 'em but how do you remove them, being brass and all? I tapped a little ( for poops and giggles ) and it didn't budge. Which is why the soaking? But then what do you use to pull them out?
    The float bowl gaskets all seem ok as I ran my finger along the edges ( of course not in #3 'cause I ain't got the float out yet. ) and didn't feel any overlapping.
    Anyway, that's where I'm at. I give on #3 tonight. Try again tomorrow.
    Thanks guys.
    Attached Files

    Comment


    • #77
      Hi JonnyO, here are some links to a float pin removal tool and what others have gone through. In your situation it may be as easy as grabbing #3's pin with locking pliers, twisting and gently pulling to remove the pin, BUT whatever way you end up removing it take your time and put the hammer away. I've rebuilt many carbs and the only item that I needed a slight tapping force to remove was the emulsion tubes where the main jet resides.

      https://xs11.club/search?q=float+pin...val+tool%22%7D

      1980 XS1100G "Dolly G" Full Dresser (with a coat of many colors )
      1979 XS1100SF (stock-euro mods planned)
      1984 XV700L Virago (to be hot-modded)
      1983 XJ750MK Midnight Maxim (semi-restored DD)
      1977 XS650D ( patiently awaiting resto)

      Sometimes it takes a whole tank of gas before you can think straight.

      Comment


      • #78
        Got the #3 pin out. For what it's worth it had some burrs or something on the end because it didn't want to slide past the other post and didn't want to slide back through easily either. I thought about ordering a replacement and then thought about how long it's taken to get replacement parts and said the heck with that; a bit of sanding and now it slides nicely. PB around the needle assembly.

        Comment


        • #79
          Is that a head I'm seeing at the end of the pin? Don't ever remember seeing that in any carbs I've torn down. Has somebody stuffed a nail in there?
          1980 XS1100G (one owner-me)
          1983 Kawasaki GPZ750 (Frankenbike)
          1984 Honda VF750S V45
          Owned - 1976 XS750D
          Owned - 1972 Honda CB750
          Owned - (unknown year) XS650
          (+ too many Yammies/Hondas to mention)

          Comment


          • #80
            Originally posted by Schming View Post
            Hi JonnyO, here are some links to a float pin removal tool and what others have gone through. In your situation it may be as easy as grabbing #3's pin with locking pliers, twisting and gently pulling to remove the pin, BUT whatever way you end up removing it take your time and put the hammer away. I've rebuilt many carbs and the only item that I needed a slight tapping force to remove was the emulsion tubes where the main jet resides.

            https://xs11.club/search?q=float+pin...val+tool%22%7D
            I thought about trying a pair of vice grips and was leery of crushing the head or accidentally using the post as a lever.
            The other three tapped out fairly easily. I'm not a ham-fisted, pedal-to-the-metal kinda guy-I'm pretty finicky.
            And it's a very tiny mallet.
            Thanks for the suggestion! I'll read the link.

            Comment


            • #81
              Originally posted by LenB View Post
              Is that a head I'm seeing at the end of the pin? Don't ever remember seeing that in any carbs I've torn down. Has somebody stuffed a nail in there?
              Yes, that's a head. These all had heads at one end and it's the actual part for it-it must have been removed at some point by the previous owner. I can't believe Japan would do THAT.

              Comment


              • #82
                Originally posted by JonnyO View Post

                Yes, that's a head. These all had heads at one end and it's the actual part for it-it must have been removed at some point by the previous owner. I can't believe Japan would do THAT.
                You're correct those are stock float pins. Seems like Yamaha carbs are the only ones that have an interference pin, all Hondas I've rebuilt fall out. Maybe it's just Mikuni's.
                1980 XS1100G "Dolly G" Full Dresser (with a coat of many colors )
                1979 XS1100SF (stock-euro mods planned)
                1984 XV700L Virago (to be hot-modded)
                1983 XJ750MK Midnight Maxim (semi-restored DD)
                1977 XS650D ( patiently awaiting resto)

                Sometimes it takes a whole tank of gas before you can think straight.

                Comment


                • #83
                  So again, how do you guys remove, what/how do you grab the thing to get it out? I saw one youtube short vid where the guy used a tap to get a bite on it and yanked it out but this is not feasible as I'm just replacing the o-ring and wish to reuse the needle assembly.

                  Comment


                  • #84
                    Originally posted by JonnyO View Post
                    So again, how do you guys remove, what/how do you grab the thing to get it out? I saw one youtube short vid where the guy used a tap to get a bite on it and yanked it out but this is not feasible as I'm just replacing the o-ring and wish to reuse the needle assembly.
                    Like plastic coated spark plug pliars and

                    Comment


                    • #85
                      Click image for larger version

Name:	aaneedleo-ring.jpeg
Views:	34
Size:	131.2 KB
ID:	883612

                      Comment


                      • #86
                        And hoping the little teeth marks on the outer side will do nothing...?

                        Comment


                        • #87
                          Jonnyo, now you are in the process. Really the only way to learn. If you want to keep the bike you have to get past the learning curves involved in maintaining it. Took my time and really studied your pictures. First things first. Your main jets are aftermarket. I would replace them all or go back to the originals if you still have them. Jets R Us is a good source for those. As for the float pins if you can sand them smooth and they are not in the least bit warped you can reuse them. I always replace them. The new pins available today don't press in; they just slide in and out. No fear of breaking the posts in the future. You are going to have to get the pilot jets out and you have to be careful there as well. They can sometimes be difficult and they too are brass and are easy to destroy. If you mess up the slot on them you then have to drill them and use an extractor to get them out. If you break the extractor you are pretty much screwed on that carb body. Best bet is to soak those carbs in a gallon can of Berryman's then things would come out much easier. I know you don't want to break the entire bank of carbs apart, which is what most of us do but you could just soak two carbs at a time. It would make all the components loosen up making them much easier to remove to inspect. Just looking at how hard you had to work at the float valve seat is evidence of the fact that you have a lot of buildup and crud in those carbs. As was mentioned earlier you need to get the emulsion tubes out too. The main jet is covering that up but it is probably in need of a good cleaning too. The easiest way to get those out is to remove the main jet and washer, screw one of you float bowl screws down in the tube and with a very light hammer tap on them. I guess the main thing concerning the disassembly process is to leave your gorilla mode aside and take your time. When frustration levels rise step away and soak some more. Berryman Chem-Dip Carburetor and Parts Cleaner 96oz .
                          Last edited by cajun31; 03-05-2025, 01:22 AM.
                          2 - 80 LGs bought one new
                          81 LH
                          02 FXSTB Nighttrain
                          22 FLTRK Road Glide Limited
                          Jim

                          Comment


                          • #88
                            Click image for larger version

Name:	load-loading.gif
Views:	51
Size:	30.2 KB
ID:	883617

                            Comment


                            • #89
                              As cajun31 stated, be careful with the pilot jets and to add to that I have a screw driver that I purposely ground for a tight fit for the pilots. In fact I fashioned a number of tools just for carbs and don't use them for anything but carbs. You're gettin' there.
                              1980 XS1100G "Dolly G" Full Dresser (with a coat of many colors )
                              1979 XS1100SF (stock-euro mods planned)
                              1984 XV700L Virago (to be hot-modded)
                              1983 XJ750MK Midnight Maxim (semi-restored DD)
                              1977 XS650D ( patiently awaiting resto)

                              Sometimes it takes a whole tank of gas before you can think straight.

                              Comment


                              • #90
                                Originally posted by cajun31 View Post
                                Jonnyo, now you are in the process. Really the only way to learn. If you want to keep the bike you have to get past the learning curves involved in maintaining it. Took my time and really studied your pictures. First things first. Your main jets are aftermarket. I would replace them all or go back to the originals if you still have them. Jets R Us is a good source for those. As for the float pins if you can sand them smooth and they are not in the least bit warped you can reuse them. I always replace them. The new pins available today don't press in; they just slide in and out. No fear of breaking the posts in the future. You are going to have to get the pilot jets out and you have to be careful there as well. They can sometimes be difficult and they too are brass and are easy to destroy. If you mess up the slot on them you then have to drill them and use an extractor to get them out. If you break the extractor you are pretty much screwed on that carb body. Best bet is to soak those carbs in a gallon can of Berryman's then things would come out much easier. I know you don't want to break the entire bank of carbs apart, which is what most of us do but you could just soak two carbs at a time. It would make all the components loosen up making them much easier to remove to inspect. Just looking at how hard you had to work at the float valve seat is evidence of the fact that you have a lot of buildup and crud in those carbs. As was mentioned earlier you need to get the emulsion tubes out too. The easiest way to get those out is to remove the main jet and washer, screw one of you float bowl screws down in the tube and with a very light hammer tap on them. I guess the main thing concerning the disassembly process is to leave your gorilla mode aside and take your time. When frustration levels rise step away and soak some more. Berryman Chem-Dip Carburetor and Parts Cleaner 96oz .
                                Yeah...hands on is the only way but I usually try to learn, first hand, from someone experienced with whatever the heck it is I want to do. That's just me. Reading about doing it is a frickin' waste of my time. I've got to do it to "get it".
                                The main jets... I BOUGHT FROM A YAMAHA DEALER! That's disappointing to find out. But I believe you know what the hell you're talking about. smh.

                                Cajun, as it stands I did EXAMINE the pilot jets and they looked ok-to me-could see though 'em; put 'em back in. I polished the seats with some Mother's mag cream as suggested and my little dremel buffers. I also ( pic below ) found some crusty residue ( don't know what else to call it ) in the hole where the assembly sits. Weird. Scraped it off with an exacto...CAREFULLY. Reinstalled assemblies with new o-rings and gaskets.
                                I was told to adjust the float height and sync the carbs after replacing the o-rings. The thing ran great before it started to act up. I guess my first clue ( don't know if any of you have experienced this ) should have been firing it up and being able to drive it right away. I mean stone cold it wouldn't hesitate or buck like my experience has been if you don't warm a bike up a bit before trying to ride it. I WAS GOING TO SAY SOMETHING but what? "Hey, why does my bike run perfect when it's stone cold"? Didn't think that was a good question for the board of inquiry.
                                I'm being told to do THE JOB RIGHT by cleaning and inspecting a bunch of areas and parts I HAVE NO IDEA on how to do. So I ain't going to...AT THIS POINT. For me, half the battle was remembering how everything came apart and goes back together. I'm not good with that. I'm shocked I got it back together. lmao
                                But I did. Click image for larger version  Name:	aacarbcrud.jpeg Views:	0 Size:	178.9 KB ID:	883630
                                Last edited by cajun31; 03-05-2025, 01:24 AM.

                                Comment

                                Working...
                                X