If this is your first visit, be sure to
check out the FAQ by clicking the
link above. You may have to register
before you can post: click the register link above to proceed. To start viewing messages,
select the forum that you want to visit from the selection below.
That would be cool to be the first at trying something, unless it fails miserably, then it would suck. But I think the headlight will be a good mod even if it is expensive. This is my first restoration and I am putting a lot of thought into what I want to do and why. In the end I want everyone to know that it's a xs1100 with some modern tech to make it function better. However, in the end it's still the xs1100 we all love.
1979 xs1100f
New Fuse Box
Progressive Shocks
Gold Valve Emulator
Dyna Coils
Electronic Flasher
Led Headlight
Led Turn Signals
4 Led Driving Lights
2nd Gear Fix
Auto Cam Tensioner
Digital Dash
Stainless Braided Lines
R6 4 Piston Calipers
Stainless Bolt Kit
Maier Fairing
Dyna Balancing Beads
Spin On Oil Filter
Stebel Nautilus Horn
Plasti Dip Rims
ISO Grips
That LED is very tempting over an HID. I would be VERY interested in seeing the results of this mod. Very pricey indeed, but the bulb is basically indestructable. I wonder if the back of that is any longer than the stock headlight. Specs show 3.38" from the bezel on back.
1979 XS1100F
2H9 Mod, Truck-Lite LED Headlight, TECHNA-FIT S/S Brake Lines, Rear Air Shocks, TKAT Fork Brace, Dyna DC-I Coils, TC Fuse Block, Barnett HD Clutch Springs, Superbike Handlebars, V-Star 650 ACCT, NGK Irridium Plugs, OEM Exhaust. CNC-Cut 2nd Gear Dogs; Ported/Milled Head; Modded Airbox: 8x8 Wix Panel Filter; #137.5 Main Jet, Viper Yellow Paint, Michelin Pilot Activ F/R, Interstate AGM Battery, 14MM MC, Maier Fairing, Cree LED Fog Lights.
I'm not sure if I figured it out but I have a good idea of what to do. I am going to try and connect it to the negative side of one of the coils and then place a resistor in line. I spoke to a guy that did that to his bike and it worked well. He had a Kawasaki i think.
1979 xs1100f
New Fuse Box
Progressive Shocks
Gold Valve Emulator
Dyna Coils
Electronic Flasher
Led Headlight
Led Turn Signals
4 Led Driving Lights
2nd Gear Fix
Auto Cam Tensioner
Digital Dash
Stainless Braided Lines
R6 4 Piston Calipers
Stainless Bolt Kit
Maier Fairing
Dyna Balancing Beads
Spin On Oil Filter
Stebel Nautilus Horn
Plasti Dip Rims
ISO Grips
That LED is very tempting over an HID. I would be VERY interested in seeing the results of this mod. Very pricey indeed, but the bulb is basically indestructable. I wonder if the back of that is any longer than the stock headlight. Specs show 3.38" from the bezel on back.
The LED fits nicely. in the headlight bucket. I will receive the necessary parts this week to mount it. I will post the process and the results. I have a lot invested so i hope it works. I am a LED fan so I thought I would try it. The technology is developing quickly, which is nice. I positive side to the LED is the energy usage is so low, which saves our outdated electrical system. The cost of a new stator and such is more than the light so I hope it pays for itself in the long run
1979 xs1100f
New Fuse Box
Progressive Shocks
Gold Valve Emulator
Dyna Coils
Electronic Flasher
Led Headlight
Led Turn Signals
4 Led Driving Lights
2nd Gear Fix
Auto Cam Tensioner
Digital Dash
Stainless Braided Lines
R6 4 Piston Calipers
Stainless Bolt Kit
Maier Fairing
Dyna Balancing Beads
Spin On Oil Filter
Stebel Nautilus Horn
Plasti Dip Rims
ISO Grips
It's a little embarassing blowing-up your thread like this, but your bike build is very inspirational to me next to James's Black Beauty bike pics as reference to paint my engine. Knowing the fact that you're painting at a buddy's shop, I assume you're using custom paint along with an HVLP gun. I, however am part of Son's cheapazz club, and will shamefully be using shaker cans. But, like the consensus says, it's all in the prep. I'm no means a pro painter, and always looking for tips.
I believe I have some high quality paint on my bikes now, but in the event I change it, do you recommend taking it back down to bare metal? Or to what point?
Method of paint removal?
Best primer to use?
I'll be using the 2K urethane clear coat this time around. I will maybe buy the Yamaha decals. Do you recommend applying those after the color, and prior to the clear?
Thanks Rev.
1979 XS1100F
2H9 Mod, Truck-Lite LED Headlight, TECHNA-FIT S/S Brake Lines, Rear Air Shocks, TKAT Fork Brace, Dyna DC-I Coils, TC Fuse Block, Barnett HD Clutch Springs, Superbike Handlebars, V-Star 650 ACCT, NGK Irridium Plugs, OEM Exhaust. CNC-Cut 2nd Gear Dogs; Ported/Milled Head; Modded Airbox: 8x8 Wix Panel Filter; #137.5 Main Jet, Viper Yellow Paint, Michelin Pilot Activ F/R, Interstate AGM Battery, 14MM MC, Maier Fairing, Cree LED Fog Lights.
It's a little embarassing blowing-up your thread like this, but your bike build is very inspirational to me next to James's Black Beauty bike pics as reference to paint my engine. Knowing the fact that you're painting at a buddy's shop, I assume you're using custom paint along with an HVLP gun. I, however am part of Son's cheapazz club, and will shamefully be using shaker cans. But, like the consensus says, it's all in the prep. I'm no means a pro painter, and always looking for tips.
I believe I have some high quality paint on my bikes now, but in the event I change it, do you recommend taking it back down to bare metal? Or to what point?
Method of paint removal?
Best primer to use?
I'll be using the 2K urethane clear coat this time around. I will maybe buy the Yamaha decals. Do you recommend applying those after the color, and prior to the clear?
Thanks Rev.
Wow! Those are all great questions. I will try to answer them the best I can. In my humble opinion and believe me it's humble because I am no expert you can do a great paint job if you prep correctly. Here is what I learned.
Go down to bare metal if you can. Use what ever you can to strip the paint. Some use chemicals, wire wheels. I used a sandblaster but really you can use what you have. I bought a cheap harbor freight blaster and it worked fine, although messy.
Make sure, however, if you go down to bare metal you either prime it ASAP or use some sort of anti rust spray. The parts will flash rust fast. Some even use WD40 to prevent rusting. I used a spray I bought at menards then placed the parts in a box with packing peanuts and it worked great.
Shaker cans will work if you can get to bare metal. Also, make sure you use a good degreaser just before you paint. Also, use gloves. Your grease on your hands will mess up the paint, especially the clear coat. I know people who have clear coated using pro paint and two months later their finger prints show up under the clear all because they didn't wear gloves.
I used 80 grit sand paper on the bare metal before paint. If you had a lot of rust then you might want to spray some self etching primer because if helps stop the rust from continuing to eat the metal. If you need to use body filler then please spend the money and buy the best you can find. Don't buy Bondo. Look up a body supply shop and ask questions. I use RAGE body filler but there are many types. Watch some UTube videos on using body filler. It's not hard but it is time consuming.
Patience is the key for any paint job. Use thin layers of body filler not thick ones. Our tanks are very round so use a some what pliable block. The next part is up to you and everyone has an opinion so take it for what it's worth.
Sand at first with 80 grit on a block. Don't sand with just your hand, although this is more comfortable. It's a big mistake. Use a block and take long even strokes. Mix up the pattern. Long strokes are better than short ones. Purchase some guide coat, which is just a primer. When it feels smooth spray a light coat of guide coat. Sand some more. The guide coat will sand off in the high spots and remain in the low spots.
If you have low spot, which you will, add more filler. Then sand again. Use guide coat again. Sand again. Make sure you feather your edges. Close your eyes and rub your hand over the part. If you feel an edge sand again. It's a long process but it is worth it.
When you are satisfied with you work switch to 180 grit. Block sand again. This will get all the 80 grit lines to disappear. Use the same process as before, sand, guide coat, sand. Here is where some will argue. You can move up to 220 grit or apply primer. It's your choice. If you use some filler primer and has some lift or build then stop here and prime. If your primer is thin then go to 220 grit paper and start the process all over.
Now, for primers this is what I do. If you had rust then use a self etching primer first. Spray a thin coat and let it sit and dry. Then I would use what is called a high build epoxy primer. High build means it fills the voids left behind and can me sanded. Spray a coat of primer. Then sand with 80 grit. Don't worry about sanding down to bare metal, it happens to the best of us. Apply another layer of primer and sand again. When all is smooth move up to 180 grit and sand again. Then, when all the highs and lows are smoothed out let is sit for 24 hours in a warm place.
Now, you can use a cheap HVLP gun and an air compressor to do the rest if you take some necessary steps. I have seen people set up a tent or a tarp enclosure as a paint booth. It works as long as there is no dust. At the same body shop you purchased your filler at you can get paint that is pre mixed. Or you can go online and purchase paint that is pre mixed.
If you choose to use a rattle can that is fine as well, it will work great. Here is what you do. Apply the base coat (color) in even light coats. This is important. Use light coats. Once the base coat is applied evenly, usually done in three light coats then let it sit for 24 hours in a warm place. Then apply your clear. Read the instructions and wait for the clear to dry. Then grab some 800 wet/dry sand paper dip it into a bucket of clean water. Gently sand the surface of the painted part. Make sure to not sand through the layer of clear. Be gentle around the body lines. It's easy to sand through those lines. Rinse the part and let it dry. Look carefully at the part. It should look very dull. If you see a shiny part that means you need to sand a little more. Sand, rinse and dry until the part is dull looking. Then degrease. This is important, make sure you wear gloves and degrease. The spay your clear again. Sand, rinse and dry again until part is dull. This process not only evens out the clear but it also hardens it.
When all looks great then move up your sand paper to 2500 or 3000 and gently sand again. Always using lots of water when you sand. Then wax it with some good carnauba wax like Mothers. Buff away and stand back and admire your hard work. Have a beer or something and lift a toast to a awesome paint job.
I hope that helps. Also, the engine paint i used is actually a ceramic coat product called CeraKote. It withstands high heat and doesn't flake. Actually, it is super strong and resilient. The cool thing about it is it's air cured. You apply it just like paint. Prep your engine or exhaust using the steps I told you and spray it on in very thin layers. A little goes a long way. Thin layers is better than thick. Let it sit 24 hours to harden. It reaches it's full cure in 5 days. It is by far the easiest high temp coating around. They even sell an HVLP gun for 50 bucks that you can use to apply it. You can use a pancake air compressor to spray it and it goes so fast you don't really need a booth.. Just some cheap plastic as a back drop.
In all that I said remember these things. Be patient and take the time to prep well. Hope this helps.
1979 xs1100f
New Fuse Box
Progressive Shocks
Gold Valve Emulator
Dyna Coils
Electronic Flasher
Led Headlight
Led Turn Signals
4 Led Driving Lights
2nd Gear Fix
Auto Cam Tensioner
Digital Dash
Stainless Braided Lines
R6 4 Piston Calipers
Stainless Bolt Kit
Maier Fairing
Dyna Balancing Beads
Spin On Oil Filter
Stebel Nautilus Horn
Plasti Dip Rims
ISO Grips
Two more things. If your paint is water base then use a water base degreaser. If it's oil base then use a oil base degreaser. Ask your body supply shop people what degreaser to use with the paint you are applying.
Also, apply the decals just after you sand your first coat of clear coat. So sand your first coat of clear, measure out where you decal goes, then degrease, then spray your part with a mixture of baby soap and water. Peal the first layer off the decal. Apply the decal and use a body filler scraper to push out all the bubbles. Then rub it for a while with a paper towel. Let it sit for a long while and then gently, very gently begin to peal the final layer. If the decal lifts then let it sit some more to dry. Then peal the final layer back making sure to go very slow. Once the layer is off let the part sit some more for the decal to bond. Once it has bonded, degrease again, apply some clear, gently sand and clear sand and clear.
1979 xs1100f
New Fuse Box
Progressive Shocks
Gold Valve Emulator
Dyna Coils
Electronic Flasher
Led Headlight
Led Turn Signals
4 Led Driving Lights
2nd Gear Fix
Auto Cam Tensioner
Digital Dash
Stainless Braided Lines
R6 4 Piston Calipers
Stainless Bolt Kit
Maier Fairing
Dyna Balancing Beads
Spin On Oil Filter
Stebel Nautilus Horn
Plasti Dip Rims
ISO Grips
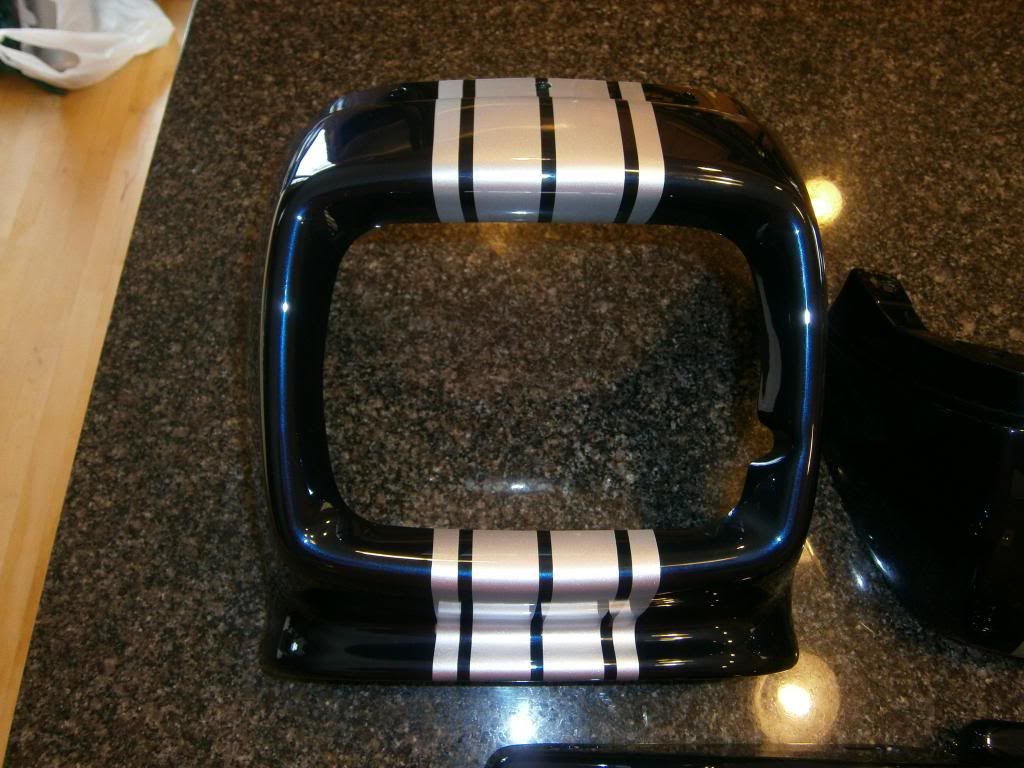
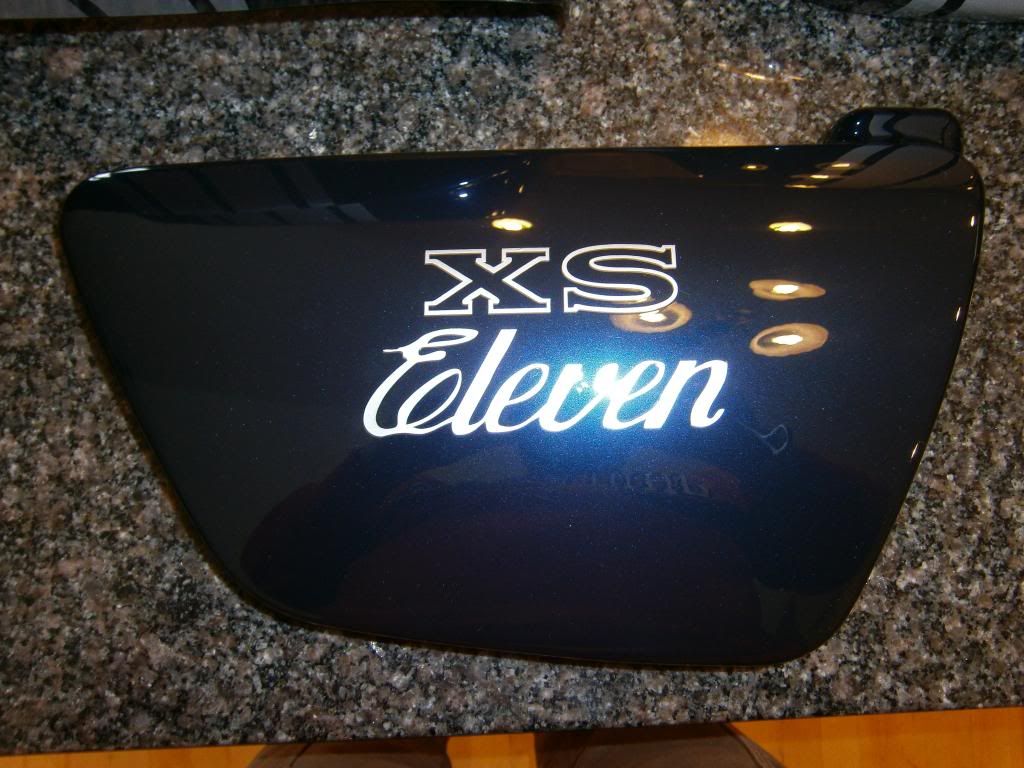
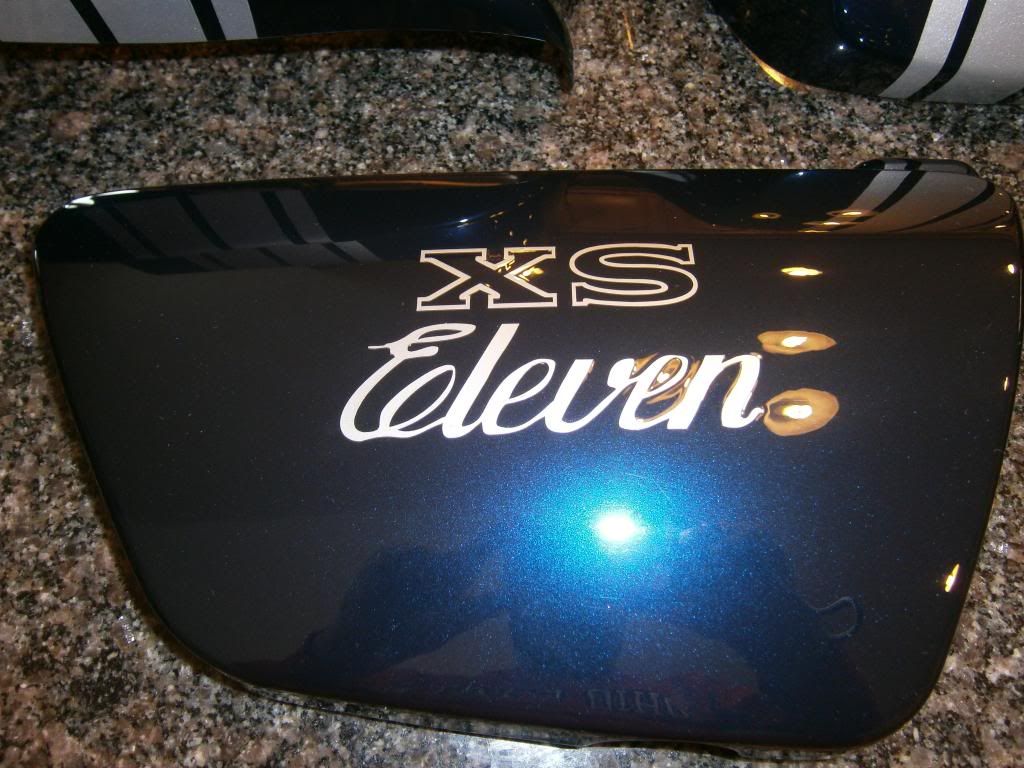
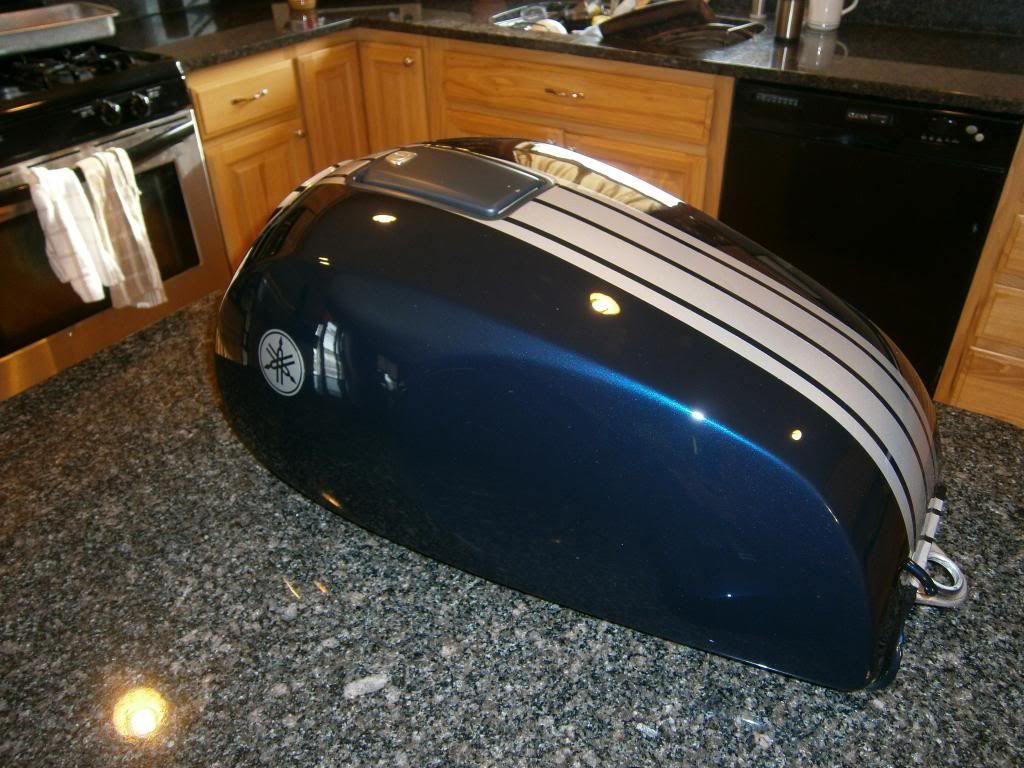
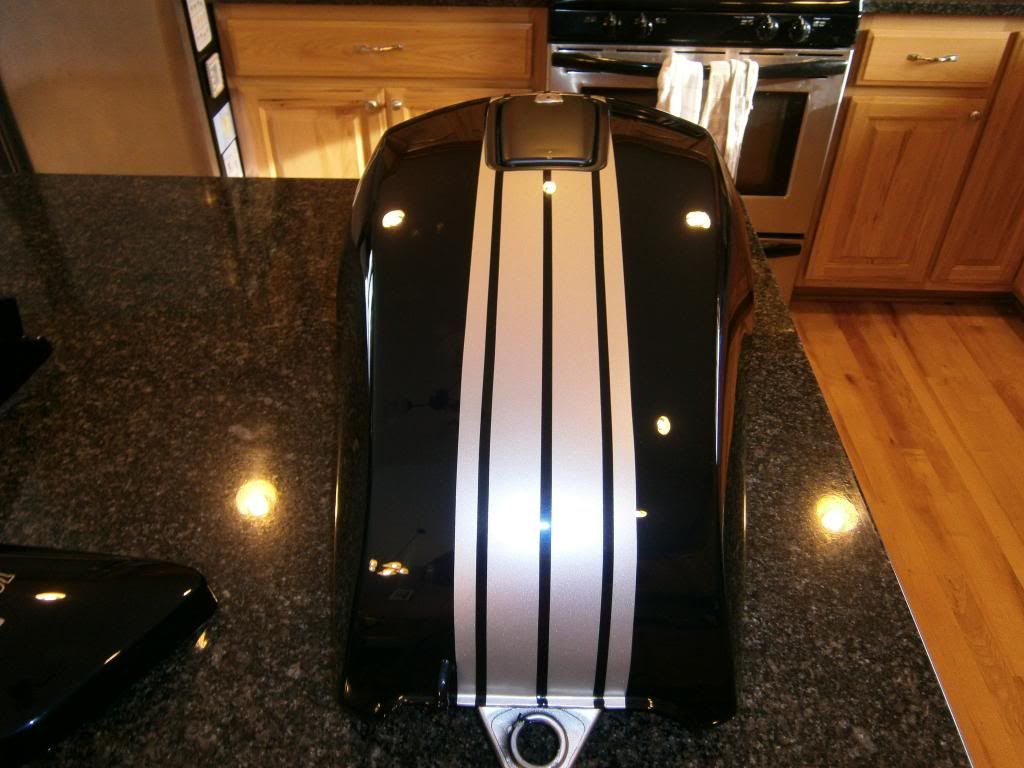
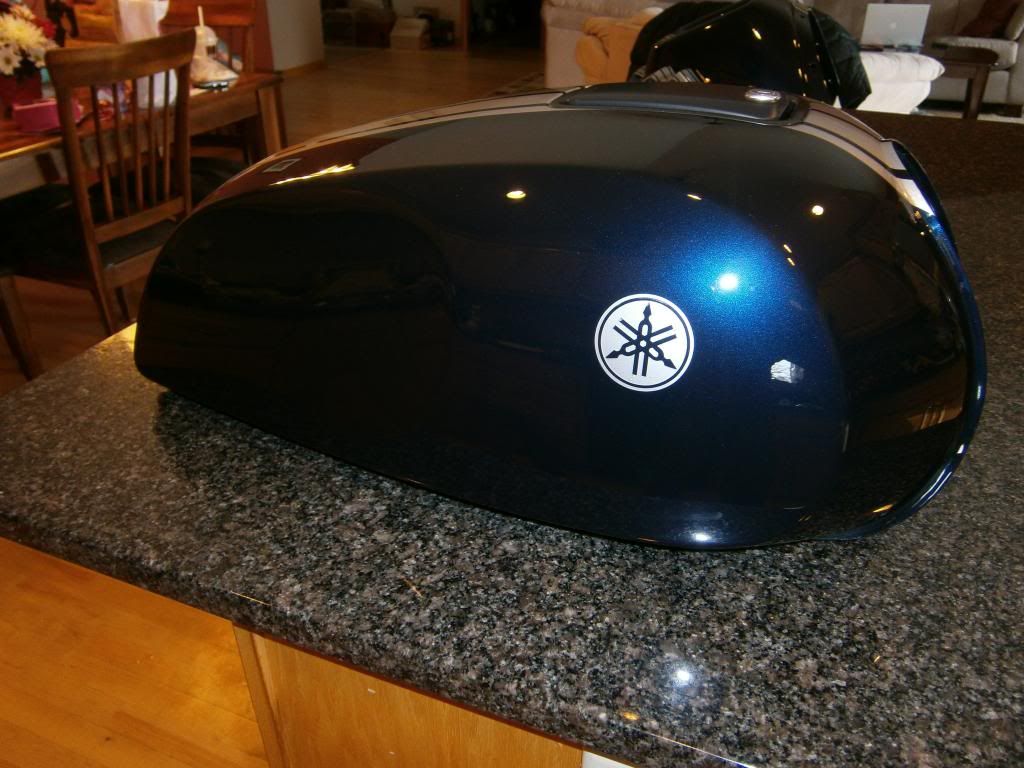
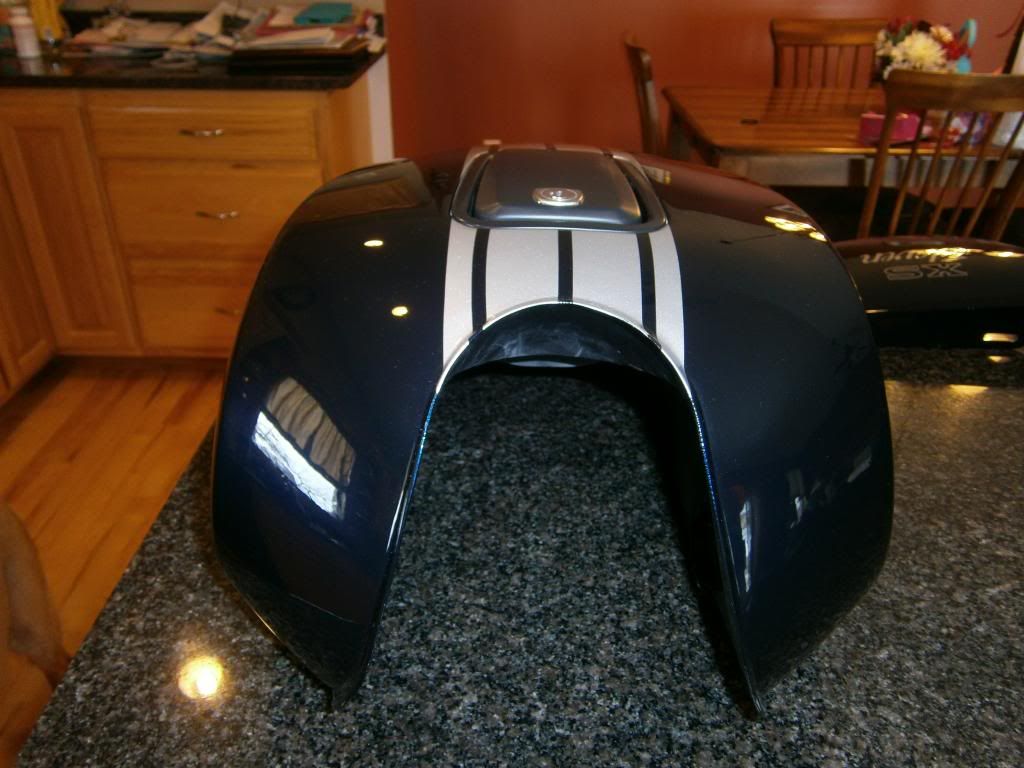
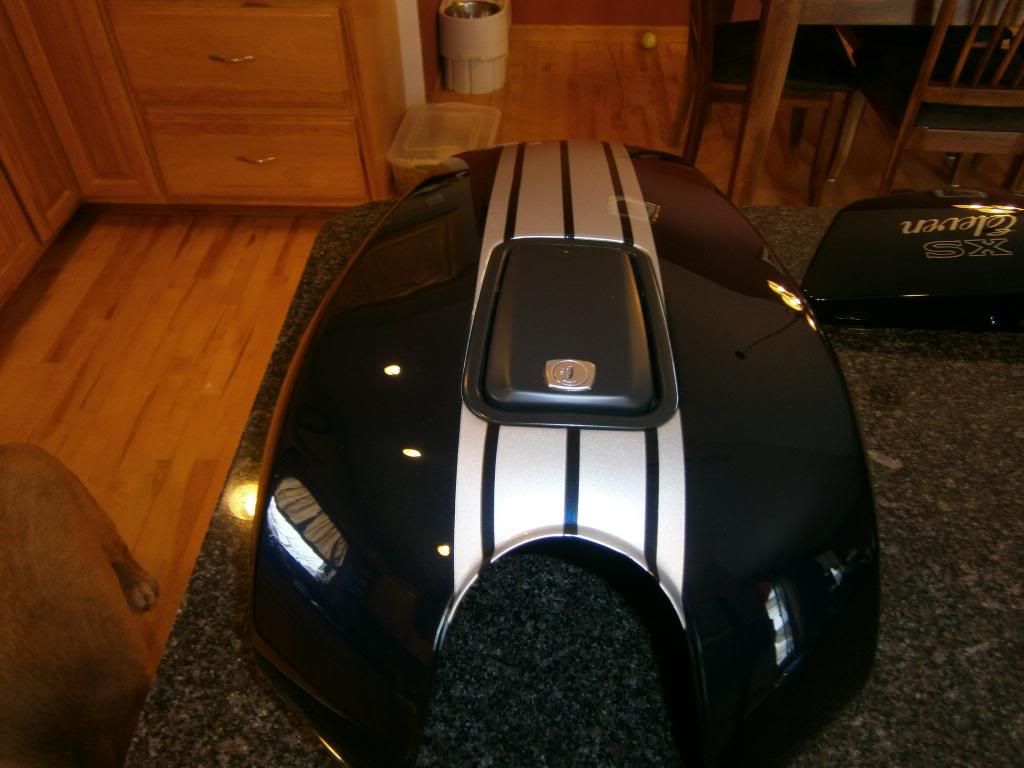
The only thing I wasn't pleased about was the logos. They look sharp but there is a couple bubbles that came up. It won't affect the logo since I used 5 coats of clear, but it isn't perfect. Also, I painted the gas cap. However, the clearance is so tight that when you open the cap it actually rubs against it's own bezel and scratches the paint. I am going to take it back out and bend the bezel a bit to provide some clearance then repaint. It's not a perfect show quality job on the decals but the best I could do. My buddy that owns the auto body shop says even the best logos such as "Harley" decals bubbles up a bit. Oh well, nothing on this bike is actually perfect so I am very pleased. It's hard to take a bike that's 35 years old and make it perfect. Hope you enjoy what you see. Now if things would just warm up I can put everything back together.
1979 xs1100f
New Fuse Box
Progressive Shocks
Gold Valve Emulator
Dyna Coils
Electronic Flasher
Led Headlight
Led Turn Signals
4 Led Driving Lights
2nd Gear Fix
Auto Cam Tensioner
Digital Dash
Stainless Braided Lines
R6 4 Piston Calipers
Stainless Bolt Kit
Maier Fairing
Dyna Balancing Beads
Spin On Oil Filter
Stebel Nautilus Horn
Plasti Dip Rims
ISO Grips
The only thing I wasn't pleased about was the logos. They look sharp but there is a couple bubbles that came up. It won't affect the logo since I used 5 coats of clear, but it isn't perfect. Also, I painted the gas cap. However, the clearance is so tight that when you open the cap it actually rubs against it's own bezel and scratches the paint. I am going to take it back out and bend the bezel a bit to provide some clearance then repaint. It's not a perfect show quality job on the decals but the best I could do. My buddy that owns the auto body shop says even the best logos such as "Harley" decals bubbles up a bit. Oh well, nothing on this bike is actually perfect so I am very pleased. It's
hard to take a bike that's 35 years old and make it perfect. Hope you enjoy what you see. Now if things would just warm up I can put everything back together.
Hi Rev,
It may not be "Perfect", as you say, but it's a pretty spectacular paint job none the less. Not to mention, you did all the work yourself. If you had of sent it out to get done, I highly doubt it would have came back looking as good as what you have accomplished. Nice colours and paint scheme.
Wayne
80 XS1100 SG "Phoenix"
"We are the type of band that if we moved in next door to you...Your lawn would die"
Lemmy from Motorhead
 Tweet
Tweet


Comment