Announcement

Collapse
No announcement yet.

Carbs Flooding the airbox & more!

Collapse
X
 
  • Filter
  • Time
  • Show
Clear All
new posts

  • Carbs Flooding the airbox & more!

    I decided to start my own thread on this particular issue for numerous reasons.
    ( 1 ) I studied the following link & cannot figure out how one can view the pictures that are shown.
    LINK: http://www.xs11.com/forum/showthread...811#post363811
    ( 2 ) The original thread was a extension of another members post although it was the exact same issue.
    LINK: http://www.xs11.com/forum/showthread.php?t=46761
    ( 3 ) I've decided to post pictures of my own, this may help clarify as well as describe with certainty of my particular situation.
    So before I go further, is the reason I am unable to view the pictures due to broken links or is this the issue?
    http://www.xs11.com/forum/showthread.php?t=35341


    There is ALOT OF REALLY beneficial information within this site but some of it's a bit broken, not that it's a bad thing but I'm kinda lost on a few things but I'll get through it.

    About My Bike
    1982 Yamaha XJ1100 Maxim
    I purchased this bike for $1100 cash & got a cheap helmet & a pair of riding gloves & a nice heavy riding leather jacket to boot! My intention from the start was to completely restore it from the ground up except for the motor which only has 12,542 original miles on it! The guy I bought it from laid it over while sitting still 3 times, that was his claim & you can see it from the pics that wasn't exactly true but for the money I didn't think it was too bad!
    Pic: https://i.gyazo.com/65b91884dc3488db...6e41904cac.jpg

    Here is what it looked like when I purchased it!
    Pic: https://i.gyazo.com/0e6d7b083a94d1c9...a1776a5118.jpg
    Pic: https://i.gyazo.com/39b80d5b96cf42c7...0b8dcdf316.jpg

    Here's what it looks like as of now!
    Pic: https://i.gyazo.com/f0a3e2ff0f16f9ab...ced84d1e45.jpg
    Pic: https://i.gyazo.com/75176cdebbd3acb2...1773a342e1.png
    Pic: https://i.gyazo.com/d35e62bd5ff5bb16...fb85a438f5.jpg
    Pic: https://i.gyazo.com/d5b1557bae4268aa...a9e3523d88.png
    Pic: https://i.gyazo.com/6da111ee271c237a...66df81b35b.jpg
    Pic: https://i.gyazo.com/b0cc11fecd3c91b5...77e28eef8c.jpg
    Pic: https://i.gyazo.com/ca7714c81ccb4db6...c1be77eace.png


    I've replaced or reconditioned the following items on this bike, numerous new parts:
    ( 1 ) Complete Headlight assembly ( salvage )
    ( 2 ) Replaced the instrument cluster exterior shell ( salvage )
    ( 3 ) Handlebar grips ( new )
    ( 4 ) Mirrors ( salvaged )
    ( 5 ) Right front turn signal ( complete )( salvaged )
    ( 6 ) Both Clutch & Brake Levers ( new )
    ( 7 ) Front Fender ( salvaged )
    ( 8 ) Replaced front Brake pads ( new )
    ( 9 ) Replaced front wheel bearings & seals ( new )
    ( 10 ) Front Fork Oil ( new )
    ( 11 ) Clutch cable ( new )
    ( 12 ) Left side timing cover ( salvaged )
    ( 13 ) Right side alternator cover ( salvaged )
    ( 14 ) Timing Chain Tensioner ( new )
    ( 15 ) Fuel Lines ( new )
    ( 16 ) Petcock Kits ( new )
    ( 17 ) YICS fuel vacuum kit ( new )
    ( 18 ) Front & Rear Tires ( new Kendra's )
    ( 19 ) Alternator Brushes ( new )
    ( 20 ) Battery ( new )
    ( 21 ) Battery Box Top ( salvaged )
    ( 22 ) Signal Flasher ( new )
    ( 23 ) Pivot Shaft Cover boot w/spring clamps ( new )
    ( 24 ) Rear Brakes ( new )
    ( 25 ) Tool Kit ( salvaged )
    ( 26 ) Owners Manual ( salvaged )
    ( 27 ) Service Manual ( salvaged )
    ( 28 ) Exhaust COMPLETE ( salvaged stock )
    ( 29 ) Exhaust gaskets ( new )
    ( 30 ) Spark Plug Wire Ends ( new )
    ( 31 ) Spark Plugs ( new )
    ( 32 ) Engine Oil & filter ( new )
    ( 33 ) Final Drive Oil ( new )
    ( 34 ) Transmission Oil ( new )
    ( 35 ) Foreward Footpegs ( salvaged )
    ( 36 ) Luggage Rack ( Not Pictured ) ( salvaged )
    ( 37 ) Air Cleaner ( new )
    ( 38 ) Rear Turn Signals ( salvaged )
    ( 39 ) Lockhart Oil Cooler ( salvaged )
    ( 40 ) All new paint including the frame! ( Aztec Pearl Orange w/metallic flake )
    ( 42 ) Carb Kits or whatever it takes to fix them! ( new )
    ( 43 ) Rear Axel Wheel Bearings ( new )
    ( 44 ) Rear Axel Seals ( new )
    ( 45 ) Brake Fluid ( flushed / new )
    ( 46 ) Parts Catalog ( new )


    As you can see I have hours & money invested into this bike thus far & yes it runs PERFECTLY other than the carbs flooding the air box. I also intend to clean the fuel tank while I have it removed, it's not that bad but I want it better than it's current state. I'll post more as I go thru the process of fixing the carbs but that's it for now.


    If I need to use a different format just let me know & if size matters I will adjust that as well.
    Two kinds of people whom own motorcycles, those that have went down & those that will go down! So far I've been fortunate! RIDE SAFE

  • #2
    That is one colorful thread!

    With all that work you shared that you did and that it runs perfectly, other than dumping fuel out the airbox which was the genesis of starting this thread, Get 4 o-rings for the needle seats and be done with it!

    I'll bet you a dollar, a doughnut and a cup of coffee that is where the leak is coming from.
    Howard

    ZRX1200

    BTW, ZRX carbs have the same spacing as the XS11... http://www.xs11.com/forum/showthread.php?t=35462

    Comment


    • #3
      Nice work!

      Welcome to the forum, Gunny, you have been a busy beaver and I like your use of color!

      As Bonz mentioned, you should check the float needle seat o-rings, they shrink and harden with heat and age. You mentioned carb kits but didn't say if you had already bought and installed them or not so... put some clear plastic lines on the carburetor float bowl drains, then start the engine and check the dynamic fuel levels in the float bowls when the engine is running. The fuel levels should be all be below the carburetor body, 3m +/- 1mm (0.12 inch +/- 0.04 inch). The fuel levels should all drop when you blip the throttle, then immediately refill and recover.

      After you shut off the engine, don't move the bike or the hoses, leave them connected. It may take a while (overnight?) but you'll be able to spot any carburetors that overfill and flood the air box.


      It's going to involve more money and time but you should get some new brake hoses and clean or rebuild the brake calipers and master cylinders. Teflon hoses with stainless steel braiding are the best but new rubber hoses will work just fine. The important thing is that they're all old and the Murphy can pop them at any time. Mine did it as I pulled into the garage and I kept rolling, hit the shelves on the side wall, scared the cats and so on but I was lucky I'd already slowed down to pull in the garage, it could have been a whole different story with no funny ending.

      The pictures in the threads you listed are stored on Photobucket and they recently stopped serving them to remote websites like the forum here on XS11.com unless you have a paid account. The images are still there for the threads, right-click them and they should open in another page, tab, window, or whatever your browser will use. It's not as convenient as seeing them all on one page in the message(s) but it does work.
      -- Scott
      _____

      2004 ST1300A: No name... yet
      1982 XJ1100J: "Baby" SS Brakes, '850 FD, ACCT
      1980 XS1100G: "Columbo" SS Brakes, '850 FD, ACCT
      1979 XS1100SF: "Bush" W.I.P.
      1979 XS1100F: parts
      2018 Heritage Softail Classic 117 FLHCS SE: "Nanuk" It's DEAD, it's not just resting. It is an EX cycle.

      Comment


      • #4
        Originally posted by Bonz View Post
        That is one colorful thread!

        With all that work you shared that you did and that it runs perfectly, other than dumping fuel out the airbox which was the genesis of starting this thread, Get 4 o-rings for the needle seats and be done with it!

        I'll bet you a dollar, a doughnut and a cup of coffee that is where the leak is coming from.
        Your probably correct in your statement Bonz- Get 4 o-rings for the needle seats & this is exactly what I'm going to do. I've searched for kits but haven't located any as of yet but that's probably because I've been sleeping all day! This is the first weekend I've had off for a month, we've been pumping out the MY17 / 18 bikes at work!
        Last edited by GUNNY1966; 07-28-2017, 06:39 PM. Reason: missed up!
        Two kinds of people whom own motorcycles, those that have went down & those that will go down! So far I've been fortunate! RIDE SAFE

        Comment


        • #5
          Originally posted by 3Phase View Post
          Welcome to the forum, Gunny, you have been a busy beaver and I like your use of color!

          As Bonz mentioned, you should check the float needle seat o-rings, they shrink and harden with heat and age. You mentioned carb kits but didn't say if you had already bought and installed them or not so... put some clear plastic lines on the carburetor float bowl drains, then start the engine and check the dynamic fuel levels in the float bowls when the engine is running. The fuel levels should be all be below the carburetor body, 3m +/- 1mm (0.12 inch +/- 0.04 inch). The fuel levels should all drop when you blip the throttle, then immediately refill and recover.

          After you shut off the engine, don't move the bike or the hoses, leave them connected. It may take a while (overnight?) but you'll be able to spot any carburetors that overfill and flood the air box.


          It's going to involve more money and time but you should get some new brake hoses and clean or rebuild the brake calipers and master cylinders. Teflon hoses with stainless steel braiding are the best but new rubber hoses will work just fine. The important thing is that they're all old and the Murphy can pop them at any time. Mine did it as I pulled into the garage and I kept rolling, hit the shelves on the side wall, scared the cats and so on but I was lucky I'd already slowed down to pull in the garage, it could have been a whole different story with no funny ending.

          The pictures in the threads you listed are stored on Photobucket and they recently stopped serving them to remote websites like the forum here on XS11.com unless you have a paid account. The images are still there for the threads, right-click them and they should open in another page, tab, window, or whatever your browser will use. It's not as convenient as seeing them all on one page in the message(s) but it does work.
          I didn't mention a few parts but I did rebuild all the brake calipers, I just forgot to add that to the list of parts!

          As for the brake lines you mentioned stainless steel braid, where did you get those or did you have them special order or ??? Sounds like a great idea & I'm game!

          You mention a paid account, I assume you mean here on XS ??? I'd be glad to join / donate, I'll look into that!!![/b]
          Two kinds of people whom own motorcycles, those that have went down & those that will go down! So far I've been fortunate! RIDE SAFE

          Comment


          • #6
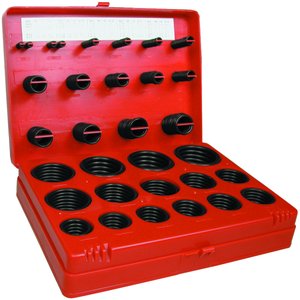
            Harbor freight sells a Viton O-ring assortment kit. I used some from that kit on my ZRX 40mm carburetors with press-in needle seats and they worked great. They aren't exact however they work very well. I would expect similar success with the XS.

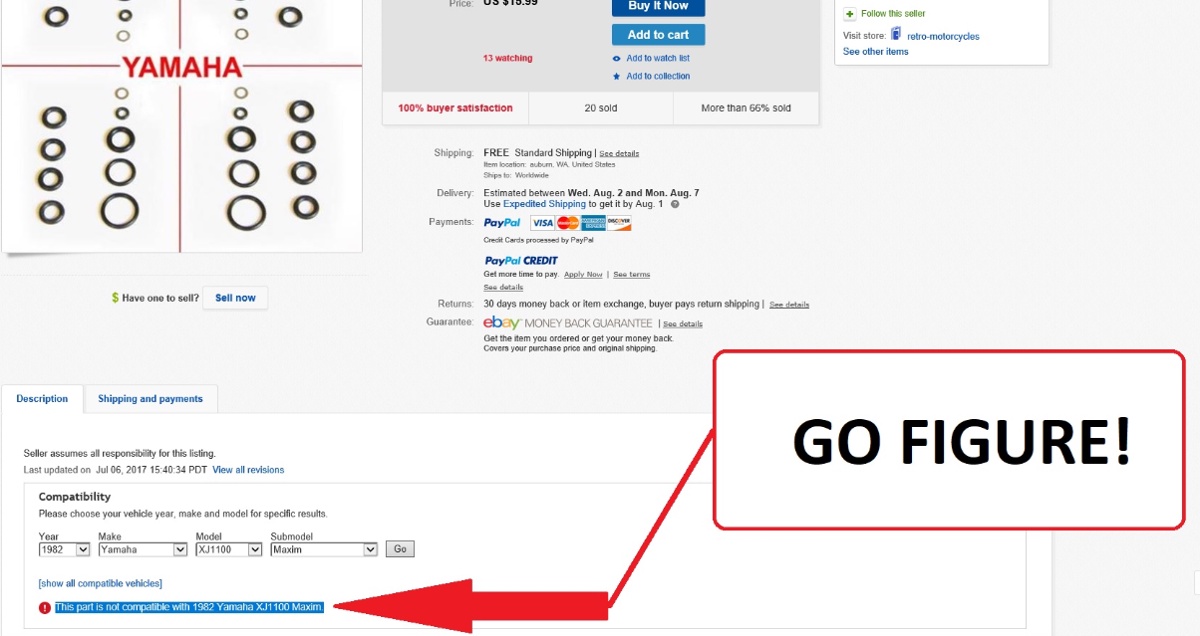
            Or this option from eBay and you have everything to rebuild the carbs fully including the four O-rings for the needle seats.

            http://www.ebay.com/itm/1978-83-Yama...38.m2548.l4275
            Howard

            ZRX1200

            BTW, ZRX carbs have the same spacing as the XS11... http://www.xs11.com/forum/showthread.php?t=35462

            Comment


            • #7
              I wouldn't ever use another Harbor Freight Viton o-ring again, the ones I tried in my XJ11 to seal the oil pump to the engine case and to seal the main oil gallery between the upper and lower engine case halves both MELTED, then started to dissolve in hot engine oil after about 2,000 miles.
              I don't know what kind of cheap plastic Harbor Freight used to make them but it's definitely not Viton.

              One example of a decent Nitrile (Buna-N) o-ring kit is from Fastenal and I have a local outlet in town but there are a lot of other options:-

              https://www.fastenal.com/products/details/0414190

              386Pc Nitrile Metric Maintenance Kit O-Ring Kit
              Fastenal Part No. (SKU): 0414190
              UNSPSC: 31401503
              Manufacturer: Fastenal Approved Vendor
              This is a Standard Catalog Item


              Here are some Yamaha o-rings at Partzilla.com:-

              Home / OEM Parts / Yamaha / Motorcycle / 1982 / XJ1100J / CARBURETOR:

              #46 O-RING
              8F2-14147-00-00 $5.26 $3.97 4 each


              Originally posted by GUNNY1966 View Post
              I didn't mention a few parts but I did rebuild all the brake calipers, I just forgot to add that to the list of parts!
              Heh, rebuild or replace what you can but cleaning the crud/corrosion out of the caliper o-ring groove is the most important part.

              Originally posted by GUNNY1966 View Post
              As for the brake lines you mentioned stainless steel braid, where did you get those or did you have them special order or ??? Sounds like a great idea & I'm game!
              I have to send you to another site but I believe it's worth it. Take your time and read through the information on xjbikes.com, then get in touch with the vendor, chacal, the owner of XJForever and one of the XS1100/XJ1100 rally sponsors.

              Chacal's parts can be expensive but he has some factory parts for sale and a lot of top quality aftermarket parts for the entire range of Yamaha XJs, not just the 1100. There are a lot of less expensive, not cheap, options but Chacal and a few XS/XJ owners went through the hoops to get all of his brake hose assemblies DOT Certified and to ensure that they will bolt on and work, they're not just a pile of individually DOT certified parts that you have to assemble and the SNAFU is on you.


              xjbikes.com | forums | forums | xj4ever -- supporting-vendor.23


              Originally posted by GUNNY1966 View Post
              You mention a paid account, I assume you mean here on XS ??? I'd be glad to join / donate, I'll look into that!!!
              No, XS11.com would love the donation but can't do pictures. You need an account on an image hosting site, then post the link to the image in your message.

              http://www.photobucket.com/ is still free and you can link to the pictures but they won't show the pictures on a remote web site. Unless you have one of their paid accounts, all you see on the page is their new error JPG. I got lucky and paid for an account before they dropped the hammer so my pictures still work and I have a couple of years to see what happens to Photobucket.

              My XJ1100 on the way to the July, 2017 rally in Kremmling, CO
              -- Scott
              _____

              2004 ST1300A: No name... yet
              1982 XJ1100J: "Baby" SS Brakes, '850 FD, ACCT
              1980 XS1100G: "Columbo" SS Brakes, '850 FD, ACCT
              1979 XS1100SF: "Bush" W.I.P.
              1979 XS1100F: parts
              2018 Heritage Softail Classic 117 FLHCS SE: "Nanuk" It's DEAD, it's not just resting. It is an EX cycle.

              Comment


              • #8
                Originally posted by 3Phase View Post
                http://www.photobucket.com/ is still free and you can link to the pictures but they won't show the pictures on a remote web site. Unless you have one of their paid accounts, all you see on the page is their new error JPG. I got lucky and paid for an account before they dropped the hammer so my pictures still work and I have a couple of years to see what happens to Photobucket.
                Hey Scott,

                PB shut off even just LINKING for free accounts. I just tried it with the thread that he linked which was from CrazySteve, and after all of the adds were shut down, it left me viewing the same ERROR image! Apparently ONLY your grandfathered paid account will work with just the link vs. the embedded photo.

                I'm trying to view just the root directory of Steve's account to then try to access the albums so I can download the photos, and then upload them to the XS11 server account so I can fix the photos!? But so far, NO JOY!
                T. C. Gresham
                81SH "Godzilla" . . .1179cc super-rat.
                79SF "The Teacher" . . .basket case!
                History shows again and again,
                How nature points out the folly of men!

                Comment


                • #9
                  Originally posted by TopCatGr58 View Post
                  Hey Scott,

                  PB shut off even just LINKING for free accounts. I just tried it with the thread that he linked which was from CrazySteve, and after all of the adds were shut down, it left me viewing the same ERROR image! Apparently ONLY your grandfathered paid account will work with just the link vs. the embedded photo.

                  I'm trying to view just the root directory of Steve's account to then try to access the albums so I can download the photos, and then upload them to the XS11 server account so I can fix the photos!? But so far, NO JOY!
                  Well, that sautees big green zucchinis. Maybe I can see the pictures when I follow the links because I have a paid account.
                  -- Scott
                  _____

                  2004 ST1300A: No name... yet
                  1982 XJ1100J: "Baby" SS Brakes, '850 FD, ACCT
                  1980 XS1100G: "Columbo" SS Brakes, '850 FD, ACCT
                  1979 XS1100SF: "Bush" W.I.P.
                  1979 XS1100F: parts
                  2018 Heritage Softail Classic 117 FLHCS SE: "Nanuk" It's DEAD, it's not just resting. It is an EX cycle.

                  Comment


                  • #10
                    Bummer you had a problem, Scott. I'm not sure which viton O-rings you used, not that there is any other viton besides viton. . The ones I am using from Harbor freight are a brown color.

                    The ones from the kit I bought have been in the ZRX carbs for over 20,000 miles, and I have used them as petcock o-rings and going strong for tens of thousands of miles. Would not hesitate to recommend them based on that experience.
                    Howard

                    ZRX1200

                    BTW, ZRX carbs have the same spacing as the XS11... http://www.xs11.com/forum/showthread.php?t=35462

                    Comment


                    • #11
                      Originally posted by Bonz View Post
                      Bummer you had a problem, Scott. I'm not sure which viton O-rings you used, not that there is any other viton besides viton. . The ones I am using from Harbor freight are a brown color.

                      The ones from the kit I bought have been in the ZRX carbs for over 20,000 miles, and I have used them as petcock o-rings and going strong for tens of thousands of miles. Would not hesitate to recommend them based on that experience.
                      I know what Viton looks like and how it's supposed to feel. These look sort of alright but don't feel right. I'm glad the ones you bought have held up to prolonged exposure to fuel but I won't use them for anything except low-temp vibration dampers, spacers, maybe a stylish necklace or a wristband.


                      Harbor Freight | 180 Piece Viton O-Ring Kit
                      Storehouse® - Item#67525


                      Real Viton's temperature range is -26°C to +205°/230°C (-15°F to +400°/440°F).

                      In my XJ's engine, this alleged Viton o-ring separated and melted to the engine case and the oil pump.


                      Oil pump side.


                      Engine case side.


                      After only a little over a month and 2,000 miles on the engine, there is absolutely no way there were enough hours on it even if the oil temp got anywhere close to the lower 200C/400F spec to impart a heat set to a Viton o-ring, much less melt and separate it.
                      -- Scott
                      _____

                      2004 ST1300A: No name... yet
                      1982 XJ1100J: "Baby" SS Brakes, '850 FD, ACCT
                      1980 XS1100G: "Columbo" SS Brakes, '850 FD, ACCT
                      1979 XS1100SF: "Bush" W.I.P.
                      1979 XS1100F: parts
                      2018 Heritage Softail Classic 117 FLHCS SE: "Nanuk" It's DEAD, it's not just resting. It is an EX cycle.

                      Comment


                      • #12
                        Originally posted by Bonz View Post
                        Harbor freight sells a Viton O-ring assortment kit. I used some from that kit on my ZRX 40mm carburetors with press-in needle seats and they worked great. They aren't exact however they work very well. I would expect similar success with the XS.

                        Or this option from eBay and you have everything to rebuild the carbs fully including the four O-rings for the needle seats.

                        http://www.ebay.com/itm/1978-83-Yama...38.m2548.l4275
                        Well the Ebay O-rings are a fail according to the information I got!

                        https://gyazo.com/9c99e1f2828ad0fce962f64804920873
                        Two kinds of people whom own motorcycles, those that have went down & those that will go down! So far I've been fortunate! RIDE SAFE

                        Comment


                        • #13
                          Originally posted by TopCatGr58 View Post
                          Hey Scott,

                          PB shut off even just LINKING for free accounts. I just tried it with the thread that he linked which was from CrazySteve, and after all of the adds were shut down, it left me viewing the same ERROR image! Apparently ONLY your grandfathered paid account will work with just the link vs. the embedded photo.

                          I'm trying to view just the root directory of Steve's account to then try to access the albums so I can download the photos, and then upload them to the XS11 server account so I can fix the photos!? But so far, NO JOY!
                          It's kind of a hassle TOPCAT but I guess I can use the Gyazo screen shot tool & make any adjustments I want & make use of the Windows Paint program but still one would need to go to the link posted to view any pics.! Is there any other way to do it??? I'll research a bit & see if I can come up with a solution! p.s. I donated some $$ to the site in hopes it helps! Thank You :-)
                          Two kinds of people whom own motorcycles, those that have went down & those that will go down! So far I've been fortunate! RIDE SAFE

                          Comment


                          • #14
                            Originally posted by GUNNY1966 View Post
                            It's kind of a hassle TOPCAT but I guess I can use the Gyazo screen shot tool & make any adjustments I want & make use of the Windows Paint program but still one would need to go to the link posted to view any pics.! Is there any other way to do it??? I'll research a bit & see if I can come up with a solution! p.s. I donated some $$ to the site in hopes it helps! Thank You :-)
                            This, from another forum;

                            Try this hack on the photo address.
                            After the .jpg before the [/img] put ~original
                            .jpg~original[/img]
                            This will get all the PB photos showing again, for the moment at least!
                            __________________
                            Marcus
                            aka. Gojeep
                            Victoria, Australia
                            www.go.jeep-xj.info

                            Comment


                            • #15
                              How To Replace Deteriorated Needle Seat O-Rings

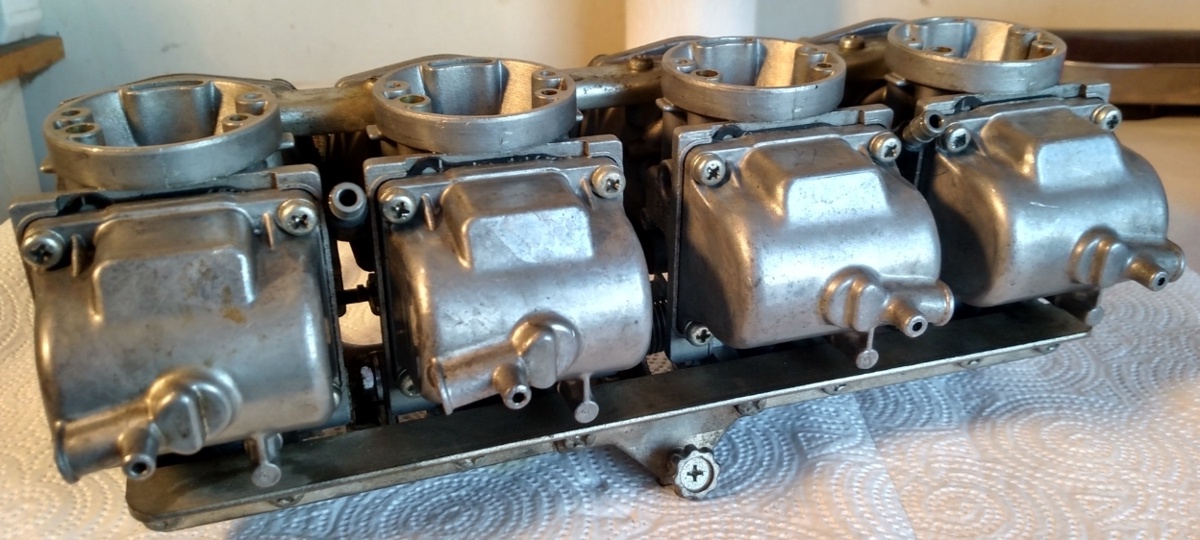
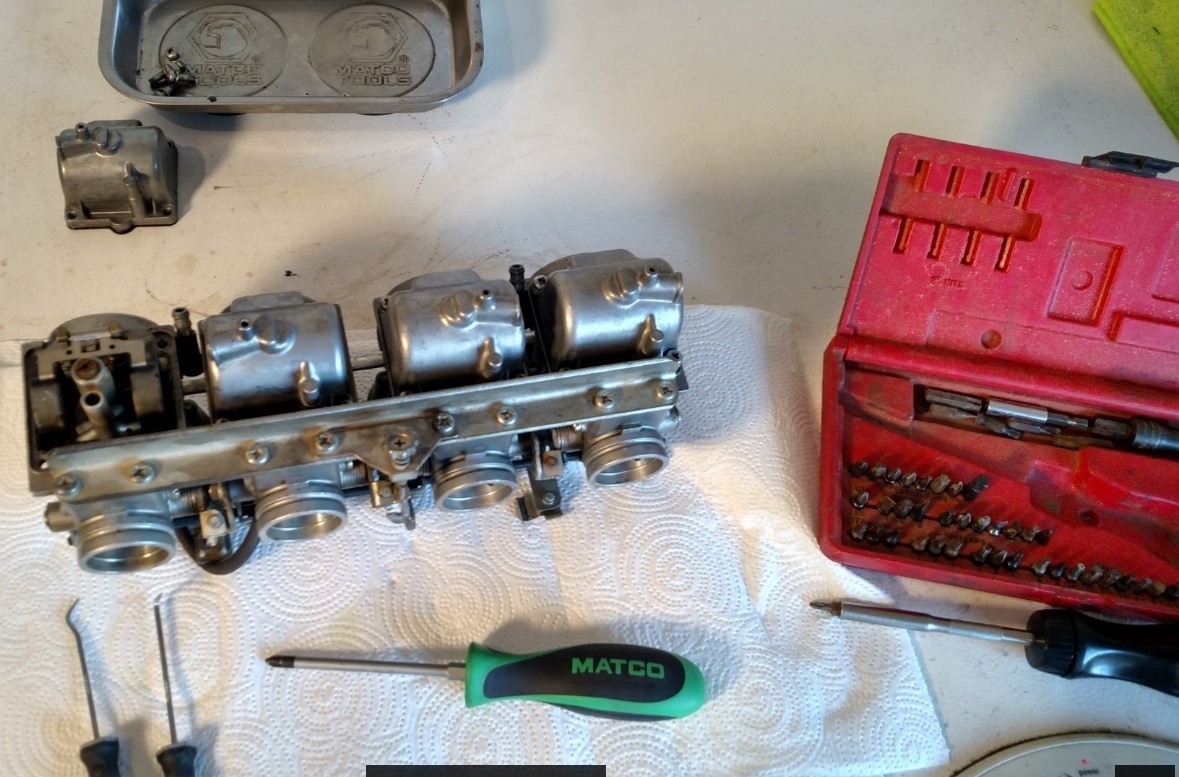
                              So I gathered up the necessary tools & cleaned off the work bench & started tearing down the carbs..

                              * NOTE * When removing the bowl assembly, use the correct Phillips screwdriver that fits the screw!!

                              I tried 4 different heads from my Snap Off box before I found a Matco driver that fit the full depth of the screws. I might also add I could tell someone had been into the carbs before as the screws were slightly damaged from someone using the incorrect driver head as shown in the following pic.!

                              https://gyazo.com/ffac8118ec39cd3c52e0abd4c5884b05

                              https://gyazo.com/d66257af7db5b256c1730640df4451ce

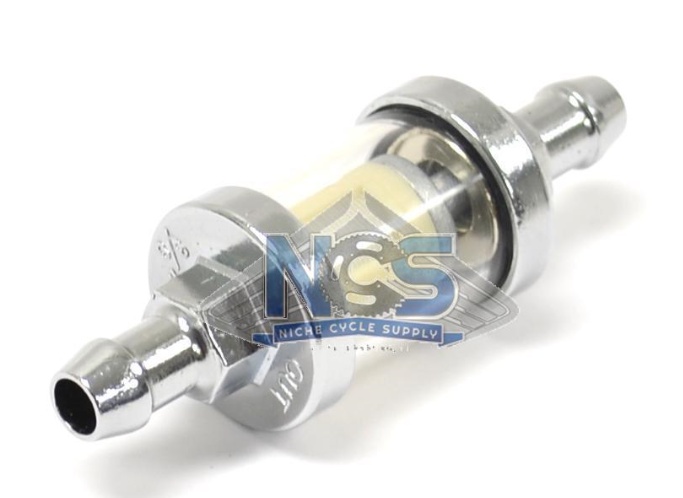
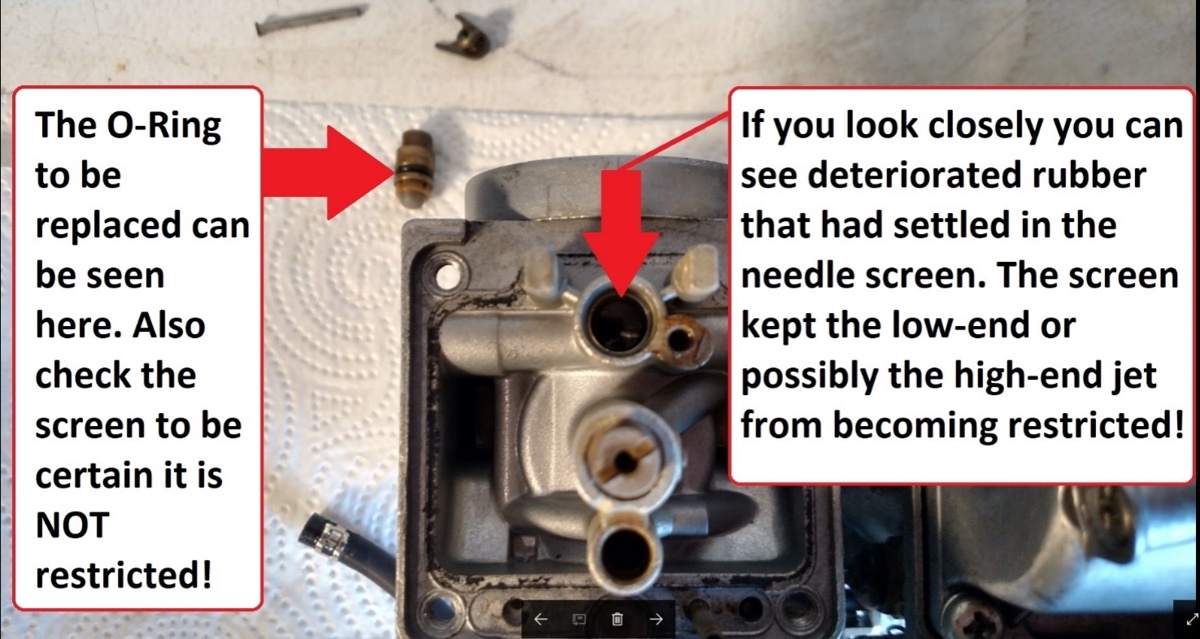
                              Once I had removed the bowl I noticed they were extremely dirty which reminds me why I had purchased 2 filters to place in the gas line AFTER the petcocks. Also there was some deteriorated rubber which can be seen in the pics.

                              https://gyazo.com/b0dc3de279c024ee8501109fac879b83

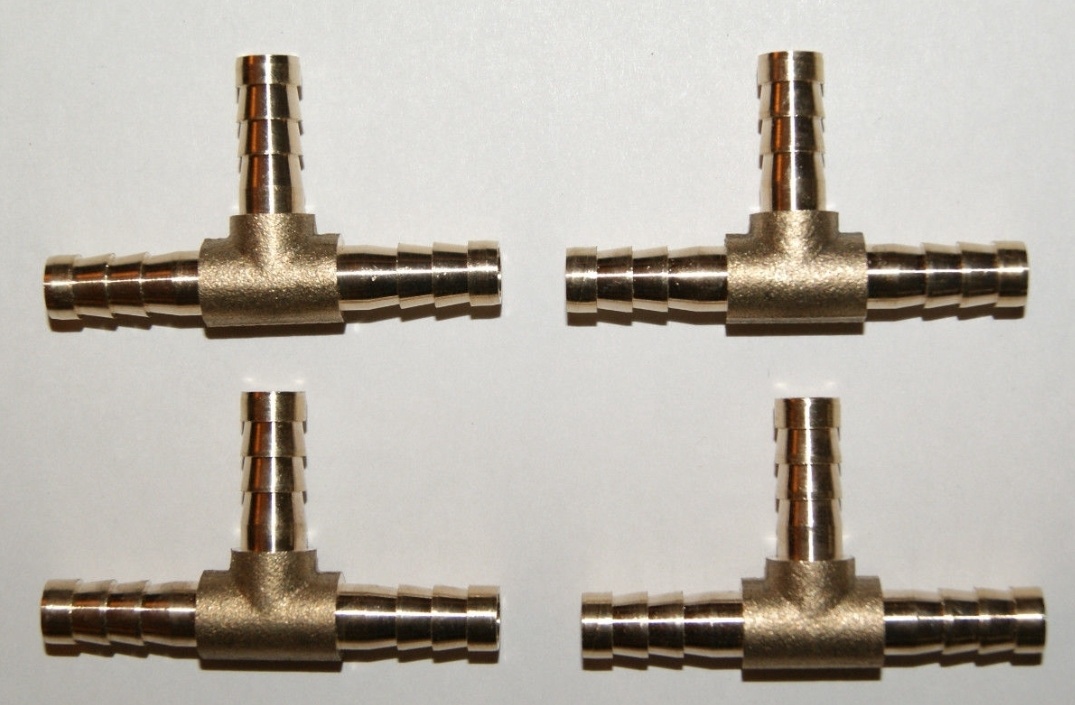
                              Also I did away with the plastic "T" fittings & got some brass fittings * NOTE * I had to cut them down in size as they were extremely to long.

                              https://gyazo.com/c1b0cbf90327e2e3ef899bd0d3e1a41e

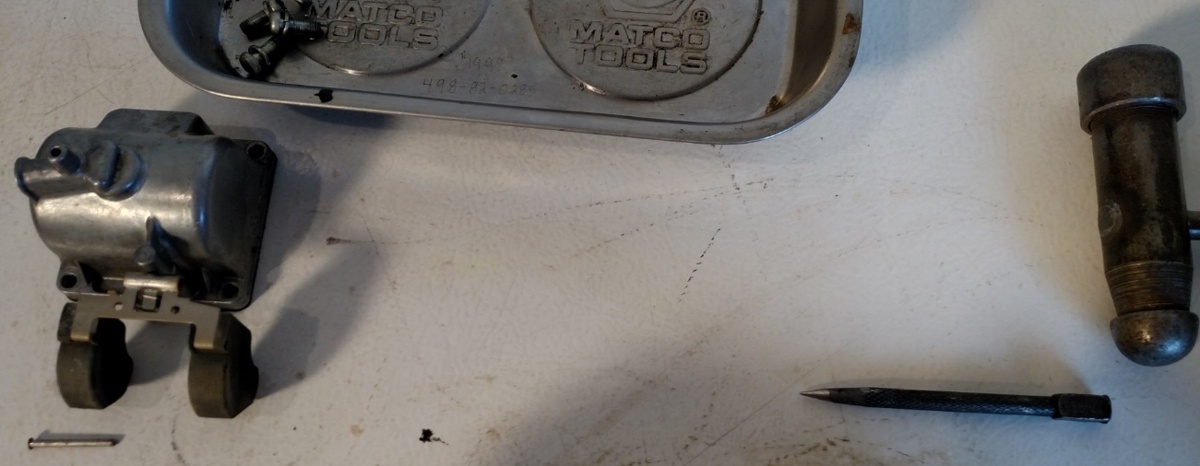
                              * NOTE *When removing the floats a small punch & small hammer may be required to remove the pin that retains the floats.

                              https://gyazo.com/0d5db0249c8e3a948dbaaeb98898ad2e

                              Once the float pin has been removed "GENTLY / CAREFULLY" remove the float & needle valve as shown in the following pic, Failure to do so will change the dynamic float level!

                              https://gyazo.com/b4d80d4bc0ea58440606a78cced51652

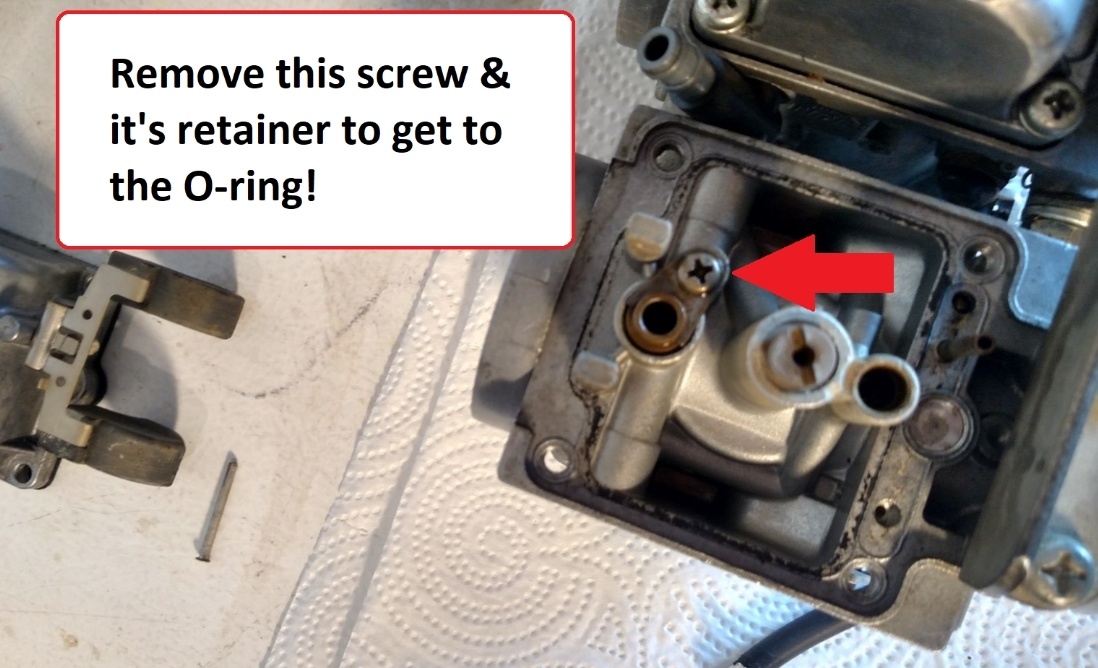
                              Once the screw & retainer have been removed gently lift out the float valve o-ring assembly. See the following pic for further detail! Do NOT blow them out facing you, they may have debris & or gas inside them!!

                              https://gyazo.com/73c7ec6dcef3c42ced3ec7131a7b722c

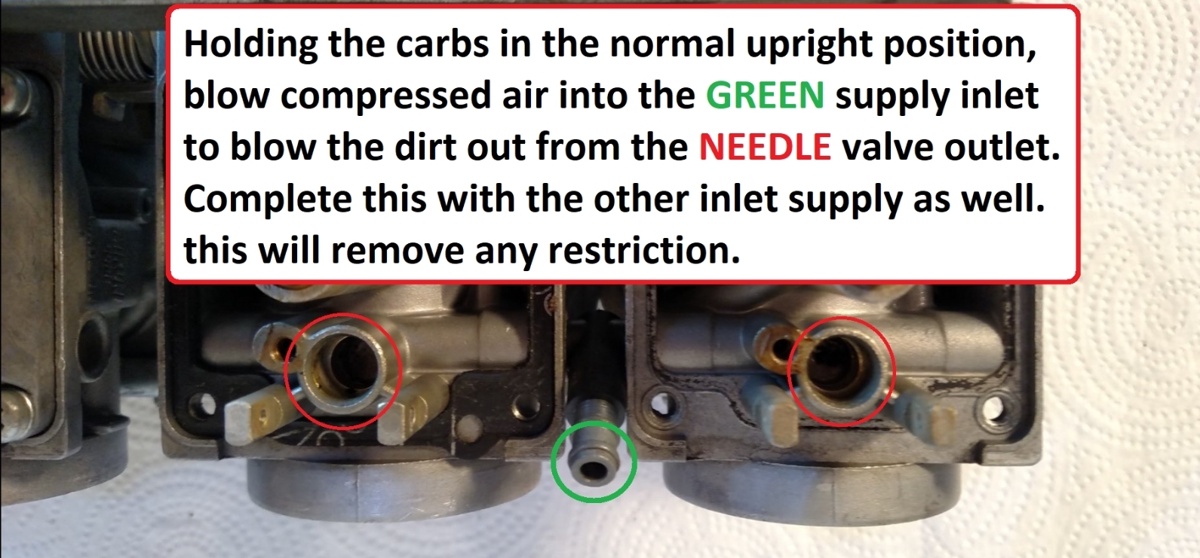
                              Used compressed air to blow thru the fuel supply to clean out the deteriorated rubber & or any other dirt, VIEW the following pic.

                              https://gyazo.com/2a21e2d17673d81843638cf17eac7e92

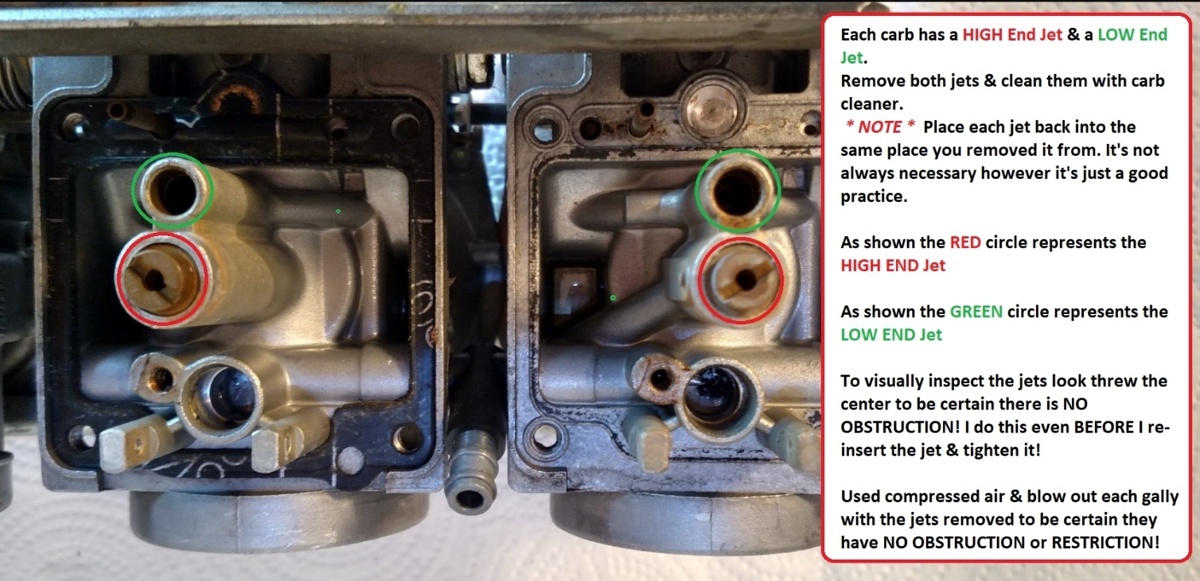
                              Since you have gone this far now is also the best time to remove both the HIGH end jet & the Low end jet. Be sure to use the right size straight screw driver to do this so you don't break or damage the heads of the jets. In the following picture you will see both jets shown in more detail.

                              https://gyazo.com/ecb7713939b9a71a08557726388818c3

                              After cleaning everything & now that you have installed the new O-rings simply reverse the steps you took to remove each item, pretty simple!
                              It's not always necessary to replace the bowl gaskets unless you have damaged them during the bowl removal or while cleaning. You should also visually inspect EVERYTHING while reassembling. Also inspect the supply inlets to be certain they are not loose or leaking, if they were leaking you would need to replace the O-rings throughout the supply inlets.


                              I called a local shop & they wanted $245 in labor & that doesn't include the parts. By doing this yourself & following each of the steps carefully one can save some $$$.

                              If I missed anything feel free to reply & be sure to read the rest of the thread as I cannot edit this post! Others may have suggestions or advice that may be important & worthy, I am HUMAN after all!!
                              Two kinds of people whom own motorcycles, those that have went down & those that will go down! So far I've been fortunate! RIDE SAFE

                              Comment

                              Working...
                              X