 Tweet
Tweet
Can anyone from the collective confirm that the O-rings for the needle seats would be different on an 82 XJ? I don't believe that to be the case.
-
Howard
2001 ZRX 1200
1982 Seca 750
1983 Nighthawk 550 -
-- Scott
_____
♬
2004 ST1300A: No name... yet
1982 XJ1100J: "Baby" SS Brakes, '850 FD, ACCT
1980 XS1100G: "Columbo" SS Brakes, '850 FD, ACCT
1979 XS1100SF: "Bush" W.I.P.
1979 XS1100F: parts
2018 Heritage Softail Classic 117 FLHCS SE: "Nanuk" It's DEAD, it's not just resting. It is an EX cycle.
♬Comment
-
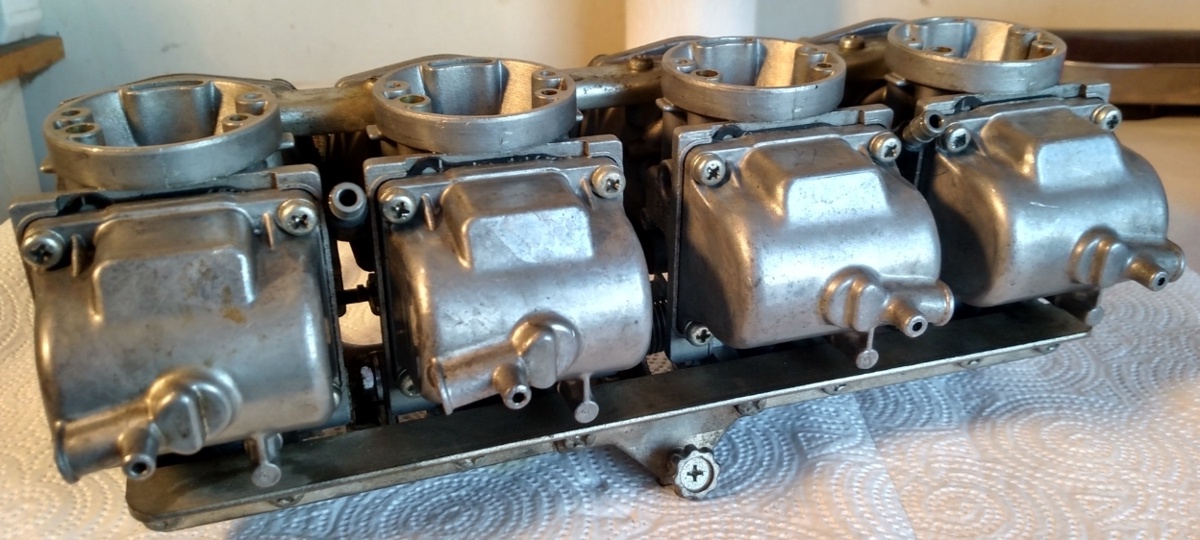
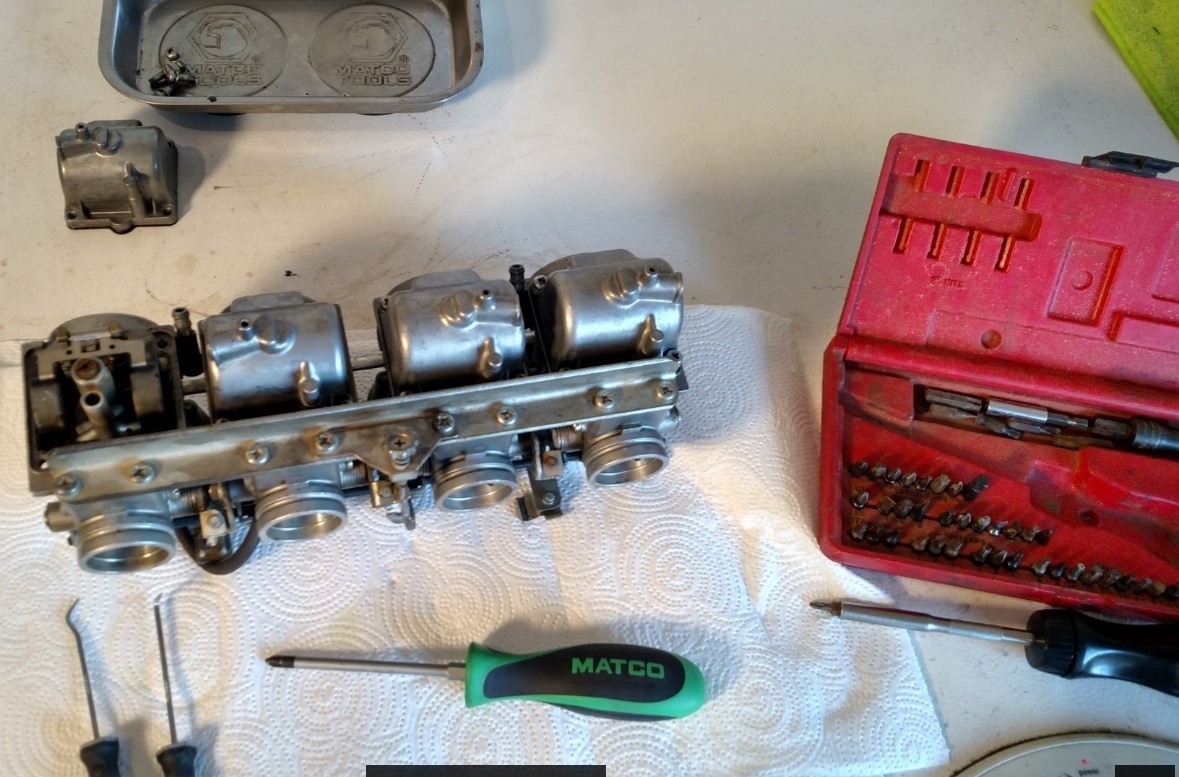
You need to remove all of the emulsion tubes to clean all of their air inlet holes. A wooden toothpick works great for the air holes, Brasso helps too and makes your work shine but compressed air won't cut the mustard except for the first pass. Mikuni calls the emulsion tube the "Needle Jet" and the slide needle is the "Jet Needle" but whatever you call them, they need to be cleaned periodically. The emulsion tubes can be pushed out through the top of the carburetors after you remove the Main jet and its spacer washer so you do need to remove the slides and diaphragms to remove the tubes.
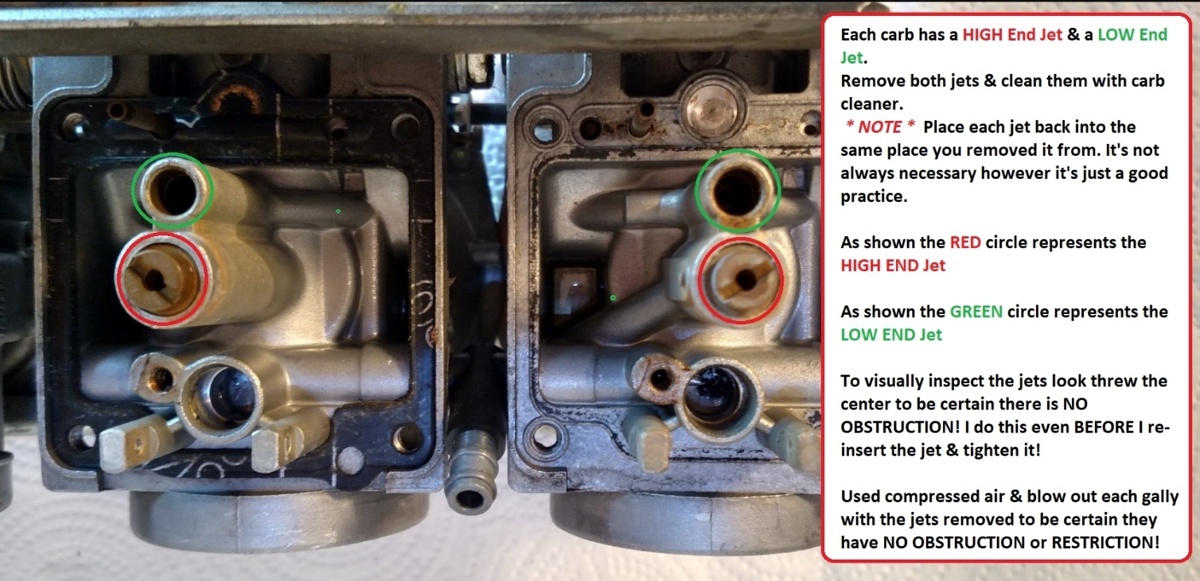
The same thing applies to the Pilot jets (low speed/idle jets). The tiny metering hole in the end of the jet and the internal passage drilled through the center of the jet body have to be clean. Compressed air can blow the accumulated crud and scale to the far end of the jet where it just piles up because it can't force it through the metering hole. You need a screwdriver that's ground and trimmed to exactly fit the hole in the jet tower in the carburetor body and the slot in the head of the Pilot jet to remove it or you'll round it off and play merry gosh getting it out.
You don't have to polish the parts unless you're bored but here are some examples from my 1979 carburetors with brass floats, your XJ11 tubes and jets are similar:-

 -- Scott
_____
♬
2004 ST1300A: No name... yet
1982 XJ1100J: "Baby" SS Brakes, '850 FD, ACCT
1980 XS1100G: "Columbo" SS Brakes, '850 FD, ACCT
1979 XS1100SF: "Bush" W.I.P.
1979 XS1100F: parts
2018 Heritage Softail Classic 117 FLHCS SE: "Nanuk" It's DEAD, it's not just resting. It is an EX cycle.
♬Comment
-
I wished I'd have seen this earlier, YOU SIR do some REALLY fine work! That looks AWESOME! I just dipped mine in brasso but the floats on mine are the hard foam style. Your 100% correct tho, the emulsion tubes should be removed & cleaned as well! See I was right there are things I missed to post & that's why it's ALWAYS good to R E A D the entire thread when doing this kinda work. I said I was Human Two kinds of people whom own motorcycles, those that have went down & those that will go down! So far I've been fortunate!
 RIDE SAFE
 Comment
-
3phase, thanks for the extra clarity.
Gunny, like I had suggested in the previous post with the eBay link... this o-ring kit will work with your bike.
In general, be leery of an eBay fitment guide as gospel over experience. Do check with the collective first because someone, somewhere can absolutely confirm one way or the other.
With all respect, do we need to supersized colored letters other than on occasion to make a point? This looks like I'm staring at a Christmas tree in July.
Howard
2001 ZRX 1200
1982 Seca 750
1983 Nighthawk 550Comment
-
Hey Scott,
Your info regarding the HF Viton rings has got me thinking(watch out! )
)
I think I remember using one of those for the oil galley plug behind the ALT cover when I did my recent rebuild. I also replaced the the crankshaft seals on both side, and thought I was meticulous about how I did it, sealant and even J-B weld to provide further bracing of the lipless seal with the crankcase. On my last trip to XS SE the right side started leaking badly, and I thought/assumed that it was the right crankshaft seal that had let go!? But now I'm thinking/hoping that possibly it was the O-ring for the galley plug instead!? I haven't torn down the bike YET to investigate, I know that galley plug is under a lot of pressure and I would loose a quart a tankful on the ride home, AND the crankcase seals aren't necessarily under that type of pressure to cause that amount of hemorrhaging!?!?
It would sure be nice for the leak to be just the galley plug. If so, I'll tap it and put in a threaded plug this time, along with reporting back what I find with regards to the condition of the galley plug seal/oring!? Here's hoping!?
T.C.T. C. Gresham
81SH "Godzilla" . . .1179cc super-rat.
79SF "The Teacher" . . .basket case!
History shows again and again,
How nature points out the folly of men!Comment
-
No sweat, Gunny, from your pictures, it looks like your XJ was in really good condition except for some cosmetic issues.
There is no magic bullet for the carburetors. I haven't found anything, including ultrasonic cleaning, that can remove all of the corrosion, water scale and some other even less savory deposits from brass and other carburetor parts except a bright light, magnifying glass, time, and labor. On my '79, the floats leaked and had to be resoldered, then rebalanced (re-floated?) to their original factory weight. I had to use a fine wire to poke through the scale plugging the holes in all of the carburetor jets, then finish cleaning the darn things with Brasso, toothpicks, and Q-Tips without screwing up the holes or gouging the brass. Polishing anything brass is just an old habit I picked up somewhere.
For what it's worth, I didn't name my '79 Special "Bush" for political reasons, we literally had to cut it out of the bush that had grown through it after ten years outside in the salt air. Lucky me") it had been 'stored' before we were blessed with mandatory ethanol fuel.
it had been 'stored' before we were blessed with mandatory ethanol fuel.


No hay de que, Bonz!
I don't know if he's a Marine (Gunny, are you a Marine?) but "Gunny" and colorful, larger-than-life language is pretty much de rigueur.
-- Scott
_____
♬
2004 ST1300A: No name... yet
1982 XJ1100J: "Baby" SS Brakes, '850 FD, ACCT
1980 XS1100G: "Columbo" SS Brakes, '850 FD, ACCT
1979 XS1100SF: "Bush" W.I.P.
1979 XS1100F: parts
2018 Heritage Softail Classic 117 FLHCS SE: "Nanuk" It's DEAD, it's not just resting. It is an EX cycle.
♬Comment
-
It may or may not be the o-ring, you'll have to look and possibly pull the rotor to verify and fix it. Personally, I won't trust another Harbor Freight Viton o-ring except in a non-critical role. I may have bought a bad batch and I won't buy another one but you'll have to check the gallery plug to see if it's leaking, that'd be a hoot if was that simple.
I haven't had any problems with Harbor Freight's generic Nitrile yet but from your vacation time overseas you already know what buying from the lowest bidder will net you.
The only way the pressurized oil can get out of the Main and Rod bearings and return to the oil pan is to exhaust itself out of both sides of the bearings' circumference. The crankshaft seals shouldn't be under much pressure unless they get pushed in too far. There's an oil drain hole in the outboard edges of the lower outer Main bearing saddles that's drilled through the same groove that's cut for the crank seals and it allows spent/exhausted Main bearing oil to return to the sump instead of jetting out through the crank seals. It can't happen with the OEM Yamaha seals because they have that locating/retaining ridge on them but the replacement seals can be pushed in too far. IF that happens, the pressurized, exhausted, Main bearing oil will try to go out through the seal because it can't drain back into the oil pan.
Columbo's lower case, #5 Main saddle.

Spare junk lower case, #5 Main saddle.


 Last edited by 3Phase; 07-30-2017, 10:48 AM.-- Scott
_____
♬
2004 ST1300A: No name... yet
1982 XJ1100J: "Baby" SS Brakes, '850 FD, ACCT
1980 XS1100G: "Columbo" SS Brakes, '850 FD, ACCT
1979 XS1100SF: "Bush" W.I.P.
1979 XS1100F: parts
2018 Heritage Softail Classic 117 FLHCS SE: "Nanuk" It's DEAD, it's not just resting. It is an EX cycle.
♬Comment
-
I don't get into my personal life much but "HOORAH" & as for you sidewalk sissies here is one of my most famous quotes! "OFF YOUR A$$ ON YOUR FEET OUTTA THE SHADE & INTO THE HEAT"
p.s. No Pun Intended & by the way it's not merica it's
v v v v v v v v v v v v v v v v v v v v
AMERICA
"NOW we have it RIGHT HERO'S!!!
NOW THAT'S COLORFULL!Two kinds of people whom own motorcycles, those that have went down & those that will go down! So far I've been fortunate! RIDE SAFE Comment
-
Has anyone else replaced the O-rings without removing the carbs? I have done this a few times with success.80 GComment
-
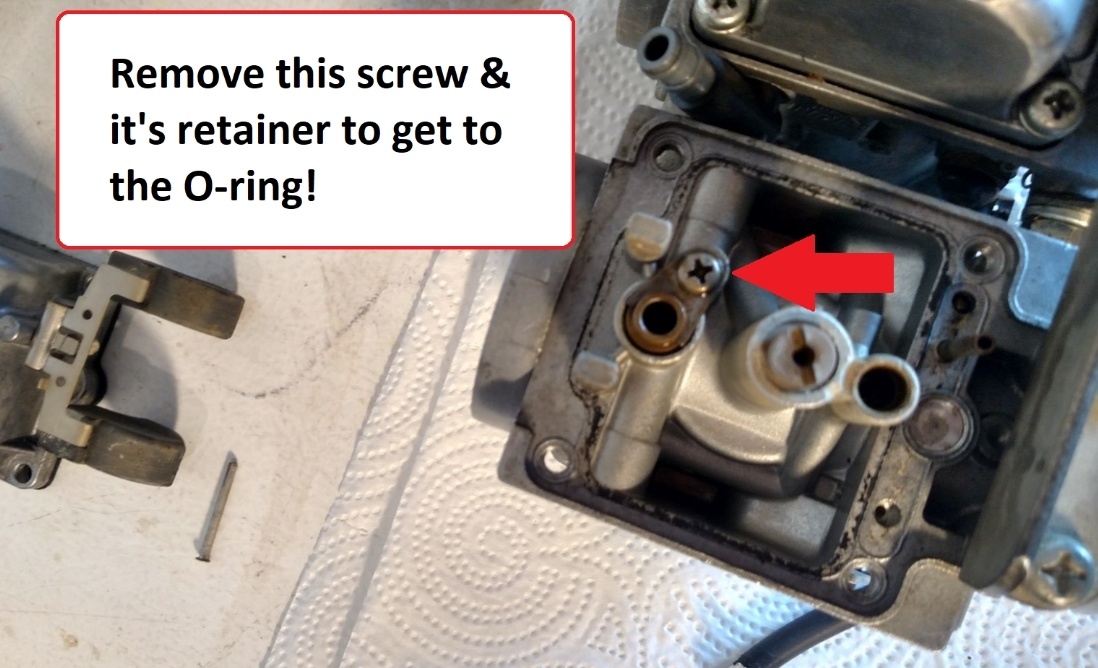
Note: those screws are NOT Phillips head. They are JIS(Japenese Industrial Standard). A JIS screwdriver can be had at your local NAPA.
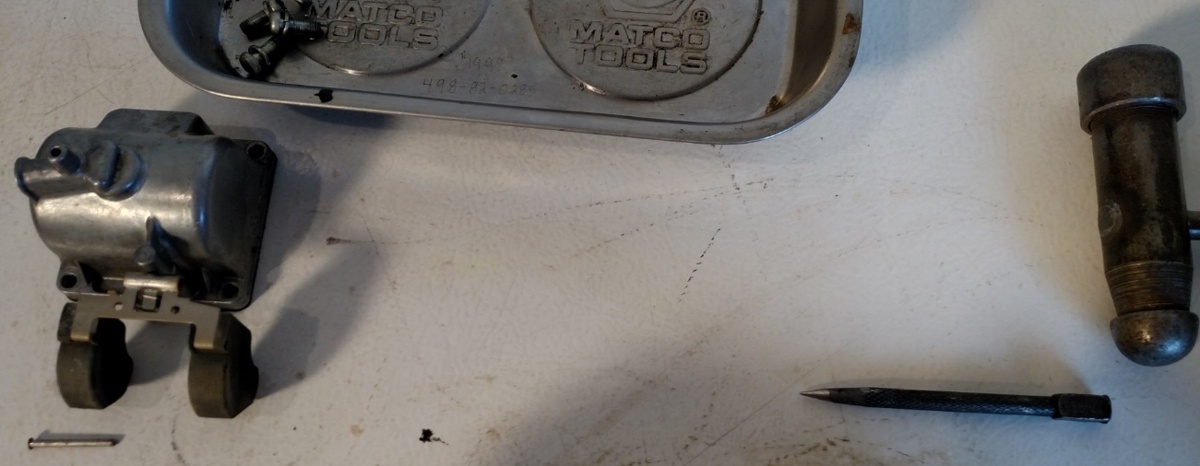
Those float pins have a tiny raised shoulder on their end...can make them tight when inserted. To keep from breaking float pin post, use a spring loaded center punch to remove. Have to be careful to not break a post, but myself, use a pair of sidecutters, with taper facing float pin shoulder and lightly squeeze cutters. The taper of sidecutters pushes pin outward. Still have to be careful applying 'squeeze', as the force against float pin post can break it. Once remove, chuck end of float pin in a drill, spin it using a fine file to remove that shoulder....makes it way easier to remove next time ......or replace them with metric allen-head screws.
81H Venturer1100 "The Bentley" (on steroids) 97 Yamaha YZ250(age reducer) 92 Honda ST1100 "Twisty"(touring rocket) Age is relative to the number of seconds counted 'airing' out an 85ft. table-top.
......or replace them with metric allen-head screws.
81H Venturer1100 "The Bentley" (on steroids) 97 Yamaha YZ250(age reducer) 92 Honda ST1100 "Twisty"(touring rocket) Age is relative to the number of seconds counted 'airing' out an 85ft. table-top.Comment
-
Motoman said, "Those float pins have a tiny raised shoulder on their end...can make them tight when inserted. To keep from breaking float pin post, use a spring loaded center punch to remove. Have to be careful to not break a post, but myself, use a pair of sidecutters, with taper facing float pin shoulder and lightly squeeze cutters. The taper of sidecutters pushes pin outward. Still have to be careful applying 'squeeze', as the force against float pin post can break it. Once remove, chuck end of float pin in a drill, spin it using a fine file to remove that shoulder....makes it way easier to remove next time......or replace them with metric allen-head screws."
I have used the side-cutter approach (outer edge not beveled, but flush) before and although it will work with the goal post adjacent the side cutter, the other goal post can snap off if the end of the pin is tight there. Without a special tool (invented by Ken), You might be able to devise a metal strut to exact fit between the goal posts while you use the side cutter.
Also, when you reassemble, there is no need to hammer the pin home! Push it in until it is snug and then STOP.Skids (Sid Hansen)
Down to one 1978 E. Stock air box with K&N filter, 81H pipes and carbs, 8500 feet elevation.Comment


Comment