Announcement

Collapse
No announcement yet.

saddlebags

Collapse
X
 
  • Filter
  • Time
  • Show
Clear All
new posts

  • #31
    The paint applied to the hardbags is very thick and cracked in spots. I believe it will need filler in spots too.
    Tim
    1979 xs1100sf black.
    1973 Harley fx.
    2005 Honda 450x.

    Comment


    • #32
      Finesse Filler vs. Bondo vs. Spot Putty vs. Glazing

      Originally posted by timktm View Post
      I believe it will need filler in spots too.
      Tim
      Tim,
      What we need now is some really clear close-up shots of these bags. That will help us give you a little guidance on the right product and procedures to get them ready for paint. Take a shot of the WORST areas and the overall AVERAGE areas.

      I recently repaired a set of this exact style as yours that were in "DECENT" shape. I also repaired a set of the newer style hinged PLASTIC bags that were in HORRIBLE shape with bubbling and peeling paint a mile thick. Honestly, the style bag you have is MUCH easier to work with and 100x easier to repair.

      It is very possible you could get away with SPOT PUTTY followed by a couple coats of a good high-build primer to get the bags really nice. Traditional "BONDO FILLER" will never be a good option for these as it will make more problems on this project than benefits.

      Sincerely,
      KURT
      Kurt Boehringer
      Peachtree City, Georgia

      1970 - CT70K0 - Mini-Trail
      1978 - SR500 - Thumper
      1979 - CT70H - Mini-Trail
      1979 - XS1100SF - Pensacola
      1980 - XS850SG - Rocky
      1980 - XS1100SG - The Ugly Duck
      1980 - XS1100SG - Mayberry Duck
      1981 - XS1100SH - DEAD Duck Cafe'
      1981 - XJ550 Maxim - Nancy's Mini-Max
      1982 - XJ650 SECA - Hurricane
      1986 - FJ1200 - Georgia Big Red
      1992 - FZR1000 - Genesis
      2016 - FJR1300A - Montgomery

      Comment


      • #33
        Here you go.


        1979 xs1100sf black.
        1973 Harley fx.
        2005 Honda 450x.

        Comment


        • #34
          PO Sanded? Darn!

          Tim,
          Looks like the PO attempted to sand some of those dings/chips? NOT a great idea~! Now, there is a low spot which WILL SHOW in the final coat. It'll look like a dent since he concentrated his work on one relatively small location.
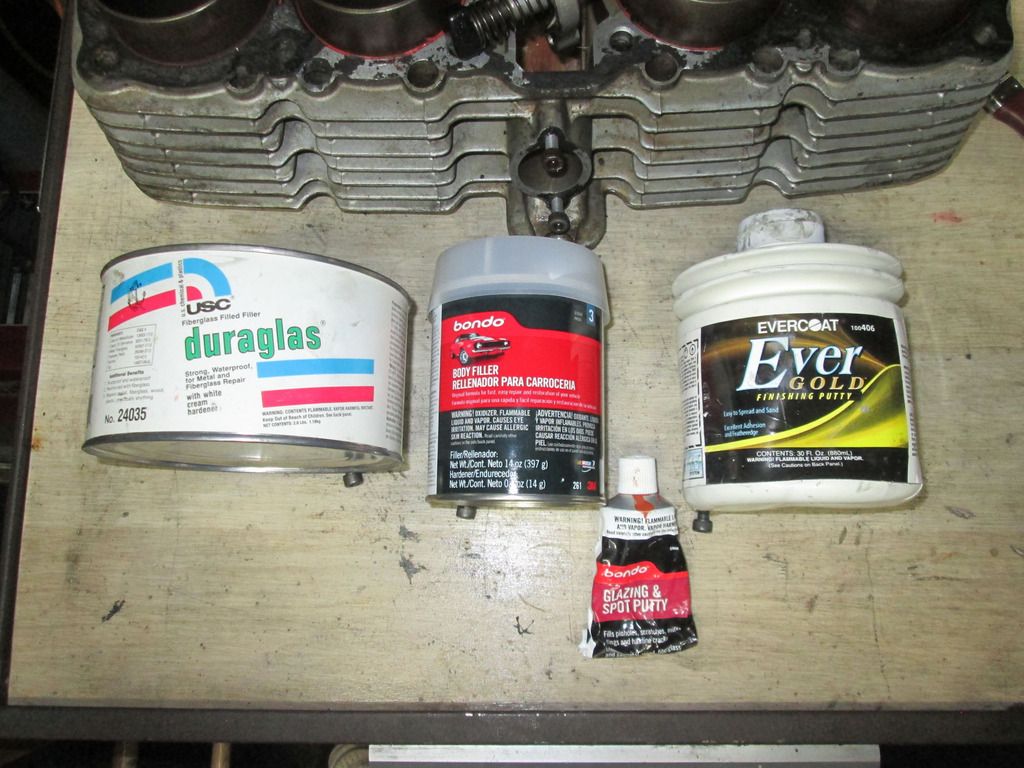
          Overall the paint does NOT look horrible at all but it does need more preparation than a little sanding.

          In a little bit, I'll post a pic of the type of filler needed for those big chips & now low spots..... You WILL need primer now that there is going to be a LITTLE filling material but there is no reason to go crazy by significantly sanding those down.....

          Any through cracks?

          Sincerely,
          KURT
          Kurt Boehringer
          Peachtree City, Georgia

          1970 - CT70K0 - Mini-Trail
          1978 - SR500 - Thumper
          1979 - CT70H - Mini-Trail
          1979 - XS1100SF - Pensacola
          1980 - XS850SG - Rocky
          1980 - XS1100SG - The Ugly Duck
          1980 - XS1100SG - Mayberry Duck
          1981 - XS1100SH - DEAD Duck Cafe'
          1981 - XJ550 Maxim - Nancy's Mini-Max
          1982 - XJ650 SECA - Hurricane
          1986 - FJ1200 - Georgia Big Red
          1992 - FZR1000 - Genesis
          2016 - FJR1300A - Montgomery

          Comment


          • #35
            No through cracks.
            1979 xs1100sf black.
            1973 Harley fx.
            2005 Honda 450x.

            Comment


            • #36
              Filling Materials......

              Tim et al,
              Here are some various filling materials. Each has its strengths and weaknesses. Used improperly, WHAT A MESS!


              Going Left to Right........


              Fiberglass impregnated body filler. Sand with 60+/- so it grabs......
              Used for LARGE problems or even used to fill HOLES. Would be a good choice INSIDE the bags to repair a crack. Otherwise useless on our bikes. IF a guy needs much of this.... He needs a new bike! LOL - About $15 You won't need to spend

              Traditional BONDO..... Sand with 60+/- so it grabs
              This stuff is great for smaller dents & dings but does NOT feather well. Its coarse nature makes it nearly impossible to get a good finish on. Frequent air bubbles and imperfections that can NOT be sanded out. I can show you a couple spots on my T/A where I used it exclusively (before I knew better) and the edges are still lightly visible. If you had a dent or area needing more than 3/16" of fill this would be step #1. You won't want this on the bags.....Normally About $10

              Spot & Scratch Filler (Tube) No Pre-Sanding Required.......
              A relatively cheap product pre-mixed and ready for use. DEEEP Scratches and MINOR chips are the best use for this. Might have been able to get away with this before the PO sanded the heck out of the top. But, some of those chips on the corners look kinda big. Primer will fill most all scratches but those deep ones need a little extra help. About $6-7 a tube....Skip it for now, shouldn't need it.

              Finesse or Glazing/Finishing Putty Pre-Sand with 120 so it grabs....
              This is the stuff! Very thin and the consistency is much like SnackPack Pudding... (got dinner on my mind - LOL)!. Creates a finish perfect for feathering and is not likely to give air bubble spots and imperfections. This would be used over you bigger chips and the area sanded. Spread a couple inches wider than the effected area and properly sand (more on that in a minute). This product (or similar) is always used over "Traditional Bondo" to get the proper finished surface. As the Southern Boys would say "They're proud of that stuff"..... Meaning, break open the WALLET! This small container was $35! THIS WHAT YOU NEED!

              Sanding in a minute.....

              KURT
              Kurt Boehringer
              Peachtree City, Georgia

              1970 - CT70K0 - Mini-Trail
              1978 - SR500 - Thumper
              1979 - CT70H - Mini-Trail
              1979 - XS1100SF - Pensacola
              1980 - XS850SG - Rocky
              1980 - XS1100SG - The Ugly Duck
              1980 - XS1100SG - Mayberry Duck
              1981 - XS1100SH - DEAD Duck Cafe'
              1981 - XJ550 Maxim - Nancy's Mini-Max
              1982 - XJ650 SECA - Hurricane
              1986 - FJ1200 - Georgia Big Red
              1992 - FZR1000 - Genesis
              2016 - FJR1300A - Montgomery

              Comment


              • #37
                Sanding.....

                Tim et al,

                Sanding is rarely if ever done with a bare hand! It's much to easy to press into a small area (knowingly or otherwise) and make a "dent" or other imperfection that will immediately show when the top coat is applied.

                Yes. you've got to use our fingers alone in those small tight corners but NEVER on a wide open space....


                Left to right again....

                The Traditional Sanding Block:
                Would keep a guy from sanding too much in one small area but some guys just can't resist the urge to turn it on its edge and go to town. Keep it flat and use longer strokes... SPREAD out the sanding over a longer area. Probably could fit the bill for those bags. $5 at HomeDepot.

                DURABLOCK:
                This stupid little chunk of firm yet bendable foam is a great choice for those bags and the eventual work on the tank. Allows work around corners and curves and is very effective on the wide open spaces. This is another one of those "Break out the Wallet" items as they sure are proud of these. I think it was more than $15. But, I tried a number of other items I thought would work are well but they didn't. SPLURGE! Get one if you can.

                LONG BOARD:
                Not too much use for one of these on an XS11 but I pictured it anyway. I think I MIGHT have used this a couple times on the tanks that were is crap shape. Really best for a hood or long fender.

                SANDING TECHNIQUE:
                Sanding in an "X" pattern seems to work best for all applications when possible. For example: Follow the contour of the lid (Front--->Back) for MOST of the sanding but occasionally cross the work (Side -Side) for several sweeps and this will keep you from creating length-wise grooves. Pressure should be FIRM but not GORILLA FIRM.

                Getting close to smooth? - GUIDE COAT

                Once the area has had an application of filler and the sanding has knocked the filler down to a point where you think you are close.. FAINTLY spray a bit of rattle can (any color any brand) on the surface. Let it dry. Continue sanding until it's all gone none left in any nook or cranny..... Time for primer!

                If time permits.... I'll post the primer info.

                KURT
                Kurt Boehringer
                Peachtree City, Georgia

                1970 - CT70K0 - Mini-Trail
                1978 - SR500 - Thumper
                1979 - CT70H - Mini-Trail
                1979 - XS1100SF - Pensacola
                1980 - XS850SG - Rocky
                1980 - XS1100SG - The Ugly Duck
                1980 - XS1100SG - Mayberry Duck
                1981 - XS1100SH - DEAD Duck Cafe'
                1981 - XJ550 Maxim - Nancy's Mini-Max
                1982 - XJ650 SECA - Hurricane
                1986 - FJ1200 - Georgia Big Red
                1992 - FZR1000 - Genesis
                2016 - FJR1300A - Montgomery

                Comment


                • #38
                  Kurt,
                  I understand the filler in the really low areas but can't most of the other imperfections be sanded out? Like in the areas where the paint has cracked? Most of the paint is pretty thick.
                  Tim
                  1979 xs1100sf black.
                  1973 Harley fx.
                  2005 Honda 450x.

                  Comment


                  • #39
                    Kurt,
                    Just want to say thanks for the information. I know some of us would like to do our own paint and information like this is like gold.
                    81 LH in process
                    09 vstar 1300
                    only allowed 2

                    Comment


                    • #40
                      Originally posted by timktm View Post
                      Most of the paint is pretty thick.
                      Tim
                      Tim,
                      It looks like eight coats+ of paint & primer on that lid? Assuming I counted correctly from the first photo? That's what would make sanding it down to eliminate the chips very difficult. IF the paint is solid but seeing the signs of age, there is no reason to sand the heck out of it for days. It will be much more difficult to make that work look as nice as a THIN layer of glazing properly finish sanded. Also, a fraction of the labor effort.

                      I assume you are also planning on BLACK like your tank & side covers? If it were MINE, a light skim on the bad spots, sand, guide coat, sand, prime, wet sand,...READY for PAINT!

                      Bubbling and peeling paint is another story. 
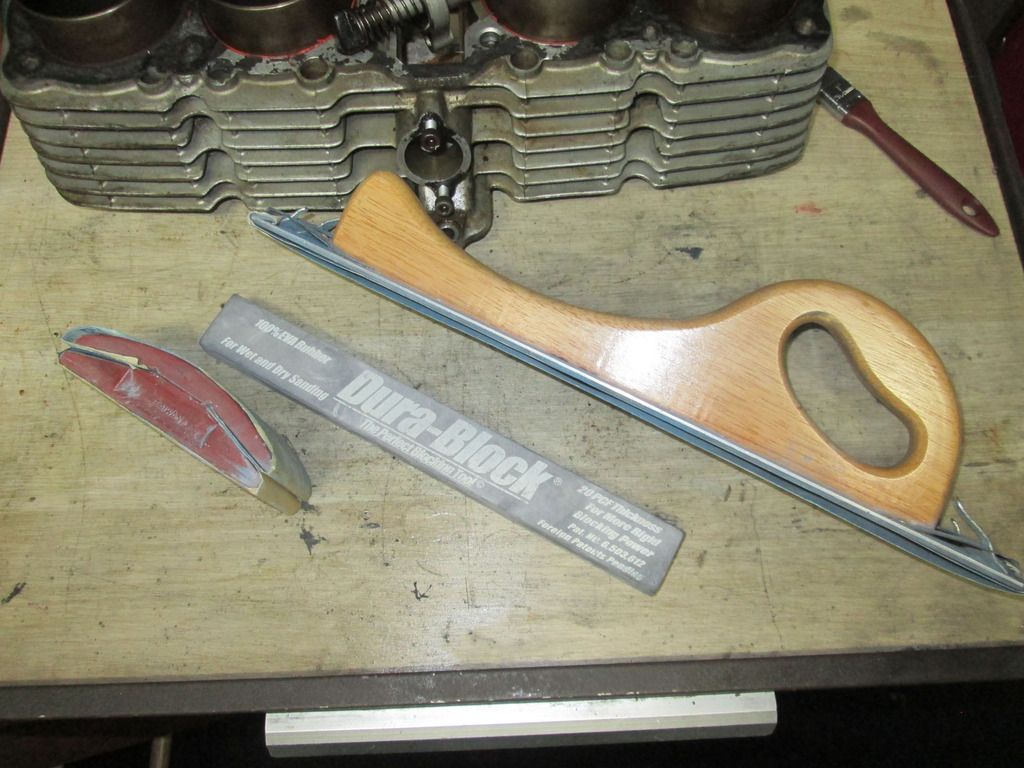
Got to get that kind of paint off.

                      If you are planning on BLACK. You'll want to drill off all the rivets holding the hardware and carefully remove it & all the edge seals. No matter how good you are, you're gonna' see some of that red somewhere if you don't. The seals are probably held on with 10x as much weatherstrip adhesive than is required. That gummy crap is a royal pain in the butt to get off!

                      KURT
                      Kurt Boehringer
                      Peachtree City, Georgia

                      1970 - CT70K0 - Mini-Trail
                      1978 - SR500 - Thumper
                      1979 - CT70H - Mini-Trail
                      1979 - XS1100SF - Pensacola
                      1980 - XS850SG - Rocky
                      1980 - XS1100SG - The Ugly Duck
                      1980 - XS1100SG - Mayberry Duck
                      1981 - XS1100SH - DEAD Duck Cafe'
                      1981 - XJ550 Maxim - Nancy's Mini-Max
                      1982 - XJ650 SECA - Hurricane
                      1986 - FJ1200 - Georgia Big Red
                      1992 - FZR1000 - Genesis
                      2016 - FJR1300A - Montgomery

                      Comment


                      • #41
                        Kurt,
                        I figured it comes down to labor. It would take a while to get it all off. And you beat me to my next question, that is the hardware and seals on the lids. The large seals on the bottom section of the bags was loose and came right off. The tops are sealed pretty good. I will see how that comes off. The hardware was all loose anyway so it needs new rivets anyway. I will work on that stuff today while getting some supplies. And yes you are correct, black it is.

                        Tim
                        1979 xs1100sf black.
                        1973 Harley fx.
                        2005 Honda 450x.

                        Comment


                        • #42
                          Kurt,
                          What kind of paint am I usung, urathane, enamel ? Etc
                          I went to get it and I didn’t know.
                          Tim
                          1979 xs1100sf black.
                          1973 Harley fx.
                          2005 Honda 450x.

                          Comment


                          • #43
                            Originally posted by kboehringer View Post
                            That gummy crap is a royal pain in the butt to get off!

                            KURT
                            Try Naptha. (Coleman fluid) It will dissolve a lot of adhesives, and not harm most automotive finishes. Wet a corner of a rag with Naptha, and rub the gummy adhesive. Try on an inconspicuous place first, because it will soften some spray can paints.


                            CZ

                            Comment


                            • #44
                              Originally posted by timktm View Post
                              Kurt,
                              What kind of paint am I usung, urathane, enamel ? Etc
                              I went to get it and I didn’t know.
                              Tim
                              Tim,
                              Tell them you want PPG SHOPLINE.

                              PPG ShopLine has two (+) varieties, JAU & JE for the "PAINT"
                              JE = Acrylic Enamel or
                              JAU = Direct Gloss Acrylic Urethane.
                              +
                              JR506 - Medium Reducer - Quart
                              JH6680 - Medium Top Coat Hardener - 1/2 Pint

                              For primer you will want:
                              JP202 - 2K Primer Surfacer - Pint
                              JH301 - Undercoat Hardener - 1/2 Pint
                              Your top coat reducer will work with this.....

                              I have not purchased "BLACK" for any of my projects lately. The color choice may dictate only one or the other (JAU or JE) is available. I use JAU with my T/A as that's the only choice. I believe the JE is a tiny little less expensive but it's all pretty affordable. I have NO preference for ease of use or finished product quality both are great all my XS11's are painted in JE.

                              Take one of your OEM side covers with you! You can look through sample books and find the best match. If you have a good mixer he/she can make a minor adjustment to get it even closer..... I guess you know that there are probably a zillion different "Blacks"

                              Direct the counterperson that you want your paint mixed as single-stage. This does not mean you won't have a nice gloss. It just means you shoot both at one time from one mix. A heck of a lot easier. If you like you can go later and put even more clear on it.... but it really won't need it.

                              Sincerely,
                              KURT
                              Kurt Boehringer
                              Peachtree City, Georgia

                              1970 - CT70K0 - Mini-Trail
                              1978 - SR500 - Thumper
                              1979 - CT70H - Mini-Trail
                              1979 - XS1100SF - Pensacola
                              1980 - XS850SG - Rocky
                              1980 - XS1100SG - The Ugly Duck
                              1980 - XS1100SG - Mayberry Duck
                              1981 - XS1100SH - DEAD Duck Cafe'
                              1981 - XJ550 Maxim - Nancy's Mini-Max
                              1982 - XJ650 SECA - Hurricane
                              1986 - FJ1200 - Georgia Big Red
                              1992 - FZR1000 - Genesis
                              2016 - FJR1300A - Montgomery

                              Comment


                              • #45
                                Kurt,
                                Thanks, I will get it tomorrow and work on filling those spots with the glazing /finishing putty. I got the hardware and edge seals off and cleaned. What a pita! I'm looking at new hardware to, as these are in pretty rough shape. Also, what adhesive to use on the edge seals?
                                Tim
                                1979 xs1100sf black.
                                1973 Harley fx.
                                2005 Honda 450x.

                                Comment

                                Working...
                                X