
 Tweet
Tweet
Any suggestions on cleaning the brass tube while we are at it? I shot cleaner up it and it didn't seam to make it very far...
-
79 F -
If I am not successful with spraying and waiting then spraying again then I soak the carbs in Yamaha's carb dip which is the best thing I have used so far. A smaller diameter wire inserted should help as well.
Thing is if all that is plugged up then what about the rest of that circuit in the carb. I would go to a soak or an ultrasonic bath to clean all of it. Nothing can be left to chance on a carb cleaning, which is why we always say the triple clean thing.2-79 XS1100 SF
2-78 XS1100 E Best bike Ever
80 XS 1100 SG Big bore kit but not fully running yet.
Couple of more parts bikes of which 2 more will live!Comment
-
I would highly recommend removing the carbs, remove fuel bowls, floats and vacuum diaphrams. Remove the pilot jets and main jets. Main jets removed you can remove the brass piece out the top of carbs. Put all the brass pieces and carb bodies in warmed up Pine-Sol. Only use original Pine-Sol.....do NOT use generic pine-sol! Soak it all fpr a period of time, remove the carb bodies and blow air using a pointed piece on end of blower. Use a magnifying glass to inspect that teeny atomizing hole in top-side of pilot jets that they are open and clean . Wah it all with hot water then blow clean and dry ALL pieces making sure they all are open and clean and re-assemble carbs and install. The STILL plugged pick-up tube in carb body indicates to me you actually haven't properly disassembled carbs and cleaned as I have stated above. THAT is why we state 'triple clean'! Hopefully by the third time, you will properly get them clean........'.patience grasshopper' and the need for being particular and through IS needed for these particular Mikuni carbs in order for them to work properly. You CANNOT just blow carb cleaner through the carb bodies and pieces and expect decent to good results!
Last edited by motoman; 03-12-2016, 07:25 PM.81H Venturer1100 "The Bentley" (on steroids) 97 Yamaha YZ250(age reducer) 92 Honda ST1100 "Twisty"(touring rocket) Age is relative to the number of seconds counted 'airing' out an 85ft. table-top.
. Wah it all with hot water then blow clean and dry ALL pieces making sure they all are open and clean and re-assemble carbs and install. The STILL plugged pick-up tube in carb body indicates to me you actually haven't properly disassembled carbs and cleaned as I have stated above. THAT is why we state 'triple clean'! Hopefully by the third time, you will properly get them clean........'.patience grasshopper' and the need for being particular and through IS needed for these particular Mikuni carbs in order for them to work properly. You CANNOT just blow carb cleaner through the carb bodies and pieces and expect decent to good results!
Last edited by motoman; 03-12-2016, 07:25 PM.81H Venturer1100 "The Bentley" (on steroids) 97 Yamaha YZ250(age reducer) 92 Honda ST1100 "Twisty"(touring rocket) Age is relative to the number of seconds counted 'airing' out an 85ft. table-top.Comment
-
Fuel Delivery Problems
I am assuming you will all say, clean the carbs a third time, but first just check out the video and let me know if there is anything I am still missing.
Updates: I stretched the little spring inside the vacuum petcocks, and now they are completely closed when there is no vacuum pressure from the engine and they don't leak (I also swapped the overflow and fuel supply lines, I am sure that helped as well). I bought one of the ultrasonic cleaners from HF and tossed in the carb bowls, now if I shoot cleaner in the bowl side, it shoots out the hole that the brass tube goes in.
In the video, I shot a little starter fluid in and then started it up. I was holding the throttle 1/3 to 1/2 open to get it to run, at 18 and 13 seconds I let the throttle down to 1/4 and it made a slightly different sound.
In the meantime, I guess I will clean the carbs again...79 FComment
-
Carb cleaning question
Ok i have the carbs all apart and running all of the jets and bowls through the ultrasonic cleaner. making sure every hole connects to its partner hole by shooting carb cleaner up the hole and checking it out the other side. there is one hole that I haven't found the other side to, it is on the top (diaphragm side) and it is the only hole that goes straight down. near the two holes with brass closing them off (the choke one and the other one).
does anyone know what that hole is?79 FComment
-
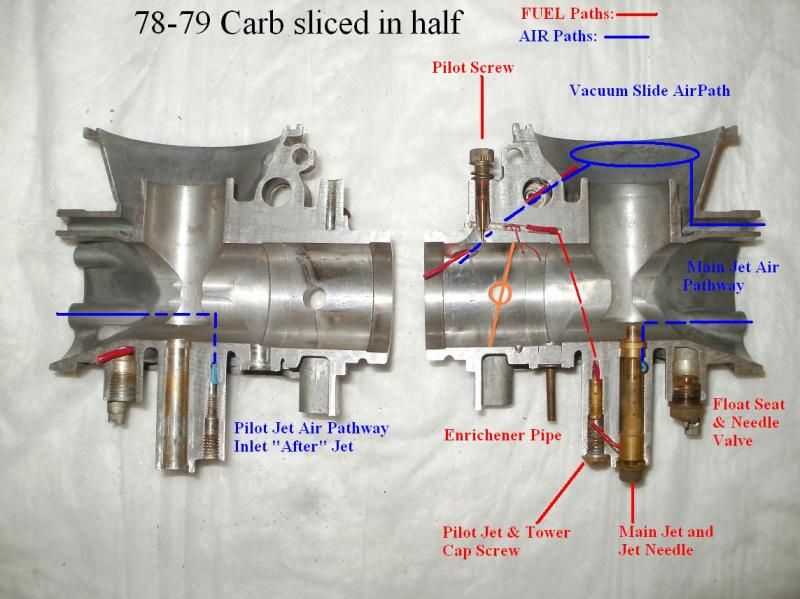

Maybe these will help, I sawed some carb bodies in half to show the internal pathways, these are of 79 F carbs.
In the top one, you can see the enrichment pipe, it runs up to the large hole where the enrichener plunger fits.
In the second is probably the hole in the diaphragm side you found, it's just a machining hole, it's capped off at the diaphragm side, but is open to let the fuel flow from the pilot jet up to that point, then across and forward to the pilot screw and the small 3 ports near the butterfly.
T.C.T. C. Gresham
81SH "Godzilla" . . .1179cc super-rat.
79SF "The Teacher" . . .basket case!
History shows again and again,
How nature points out the folly of men!Comment
-
Carbs are clean! Timing issues?
Hey guys, the carbs are clean and fuel delivery doesn't seem to be a problem. But it doesn't seem to be firing on all four nicely just yet. Check out the following video to here it running. It starts right up and idles ok, still more carb tuning to do, but I wanted to see if there was anything funky with the timing first.
Also, this may be completely unrelated- but when I started her up (with a little bit of starter fluid) the little cap by the timing chain tightener shot off and spurted some oil out with it.. Does anyone know why that would happen?
Here is the video.
79 FComment
-
Also, if I put my hand over the pipes while it's running- 1&2 puts out less of a punch than 3&479 FComment
-
This might also be helpful for trouble shooting. Here are all the plugs, 1,3, and 4 are pretty black. 2 isn't so bad.
79 FComment
-
DO NOT TRY TO START IT! I think the cam chain adjuster slipped as the stock one will do now and then.
Redo the cam chain adjustment first.
Your plugs show rich on all 4, so I think you will need to look at carb settings.
I didn't read the thread, but do you have a sync tool to vacuum sync the carbs?
If so, after the cam chain is fixed, fir up the bike with a 20" box fan blowing over the engine and let it warm up for about 4 minutes.
Then, starting at #3 sync the carbs. set #3 & #4 together, then #1 & #2, then #2 to #3. After, you will probably need to set the idle mixture and sync one more time.Ray Matteis
KE6NHG
XS1100 E '78 (winter project)
XS1100 SF Bob Jones worked on it!Comment
-
81H Venturer1100 "The Bentley" (on steroids) 97 Yamaha YZ250(age reducer) 92 Honda ST1100 "Twisty"(touring rocket) Age is relative to the number of seconds counted 'airing' out an 85ft. table-top.Comment
-
Still timing?
I am still having timing issues I think, 1&2 don't seem to be firing as often as 3&4. I fixed the cct issues with a helicoil and got her all buttoned back up. I am hoping this can be fixed by a good carb sync but I thought I would ask the if there was anything else I was missing.
See video for the difference in 1&2 and 3&4. You can hear 3&4 running pretty good and then 1&2 is intermittent.
79 FComment
-
On the bike, I suggest you remove that round ignition cover on left side, using both hands trying to stretch the insulation of pick-up coil wires every inch. Any stretch indicates wires under insulation is broken from the constant movement of timing advance assembly. If wires indicate they are broken internally, cut and use a shortened piece of naked butt connector with a teeny piece of shrink tubing slipped back over the fix. Do NOT solder the repaired area.
81H Venturer1100 "The Bentley" (on steroids) 97 Yamaha YZ250(age reducer) 92 Honda ST1100 "Twisty"(touring rocket) Age is relative to the number of seconds counted 'airing' out an 85ft. table-top.Comment


Comment