Announcement

Collapse
No announcement yet.

Different gas tanks?

Collapse
X
 
  • Filter
  • Time
  • Show
Clear All
new posts

  • #46
    As for the plugs, I feel like I should have them replaced in order to see what is happening inside of the cylinder (burning plugs or whatever). So will any plug work from that list that you have provided?
    I checked the list TC posted, and there are several resistor type plugs on the list. Just watch out for the ones with an "R" in the part number.

    Also, on the strap - it's about 1/8" thick. I don't think you'll be cutting it with snips unless your hands are a lot stronger than mine. A hacksaw will eat right through it, though. You want a little thickness to it so the clamp part grabs it firmly.
    Last edited by dbeardslee; 08-11-2015, 08:58 PM.
    I think I have a loose screw behind the handlebars.

    '79 XS11 Standard, Jardine 4/1, Dyna DC1-1 Coils, 145 mains, 45 pilots, plastic floats - 25.7mm, XV920 fuel valves, inline fuel filters, speed bleeders, Mikes XS pods, spade-type fuse block, fork brace, progressive fork springs/shocks, manual petcocks, 750 FD, Venture cam chain tensioner, SS brake lines

    Comment


    • #47
      Originally posted by dbeardslee View Post
      Also, on the strap - it's about 1/8" thick. I don't think you'll be cutting it with snips unless your hands are a lot stronger than mine. .
      YOU DOUBT ME! ;P. Didn't realize how thick they were, I'll need to find myself a hack saw! Guess I'll be making a trip home sometime :P. A mod like that probably wont' be done for a few moths yet
      80 Special Cafe Project

      Comment


      • #48
        Originally posted by Xarik View Post
        YOU DOUBT ME! ;P. Didn't realize how thick they were, I'll need to find myself a hack saw! Guess I'll be making a trip home sometime :P. A mod like that probably wont' be done for a few moths yet
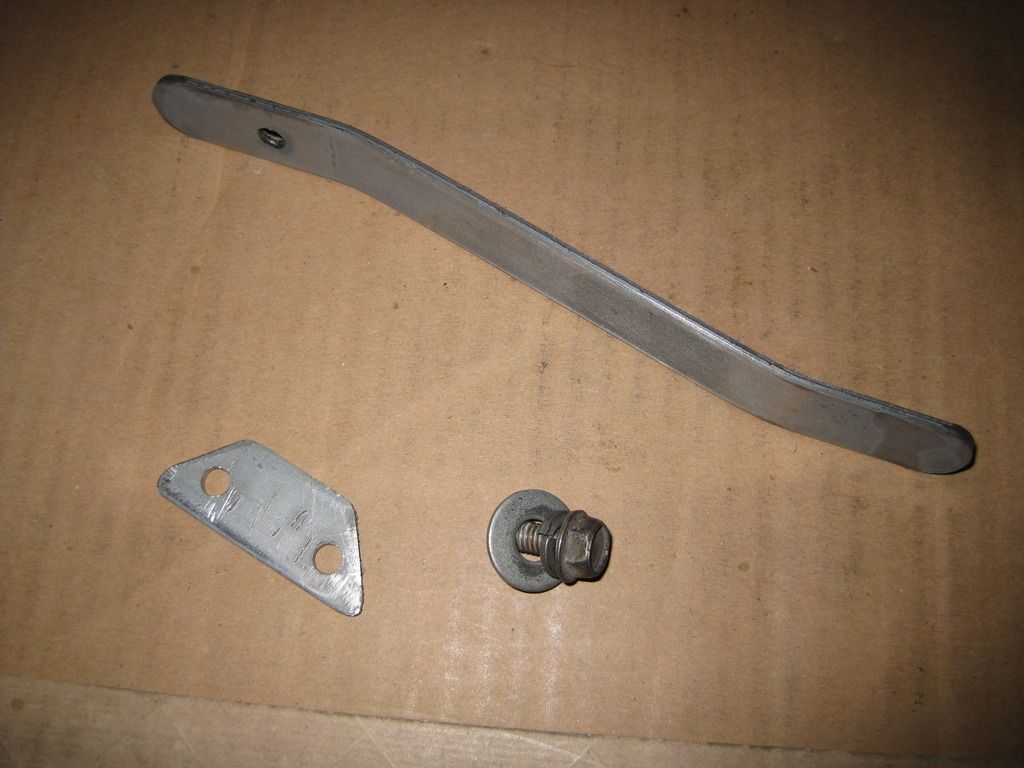
        I ran mine for quite a while without the strap, but when I bought new carb hangers I wanted to make sure they lasted as long as possible. I just made one for my brother last week. Matter of fact it's the one in the pics. I've still got some of that bar stock out in the mancave. If I get a little time and motivation I might just whip one up for you.
        I think I have a loose screw behind the handlebars.

        '79 XS11 Standard, Jardine 4/1, Dyna DC1-1 Coils, 145 mains, 45 pilots, plastic floats - 25.7mm, XV920 fuel valves, inline fuel filters, speed bleeders, Mikes XS pods, spade-type fuse block, fork brace, progressive fork springs/shocks, manual petcocks, 750 FD, Venture cam chain tensioner, SS brake lines

        Comment


        • #49
          Originally posted by dbeardslee View Post
          I ran mine for quite a while without the strap, but when I bought new carb hangers I wanted to make sure they lasted as long as possible. I just made one for my brother last week. Matter of fact it's the one in the pics. I've still got some of that bar stock out in the mancave. If I get a little time and motivation I might just whip one up for you.
          Hey that'd be amazing! Any little bit on my new project would help. I've bit off quite a lot here. This is my second bike, my first was a Ninja 250 that I went down on last week (I'm fine and the bike is sold now). So I'm putting all my effort into this new one and I'm extremely excited !
          80 Special Cafe Project

          Comment


          • #50
            Originally posted by Xarik View Post
            Hey that'd be amazing! Any little bit on my new project would help. I've bit off quite a lot here. This is my second bike, my first was a Ninja 250 that I went down on last week (I'm fine and the bike is sold now). So I'm putting all my effort into this new one and I'm extremely excited !
            Ouch! Be careful with that 11. They're heavy bikes with LOTS of power, and can be very unforgiving if you let one get away from you.
            I think I have a loose screw behind the handlebars.

            '79 XS11 Standard, Jardine 4/1, Dyna DC1-1 Coils, 145 mains, 45 pilots, plastic floats - 25.7mm, XV920 fuel valves, inline fuel filters, speed bleeders, Mikes XS pods, spade-type fuse block, fork brace, progressive fork springs/shocks, manual petcocks, 750 FD, Venture cam chain tensioner, SS brake lines

            Comment


            • #51
              Originally posted by dbeardslee View Post
              Ouch! Be careful with that 11. They're heavy bikes with LOTS of power, and can be very unforgiving if you let one get away from you.
              I understand, the ninja went down with basically no explanation. The only guess anyone could come up with was that the tires weren't warmed up on the sides yet, but it wasn't a hard corner, I wasn't breaking or accelerating, I wasn't going too slow/fast, it was clean on the ground, my tires are in great shape and there was just no explanation to how or why it went down. I'm taking this xs1100 very slowly though. I got comfortable on the ninja very fast, but I'm sure 1100 (3 or 4 times more HP) will be enough to scare the crap out of me and utilize more throttle control and to be easy on the clutch. But it'll be very difficult to do anything with the bike in its current state!
              80 Special Cafe Project

              Comment


              • #52
                Okay, Xarik...

                I got feeling spunky today and knocked out a carb brace for you. I had a bolt and some washers that will fit for the frame connection, but you'll have to get your own carb clamp bolts. M5X0.8X25mm socket head bolts should work perfect, but I think I used 30mm on mine and my brother's. You should be able to get them at just about any hardware store. I'd put a washer and a lock washer on them too.

                I sized the clamp for '79 carbs, and I wouldn't swear that the distance between the bolts is the same on '80's. Should be real close, but you might have to adjust the holes a little with a round file if it doesn't fit perfectly.

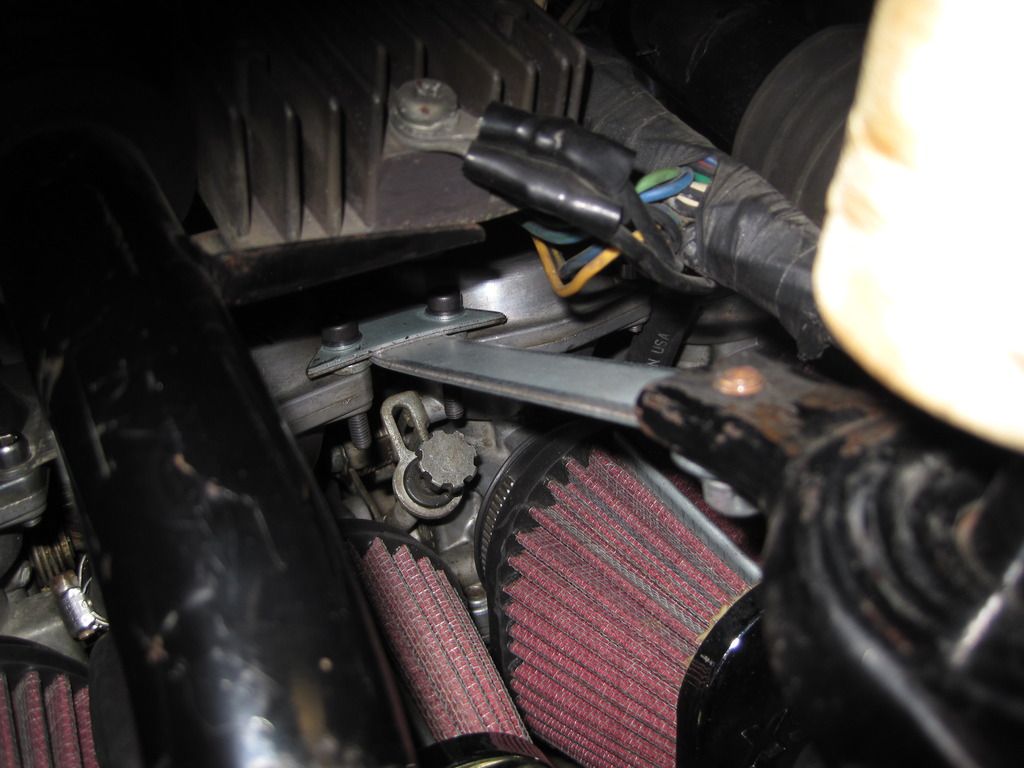
                When you install it, put the clamp loosely on the carb first, then slide the tongue of the brace between the clamp and the bracket for the carbs. Then bolt the other end to the frame and lastly snug the bolts down on the carb clamp with a 5mm allen wrench.

                Here it is -


                I used my brother's for a template, and since I had the seat off and the tank raised, I took some better pics to show how it installs -


                And here's a pic of the brand new Mikes XS pods I installed on Betsy last week. I gave the old ones to my brother. I thought about making some velocity stacks as TC recommends, but in the end I decided not to. My reason was simple. As you can see there's not a tremendous amount of room from the rear of the pod to the side covers. If I had installed velocity stacks it would have pushed the pods farther to the rear where they would be fighting the side covers for space. I don't doubt for a minute that velocity stacks will get you straighter air flow, but these work just fine without 'em, and it gives me a little more room. I can remove my carbs with the pods attached, and it's easier to remove and reinstall them when the carbs are off the bike. JAT


                PM me your address and I'll drop the brace in the mail to you.
                I think I have a loose screw behind the handlebars.

                '79 XS11 Standard, Jardine 4/1, Dyna DC1-1 Coils, 145 mains, 45 pilots, plastic floats - 25.7mm, XV920 fuel valves, inline fuel filters, speed bleeders, Mikes XS pods, spade-type fuse block, fork brace, progressive fork springs/shocks, manual petcocks, 750 FD, Venture cam chain tensioner, SS brake lines

                Comment


                • #53
                  Originally posted by dbeardslee View Post
                  I got feeling spunky today and knocked out a carb brace for you. I had a bolt and some washers that will fit for the frame connection, but you'll have to get your own carb clamp bolts. M5X0.8X25mm socket head bolts should work perfect, but I think I used 30mm on mine and my brother's. You should be able to get them at just about any hardware store. I'd put a washer and a lock washer on them too.

                  I sized the clamp for '79 carbs, and I wouldn't swear that the distance between the bolts is the same on '80's. Should be real close, but you might have to adjust the holes a little with a round file if it doesn't fit perfectly.

                  When you install it, put the clamp loosely on the carb first, then slide the tongue of the brace between the clamp and the bracket for the carbs. Then bolt the other end to the frame and lastly snug the bolts down on the carb clamp with a 5mm allen wrench.

                  Here it is -


                  I used my brother's for a template, and since I had the seat off and the tank raised, I took some better pics to show how it installs -


                  And here's a pic of the brand new Mikes XS pods I installed on Betsy last week. I gave the old ones to my brother. I thought about making some velocity stacks as TC recommends, but in the end I decided not to. My reason was simple. As you can see there's not a tremendous amount of room from the rear of the pod to the side covers. If I had installed velocity stacks it would have pushed the pods farther to the rear where they would be fighting the side covers for space. I don't doubt for a minute that velocity stacks will get you straighter air flow, but these work just fine without 'em, and it gives me a little more room. I can remove my carbs with the pods attached, and it's easier to remove and reinstall them when the carbs are off the bike. JAT


                  PM me your address and I'll drop the brace in the mail to you.

                  WOW! THAT'S AWESOME!

                  Thank you SO much for the pictures and write up and I'm ESPECIALLY thankful for the piece itself haha. I'll be sure to put that on to help keep the carbs in place! WOO that's awesome haha.

                  I see your issue with doing the velocity stack, hopefully mine has enough room for them though. I think it'll be a smarter rout for me to do the velocity stack since they are recommended for any type of filter, why not just use the ones that I have and put on the velocity stack.

                  I'll go ahead and PM you right away!
                  80 Special Cafe Project

                  Comment


                  • #54
                    Hey again,

                    I posted a link to the tech tip for the velocity stacks, and the info about the fitting process is in there, but you've got it right in the order you stated. I didn't shove the PVC pipe ALL the way up against the carbs...I left about a 1/2" or so of space to ensure that the PVC also wouldn't interfere with the ports. The filters are just a little larger than the PVC and that's why you need something wrapped around the PVC to widen it enough to help make a seal with the pod filters. Iused Duct Tape as you can see!

                    Yes, you can use essentially any of the spark plugs in that listing, would just recommend getting non-resistor....all of the plugs will fit the plug hole, protrude the proper amount into the combustion chamber, etc.

                    That was great of DB to make that bracket/brace for you.
                    Don't forget to check to see if the carbs have the sharing tunnel or not..and IF they DO...then the carbs need the rubber pilot jet tower caps inside the bowl area to prevent them from being too rich.

                    As far as your spill......it only takes a few drops of oil/antifreeze/even air conditioner condensation drip to provide the lubricant to allow the wheel/tire to loose traction enough to drop it! Also, how OLD were the tires on the bike....after about 5 years, the Ozone hardens them and they can get slippery just due to hardening. This will remind you to check the BORN ON date on your 11. If you're not familiar with that, see the front tire change tip/pictorial....it shows you what the born on date looks like, how to read it, etc.

                    We're pulling for you to have some good luck and that the airfilter stack mod along with verifying the carbs/jets...sharing tunnel or not, pilot jet tower caps if needed, will get the bike back into decent running condition.

                    Yep, you'll need to learn how to play with the clutch/throttle a bit more to be able to be able to control the roll on/off of the power....there's a bit of slack/slop in the drivetrain due to the driveshaft, middle gear, final drive, ujoint, and so there can be some jerkyness if you abruptly apply or release the throttle. Hopefully you've attended a MSF course recently!?

                    T.C.
                    T. C. Gresham
                    81SH "Godzilla" . . .1179cc super-rat.
                    79SF "The Teacher" . . .basket case!
                    History shows again and again,
                    How nature points out the folly of men!

                    Comment


                    • #55
                      Originally posted by TopCatGr58 View Post
                      Hey again,

                      I posted a link to the tech tip for the velocity stacks, and the info about the fitting process is in there, but you've got it right in the order you stated. I didn't shove the PVC pipe ALL the way up against the carbs...I left about a 1/2" or so of space to ensure that the PVC also wouldn't interfere with the ports. The filters are just a little larger than the PVC and that's why you need something wrapped around the PVC to widen it enough to help make a seal with the pod filters. Iused Duct Tape as you can see!

                      Yes, you can use essentially any of the spark plugs in that listing, would just recommend getting non-resistor....all of the plugs will fit the plug hole, protrude the proper amount into the combustion chamber, etc.

                      That was great of DB to make that bracket/brace for you.
                      Don't forget to check to see if the carbs have the sharing tunnel or not..and IF they DO...then the carbs need the rubber pilot jet tower caps inside the bowl area to prevent them from being too rich.

                      As far as your spill......it only takes a few drops of oil/antifreeze/even air conditioner condensation drip to provide the lubricant to allow the wheel/tire to loose traction enough to drop it! Also, how OLD were the tires on the bike....after about 5 years, the Ozone hardens them and they can get slippery just due to hardening. This will remind you to check the BORN ON date on your 11. If you're not familiar with that, see the front tire change tip/pictorial....it shows you what the born on date looks like, how to read it, etc.

                      We're pulling for you to have some good luck and that the airfilter stack mod along with verifying the carbs/jets...sharing tunnel or not, pilot jet tower caps if needed, will get the bike back into decent running condition.

                      Yep, you'll need to learn how to play with the clutch/throttle a bit more to be able to be able to control the roll on/off of the power....there's a bit of slack/slop in the drivetrain due to the driveshaft, middle gear, final drive, ujoint, and so there can be some jerkyness if you abruptly apply or release the throttle. Hopefully you've attended a MSF course recently!?

                      T.C.

                      Yup, I took a MSF coarse. cost me $350, but the coarse was the best choice I could have ever made! I learned WAY more than anyone could have told me in my friend group :P.

                      I may have missed something, what is this "sharing tunnel" that you're talking about? Sorry if I missed something that was obvious :P

                      As for the tires I had on the Ninja, the rear was less than a year old and the front was less than 3 months old and I made sure that the treads were similar as I've heard that that could cause an issue. I am attributing it to some unknown force...perhaps a ghost pushed me over...idk, but the fact is that I went down and it made for a good video and a good story and a tough lesson .

                      I just wanted to make sure that that was the only write up for the velocity stacks, it's extremely helpful, but I was looking for measurements, of course it'll be different for every set of pods :P. I'll have to fudge around with it and see what I can do! Hopefully this Saturday I can run out to the mechanics place and have them set it outside for me to just work on that and see how it runs. Past that, they can clean the tank and figure out the jets
                      80 Special Cafe Project

                      Comment


                      • #56
                        The Sharing tunnel info was part of post #33 just below the Photo of the Filter mount/lip!

                        The 80 and 81's are supposed to have essentially the same carbs....provided you don't have the rare bastardized early 80 series that still have the sharing tunnel between the pilot and main jet towers....which feeds the pilot circuit thru the main jet similar to the older 78-79 carbs....but the 80-81's use smaller mains. The later 80-81 carbs do NOT have a sharing tunnel and the pilot jet feeds directly from the carb bowl and not via the main jet. With the bastardized 80 carbs with the sharing tunnel...the pilot jet tower is supposed to be capped off with rubber plugs so that it feeds only from the main jet tower....otherwise it can be too rich.
                        That tech tip was the only one posted with the Plumbing parts mod...there's another tip there about using the OEM velocity stacks from the OEM airbox, but you don't have the OEM airbox to cannabalize.

                        T.C.
                        T. C. Gresham
                        81SH "Godzilla" . . .1179cc super-rat.
                        79SF "The Teacher" . . .basket case!
                        History shows again and again,
                        How nature points out the folly of men!

                        Comment


                        • #57
                          Originally posted by TopCatGr58 View Post
                          The Sharing tunnel info was part of post #33 just below the Photo of the Filter mount/lip!


                          That tech tip was the only one posted with the Plumbing parts mod...there's another tip there about using the OEM velocity stacks from the OEM airbox, but you don't have the OEM airbox to cannabalize.

                          T.C.
                          OH! Finally found it :P. The rare 1980 carb that is "bastardized". Will it be obviously different from the image that is posted there?
                          80 Special Cafe Project

                          Comment


                          • #58
                            Originally posted by Xarik View Post
                            OH! Finally found it :P. The rare 1980 carb that is "bastardized". Will it be obviously different from the image that is posted there?
                            To check for the tunnel you have to remove a main jet and look for a hole that runs between the main jet tower and the pilot jet tower. If the hole is there then you need the rubber plug on the pilot tower. If there's no hole, then there should be no plug.
                            I think I have a loose screw behind the handlebars.

                            '79 XS11 Standard, Jardine 4/1, Dyna DC1-1 Coils, 145 mains, 45 pilots, plastic floats - 25.7mm, XV920 fuel valves, inline fuel filters, speed bleeders, Mikes XS pods, spade-type fuse block, fork brace, progressive fork springs/shocks, manual petcocks, 750 FD, Venture cam chain tensioner, SS brake lines

                            Comment


                            • #59
                              I'm not sure if you ordered those pods from MikeXS yet but if not here is another site with guaranteed lipless pods. These are the ones I have on my bike and $20 less than Mike's.

                              http://yamahazone.biz/airfilters.html
                              Part number: PART # 005-121

                              Here they are on mine:
                              80 SG BRAT

                              http://s659.photobucket.com/user/rya...d.jpg.html?o=2

                              Comment


                              • #60
                                Originally posted by RyanMR2 View Post
                                I'm not sure if you ordered those pods from MikeXS yet but if not here is another site with guaranteed lipless pods. These are the ones I have on my bike and $20 less than Mike's.

                                http://yamahazone.biz/airfilters.html
                                Part number: PART # 005-121

                                Here they are on mine:
                                Your bike...I want it!

                                VERY well done bike, I love the look and it is EXACTLY what I'm going for. I had a change of heart from the Cafe seat and want a brat seat...gotta get the ladies ;P (Jk, I just like the look more). You should message me about the handlebars and what you did there, I was considering clip ons are trying to find the right clubmans, but I'd love to know what you did.

                                I'm throwing around all of my options here....Yes the velocity stack will save me money and make the bike run better, but at this point, I'd rather have the correct pods and then just go ahead and do the velocity stacks later as an upgrade. SO I think I'll purchase from the link provided and add those to the bike whenever they show up. (Dang shipping is expensive from this site tho).

                                Seriously though, you should message me about your handelbars and the seat for your bike, I want to do that
                                80 Special Cafe Project

                                Comment

                                Working...
                                X