Announcement

Collapse
No announcement yet.

1980 XS11 Special - Ugly Duckling Rebuild

Collapse
X
 
  • Filter
  • Time
  • Show
Clear All
new posts

  • #16
    LOL Ian...
    1980 XS650G Special-Two
    1993 Honda ST1100

    Comment


    • #17
      If I did not find that treasure of an OEM exhaust system, I would have gone the Supertrapp route. However, I never found those mufflers cheap, and I needed two!
      1979 XS1100F
      2H9 Mod, Truck-Lite LED Headlight, TECHNA-FIT S/S Brake Lines, Rear Air Shocks, TKAT Fork Brace, Dyna DC-I Coils, TC Fuse Block, Barnett HD Clutch Springs, Superbike Handlebars, V-Star 650 ACCT, NGK Irridium Plugs, OEM Exhaust. CNC-Cut 2nd Gear Dogs; Ported/Milled Head; Modded Airbox: 8x8 Wix Panel Filter; #137.5 Main Jet, Viper Yellow Paint, Michelin Pilot Activ F/R, Interstate AGM Battery, 14MM MC, Maier Fairing, Cree LED Fog Lights.

      Comment


      • #18
        Its been a few years since I bought this Supertrapp but I recall paying only $220 from Summit Racing...I dont think thats cost prohibitive..when you consider that when MAC (the last company to make an aftermarket exhaust) new were going for $360+ and about a year ago on ebay a pristine XS1100 NOS exhaust sold for over $1300 I looked for a Kerker for over 4 years...and i knew people that had them and wouldnt sell...finally I wore down one member here but I still had to wave $400 in his face before I could drag it away...

        Last edited by madmax-im; 05-23-2015, 09:58 AM.
        1980 XS650G Special-Two
        1993 Honda ST1100

        Comment


        • #19
          Hey again Kurt,

          Well, I'm gifted with the ability to "touch-type", so gabbing a lot is relatively easy for me.

          I know you were able to get the bike to run, but these machines are tough, and can often run on only 2 cylinders instead of 4. I'm just saying that I hope you found the diagnostic portion of the manual for the coils and that you tested them Prior to ordering the wires and caps. The coils are now some 35+ years old...and they weren't that strong to begin with....at just a bit over 15K volts. And because yours in an 80, it still uses the 2H7 TCI, and a ballast resistor inline for powering the coils during running. The coils are 1.5 ohm type. In 81 Yamaha did away with the Ballast resistor, upgraded the TCI in the 4RO style and went with 3.0 ohm coils instead so that they get and use 12 Volts all the time. With the 1.5 ohm type, the ballast resistor drops the voltage down to about 9 or so during running to prevent burning them up. During starting the TCI bypasses the B.R. and sends the full 12V to the coils to provide a little stronger spark for starting...but once running, routes power thru the B.R. to the coils at reduced voltage....which also makes for reduced KV output.

          A hi output type of ignition coil is a nice upgrade....but a little costly when you go with NEW Dynatek or ACCEL at ~$125-$150 or more a pair with wires and such. But they provide much stronger spark, like 30+KV, and when using the 3.0 ohm type, you bypass the B.R. and feed 12 volts to them ALL the time, so that they are providing full strength spark ALL THE TIME. Performance reports from users say that it doesn't necessarily provide for any better fuel economy....but general starting and seat of the pants power feels better, definitely better low rpm spark energy for smoother idle and low rpm throttle response...since near/at idle, the bike is essentially running off of the battery alone, and voltage drops can occur throughout the system...and with the old coils/B.R., voltage drops can cause low rpm misses.

          After typing the above coil info..I then re-glanced at the photos and noticed both the Multi-meter and the manual the coils were laying on....so you've probably done your testing homework. Wish you had checked here before ordering your manual.....we have a member that provides PDF online version for free download from his hosted server.... Find Catatonic Bug and look at his profile, you'll find the links to his site....the PDF Service manual is ~200 MBs, along with other manuals if you like.

          Put your 160 speedo in the parts for sale forum....you'll definitely be able to sell it and recoup some of your $$ for other parts..ie the 85 MPH speedo and such. And hey, I'm also in my late 50's but I do like having the ability to see my speed above the 85 mph level....occasionally!

          Glad to hear you have TIG skills....many folks have wanted to get some Stainless Steel headers/pipes for their machines. Find a thread by James England.....he RESTORED a 78E to pristine condition, and put on a NEW custom built SS set of pipes.....$$ But being able to BUILD your own could make SS a bit more affordable. Remember, the OEM headers are double walled which kept them from bluing, but the aftermarket ones are all single walled, so discoloration is very common....blue or gold depending on your tuning. There is a process you may be aware of ...JET HOT COATING or similar...they now have it in an almost chrome/silver finish as well as black, and will preserve homebuilt ones much better than just hi-temp painting....and the coating is also reported to make them perform better due to keeping the heat within them and sending it out the back instead of radiating as much thru the pipe walls! YMMV

          As for the CCT, PLEASE read that thread and others regarding both the adjustment procedure as well as the R&R process....due to the chance for excessive slack in the chain when removing the CCT allowing it/chain to drop down around the crankshaft sprocket skipping teeth and going out of time....or even slipping BESIDE the sprocket without detection...and then really causing lots of damage bending all valves and such! Highly recommend removing the valve cover...good time for valve clearance check...and shim adjustment, along with being able to ENSURE that the cams/crank stay in proper valve timing while R&R'ing the CCT! No aspersions on your experience as a previous Yamaha mechanic and such...but this is a very critical process and several folks with experience have fubared it!

          Okay, an otherwise complete non-hacked harness will go a long way. Would still highly recommend replacing the OEM glass fuse block with a SOLID ATCO style of your choice....don't forget the separate MAIN fuse that's usually on the other side of the frame away from the fuseblock. And while you'll have the harness and all connectors apart....DEOXIT or similar contact cleaner is also highly recommended...and then a judicious use of Dielectric Grease to protect/seal the junctions afterwards....again you can read the recent discussions regarding WHEN to apply the "Insulating Grease"....before or after the plugs are connected.

          Okay, I'll shut up now.

          T.C.
          T. C. Gresham
          81SH "Godzilla" . . .1179cc super-rat.
          79SF "The Teacher" . . .basket case!
          History shows again and again,
          How nature points out the folly of men!

          Comment


          • #20
            Thirty-Seven Splices (stopped counting) Near Miss with the XJ....

            Originally posted by TopCatGr58 View Post
            A hi output type of ignition coil is a nice upgrade....but a little costly when you go with NEW Dynatek or ACCEL at ~$125-$150 or more a pair with wires and such........After typing the above coil info..I then re-glanced at the photos and noticed both the Multi-meter and the manual the coils were laying on...
            Before the initial start-up attempt I verified I had spark on all the cylinders. It’s absolutely amazing that garbage provided any spark at all. I performed all the tests on the coils recommended by the authors of the “How-To” thread as well as what I could find in the manual. Everything was in-spec after the coil wires were replaced. They’re done now and hopefully ready to roll. O’Reilly’s only charged me .68 per foot and I grabbed 12’ for less than $10. I made the lengths each 18” and will cut ‘em back when I install them. I got extra for later projects.


            Once I get all the major difficulties taken care of, and the bike is driveable, I’ll probably make the coil upgrade a high priority. Also, once the bike is in a driving form, I’ll completely disassemble it to have the frame powder coated and re-assemble it from scratch checking every nut & bolt before we start making use of it on a regular basis.

            Originally posted by TopCatGr58 View Post
            Put your 160 speedo in the parts for sale forum....you'll definitely be able to sell it and recoup some of your $$ for other parts..ie the 85 MPH speedo and such. And hey, I'm also in my late 50's but I do like having the ability to see my speed above the 85 mph level....occasionally!
            That’s something I thought about doing. Maybe one of the “Younger Folks” needs the ability I don’t desire. Wish I could trade it for a 160mph for the T/A? LOL. The T/A’s speedo is a 100 limit. I’ve buried that thing more than once lately!

            Originally posted by TopCatGr58 View Post
            Glad to hear you have TIG skills....many folks have wanted to get some Stainless Steel headers/pipes for their machines.
            If I make one, and I most likely will, I’ll go with stainless. Anything less from a complete custom job would be a waste of my time. Unfortunately, although I’d have no problem with the welding, bending pipe is an issue. I however have a local guy that does all the exhausts on our Hot Rods. IF his bender can do a pipe this small I’M ALL SET!


            At them moment this is all I have after cleaning all the black bomb paint off of them. The collector for the left was rotted terribly and I had to cut it back to good metal. If nothing else, these pieces can be used for mocking up the SS pipes.

            Originally posted by TopCatGr58 View Post
            There is a process you may be aware of ...JET HOT COATING or similar...they now have it in an almost chrome/silver finish
            I’m a Maintenance Manager for a very large production facility. We have an internal chrome plating operation but is unfortunately designed to plate very specific roller and can’t be used for other items – SHUCKS! However, we use a local company to coat other rollers with a process they call DIAMONITE. This is a nickel plating method that is actually tougher than chrome and does not require the copper layer for chrome adhesion. SEVERAL of the engine brackets on my T/A & Z-28 are Diamonited. The offered to do the Hedman Headers for my T/A but I found a set of Ceramic Hookers for cheap first.

            Because of very stringent EPA & OSHA regulations, which get more demanding each and every year, Chrome Plating in the U.S. is going to become a thing of the past before ‘ya know it.

            Originally posted by TopCatGr58 View Post
            As for the CCT, PLEASE read that thread and others regarding both the adjustment procedure as well as the R&R process.
            Thank you very much for the reminder! My professional experience as a Yamaha mechanic was EXTREMELY limited and it was more than 30+ years ago. I would most likely HAVE screwed this up.

            Originally posted by TopCatGr58 View Post
            Okay, an otherwise complete non-hacked harness will go a long way.
            Today I was working on a number of items and decided to COUNT the number of splices I could find in the harness. I REACHED 37 – YES – THIRTY-SEVEN SPLICES before I got pissed and stopped counting. I haven’t even been brave enough to open the headlamp assembly. Who knows what the heck I’ll find in there!
            Originally posted by TopCatGr58 View Post
            Okay, I'll shut up now.
            T.C.
            Please DO NOT SHUT UP! I’m learning here! If you write it, I will take the time to read it and learn from it!

            XS Folks,
            For those that thought my garage was spotless, you can see that it clearly is not on the other side….


            I felt my XJ was getting a little neglected so I took her for a spin before she got mad at me. I the XJ over to the local convenience store and was nearly smashed by some young girl talking on her *&^%% cell phone! “^&$*%()#@* IDIOT!” GET OFF THE (*^&%%$# PHONE

            I thought about kicking a huge dent into her driver’s door but decided to stay out of jail…

            BE CAREFUL OUT THERE!!!!!

            Respectfully
            Kurt
            Kurt Boehringer
            Peachtree City, Georgia

            1970 - CT70K0 - Mini-Trail
            1978 - SR500 - Thumper
            1979 - CT70H - Mini-Trail
            1979 - XS1100SF - Pensacola
            1980 - XS850SG - Rocky
            1980 - XS1100SG - The Ugly Duck
            1980 - XS1100SG - Mayberry Duck
            1981 - XS1100SH - DEAD Duck Cafe'
            1981 - XJ550 Maxim - Nancy's Mini-Max
            1982 - XJ650 SECA - Hurricane
            1986 - FJ1200 - Georgia Big Red
            1992 - FZR1000 - Genesis
            2016 - FJR1300A - Montgomery

            Comment


            • #21
              I thought about kicking a huge dent into her driver’s door but decided to stay out of jail…
              Yeah, that is why I don't "pack" when I ride. A 0.45 hole through the proper door would land me in jail for a LONG time in this state. And the problem is here it is a multiple time per day event!
              Ray Matteis
              KE6NHG
              XS1100 E '78 (winter project)
              XS1100 SF Bob Jones worked on it!

              Comment


              • #22
                Okay, you asked for it!

                Hey again,

                Hope you're reading other posts/threads while you're perusing the site, with your level of rebuild, you'll be able to glean info about every system on your machine that will either help you, make it easier, or save you $ when you get to it.

                Take a look at the recent SHOCK recommendation thread.

                I meant to say something about the STOCK BUCKHORN Special handlebars before, just forgot! I rode with them for ~10 years when I got mine NEW in '83, then it sat for 10 years with the 1st/2nd gear malady and I didn't know how to fix it, was afraid of splitting the cases, and also didn't have a garage or $$ at the time! 10 years later, I came across the XS11 Yahoo email list, and then XS11.com, learned about the Dremmel tranny fix, had gotten into a new home/garage with better finances, and also my Dad passed away in 1999, got me realizing life's too short, so I dove into it.

                I was still on a bit of a budget, so tried to keep expenses to a reasonable level, but splurged on the 1179 cc "little" Wiseco big bore kit, had a local motorcycle racing/builder shop perform my boring, but I did all the work myself, didn't tear down/split the cases....bike had an estimated ~50k miles on it...my Odometer broke at 975...just used the tripometer to monitor gas, rode it daily commuting for work for 1.5 years, but then relied on car. Anyways, with everybody talking about how these machines were so well engineered with automotive style crank/rod bearings, and that they were known to go 100K or more miles easily, and I still had the fear of splitting cases, and the bike had NO symptoms of bottom end problems prior to the gears going bad, so I "assumed" that the bottom end bearings would still be fine for the rebuild, so I only put in new pistons/rings/wrist pins, and it's been working just fine for some 25K miles since!

                Back to the handlebars, for "most" folks they put the wrists in an awkward angle and can cause some discomfort with extended riding distances. Mine were all rusted anyways, and the recommendations were to get some off of the early series Gold Wings....they have a similar rise and pull back, but the wrist angles are much more ergonomic, and have worked very well. Now if you talk to JetMechMarty, he'll sing the praises for the buckhorns.....but then again he's a convert from the XS 650 twin....so "anything" was an upgrade from that! YMMV!!!

                With regards to your bike, the speedo has been swapped, so you don't really know how many miles are on the engine, nor how well or poorly it was treated, and without being able to ride it under normal full power, you don't know if it has the 1st/2nd gear symptoms or not? With your plans and work to get it running, and THEN tear it back down to FRAME for powder coating, that will the chance to get it running decently and to be able to put the tranny under good load/stress and see if you have any of the skipping gears symptoms....and if so...then you can plan on the repair when you tear it back down for frame painting.

                But to really be able to put the full engine power stress to the tranny, you'll need to ensure that the clutches are holding their best. The OEM springs have most likely gotten compressed from the 30+years of storage/use, and as part of your reconditioning, you'll want to pull the clutch basket out, inspect the frictions for spec....3.0mm max, 2.8 min, as well as the steels...possibly rusted, clean and deburr the tangs and ensure flatness, and then put in new BARNETT springs, and then use any dino/synth oil of your choice as long as it doesn't have anything in the lower half of the API seal, no friction modifiers...which contribute to clutch slippage.

                I noticed that you have just the OEM intake boots on the carbs and velocity stacks....don't know if there WAS an oem airbox, or if this was how you got it? Again, pros/cons with OEM airbox vs. stack/pods....there are good tech tips about Modding for Stacks and pods to emulate the OEM stack straight air flow affect and still provide ease of R&R of the carbs as well as different looks and sounds. Aside from that, there isn't any real increase in performance/airflow with Pods...and some folks complain about tuning problems. We came up with the Pods stack mod due to the prominent lip on the cheap EMGO brand cone filters interfering with the carb inlet ports, and later learned of the benefit of the stack design that emulates the OEM airbox internal stacks, and with the stacks....the tuning issues seem to be moot...YMMV! Other brands...ie. XS on Partsnmore and MikesXS have K&N clone style pods without any prominent lip to interfere with air flow, but even so "WE" still recommend installing mounting stacks for the Pods vs. just putting them directly on the carbs...again to help with the air flow characteristics.

                The OEM brake lines are JUNK....Vinyl expands and gives you a mushy feel. We highly suggest going to Stainless Braided lines. The OEM master cylinder is large....~16mm to provide the amount of fluid needed to drive both caliper's single pistons. The Specials have the funky swivel calipers with slanted pads, they work adequately when in good condition and the SS lines will give you a firmer lever feel and response. Due to the single bolt swivel design, upgrading to modern 2 or more piston calipers is very problematic. IT can be done for someone with an adventureous attitude and the equipment to perform the NON-reversible mods to the fork sliders...see this long thread!

                http://www.xs11.com/forum/showthread...ial+fork+brake

                I have a smaller XJ front MC, my cheap solution to my damaged OEM during my initial rebuild...didn't realize when I got it that the XJ only drove 1 caliper, the other front caliper was driven by the rear MC with a metered splitter!! With my OEM vinyl lines when I first put it on, I had to pump the lever at least once to get any decent pressure, but once I put the SS lines on there, it was quite adequate with the OEM calipers...and then when I did this 2 piston caliper upgrade, the combined fluid volume needed was a little less than the OEM calipers, so it worked even better. Folks with Standards/forks....or the 81LH forks/sliders have it easier/better for modding to modern calipers due to the dual bolt mounting design vs. the special's single swivel bolt. Also, inspect your BOLT for trueness....if it's slightly bent...it can cause PULSING...and regrettably they can get bent from aggresive braking action! And I think it was already mentioned, when rebuilding the calipers, to scrape thorughly underneath and inside the caliper piston O-ring Groove....corrosion likes to build up there putting excessive pressure on the ring/then the piston not allowing it to slide/release properly and can lead to overheating/stuck caliper....aside from the spooge hole in the MC! Replacement pistons are available from aftermarket source, I don't have the link handy, but I'm sure someone can chime in IF you need it, if you don't find it in a search.

                Back to the wiring harness...remember to inspect/ clean the ALT plugs BEHIND the main fuse panel....known point of corrosion and then resultant failure due to resistance overheating melting!! The Tach gets it signal from one of the legs off the ALT's 3 phases. Also, all of the combined ground wires at the frame/Reg-Rect connection under the tank is another source of problems/electrical gremlins....aside from the handlebar kill switch and the main ignition switch. And it's recommended to ADD an additional ground wire from that R/R to the battery ground, not just relying on the battery cable to frame, as well as the 2nd ground strap at the starter/engine case below the carbs to frame.

                T.C.
                T. C. Gresham
                81SH "Godzilla" . . .1179cc super-rat.
                79SF "The Teacher" . . .basket case!
                History shows again and again,
                How nature points out the folly of men!

                Comment


                • #23
                  Ugly Duckling Gets Paint! - May not quite so ugly?

                  T.C.
                  A little short on time as I have to go clean up the mess but I have been looking at a lot of other threads gaining info. I found the bolts on BOTH front calipers are bent BADLY. They will be replaced. Found that info in another thread. I also noticed a guy having trouble spinning his final drive and went & changed my oil in both mid-drive and final drive. Mid looked pretty clean. Final looked like MUD.

                  I'm looking for additional info on aftermarket front master cylinders? I took mine apart and found the rubber diaphragm broken. A rebuilt kit & diaphragm or used one (which may be no better than mine) is running about the same $$ as some I've seen brand new aftermarket? I saw nothing in the BRAKES sections.

                  XS Guys,
                  Again, just a quickie as it's time to clean up the mess and start the grill. Hope everyone is having a great holiday weekend so far..... I can't keep my hands off of the XS11 and decided since my harness hadn't showed I do some other stuff.


                  Although my wife knows my admiration for the "Blue Hues" she voted for the Green. She didn't really OBJECT to blue but I could tell it was her preference. The paint is still wet (Tacky) but it's really beginning to grow on me. I think I'm gonna like it a lot.


                  The tank was completely sandblasted and primered in a PPG heavy sandable primer after a light coat of bare metal primer. The top-coat is PPG JAU series single-stage. This is a 2003 Honda Accord car color... Sorry

                  I did NOT take the time to finesse the body of the tank and there is a couple barely noticeable dings. I can fix those at a later date with ease but at least I have a nice base to work from, the tank won't rust any further, and I won't have to flip it for a final touch-up as the undersides of all the parts will certainly be fine as is. I will likely need to apply an internal coating due to some interior rust I could not remove.

                  I know it might be better to look at the PPG color swatches and pick something original but using up something I have "In-Stock" is a great way for me to save $$$ and use those funds on some of the MANY MANY items I need to make her run properly.... Heck, at this pace the XS may be able to attend the North Carolina Gathering! 
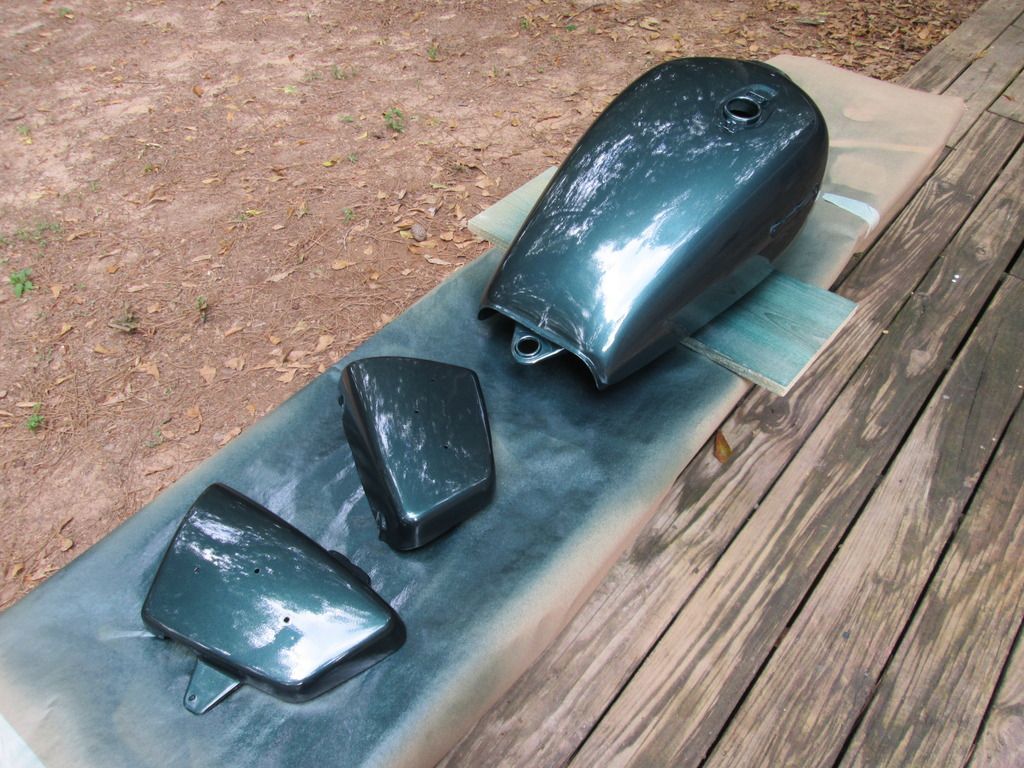
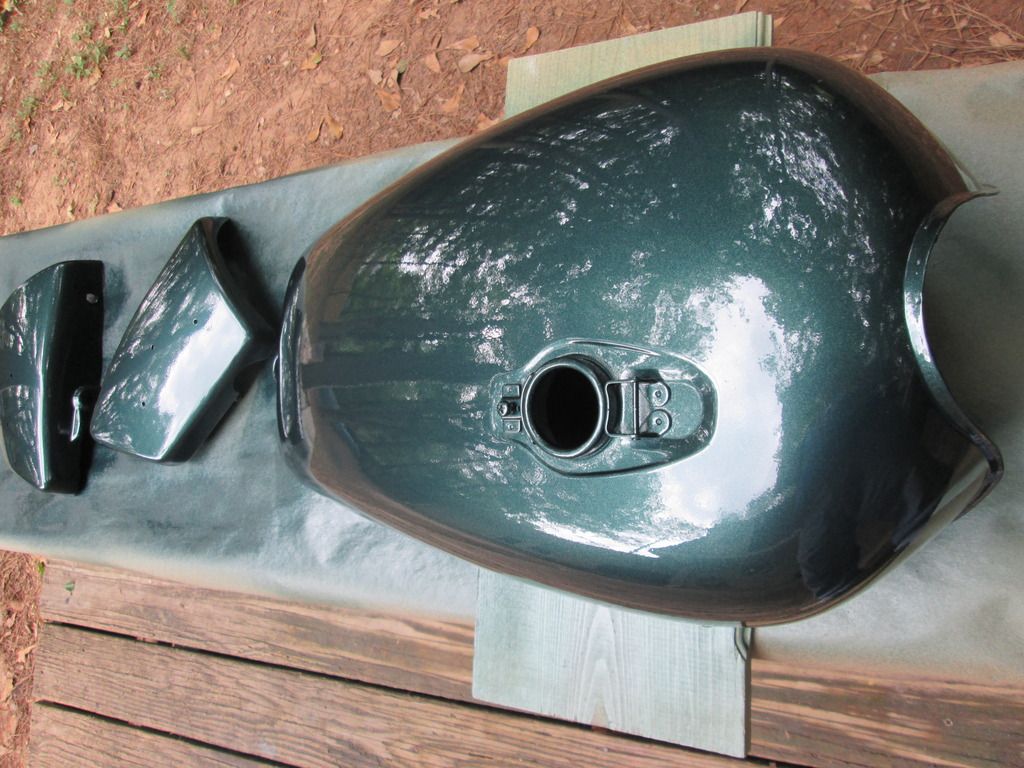
Especially since the bride is ALL IN on the event!

                  What do ya'll think of the color? If you think it stinks you won't hurt my feelings.

                  Respectfully,
                  Kurt
                  Kurt Boehringer
                  Peachtree City, Georgia

                  1970 - CT70K0 - Mini-Trail
                  1978 - SR500 - Thumper
                  1979 - CT70H - Mini-Trail
                  1979 - XS1100SF - Pensacola
                  1980 - XS850SG - Rocky
                  1980 - XS1100SG - The Ugly Duck
                  1980 - XS1100SG - Mayberry Duck
                  1981 - XS1100SH - DEAD Duck Cafe'
                  1981 - XJ550 Maxim - Nancy's Mini-Max
                  1982 - XJ650 SECA - Hurricane
                  1986 - FJ1200 - Georgia Big Red
                  1992 - FZR1000 - Genesis
                  2016 - FJR1300A - Montgomery

                  Comment


                  • #24
                    I think if your wife likes the color you're in like Flynn -- Happy Memorial Day to you and your'n too!

                    .
                    -- Scott
                    _____

                    2004 ST1300A: No name... yet
                    1982 XJ1100J: "Baby" SS Brakes, '850 FD, ACCT
                    1980 XS1100G: "Columbo" SS Brakes, '850 FD, ACCT
                    1979 XS1100SF: "Bush" W.I.P.
                    1979 XS1100F: parts
                    2018 Heritage Softail Classic 117 FLHCS SE: "Nanuk" It's DEAD, it's not just resting. It is an EX cycle.

                    Comment


                    • #25
                      Brake MC source

                      Hey Kurt,

                      You call that GREEN? But looks good anyways, at least it's shiny!

                      Now here's a green motorcycle!


                      See my signature.

                      Follow this link to this item: http://www.mikesxs.net/product/08-0265.html
                      Here's the main brake/MC parts page:
                      http://www.mikesxs.net/products-71.html#products

                      Brake Master Cylinder Assembly 16mm - dual disc


                      Master Cylinder Assembly - 16mm bore.
                      Recommended for late dual disc Front brakes on 1977-84 Yamaha XS650's
                      Or single front disc brake (1972-76 650's).
                      Yamaha OEM type.
                      Complete with brake lever, brake light switch, banjo bolt and washers. Mirror mount has Left Threads.
                      For dual disc brakes.

                      Also fits: XS750 Standard and Special 1977-79 dual disc, XS850 Standard and Special 1980-81 dual disc, XS1100 Standard and Special 1978-81 dual disc.

                      Part #08-0265 $87.00 USD Ea.
                      Hope you and everyone also has a good Memorial Day weekend, from one VET to everyone.
                      T. C. Gresham
                      81SH "Godzilla" . . .1179cc super-rat.
                      79SF "The Teacher" . . .basket case!
                      History shows again and again,
                      How nature points out the folly of men!

                      Comment


                      • #26
                        T.C. As an ex Airborne, I'll take the thanks from an ex Navy.....
                        Ray Matteis
                        KE6NHG
                        XS1100 E '78 (winter project)
                        XS1100 SF Bob Jones worked on it!

                        Comment


                        • #27
                          Green

                          Originally posted by kboehringer View Post


                          What do ya'll think of the color? If you think it stinks you won't hurt my feelings.
                          Hi, Kurt -

                          I really like the green you've chosen ... subdued, but classy ... I think it's a nice shade for these 11's.

                          Reminds me of a couple of colors used by two of our other members ...

                          I believe this one belongs to our member gonzo (Ron):


                          And here's a pic of a tank painted by our member tcoop (Ty):


                          Anyway, keep those updates and pics coming ... we love build threads!
                          Marco

                          Current bikes:
                          1979 Yamaha XS Eleven Special (SF)
                          1979 Honda CBX
                          2002 Kawasaki ZRX1200R

                          Rest in Peace, Don Glardon (DGXSER) 1966-2014
                          WE MISS YOU, DON

                          Comment


                          • #28
                            Wiring - Wiring - Wiring (79 Generator or 80 Generator?)

                            Originally posted by Prisoner6 View Post
                            ... subdued, but classy ... I think it's a nice shade for these 11's.
                            Thanks Prisoner6, I like those photos you provided.....If those are not the same color they aren't much different.


                            XS Guys,
                            Aside from a little time for Hot Dogs & Hamburgers, a little time working on my mother's mini-van, I spent most of my extended weekend working on the XS. It didn't plan it that way, but it's become an obsession.

                            I have a new main harness on the way, but will still need to repair the damage to all the stuff that will eventually attach to it. The generator, ignition advance wiring and all the other devices attached to the main are; cut, spliced, burned, taped to heck, melted, or otherwise screwed up. I can't afford to replace all these pieces at once so I have to repair 'em where possible.

                            I have an extra harness for the XJ550 I purchased but didn't need as part of a lot of parts. By snipping pieces from the spare XJ harness I'm getting wires of the proper color installed to replace all the yellow wiring the PO used on everything. All repairs are soldered and heat shrunk.

                            During the repairs, I found a possible problem? The generator on my bike has three WHITE wires, one YELLOW, one GREEN, and one TAN. The Clymer wiring diagram indicates my '80SG should not have the yellow wire. HOWEVER, a 79SF should have a yellow wire. Could the PO have replaced the generator with a '79 unit? According to my steering stem my bike was manufactured 8/79. Could this have been a leftover component from '79 model year manufacturing? Currently the wire goes to a 4-plug terminal. On the opposite side there is nothing. The three WHITES travel through that same terminal connector and go direct to the rectifier as the wiring diagram shows that they should. THOUGHTS?


                            I'm gonna tackle this mess next. Notice the melted wires and connectors? Looks like a possible fire and some to-close-for-comfort damage by the exhaust as well.


                            The other side (advance & neutral) has been completely re-wired back and INTO the connector.


                            Respectfully,
                            Kurt
                            Kurt Boehringer
                            Peachtree City, Georgia

                            1970 - CT70K0 - Mini-Trail
                            1978 - SR500 - Thumper
                            1979 - CT70H - Mini-Trail
                            1979 - XS1100SF - Pensacola
                            1980 - XS850SG - Rocky
                            1980 - XS1100SG - The Ugly Duck
                            1980 - XS1100SG - Mayberry Duck
                            1981 - XS1100SH - DEAD Duck Cafe'
                            1981 - XJ550 Maxim - Nancy's Mini-Max
                            1982 - XJ650 SECA - Hurricane
                            1986 - FJ1200 - Georgia Big Red
                            1992 - FZR1000 - Genesis
                            2016 - FJR1300A - Montgomery

                            Comment


                            • #29
                              The yellow wire from the stator is still present but not used on the 80-81 models. It was used on the 78-79 to trigger the headlight relay. Your relay should be triggered by one of the white wires, the one with an in line diode up somewhere in the harness near the relay.
                              Last edited by bikerphil; 05-25-2015, 11:36 PM.
                              2H7 (79)
                              3H3

                              "If it ain't broke, modify it"

                              Comment


                              • #30
                                Another missing part -

                                BikerPhil - Thanks for the info on the generator. Happy to hear I don't have yet another wrong/bad part.

                                XS Guys,
                                Today, I took the petcocks to work, sandblasted years of goo and rust out of them, rebuilt them with new O-rings, and reinstalled them on the tank. I couldn't figure out why I had four (total) hose connections on the petcocks when there are only two supply lines to the carbs?

                                Well..... The Clymer Manual has informed me that I'm missing the vacuum valve required by these petcocks.

                                Tomorrow, I'm taking the front calipers (a real mess they are) to work and will blast the exteriors of those. Both will need a hone and a rebuild kit. I haven't got around to pulling the rear caliper off yet. It seems to work. But after 35 years of little or no maintenance, it's gonna get a rebuild and new pads too. Once I get around to removing it.


                                Kurt
                                Kurt Boehringer
                                Peachtree City, Georgia

                                1970 - CT70K0 - Mini-Trail
                                1978 - SR500 - Thumper
                                1979 - CT70H - Mini-Trail
                                1979 - XS1100SF - Pensacola
                                1980 - XS850SG - Rocky
                                1980 - XS1100SG - The Ugly Duck
                                1980 - XS1100SG - Mayberry Duck
                                1981 - XS1100SH - DEAD Duck Cafe'
                                1981 - XJ550 Maxim - Nancy's Mini-Max
                                1982 - XJ650 SECA - Hurricane
                                1986 - FJ1200 - Georgia Big Red
                                1992 - FZR1000 - Genesis
                                2016 - FJR1300A - Montgomery

                                Comment

                                Working...
                                X