Announcement

Collapse
No announcement yet.

1st Carb Rebuild (Need Help)

Collapse
X
 
  • Filter
  • Time
  • Show
Clear All
new posts

  • 1st Carb Rebuild (Need Help)

    I finally took the plunge and pulled the carbs to rebuild them this weekend.

    The carb 101 tech tip is priceless! There were a few issues (because I an doing this on a 79) but otherwise it was spot on.

    The first 3 pilot jets came out perfectly, but the last one stripped out. So I used the star bit from the precision screw set that I got for this job and jammed it in the hole in the pilot jet (after soaking it for 2 days in Liquid Wrench) and it came out easy peasy.

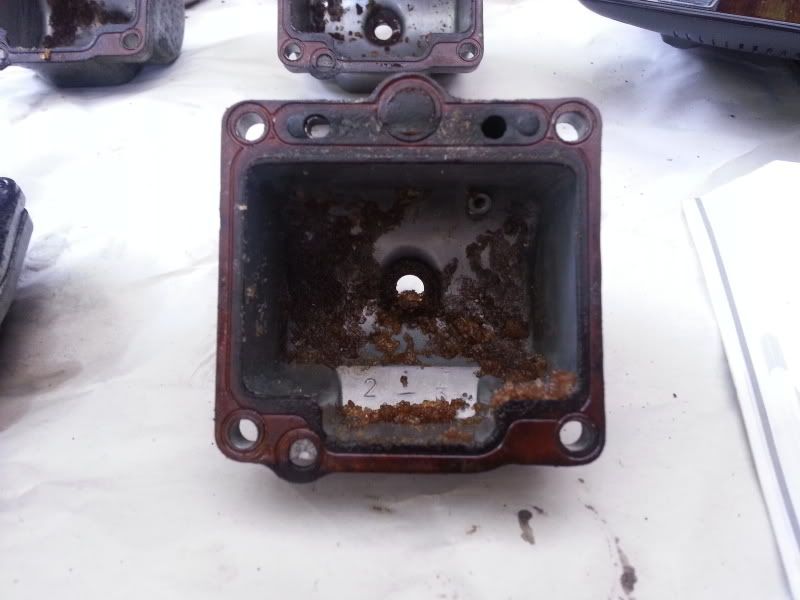
    Since the carbs hadn't been off in a long time and looked like this:

    I figured that I needed to break the rack and clean everything really well. So slight problem...The screws were very stubborn and then the choke linkage was not cooperative and one of the little screws on there is completely FUBAR (so I will have to figure out how to fix that) but everything came apart and nothing broke.

    I soaked them for 12 hours in Yamalube and then scrubbed them down and soaked them for another 8. Then I sprayed them down with Berryman's carb cleaner and used a toothbrush and Q-Tips to get everything as clean as I could. Then I sprayed everything out with compressed air.

    I might have missed the part about making sure that I keep track of everything. I kept all the internal parts separate and only from the carb that they came from, but I sort of forgot which carb was which since I had to soak them two at a time.

    So how do I tell which carb is which? I know the idle screw is in the middle and I think I can figure out the ends, but are there any other tell tale signs?

    Last question. Should I use anti-seize when I reassemble so that I don't have a problem cleaning in the future? Would what be washed out by the fuel? Thanks for all the help.
    79 SF 3H3 Engine, 145/45 Mikuni Jets, El Cheapo Pod Filter Mod w/ EMGO Pods, Coil Repower w/ Dyna Coils, Accell Wires and Side Gapped Plugs, 78 Mech Advance, 4-2 Turnouts

  • #2
    Originally posted by spayne83 View Post
    So how do I tell which carb is which? I know the idle screw is in the middle and I think I can figure out the ends, but are there any other tell tale signs?

    Last question. Should I use anti-seize when I reassemble so that I don't have a problem cleaning in the future? Would what be washed out by the fuel? Thanks for all the help.
    The carb with the idle adjustment is #3, and #2 has the vacuum advance hose connection. Also note which ones have the drilled bowl vents; the bowl vents and fuel inlets face towards each other in pairs (1-2 and 3-4).

    Anti-seize on the exterior screws is fine, don't use it internally.
    Fast, Cheap, Reliable... Pick any two

    '78E original owner - resto project
    '78E ???? owner - Modder project FJ forks, 4-piston calipers F/R, 160/80-16 rear tire
    '82 XJ rebuild project
    '80SG restified, red SOLD
    '79F parts...
    '81H more parts...

    Other current bikes:
    '93 XL1200 Anniversary Sportster 85RWHP
    '86 XL883/1200 Chopper
    '82 XL1000 w/1450cc Buell, Baker 6-speed, in-progress project
    Cage: '13 Mustang GT/CS with a few 'custom' touches
    Yep, can't leave nuthin' alone...

    Comment


    • #3
      So how do I tell which carb is which? I know the idle screw is in the middle and I think I can figure out the ends, but are there any other tell tale signs?

      Last question. Should I use anti-seize when I reassemble so that I don't have a problem cleaning in the future? Would what be washed out by the fuel? Thanks for all the help.

      Those are a mess ! Might need more than 1 cleaning ?
      You will know which carbs are where when you start putting them back in the rack.
      Find a nut to fit that fubar screw lock the nut in a vice with the screw turned into it. Use a small hammer and maybe a punch or a driver to slightly shape the metal and then use the correct screw driver head to make the shape it should be, may take a number of tries.
      Now that you have the screws out they should not freeze up again unless they sit for years.
      Make sure the tank is spotless, adding a pint of Chevron Techron ( not Chevron with Techron ) into the tank and fill with low grade fuel leave it sit a couple weeks, this will be waste fuel ( don't use for anything else but killing weeds ).
      New fuel lines and filters of you choice.
      Oh and the petcocks, might as well clean them and change the wizzer valve ( rubber washer with 4 holes in it ). Take your time do all the tune up things.
      Good Luck ! Safe Riding once you get the beast up to snuff.
      You know how to spell nup, well that a nup outa me !
      76 XS650 C ROADSTER
      80 XS650 G Special II
      https://ibb.co/album/icbGgF
      80 XS 1100 SG
      81 XS 1100LH/SH DARKHORSE
      https://tinyurl.com/k6nzvtw
      AKA; Don'e, UD, Unca Don'e

      Comment


      • #4
        I already tried undoing the screw with a set of vice grips (worked with all the other screws) but this one is just a nub, so I think I may end up drilling it out and replacing it.

        I have a rebuild kit for the petcocks and a brand new freshly repaired and lined fuel tank. The new fuel lines and filters will be going in as well. Thanks for the help.
        79 SF 3H3 Engine, 145/45 Mikuni Jets, El Cheapo Pod Filter Mod w/ EMGO Pods, Coil Repower w/ Dyna Coils, Accell Wires and Side Gapped Plugs, 78 Mech Advance, 4-2 Turnouts

        Comment


        • #5
          The carbs are cleaned/rebuilt and back on the bike. It fired right up, but the idle is set low so I have to hold the throttle open a bit to keep it running. I do get an occasional "cough" but other than that it looks ok so far. Now I just need to sync all the carbs and get riding. Thanks for all the help guys.
          79 SF 3H3 Engine, 145/45 Mikuni Jets, El Cheapo Pod Filter Mod w/ EMGO Pods, Coil Repower w/ Dyna Coils, Accell Wires and Side Gapped Plugs, 78 Mech Advance, 4-2 Turnouts

          Comment


          • #6
            Start with adjusting the idle of course, around 1100 RPM or so. Then synch..tune mixture...and synch again.
            Life is what happens while your planning everything else!

            When your work speaks for itself, don't interrupt.

            81 XS1100 Special - Humpty Dumpty
            80 XS1100 Special - Project Resurrection


            Previously owned
            93 GSX600F
            80 XS1100 Special - Ruby
            81 XS1100 Special
            81 CB750 C
            80 CB750 C
            78 XS750

            Comment


            • #7
              So after cleaning and rejetting the carbs 4-5 times I finally gave up and bought all Genuine Mikuni parts (Jets, Needles, Washers) and then replacing the dented brass floats with plastic floats and setting the height to 25.7mm and I followed the instructions here (http://www.benefiscal.co.uk/forum/in...76293#msg76293) to clean them including polishing the emulsion tubes and needle valve seats. The carbs are clean enough to eat off of, but I did run into a few things that I have questions about.

              When cleaning the needle valve seats the threads of the seat were black and there was black deposits in the valve seats. They looked like carbon deposits, so I am wondering if that was just residue from the gas (which never sat for more than 2 weeks) or if it was something I should be worried about. A majority of the residue came from 2 of the seats, so I am wondering why two would have deposits and two wouldn't?
              79 SF 3H3 Engine, 145/45 Mikuni Jets, El Cheapo Pod Filter Mod w/ EMGO Pods, Coil Repower w/ Dyna Coils, Accell Wires and Side Gapped Plugs, 78 Mech Advance, 4-2 Turnouts

              Comment


              • #8
                I hope you changed all the floats and not just some of them. And then you switched to the plastic floats you need to change your float height to the later model 23mm float height.
                Nathan
                KD9ARL

                μολὼν λαβέ

                1978 XS1100E
                K&N Filter
                #45 pilot Jet, #137.5 Main Jet
                OEM Exhaust
                ATK Fork Brace
                LED Dash lights
                Ammeter, Oil Pressure, Oil Temp, and Volt Meters

                Green Monster Coils
                SS Brake Lines
                Vision 550 Auto Tensioner

                In any moment of decision the best thing you can do is the right thing, the next best thing is the wrong thing, and the worst thing you can do is nothing.

                Theodore Roosevelt

                Comment


                • #9
                  Originally posted by spayne83 View Post
                  ...
                  When cleaning the needle valve seats the threads of the seat were black and there was black deposits in the valve seats.
                  ...
                  A majority of the residue came from 2 of the seats, so I am wondering why two would have deposits and two wouldn't?
                  Check the fuel lines. The carburetors are fed in pairs, #1/#2 and #3/#4, so which carbs had the most black stuff?

                  If the fuel lines are old, or someone used a type of line that wasn't designed to hold fuel in the first place, they could be shedding little bits along with a lovely decayed/dissolved slime. Automotive fuel line sheds rubber bits too when you push it over the hose barbs so don't use it unless it's an emergency and replace it ASAP.

                  .
                  -- Scott
                  _____
                  ♬
                  2004 ST1300A: No name... yet
                  1982 XJ1100J: "Baby" SS Brakes, '850 FD, ACCT
                  1980 XS1100G: "Columbo" SS Brakes, '850 FD, ACCT
                  1979 XS1100SF: "Bush" W.I.P.
                  1979 XS1100F: parts
                  2018 Heritage Softail Classic 117 FLHCS SE: "Nanuk" It's DEAD, it's not just resting. It is an EX cycle.
                  ♬

                  Comment


                  • #10
                    I'm not trying to stir up anything, but I searched long and hard before I did this and I found this thread:

                    http://www.xs11.com/forum/showthread...plastic+floats

                    That says that the float height is based on the carb and not the float, but based on logic, it would seem that the height should be based on the material that is floating. I know that I have heard of people running both using 25.7 mm and 23 mm, so I am thinking that I will try both, if the new vacuum advance doesn't solve the matter. Based on other opinions, I should be running 145/45 but I am currently running 137.5/42.5 and getting backfires, which leads me to believe that the carbs are too rich. I'll check the plugs tomorrow to confirm.
                    79 SF 3H3 Engine, 145/45 Mikuni Jets, El Cheapo Pod Filter Mod w/ EMGO Pods, Coil Repower w/ Dyna Coils, Accell Wires and Side Gapped Plugs, 78 Mech Advance, 4-2 Turnouts

                    Comment


                    • #11
                      Well, I am running plastic floats in my early carbs and had originally set them to 25.7 and the bike was drowning. Switch it to 23 after people here set me straight and life was good.

                      The different materials have a different float profile and buoyancy. That is the reason for the height difference. The inside of the bowls are the same, the float posts are the same, use the 23mm and save yourself some hassle.
                      Nathan
                      KD9ARL

                      μολὼν λαβέ

                      1978 XS1100E
                      K&N Filter
                      #45 pilot Jet, #137.5 Main Jet
                      OEM Exhaust
                      ATK Fork Brace
                      LED Dash lights
                      Ammeter, Oil Pressure, Oil Temp, and Volt Meters

                      Green Monster Coils
                      SS Brake Lines
                      Vision 550 Auto Tensioner

                      In any moment of decision the best thing you can do is the right thing, the next best thing is the wrong thing, and the worst thing you can do is nothing.

                      Theodore Roosevelt

                      Comment


                      • #12
                        Originally posted by natemoen View Post
                        Well, I am running plastic floats in my early carbs and had originally set them to 25.7 and the bike was drowning. Switch it to 23 after people here set me straight and life was good.
                        First off Nate, that would be reverse effect. a larger float measurement is a lower float level in operation, shuts the fuel off sooner, lower fuel level. This would make the bike run leaner.

                        Also, I have a set of 79 carbs here, I put the Viton XV920 float valves in them, and the plastic floats. I initially started at 23 mm float height, and the bike barely ran. I have been dropping the float height, am back to 25.7 mm and it runs much better with that setting.

                        So now as I think through it, I changed two things, float valve and floats. Which is the same change as Jessy made. Now I ponder if not changing the float valve changes the setup??
                        Life is what happens while your planning everything else!

                        When your work speaks for itself, don't interrupt.

                        81 XS1100 Special - Humpty Dumpty
                        80 XS1100 Special - Project Resurrection


                        Previously owned
                        93 GSX600F
                        80 XS1100 Special - Ruby
                        81 XS1100 Special
                        81 CB750 C
                        80 CB750 C
                        78 XS750

                        Comment


                        • #13
                          Holy Cow!!

                          This carb discussion seems to technical. I think when I get my bike down, I am going to send the carbs out to a professional if they need all this. Man, I am getting overwhelmed just reading this post. I do like that everyone helps out, sure is a bunch of nice guys on this site!!
                          79 F

                          Comment


                          • #14
                            floats

                            Originally posted by CLTBLUESMAN View Post
                            This carb discussion seems to technical. I think when I get my bike down, I am going to send the carbs out to a professional if they need all this. Man, I am getting overwhelmed just reading this post. I do like that everyone helps out, sure is a bunch of nice guys on this site!!
                            It's not rocket science, get a measuring device at the local hardware store and set the floats to the measurement that type of float needs. Got to start learning your bike or it will cost you way more than what it's worth.

                            Sorry to be so blunt but have been through it myself and will get into the unknown again soon.

                            Knowledge is power, just got to be powered up ! These guys will help you to no end !!!!!

                            I love this list !!!!!
                            76 XS650 C ROADSTER
                            80 XS650 G Special II
                            https://ibb.co/album/icbGgF
                            80 XS 1100 SG
                            81 XS 1100LH/SH DARKHORSE
                            https://tinyurl.com/k6nzvtw
                            AKA; Don'e, UD, Unca Don'e

                            Comment


                            • #15
                              Your right

                              Your right, I do not have a lot of money, just a working slob. I better learn it.
                              79 F

                              Comment

                              Working...
                              X