Announcement

Collapse
No announcement yet.

Caliper Refurbish

Collapse
X
 
  • Filter
  • Time
  • Show
Clear All
new posts

  • Caliper Refurbish

    I decided to clean up my front calipers and take pictures of the process so I could put together a small tutorial... Here is the disassembly and cleaning of my front calipers on my '79F.

    Loosen the middle 12mm slide pin bolt then the two outter 14mm bolts.
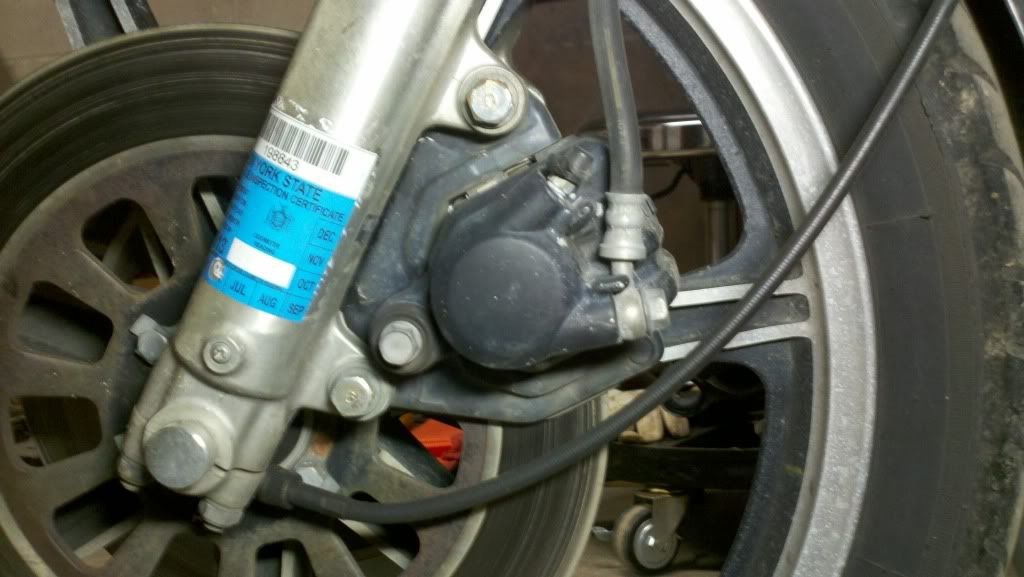


    Slide the assembly off the rotor and remove the philips screw from the back of the caliper. Now the caliper will seperate from the pads and frame.
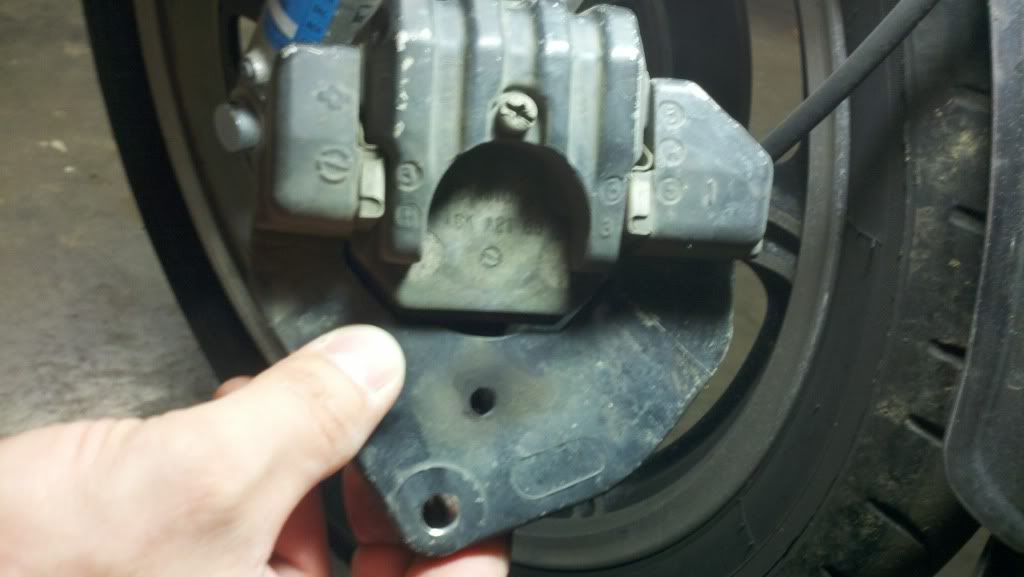


    Take out the little sheet metal shim...
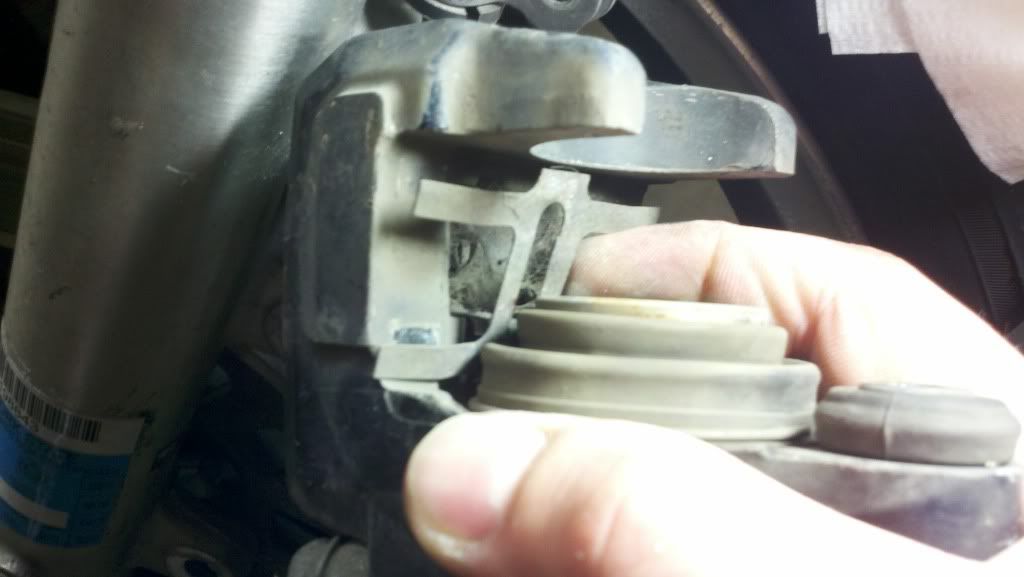


    Remove the C clip from the dust boot.
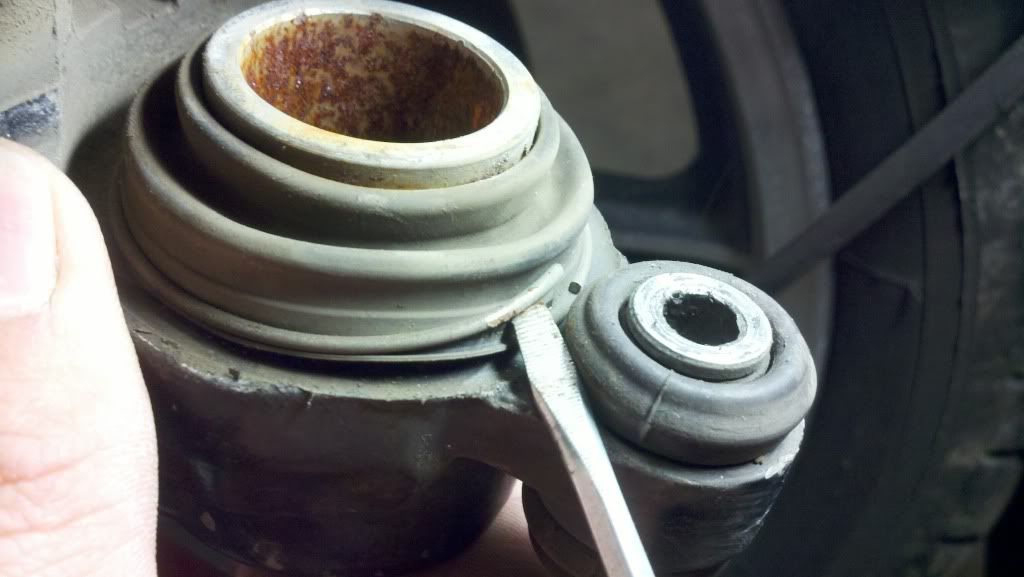


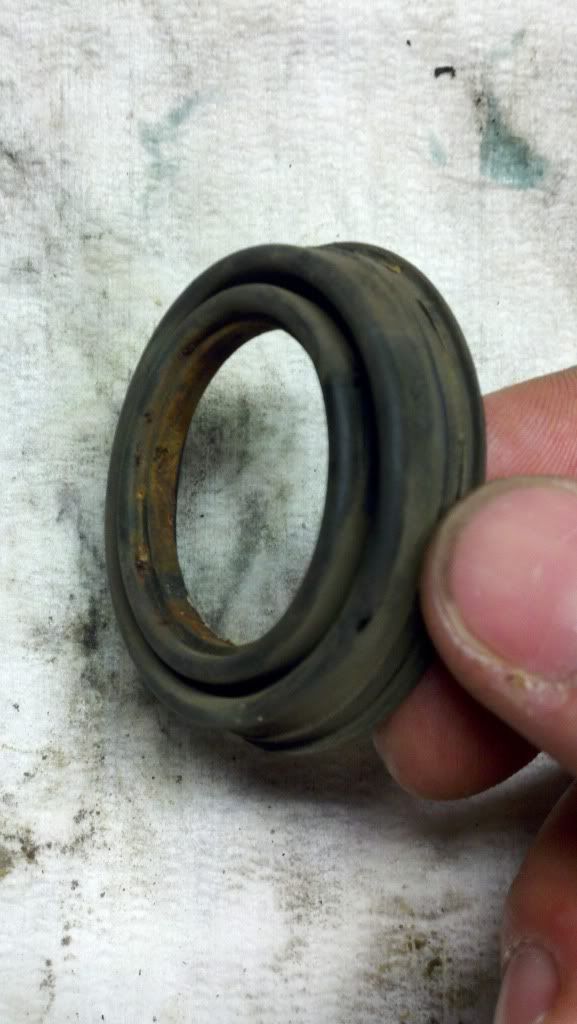
    Remove the dust boot and behold the crud. Just brush it away with a nylon brush for the time being...
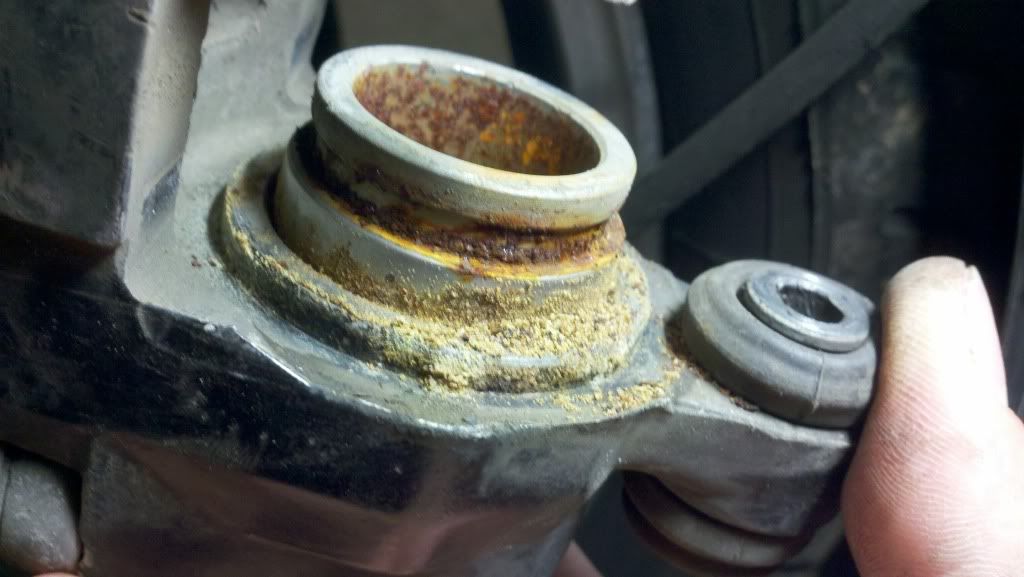


    I was doing both calipers at once so I blocked one with a piece of wood then used the master cylinder to push the other piston out some. Its not a bad idea to do this to both calipers. It should break the stiction between the piston square o-ring inside.
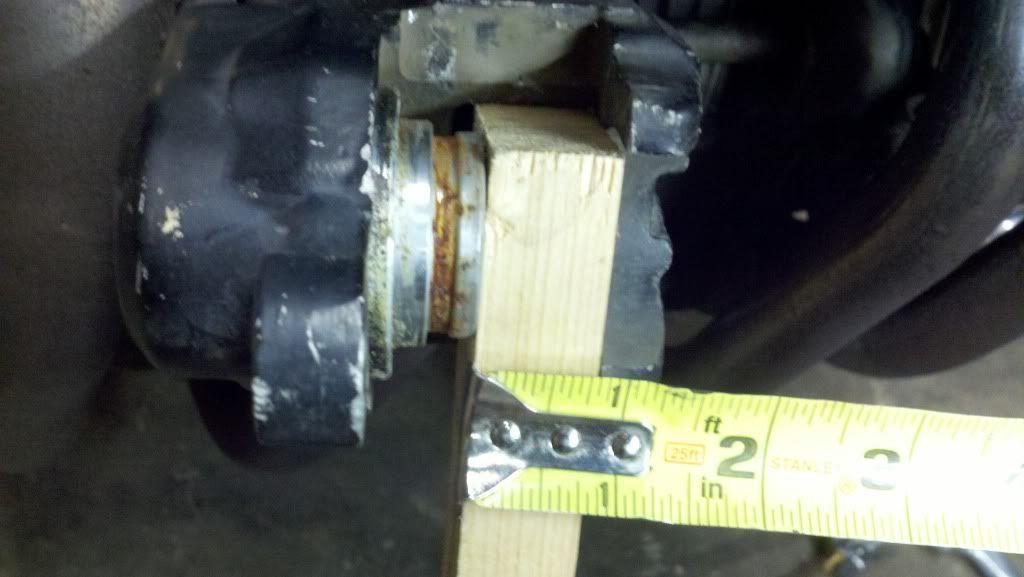


    Grab the piston with some vice grips and give it a twist to break it free. Make sure you only grab the end as this part isnt used in the pressure sealing section. At this point I decided to drain the break fluid. Turn the vice grips around and pull the piston out.
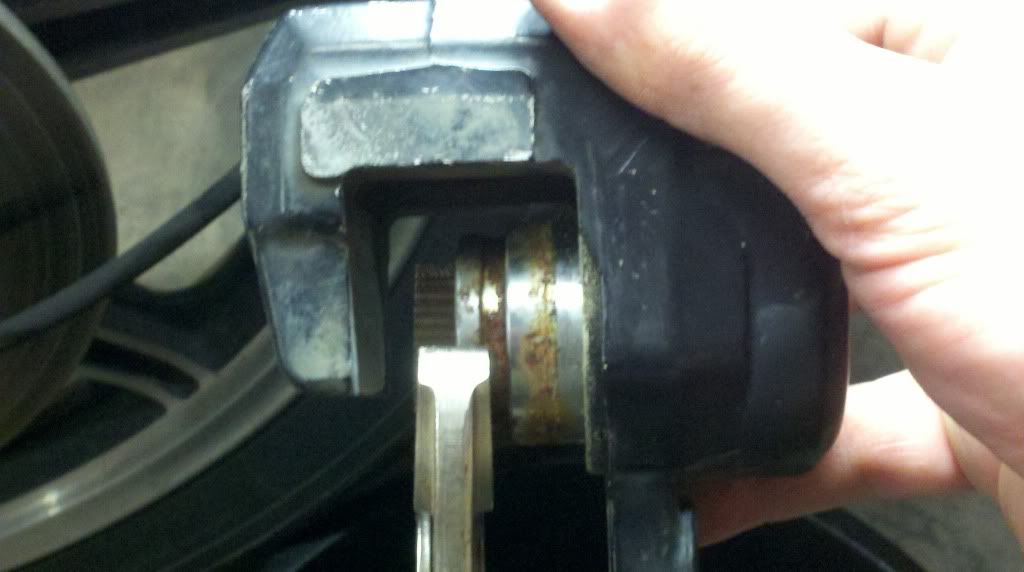


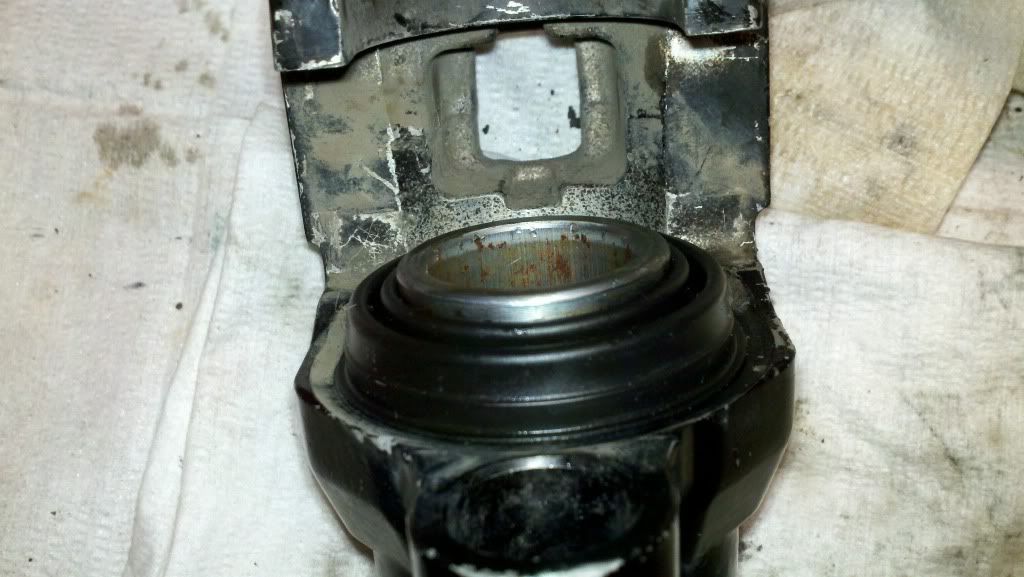
    At this point you have clear access to the square o-ring. I used a mechanics pic to remove it then proceeded to clean it and the grove behind it.
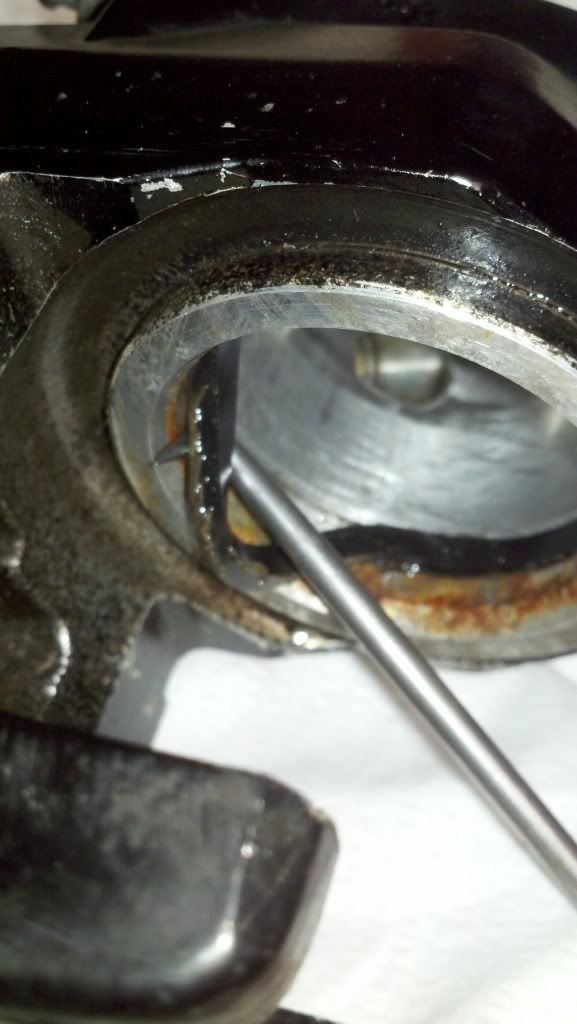


    I used the pic to break loose the chunky stuff then use 120 grit on the upper countersink and OD that was rusty colored. Do not go any deeper than where the square o-ring would begin. That section is clean and machined to proper fit with the piston.
    (O-Ring removed)
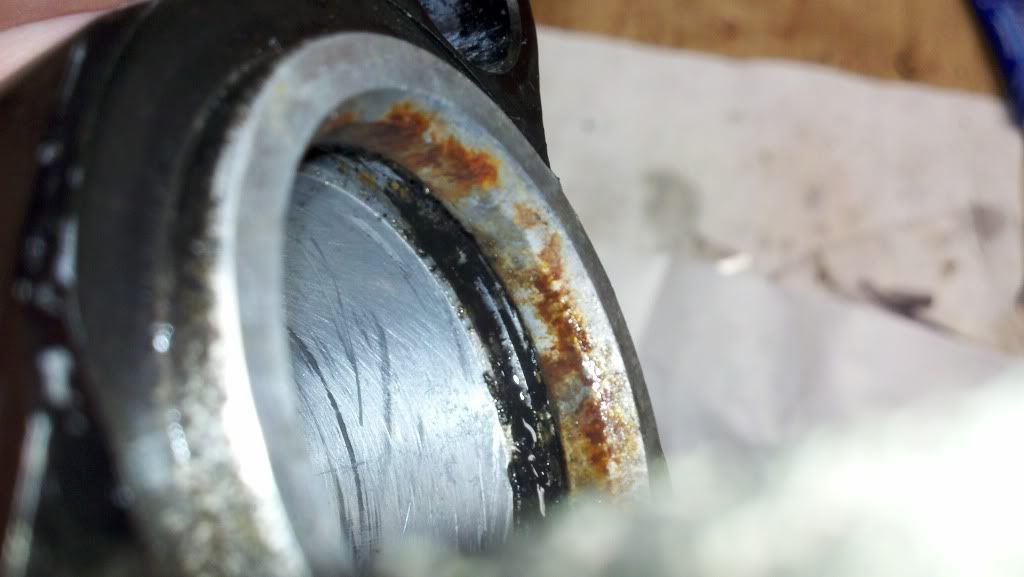


    If you have a dremel with a nylon brush wheel then get it out abd go to town. It worked well and saved some time. I sprayed it out with break cleaner prior to using the dremel. Then do a finish spray after the dremel.

    Last edited by WMarshy; 04-29-2013, 01:43 AM.
    '79 XS11 F
    Stock except K&N

    '79 XS11 SF
    Stock, no title.

    '84 Chevy K-10 "Big Blue"
    GM 350, Muncie SM465, NP208, GM 10 Bolt with 3.42gears turnin 31x10.5 Baja Claws

    "What they do have is an implacable, unrelenting presence and movement that bespeaks massive power lurking behind paint and chrome. They don't wail like a screeching ninja, the don't rumble like a harley. They just growl like a spactic, stressed out badger waiting to rip your face off and eat your soul." Trainzz~RIP~

  • #2
    That's exactly how I did mine yesterday with the dremel. It works great.
    Jeff
    77 XS750 2D completely stock
    79 SF XS1100 "Picky" stock with harley mufflers

    Comment


    • #3
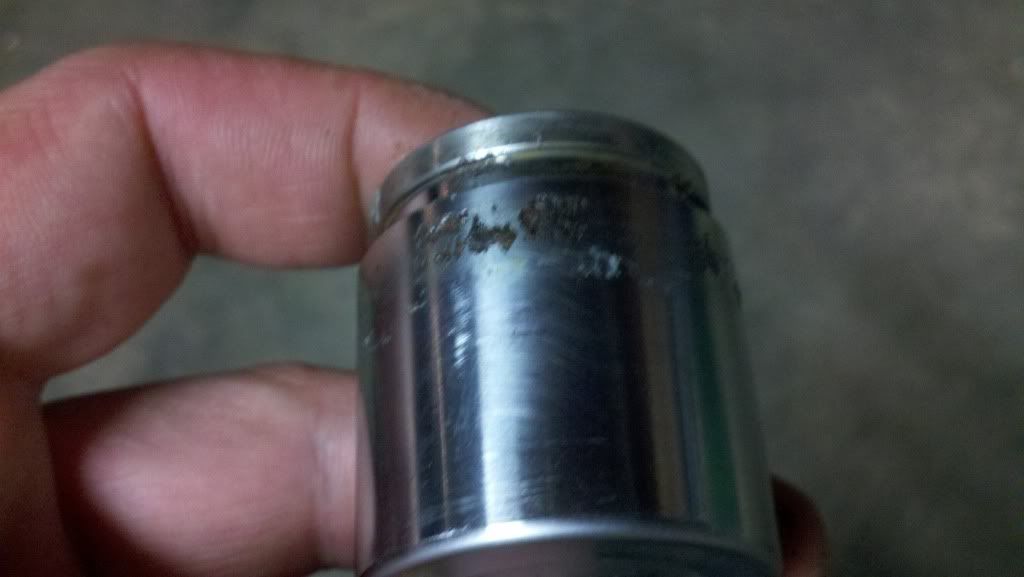
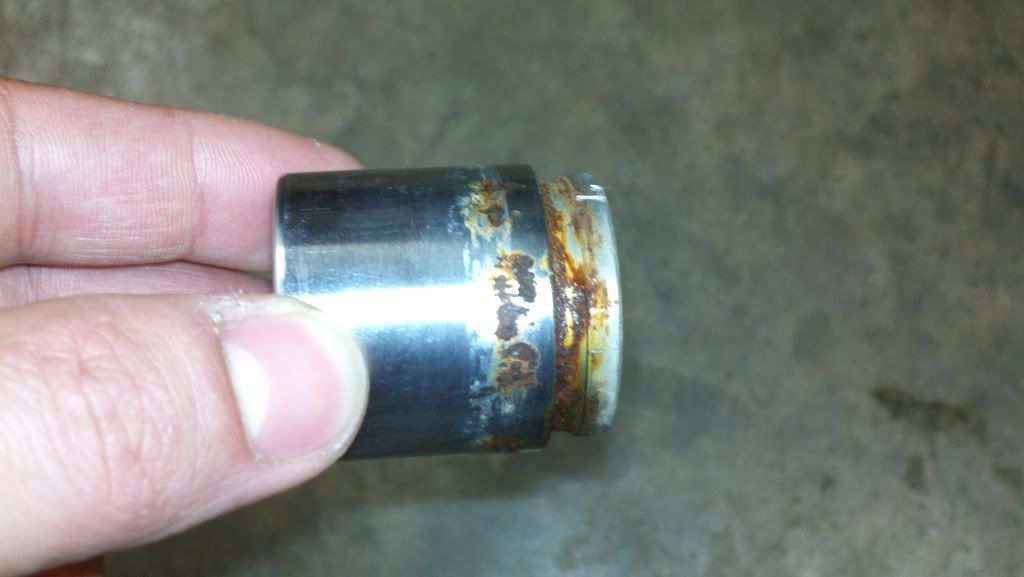
      Here's what my piston looked like.
      (Before)


      And after. I used my Dremel with the wire wheel fit this. It took off the rust but wasnt rough enough to take any of the chrome off. You can see some pitting. New pistons will go in next time the pads are replaced.


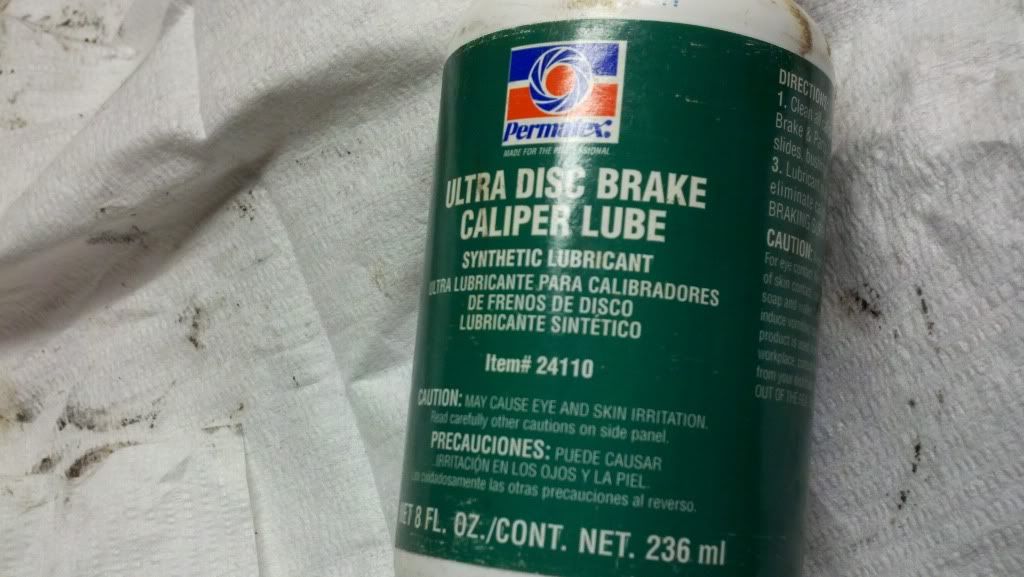
      Putting everything back together is straight forward. Make sure everything is clean. I used some of this Permatex synthetic break lubricant on the square o-ring. Just need a little bit to help the piston slide in.


      So put the square o-ring in and the piston. One I had the piston in I put some of the lube over the pitting to keep it from rusting. (Sorry no pic.)

      Then I brushed the rubber dust boot with my nylon brush and smeared some Permatex all over it then wiped it off. It might keep it from drying out and cracking (I hope), it says its good for rubber bits.


      Lastly, I cleaned up the slide pins and lubed them with the Permatex. Installes the calipers into the frame and back on the forks. Torque spec for the 78-79 standards is 32 ft-lbs on the upper 14mm bolt and 13 ft-lb on the lower. Banjo bolts are 18 ft-lb regardless the model. The manual didnt call out the torque for the slide pin so I used 15 ft-lbs (let me know if someone finds it). According to the manual, both 14 mm bolts are torqued to 18 ft-lbs...
      Last edited by WMarshy; 04-29-2013, 04:52 AM.
      '79 XS11 F
      Stock except K&N

      '79 XS11 SF
      Stock, no title.

      '84 Chevy K-10 "Big Blue"
      GM 350, Muncie SM465, NP208, GM 10 Bolt with 3.42gears turnin 31x10.5 Baja Claws

      "What they do have is an implacable, unrelenting presence and movement that bespeaks massive power lurking behind paint and chrome. They don't wail like a screeching ninja, the don't rumble like a harley. They just growl like a spactic, stressed out badger waiting to rip your face off and eat your soul." Trainzz~RIP~

      Comment


      • #4
        Originally posted by WMarshy View Post
        According to the manual, both 14 mm bolts are torqued to 18 ft-lbs...
        *for specials*
        '79 XS11 F
        Stock except K&N

        '79 XS11 SF
        Stock, no title.

        '84 Chevy K-10 "Big Blue"
        GM 350, Muncie SM465, NP208, GM 10 Bolt with 3.42gears turnin 31x10.5 Baja Claws

        "What they do have is an implacable, unrelenting presence and movement that bespeaks massive power lurking behind paint and chrome. They don't wail like a screeching ninja, the don't rumble like a harley. They just growl like a spactic, stressed out badger waiting to rip your face off and eat your soul." Trainzz~RIP~

        Comment


        • #5
          Nice write up.
          79F
          "Excelsior"
          Honda gl1100 handlebar
          Vetter IV fairing with speaker system
          OE headers,Jardine slipons
          Hid headlight 6000k
          Stock jets
          Shinko 712 F & R
          Oe hardbags and luggage rack
          TC fuse block
          K&n filter with oe airbox
          Raptor 660 Acct

          Comment


          • #6
            Thank you

            a very good guide
            XJ1100K
            Avon rubber
            MikesXS black coils
            Iridium plugs w/ 1k caps
            MikesXS front master
            Paragon SS brake lines (unlinked)
            Loud Horns (Stebel/Fiamm)
            Progressive fork springs
            CIBIE headlight reflector
            YICS Eliminator

            Comment


            • #7
              Great pictures and instructions! Just copied this and put it into my files for maintainence and repairs.

              Comment


              • #8
                Excellent work. Might I suggest Evapo-rust to put the piston in next time? Will remove every trace of rust without touching anything else.
                Bone stock 1980 Special except for the exhaust and crashbars. Oh yeah, and the scabbard for the Winchester Defender.

                Comment


                • #9
                  Nice write-up, but I'm going to nit-pic a bit...

                  Cleaning the rust out of the piston bore. I've had very good results using fine steel wool. Not as aggressive, less chance of enlarging any machined areas. Sandpaper can leave grit embedded in the soft aluminum...

                  Be very careful cleaning the o-ring groove; this is where the sealing goes on, any damage here can ruin the caliper body and give you a leaker.

                  Removing the piston. I personally don't like using pliers/vice-grips, as the possibility of damaging the piston is high. Worse yet, this method doesn't always work, even when using the master cylinder to push the piston out (and if you have issues with your master, then what?). The only fool-proof method I've found is the grease-gun trick. To do this, remove the caliper from the bike, find a bolt that fits in place of the banjo bolt. Plug the banjo hole, then loosen the bleeder. Plug the grease gun on the bleeder (it's shaped enough like a zerk fitting to 'connect') then start pumping grease into the caliper. The piston will slowly move out as you pump grease in, no fuss. Grease guns can deliver up to 10,000 PSI, far more than the 3000 at best the master cylinder can. This has never failed to remove even the most stubborn pistons, and is much safer than using compressed air. If you fill the caliper with brake fluid before doing this, most of the grease will 'fall out' of the caliper, making clean-up easier. If you do use pliers, make sure you file any burrs off the piston so you don't cut the seal.

                  I clean the rubber parts with denatured alcohol and a rag. You can also use spray brake cleaner on a rag.

                  Your piston(s) needs to be replaced. You can get away with these if using the same pads, but new pads will put them into the caliper further and you may have leaks and/or 'sticky' pistons. And that rust will come back faster than you think...
                  New stainless-steel pistons are readily available from HVC cycle. The brakes on these bikes aren't that great when everything is right, less than that isn't good...

                  That Permatex grease; while lubing the various parts is an excellent idea, if using this on the internal seals, make sure it's compatible with brake fluid. Not all are (the Permatex site doesn't say one way or another) and some can cause problems. When applying the grease to the piston seal, I'll pack the groove in the body before installing the seal with grease to keep corrosion from coming back. Install the seal and just wipe the excess out with your finger. Putting some grease in the groove the outer dust seal seats into on the piston is good (helps seal it), but don't use grease between the dust boot and the caliper body; the boot can pop off... DAMHIKIJK...

                  If you have a Special or LH/XJ, make sure you clean/grease the caliper support sleeve the mounting bolt goes through.

                  The various torque numbers as per the factory manuals....

                  All years/models including LH/XJ (except Special): caliper bracket to fork 32.5 ft-lbs (upper and lower).

                  Standard front and rear/Special rear (except LH/XJ): caliper to caliper bracket 13 ft-lbs, use blue locktite (REQUIRED).

                  Special front (except LH): Caliper to fork: 19 ft-lbs pivot bolt, 14.5 ft-lbs locknut.

                  The one torque spec I couldn't find was the LH/XJ rear caliper to mounting bracket. Same type mount as the Special front, but the bolt is larger (10mm vs 8mm) and there's no locknut so be sure to use locktite on this. The 'generic' torque table in the FSM says this can be between 25-29 ft-lbs, I'd go with that....
                  Last edited by crazy steve; 04-29-2013, 01:50 PM.
                  Fast, Cheap, Reliable... Pick any two

                  '78E original owner - resto project
                  '78E ???? owner - Modder project FJ forks, 4-piston calipers F/R, 160/80-16 rear tire
                  '82 XJ rebuild project
                  '80SG restified, red SOLD
                  '79F parts...
                  '81H more parts...

                  Other current bikes:
                  '93 XL1200 Anniversary Sportster 85RWHP
                  '86 XL883/1200 Chopper
                  '82 XL1000 w/1450cc Buell, Baker 6-speed, in-progress project
                  Cage: '13 Mustang GT/CS with a few 'custom' touches
                  Yep, can't leave nuthin' alone...

                  Comment


                  • #10
                    It's the pits.

                    Originally posted by WMarshy View Post
                    Here's what my piston looked like.
                    - - - after. I used my Dremel with the wire wheel fit this. It took off the rust but wasnt rough enough to take any of the chrome off. You can see some pitting. New pistons will go in next time the pads are replaced.

                    Hi Wade,
                    wrongo! That piston is hooped. The hard chrome edges around the rust pitting will chew away at the tetraseal in short order when the brake is put into use.
                    Then the leaking brake fluid will contaminate the brake pads and there's another expense to add to the wasted effort.
                    Best you replace the pistons before you reassemble.
                    Fred Hill, S'toon
                    XS11SG with Spirit of America sidecar
                    "The Flying Pumpkin"

                    Comment


                    • #11
                      See My Comments in Blue

                      Originally posted by crazy steve View Post
                      Nice write-up, but I'm going to nit-pic a bit...

                      Thanks, feel free. I recognize I didn’t cover some other tips for disassembly and thought this was a good start. Other useful tips could be added to this to make a complete guide and maybe into a tech tip…

                      Cleaning the rust out of the piston bore. I've had very good results using fine steel wool. Not as aggressive, less chance of enlarging any machined areas. Sandpaper can leave grit embedded in the soft aluminum...

                      I’ve also read about using steel wool on aluminum and it leaving bits embedded into the aluminum… choose you poison. It doesn’t take much pressure all you are looking to do is scuff the corrosion products off. The ID of the bore above the o-ring isnt as critical as the lower portion. Regardless, I dont think a little bit of sanding will affect the dimension.

                      Be very careful cleaning the o-ring groove; this is where the sealing goes on, any damage here can ruin the caliper body and give you a leaker.

                      That is why I use the mechanics pic to break the chunky stuff out then use the nylon brush. I would not recommend using the steel wool/sand paper or a Dremel steel wire wheel to this area. I used a small mirror inside the caliper body to look at the upper part of the o-ring groove to make sure I didn’t miss and garbage…

                      Removing the piston. I personally don't like using pliers/vice-grips, as the possibility of damaging the piston is high. Worse yet, this method doesn't always work, even when using the master cylinder to push the piston out (and if you have issues with your master, then what?). The only fool-proof method I've found is the grease-gun trick. To do this, remove the caliper from the bike, find a bolt that fits in place of the banjo bolt. Plug the banjo hole, then loosen the bleeder. Plug the grease gun on the bleeder (it's shaped enough like a zerk fitting to 'connect') then start pumping grease into the caliper. The piston will slowly move out as you pump grease in, no fuss. Grease guns can deliver up to 10,000 PSI, far more than the 3000 at best the master cylinder can. This has never failed to remove even the most stubborn pistons, and is much safer than using compressed air. If you fill the caliper with brake fluid before doing this, most of the grease will 'fall out' of the caliper, making clean-up easier. If you do use pliers, make sure you file any burrs off the piston so you don't cut the seal.

                      Very good tip that I did not discuss in regards to the grease gun. Keep in mind though, the location where I put my vice grips is not a sealing surface so in theory you can beat that up all you want as long as you remove any burrs that might contact the back of the break pad or snag the dust boot during re-assembly. I opted to use the vice grips because my calipers were moving freely.

                      I clean the rubber parts with denatured alcohol and a rag. You can also use spray brake cleaner on a rag.

                      Your piston(s) needs to be replaced. You can get away with these if using the same pads, but new pads will put them into the caliper further and you may have leaks and/or 'sticky' pistons.

                      I recognized this and made the comment that they will be replaced the next time I replace my pads (meaning I reused my current pads). It should be noted that if you calipers are pitted like this shown and you use new pads, the pitting can cause damage to the o-ring, ‘sticky’ pistons and leaks. I probably should have pointed this out further…thanks.

                      And that rust will come back faster than you think...

                      That is why I coated the pitted area with the Permatex, it should slow the growth of corrosion. It's better than what I started with and the pads and pistons will be replaced before it ever gets as bad as I found.

                      New stainless-steel pistons are readily available from HVC cycle. The brakes on these bikes aren't that great when everything is right, less than that isn't good...

                      I hear that… that’s what drove me to take them apart to clean them. They operate smooth now and it was much needed.

                      That Permatex grease; while lubing the various parts is an excellent idea, if using this on the internal seals, make sure it's compatible with brake fluid. Not all are (the Permatex site doesn't say one way or another) and some can cause problems. When applying the grease to the piston seal, I'll pack the groove in the body before installing the seal with grease to keep corrosion from coming back. Install the seal and just wipe the excess out with your finger.

                      The technical data sheet does not specifically state that it is compatible with brake fluid but it does say application includes pistons… I made a call to Permatex about it and will provide an update… Use at own risk for now.


                      Putting some grease in the groove the outer dust seal seats into on the piston is good (helps seal it), but don't use grease between the dust boot and the caliper body; the boot can pop off... DAMHIKIJK...

                      If you have a Special or LH/XJ, make sure you clean/grease the caliper support sleeve the mounting bolt goes through.

                      The various torque numbers as per the factory manuals....

                      I tried to include the torque b/c I feel it is a big help when using these tech tips. I quoted the torque specs right from the manual I got from Bug… Thanks for the clarification.

                      All years/models including LH/XJ (except Special): caliper bracket to fork 32.5 ft-lbs (upper and lower).

                      Standard front and rear/Special rear (except LH/XJ): caliper to caliper bracket 13 ft-lbs, use blue locktite (REQUIRED).

                      Special front (except LH): Caliper to fork: 19 ft-lbs pivot bolt, 14.5 ft-lbs locknut.

                      The one torque spec I couldn't find was the LH/XJ rear caliper to mounting bracket. Same type mount as the Special front, but the bolt is larger (10mm vs 8mm) and there's no locknut so be sure to use locktite on this. The 'generic' torque table in the FSM says this can be between 25-29 ft-lbs, I'd go with that....

                      Originally posted by fredintoon View Post
                      Hi Wade,
                      wrongo! That piston is hooped. The hard chrome edges around the rust pitting will chew away at the tetraseal in short order when the brake is put into use.
                      Then the leaking brake fluid will contaminate the brake pads and there's another expense to add to the wasted effort.
                      Best you replace the pistons before you reassemble.
                      Fred, see my comments above. I used the same pads that were in it so the pitting will not impact operability at this time. If I was changing pads then pistons would be no good. Thanks!

                      P.S. I would also add that if anyone is going to clean up their pistons for a second use just be carefull not to cause extra damage to the chrome plating of the piston with sand paper or an aggressive wire wheel... The dremmel wire wheel I used you could put on your bare skin so it was OK to use on the chrome piston to remove the rust...
                      Last edited by WMarshy; 04-29-2013, 06:38 PM.
                      '79 XS11 F
                      Stock except K&N

                      '79 XS11 SF
                      Stock, no title.

                      '84 Chevy K-10 "Big Blue"
                      GM 350, Muncie SM465, NP208, GM 10 Bolt with 3.42gears turnin 31x10.5 Baja Claws

                      "What they do have is an implacable, unrelenting presence and movement that bespeaks massive power lurking behind paint and chrome. They don't wail like a screeching ninja, the don't rumble like a harley. They just growl like a spactic, stressed out badger waiting to rip your face off and eat your soul." Trainzz~RIP~

                      Comment


                      • #12
                        Other useful tips could be added to this to make a complete guide and maybe into a tech tip…
                        That's my plan....

                        I'll note that one reason I don't like using vice-grips on the pistons is it is possible to egg-shape them if you get carried away (I've ran into one like that... POs, ya gotta love 'em... ). These are precision parts and abuse isn't a good thing....

                        As to the torque specs, if you're getting them out of the Clymer manual, be very suspicious. Even the FSM needs to be watched, as you can find different specs depending on where you look or 'less than clear' explanations...
                        Last edited by crazy steve; 04-29-2013, 06:59 PM.
                        Fast, Cheap, Reliable... Pick any two

                        '78E original owner - resto project
                        '78E ???? owner - Modder project FJ forks, 4-piston calipers F/R, 160/80-16 rear tire
                        '82 XJ rebuild project
                        '80SG restified, red SOLD
                        '79F parts...
                        '81H more parts...

                        Other current bikes:
                        '93 XL1200 Anniversary Sportster 85RWHP
                        '86 XL883/1200 Chopper
                        '82 XL1000 w/1450cc Buell, Baker 6-speed, in-progress project
                        Cage: '13 Mustang GT/CS with a few 'custom' touches
                        Yep, can't leave nuthin' alone...

                        Comment


                        • #13
                          I use compressed air to GENTLY push them out. With a small wood bock between the piston and the pad mount that is thin enough to let the piston come all the way out, I wrap the caliper up in a clean shop towel. Then, using a blow gun with a rubber tip, I crack up the air and slowly bring the tip towards the brake line port. Usually, when the gun is about 1/8" away from the caliper, it will have produced enough pressure to gently pop the piston out without launching it like a shotgun.
                          -- Clint
                          1979 XS1100F - bought for $500 in 1989

                          Comment


                          • #14
                            I used to swear by compressed air getting them out for me. Then I had a difficult one. The grease gun method is the safest, easiest and best method to use if they will not push out under brake application pressure.
                            I find the brake application to be messy due to brake fluid getting where I do not want it. You also can only do one at a time or you can not pump the second one out. The grease gun method is also messy but does wipe up with paper towels or a cloth and does not destroy paint.
                            Long story short, I use the grease gun method if there is any difficulty removing the pistons. It works great. Three years ago I would have argued air was better. This forum taught me different!
                            2-79 XS1100 SF
                            2-78 XS1100 E Best bike Ever
                            80 XS 1100 SG Big bore kit but not fully running yet.
                            Couple of more parts bikes of which 2 more will live!

                            Comment


                            • #15
                              Originally posted by Rasputin View Post
                              I used to swear by compressed air getting them out for me. Then I had a difficult one. The grease gun method is the safest, easiest and best method to use if they will not push out under brake application pressure.
                              I find the brake application to be messy due to brake fluid getting where I do not want it. You also can only do one at a time or you can not pump the second one out. The grease gun method is also messy but does wipe up with paper towels or a cloth and does not destroy paint.
                              Long story short, I use the grease gun method if there is any difficulty removing the pistons. It works great. Three years ago I would have argued air was better. This forum taught me different!
                              I use about 25 grains of Hodgon H4895 with a blasting cap. I have NEVER had a problem getting the piston out. Of course it can take a few hours to find the pieces of the caliper and the piston.
                              Bone stock 1980 Special except for the exhaust and crashbars. Oh yeah, and the scabbard for the Winchester Defender.

                              Comment

                              Working...
                              X