Announcement

Collapse
No announcement yet.

30 minute cam chain tensioner mod

Collapse
X
 
  • Filter
  • Time
  • Show
Clear All
new posts

  • #16
    A word of WARNING

    Great mod. However, a word of warning to those who are going to do it. There is a VERY fine line between too tight and too loose with manual tensioners. Too loose and the cam chain will jump and bend all/half of your valves. Too tight and you will drastically shorted the life of your cam chain, which if it breaks, you will bend all your valves. Not to mention that if it breaks and binds up the crank, which is highly probable, it will lock up the bike while you are riding it.

    If you are really worried about the spring being old, a new one is under $4 from bikebandit. Or you could do like I do and stretch the one you have out a little. If your plunger is worn, it is only $28. Then again, I bet you could get a good completer unit off of ebay for under $10.

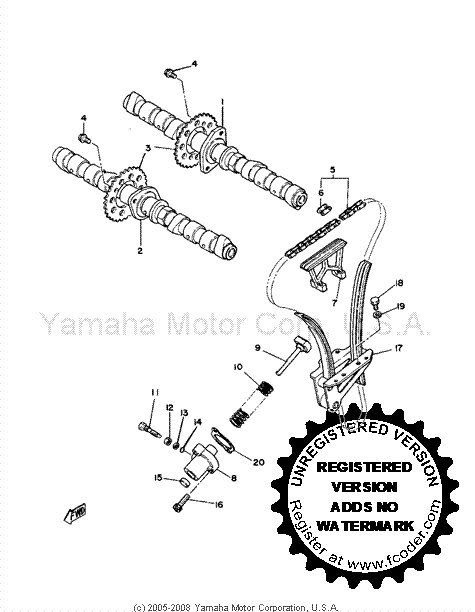
    I only bring all this up because it was a huge debate that I started over at the KZrider forum. Allegedly, the kz's which have the same type of tensioner are notorious for getting sloppy and jumping the cam chain. Personally, I believe it is due not performing the regular tensioner maintenance. It is much more crucial on the kz's due to their ridiculous cam chain setup that has tons of rollers and do-dads, all of which wear, and create slop in the cam chain (as seen below).

    Anyways, you have been warned

    Last edited by 81xsproject; 09-25-2008, 10:29 AM.
    '81 XS1100 SH

    Melted to the ground during The Valley Fire

    Sep. 12th 2015

    RIP

    Comment


    • #17
      brainstorm

      Just a thought, What if the original housing was redesigned, with the stock plunger and spring with the stop screw mounted from behind the plunger in-line?.....Just get a new spring.?????
      MDRNF
      79F.....Not Stock
      80G......Not Stock Either....In the works

      Comment


      • #18
        Update

        I'm revising my recommendation on the torque on the lock nut from 'not too tight' to 'good-n-tight'. Last night I was riding and I noticed a little cam-chain noise. I checked it this a.m. and the nut was a little loose. I think it's because the fiber gasket soaks up some oil (took it about 600 miles to do it) and it flattens out a little. A thick, dense neoprene washer may be a better choice in this location. Then again, the additional torque I put on the nut after adjusting may solve the problem.

        On the plus side, I think our concerns over a lock nut are somewhat unfounded. Here's why I say that: When the nut gets loose it will allow the carriage bolt to rotate. A full rotation of the carriage bolt will only move the face of the tensioner back by 1/16". It just doesn't rotate that quickly - unlike a stock adjuster that moves instantly when it fails. You should notice the chain starting to get a little noisy long before it does any damage.

        81xs - Was that graphic from an XJ? My tensioner isn't setup that way. It looks like this: (sorry for the watermark, but I was too cheap to buy the full version of the gif-jpg converter I used )

        I think I have a loose screw behind the handlebars.

        '79 XS11 Standard, Jardine 4/1, Dyna DC1-1 Coils, 145 mains, 45 pilots, plastic floats - 25.7mm, XV920 fuel valves, inline fuel filters, speed bleeders, Mikes XS pods, spade-type fuse block, fork brace, progressive fork springs/shocks, manual petcocks, 750 FD, Venture cam chain tensioner, SS brake lines

        Comment


        • #19
          81xs - I looked a little more closely at your post. That's a KZ tensioner, right? ( reading is good ) BTW - good advice on getting the tension right.
          Last edited by dbeardslee; 09-25-2008, 01:10 PM.
          I think I have a loose screw behind the handlebars.

          '79 XS11 Standard, Jardine 4/1, Dyna DC1-1 Coils, 145 mains, 45 pilots, plastic floats - 25.7mm, XV920 fuel valves, inline fuel filters, speed bleeders, Mikes XS pods, spade-type fuse block, fork brace, progressive fork springs/shocks, manual petcocks, 750 FD, Venture cam chain tensioner, SS brake lines

          Comment


          • #20
            That's okay, now folks can see side by side the superiority of the 11's design.
            '81 XS1100 SH

            Melted to the ground during The Valley Fire

            Sep. 12th 2015

            RIP

            Comment


            • #21
              In my very, very humble opinion, most everything said on this thread is valid but a few more things should be stated.

              A manual tensioner should not be just bolted on. After all it is 'manual' and therefore requires a little more work to use correctly. I switched to a manual tensioner simply because the stock unit was not holding the adjustment, perhaps because of my sometimes agressive (bordering on nuts) riding style.

              A loose chain can certainly jump a tooth on deceleration when the slack side of the chain becomes tensioned. When the throttle is snapped shut everything from the rear wheel forward is in flux for an instant as it all unwinds kind of like a drag slick rubberbands in the shake zone (you drag racers know what I mean). This makes the chain slap the guide against the plunger of the tensioner. The self adjusting tensioner we have uses a simple pinch bolt that will strip if overtightened and with a very small contact area on the plunger. The spring only provides the adjustment but does nothing to hold the adjustment. The pinch bolt holds the adjustment and this is the weak point. A manual tensioner simply solves the problem of the plunger sliding in if the pinch bolt cannot hold the adjustment under deceleration.

              I think correct tensioning of the chain is fairly critical (as most adjustments on a motor) and the 'automatic' stock tensioner allows adjustment with the valve cover on. I do not adjust the chain tension without removing the valve cover so I can physically check the chain slack between the sprockets with my fingers. Removing the valve cover is only a gas tank and 20 allen bolts and it allows you the ability to see what is going on inside. Besides, it does not have to be done that often.

              The threaded bolt in a manual tensioner must be locked to the tensioner body with a tight nut and then jammed with a second nut or locked some other way. That is just good insurance against a slack chain making a boat anchor out of your motor.

              Never, never, never do a chain adjustment with the motor running like some people do, as I have read on some of the other sites.

              I know there are pros and cons to switching the type of cam chain tensioner, as is switching any part from stock. If you ride the highway or you mostly commute where your throttle is opened and closed smoothly most of the time then the stock tensioner should work wonderfully. But when I get loose on those twisty back roads where I love to ride, throttle control is more 'on and off' instead of open and close. My stock tensioner just did not hold an accurate adjustment for me but the stock unit should work fine for most riders.

              Like I have said on this forum several times, a well tuned motor is a balancing act and chaning one thing can affect seveal things elsewhere. So if you are contemplating the installation of a manual chain tensioner (or any other modification), dont just bolt it on, think of the other things that can be affected before you act.
              Mike Giroir
              79 XS-1100 Special

              Once you un-can a can of worms, the only way to re-can them is with a bigger can.

              Comment


              • #22
                I do not adjust the chain tension without removing the valve cover so I can physically check the chain slack between the sprockets with my fingers.

                Unless you're tightening up the adjuster enough to move the exhaust cam while doing it, the tension between the two cam sprockets shouldn't change. You are adjusting for the slack between the exhaust cam and the crank, not the two cam sprockets.

                If you are tightening the adjuster enough to move your exhaust cam, I don't think this would be the proper tension. While adjusting the chain with the stock unit... even compressing the plunger first to where it slaps the chain.. the exhaust cam doesn't move.

                Another option with all this drilling and tapping.. etc.. is that you could simply get another stock adjuster nut and bolt and drill the housing on the opposite side to have two of these bolts holding the plunger. Cheap and easy.
                Tod
                Last edited by trbig; 09-26-2008, 09:23 AM.
                Try your hardest to be the kind of person your dog thinks you are.

                You can live to be 100, as long as you give up everything that would make you want to live to be 100!

                Current bikes:
                '06 Suzuki DR650
                *'82 XJ1100 with the 1179 kit. "Mad Maxim"
                '82 XJ1100 Completely stock fixer-upper
                '82 XJ1100 Bagger fixer-upper
                '82 XJ1100 Motor/frame and lots of boxes of parts
                '82 XJ1100 Parts bike
                '81 XS1100 Special
                '81 YZ250
                '80 XS850 Special
                '80 XR100
                *Crashed/Totalled, still own

                Comment


                • #23
                  I've run it about 100 miles since retorquing the lock nut and it hasn't budged. I picked up a nice little chrome bolt to lock the existing one in place. Pretty sure that will be sufficient - maybe even over kill, but for $.85 it's cheap insurance.

                  Mike - I was having the same issue as you. Everytime I'd get aggressive with the throttle it would push the adjuster back. For me, this is a much better solution. I've got about 700 miles on this mod now and except for the loosening, which I'm pretty sure is due to just not torquing the bolt enough, it's working great.
                  I think I have a loose screw behind the handlebars.

                  '79 XS11 Standard, Jardine 4/1, Dyna DC1-1 Coils, 145 mains, 45 pilots, plastic floats - 25.7mm, XV920 fuel valves, inline fuel filters, speed bleeders, Mikes XS pods, spade-type fuse block, fork brace, progressive fork springs/shocks, manual petcocks, 750 FD, Venture cam chain tensioner, SS brake lines

                  Comment


                  • #24
                    If the adjuster is moving while tightened then the plunger is bad. The plunger is wedge shaped so that when the lock bolt and nut are tightened it can't move. If it moves it's bad. I am sure that I ride my eleven as hard or harder then most folks on the site, as evident by my rapidly wearing rear tire. I have never had a problem. Now like you said, if that lock bolt were stripped out, that would certainly allow for the plunger to move. Hell, just tightening the lock nut probably loosened the lock bolt. With that said, this has been an excellently informative thread for all and I do really like your mod. On the subject of how to tighten it, APE Racing instructs purchasers of its manual tensioners to tighten the tensioner while turning the engine over by hand (better done with 2 people) until you can feel the movement of the chain through the tensioner and the back it out a quarter turn (of course theirs are a finer thread than your bolt probably). I know all this useless info because my buddy and I have been debating this topic for a couple years over his KZ1000. The reason it was given to him in boxes was that it jumped the chain and bent valves. I told him that that was probably because his idiot PO/father in law didn't perform the regular tensioner maintenance. But it is his bike ...
                    '81 XS1100 SH

                    Melted to the ground during The Valley Fire

                    Sep. 12th 2015

                    RIP

                    Comment


                    • #25
                      81XS - I went out and put a vernier caliper on the shaft of the plunger, and it is pretty much cylindrical. I got the same measurements at the top as at the bottom. I do recall that when I was tapping the hole it did seem to be a little tighter at one end than the other. Maybe that had something to do with it not holding the adjustment.

                      I probably adjusted it 10 -15 times before the locking bolt fitting stripped, and I didn't try to use it in that condition. I thought about using a helicoil to fix it, but decided to go a different route. I borrowed another one from a friend to get back up and running and then started monkeying around with the failed unit. I liked the way it worked so much better that I returned the other tensioner.

                      I definately hear what's being said about overtightening - and I think that's the main issue. I'm not worried about it being too loose, and as previously stated, if the nut comes loose the bolt walks back very slowly. I think it's probably one of those things you have to have a feel for. Finger tight for one person could be ratchet tight for another. I did it as per Tadracers suggestion and got it finger tight and went 1/8 turn farther in. Seems to be about right. Time will tell.
                      I think I have a loose screw behind the handlebars.

                      '79 XS11 Standard, Jardine 4/1, Dyna DC1-1 Coils, 145 mains, 45 pilots, plastic floats - 25.7mm, XV920 fuel valves, inline fuel filters, speed bleeders, Mikes XS pods, spade-type fuse block, fork brace, progressive fork springs/shocks, manual petcocks, 750 FD, Venture cam chain tensioner, SS brake lines

                      Comment


                      • #26
                        And the canary said...

                        ...chirp, chirp, chirp - which is what I was hearing from the top of my engine. It would go away when the engine warmed up, but still, I was a little concerned. I was thinking I had a cam bearing going out, so tonight I popped the valve cover off and had a good look. All the bolts are tight, no metal shavings and no signs of wear.

                        Coincidentally, I got the bird in my box immediately after installation of the manual tensioner. Aha! Says I. I took the tensioner off and had a good look at the parts, even using a mirror and a flashlight to peer back into the hole where the tensioner lives. I could see shiny wear marks from the old tensioner, and a smaller circular mark from the new device.

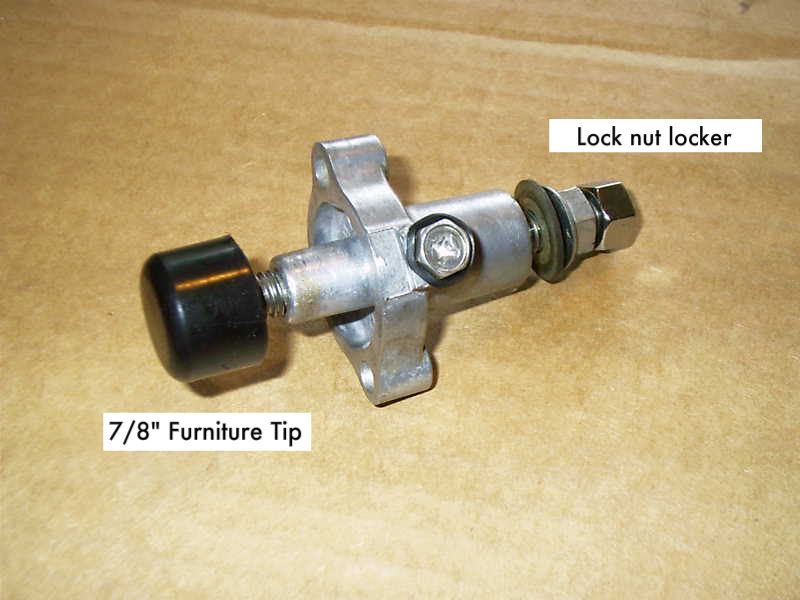
                        Not to be detered, I went up to Ace Hardware/Motorcycle Parts and bought a package of 7/8" furniture tips - like you put on a lawn chair. I hot glued one to the end of the carriage bolt and put everything back together, and what do you know, the bird's gone.

                        Evidently metal on teflon can squeek. One thing about this additional mod, it made the carriage bolt too difficult to turn by hand, so I used TADracer's method since I already had the valve cover off. A slightly smaller furniture tip might work better. Here's a pic of the modded mod.

                        I think I have a loose screw behind the handlebars.

                        '79 XS11 Standard, Jardine 4/1, Dyna DC1-1 Coils, 145 mains, 45 pilots, plastic floats - 25.7mm, XV920 fuel valves, inline fuel filters, speed bleeders, Mikes XS pods, spade-type fuse block, fork brace, progressive fork springs/shocks, manual petcocks, 750 FD, Venture cam chain tensioner, SS brake lines

                        Comment


                        • #27
                          Re: And the canary said...

                          Originally posted by dbeardslee
                          I went up to Ace Hardware/Motorcycle Parts
                          Lol, I do the same thing.
                          2H7 (79) owned since '89
                          3H3 owned since '06

                          "If it ain't broke, modify it"

                          Comment


                          • #28
                            Phil - Yeah, I love 'em. I particularly like their new selection of metric chrome nuts, bolts, and washers. Every time I'm in that place I run into another person with a bike looking for parts. They should just go ahead and change the name .
                            I think I have a loose screw behind the handlebars.

                            '79 XS11 Standard, Jardine 4/1, Dyna DC1-1 Coils, 145 mains, 45 pilots, plastic floats - 25.7mm, XV920 fuel valves, inline fuel filters, speed bleeders, Mikes XS pods, spade-type fuse block, fork brace, progressive fork springs/shocks, manual petcocks, 750 FD, Venture cam chain tensioner, SS brake lines

                            Comment


                            • #29
                              Hey Dbeardslee,

                              I hate to put a "Damper"...pun intended on your chirp dampener tensioner plunger....BUT.....

                              Like you said, those chair/stool ends are VINYL, not rubber/viton/silicone!? And you also used HOT GLUE to secure it!?

                              Did you do a temperature test of those chair leg ends, I think you would find that they get very squishy at 200+ degrees, same thing for the hot glue!

                              Perhaps something like a compressible Freezeplug piece or engine motor mount piece, that type of rubber is much more heat resistant, along with either JB weld or some other adhesive that is oil/heat resistant?? Perhaps carving out a hole in the freeze plug so that it would PRESSURE fit over the tip of the carriage bolt head? The freeze plugs have a metal bolt inserted into the rubber that is tightened against, so it might not be as hard to slightly enlarge the opening to remove the bolt and slip it over the carriage bolt head?? JAT!
                              T.C.
                              T. C. Gresham
                              81SH "Godzilla" . . .1179cc super-rat.
                              79SF "The Teacher" . . .basket case!
                              History shows again and again,
                              How nature points out the folly of men!

                              Comment


                              • #30
                                So.....

                                Why not just use the stock plunger the way it was intended to be used and put a 3/8 setscrew with some hitemp loctite (yes there is such a thing) on it to ensure the plunger does not back out?

                                You have already threaded the bore. Old plunger with the spring, run the setscrew in behind it, you're at the perfect tension and the plunger won't back out.

                                FWIW, a metric setscrew can be found much easier than a metric carriage bolt. This will make it look more "Japanesey".
                                Ich habe dich nicht gefragt.

                                Comment

                                Working...
                                X