
Good information all the way around Thank you. I'm still punching out classes at this point so I haven't jumped in yet. But working on making space and putting up new shelving for an area to house all of the motorcycle parts that I will have after doing a complete disassembly of the two parts bikes. I hope I won't need another head, but will keep you in mind if this one ends up a dud. I'm hoping it really isn't as the bike was only a year old before mount saint helens went off.
And I took a starter course for electrical engineering. And have dabbled since. The bike currently runs the home made LED blinker shutoff circuit, as well as LED everything except the headlight. I won't every claim that I know all. But usually just enough to be dangerous.
I also started picking up the stuff to do redo the seat. I keep messing with lines to make it look like the tank and seat are one. As well as ad herring to the golden ratio. Lots to consider for it to look perfect. I have seen to many images online of seats that either don't go all the way to the tank...or leave huge open areas behind the seat. And some that look like someone just threw some boards on the back and folded some fabric on it. I think I did pretty well on the first seat but I have since come up with ideas for what I can do better. More on that once I start building the next one.
Also I got the hoop bar (I know many believe it is unthinkable to do anything to the frame) and have it in place. And just need to take it to my dads for welding once the weather lets up. Then I can start on the seat.
-
As the heads on all the bikes are the same, start with the one that needs the least work and use it. I'm down the coast about 800 miles, so shipping isn't too bad if I have parts you need. I KNOW I have a low hour head, but it's still on the spare engine and may take me six weeks to get to it.
For the teardown, look at T.C. thread on Godzilla. He's taking his time and getting to all the "problem spots" of the 37 year old bike.
Bearings for the engine are HARD to find, and DO cost some money. I have a few left here, but will need them for my engine before I can let any left over sizes go.(I have partial sets of the rod and crank bearing "kits" from Yamaha, boxes with one set of each size made.) The other option is check and see of anyone still makes "custom" bearings. There used to be shops that would put new babbit on your old bearings, to the thickness you specified. Some old hotrod guys up there would know if any are still around.
I bought some super bright LED's and put them into the GIVI trunk on the BMW. I bought mine from alliedelec.com, google search gives you all the companies that sell them, and you can also find out what resistor value you need for how many LED's on a string. I still have about 50 of the red LED's left, I think. They are small, 3mm diameter, but put out a LOT of light per LED. I have a total of 16 on the box. Let me know if you want any help with them, as I AM an electronics engineer and do know a little about this stuff.Leave a comment:
-
So it has been a while since I posted. The riding season here in washington state is starting to dwindle down. I really enjoyed the first season of riding her all the way through. I have heard the valve noise from the top end all summer and it has slowly grown worse. So yesterday I purchased another parts bike. The first parts bike I will admit I didn't do right by. I tore it apart mostly for the learning lesson. It was never going to run again anyways and was missing so many parts it would have taken way to much money to get there. So now I'm here with another parts bike with much better intentions. I feel like for the first couple years there was a lot of stumbling in the dark on this bike. I made mistakes. I screwed a few things up. but over all I learned a LOT about how this bike works. Mid spring I also picked up an early 70's honda with the intention of restoring it in another year or two. For the price I couldn't let it go. The most recent addition is a 78E with a 79 special tank. No rear shocks. No carburetors or airbox. All of the electrical appears intact. And it has a 4 to one muffler that is missing the baffling. This is just what I have found missing so far. The story I was given when I picked it up was that the last fool to ride it was the day of and after mount saint helens blew. The individual road it without wrapping the air filters and scored the crap out of the cylinders. I'm hoping that this didn't do much to the valves. But I will find out when I tear it down. Either way my bike won't take another season unless I spend the 900 to have the head re sleeved and brand new valves. And there is no way my other half would let me spend that kind of money. Before I got her rideable she told me once a week to just get rid of it and buy a new one. So I have 6 months to finish my bachelor's program then this will get my full attention.
This next time around the plan is to tear it down to the frame and pickup a rebuild kit for the engine and replace my bearings. To many times of messing with the carbs and having them pouring gas into the engine, I can hear the bearings in the lower engine. Go through the three bikes and build one good clutch. The current one is having issues with moving between gears, no slippage. Swap the heads between this parts bike and mine. I will replace the valve seals on the donor bike, as well as cleaning each valve and reseating it. When I put the current one on in the spring I new that there was slop. But i didn't realize just how much that would affect everything. Finish the frame and then repaint it. I already picked up the paint gun and have been messing around with it. Not to shabby at this point. The seat I made the first round. And I think for the second round I'm going to modify the seat so it fits better with the bike. I will also take the color to a much darker brown, or a black. I want the seat to look like it fits within the frame. That's the look I have going with the new side panels and would like to transfer that to the seat. So that's the plan for now. I imagine it will be a few months before I post again but want to let you know that I hadn't bastardized it past riding. And that I wasn't one of those people that screws up one of these beauties and then throws it to ebay as parts This is an ever growing project. Something that I am learning from and will continue to make better and better as the years pass.
The new addition

Leave a comment:
-
Do you ride more or less upright, standard style, or leaning forward a la sportbike. Your bars make me think forward.Leave a comment:
-
Leave a comment:
-
What's the purpose of the micro fairing? I got at least three spare fairings with my bike, and one was small, but not as minimal as what you're considering. What is your nose cone designed to do?Leave a comment:
-
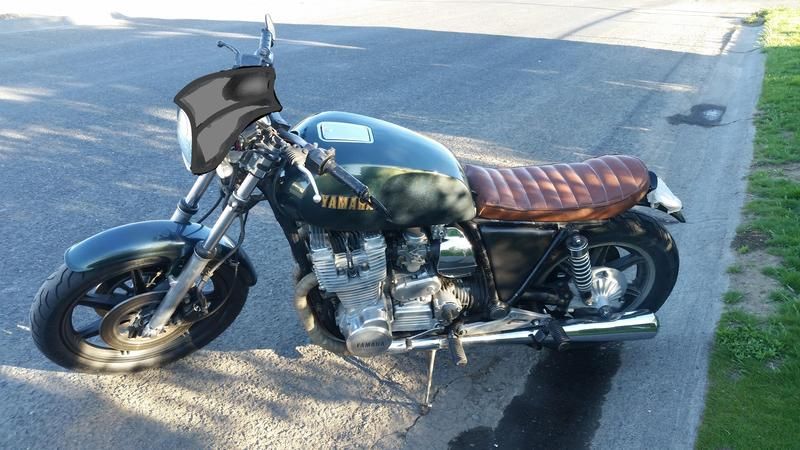
So I am messing around with the idea of making a mini fairing for the bike. Now that I have the biking running right I can focus on what should have been last from the start...making her pretty. On that note I'm headed over tomorrow to finally get the hoop installed. Thinking once that is on I will be cutting out a plate that will fit onto the last 8 inches of the seat so I can get it to hold the form to the new bar. Once that is done I can move the LEDs onto the underside so it will light up the rear when I turn on my blinkers. I took day time pictures but have yet to do night time photos so people can see what I'm doing with the LED madness. So far the one thing I'm seeing is that I would like to have LED strips that have more LED's per inch. I can throw a dozen of these strips on there but the closer the LED's are the brighter they are. I just can't beat that fact. As they sit to me it feels like they are good night time lights but not very efficient at day time. If I can't find them then I may have to venture down the path of figuring out how to make them.
So let me know what you think of the mock up I drew for a small front fairing.
Leave a comment:
-
-
-
-
Update
And it was the Pickup Coil Wires!! I can't believe it!! With all of the other work I have done to this bike she rides amazing compared to before! I think I just need to read the spark plugs to make sure I'm not running lean which I will check tonight when I get home! And I also picked up a round xs special round Tach for the bike...so I can get rid of this cheap 1:1 china crap. Now I need to make a bracket so the gauges are recessed more and not stuck up so high. With these euro style handle bars the gauges look a little funny when they are that high.


Leave a comment:
-
So I have heard the saying about making assumptions. And it appears I may make an ass out of my self. I assumed the coils were the issue because it didn't spark after heating up. So I checked the pickup coil after reading the repair mock up. And I'm guessing that the wires going to the pickup coils shouldn't be rubber band elastic....so....what guage wire do I need to replace it with?Leave a comment:
-
[QUOTE=motoman;484356]Mid eighties and up.......any of the four cyls. Just check across poles for either 1.5ohm, or if making the necessary changes, 3ohm. If you'd like, you can also un-solder the original coil plug-in wires and first slip a small piece of shrink tubing over wires and the re-soder them to the VFR replacement coils, then sliding shrink tubing over soldered connection.
Remember also, soldered electrical connections use rosin core NOT acid core solder or soldered electrical connection will shortly cease complete connection circuit .
.
Leave a comment:
-


 .
.
Leave a comment: