Announcement

Collapse
No announcement yet.

8000k's chain XS

Collapse
X
 
  • Filter
  • Time
  • Show
Clear All
new posts

  • #76


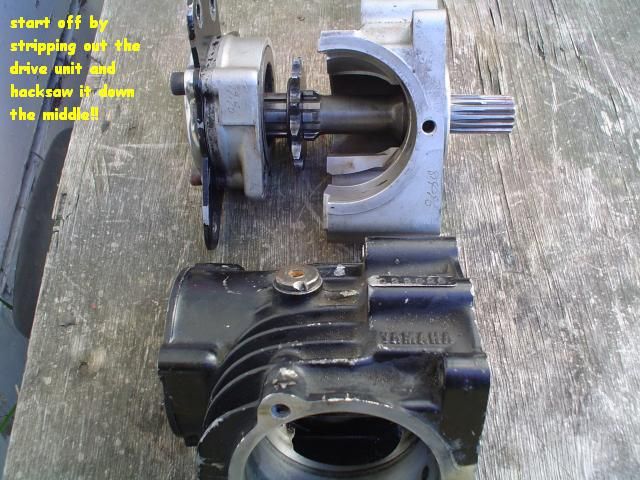
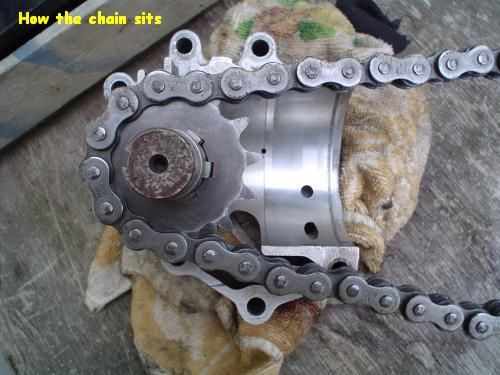
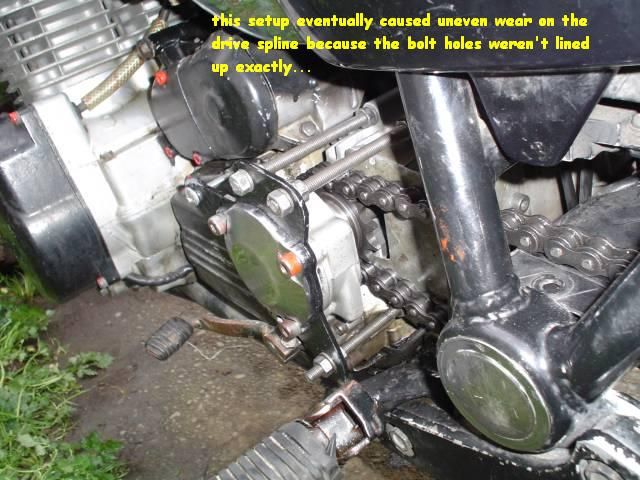
    Chop, I'm still mystified as to how you'll keep the whole drive unit in one peice and still get chain clearance on the casing. Do you mean you'd weld curved alloy braces from inner unit to outer unit, then cut the casing thru the middle afterwards?

    Comment


    • #77
      middle gear case

      exactly. if you do it that way(WELD A 3/8 INCH ROD ACROSS THE VERY LEFT UPPER BOLT TUNNELS) before cutting,the housing geometry will remain the same. I don't have one of your sprockets yet. So 1 more question, according to your very last pic ,it looks like that sprocket and chain will clear the engine casing...is this true? also in your older pics, with sprocket installed on shaft,installed in your housing, it looks like the chain runs right through the area of the circular edge of the gear housing. so, can you post a pic of your chain installed on the sprocket, sprocket installed on shaft in a view looking from the rear wheel? making sure the shaft and bearing are in firm in the housing.....p.s. I see a way you can keep your setup and do a 1-piece housing as well...send me your e-mail and i will get you a photoshop of the gear housing...thanks .....chop
      MDRNF
      79F.....Not Stock
      80G......Not Stock Either....In the works

      Comment


      • #78
        With the chain on the 13t sprocket, engine case clearance is 2mm. Chop, the housing geometry stays the same anyway, as the outer bearing sits in one position only, whether the unit is cut thru or not. You'd need those welded-on alloy rods to be u-shaped or curved, and you'd need at least 3 or 4 of them spread around the whole unit for sturdiness. Bracing the outer unit with steel plate and HT steel rod is the same thing. I think you'll find there's no way in hell you'll get get chain clearance on a one peice unit I'd love to see that photoshop pic though. Hoping you can prove me wrong! Email is patrick@inspire.net.nz Cheers.

        Comment


        • #79
          thanks 4 the pic

          hey, this clears it up for me. Check your email, never say never...thanks...chop
          MDRNF
          79F.....Not Stock
          80G......Not Stock Either....In the works

          Comment


          • #80
            bearing race

            the bearing race and/or spacer #2,#3 in your first pics would need to be placed 1st on the shaft.I'll bet they don't measure 25mm total. Get where I'm going? That's why I will relocate the lower frame member under the swing-arm pivot...
            MDRNF
            79F.....Not Stock
            80G......Not Stock Either....In the works

            Comment


            • #81
              Solid Mounts Available

              Hi pggg

              New post from guy in the UK forum
              Company there making solid mounts for XS
              Post shows dimensions for the mounts for DIY

              This sorta changes my mind about a frame bracket for the chain drive. Would like to see/ride XS w/solid mount first.


              mro

              Comment


              • #82
                Yeah mro with solid engine mounts, something similar to this should be fine.

                That original black plate has 7 holes to line up, BUT my accuracy wasn't too good and the holes ended up a tiny bit out. I'm guessing that's why the shaft wore unevenly. Will show a 'MKII' model soon 
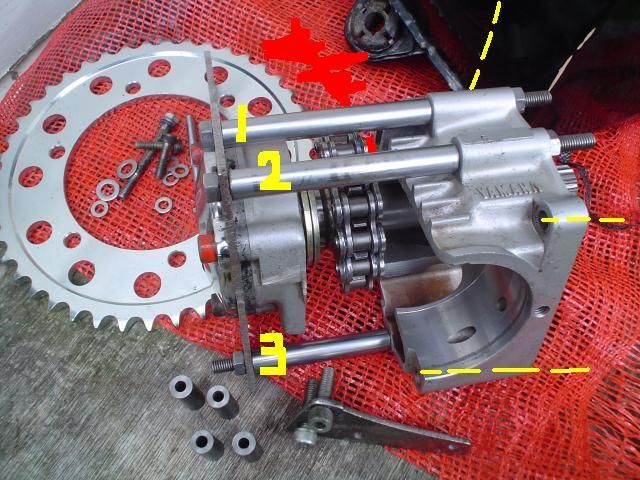
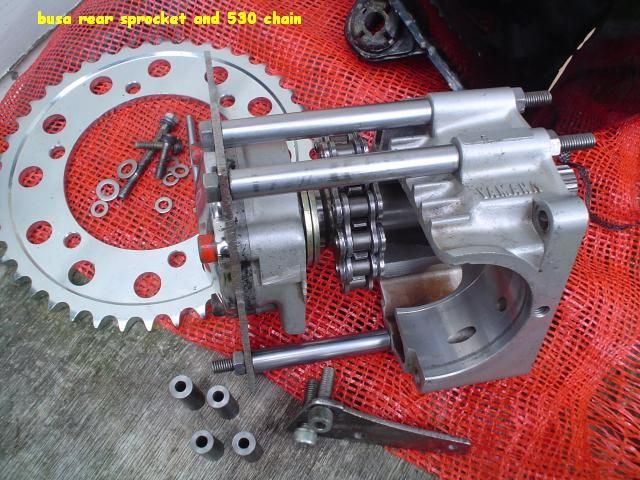
(engine mounted rather than frame for now)

                P.S. Am picking up some front sprockets next week and will have 3 spares. They're 13t 530. About US$20 posted.

                Comment


                • #83
                  Ends up I've got 2 spare 530 13t sprockets here, but dissapointingly they cost more than they did a year ago. They work out at NZ$58 each (US$37.70) Now you can get normal front sprockets over the counter here for NZ$25, so these machined sprockets are over twice the price 
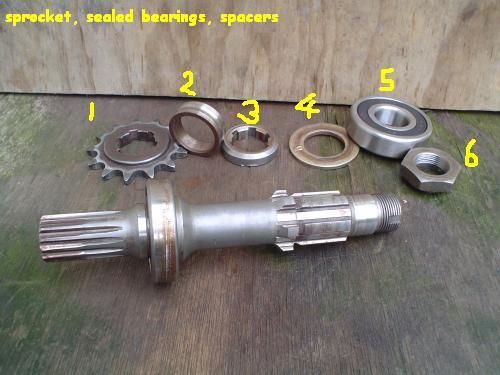
Doubt if I'll get anymore made. These machinists ' hourly charges are criminal I reckon. Costs me NZ$9 (US$5.85) to airmail to the States so they're US$43 each. Lot of dough for one measly sprocket methinks.
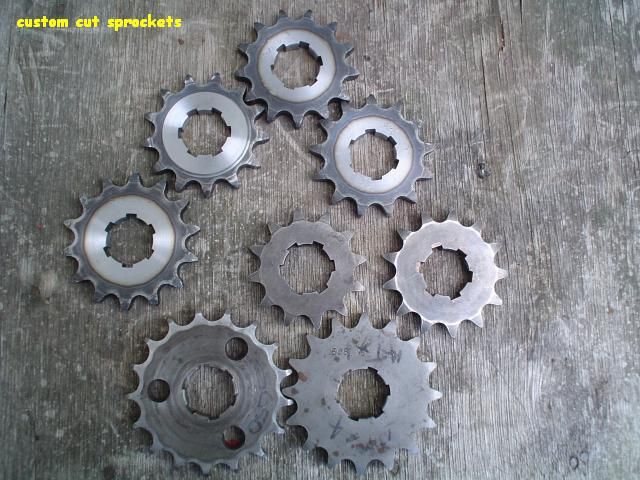
                  Anyway, Email me if someone wants one patrick@inspire.net.nz

                  Alternatively, it's probably possible to make your own spline pattern if you've got patience and a steady hand. From what I've found, unhardened 530 sprockets in any tooth number can be got cheap from commercial sprocket manufacturers. I'm thinking you can get a 26mm hole machined dead centre, then attack it with a dremel to make the required pattern. Having an XS650 sprocket to trace the pattern would be handy, but you could trace it mathematically, there's six slots 30mm apart and 6mm across. It'd be tricky and time consuming but it's another option. You harden the teeth with heat.

                  The pic shows a bunch of sprockets that fit the XS11 spline, the 16 and 17 are from an XS650, the others are a 12 and 13 in 520 pitch(not the best pitch for an XS11) and a 14 and three 13's in 530 pitch. The XS650 sprockets won't clear the engine case without some sort of major alteration. The 14 will fit with some grinding of the engine case. The 12 would be too small, and the 13's fit nicely.

                  Comment


                  • #84
                    Here's starting on some parts for a slightly different setup. The holes are drillpressed and traced from the gaskets so all perfect. High tensile rod 8.8 grade, and strong steel tube for sleeves. Wristpins would be good as sleeves if longer. Small plate bolts to the engine and main plate to engine and gearcover. Both bolt together. Also, Kawasakis and Suzukis seem to have a few exchangeable parts and I found that a Hayabusa sprocket fits my 95-97 ZX6R wheel and available from 38t to 48t


                    Comment


                    • #85
                      Forget the steel rods, if you weld all the right length steel tubes to the plate you'd get a simple bolt-on unit. 9 bolts, 5x 8mm and 4x 6mm.

                      Comment


                      • #86
                        if you weld

                        You might want a pro to cut and weld the tubes. It will be a real bitch to keep em perpendicular. Even clamped up tight the end result could be unsatisfactory.


                        mro

                        btw
                        just had a thought.
                        might make a second plate so you could bolt the thing together off the bike. Check that alignment of tubes is good and then weld it up. (on your way to making a kit?! )


                        mro

                        Comment


                        • #87
                          Yeah mro it's tricky but I know the measurements and can cut and tack on the tubes exact

                          Comment


                          • #88
                            Got The Sprocket!!

                            Hey Patrick,

                            Check your PM mailbox, have sent you a few PM's and an EMAIL, no reply???
                            T.C.
                            T. C. Gresham
                            81SH "Godzilla" . . .1179cc super-rat.
                            79SF "The Teacher" . . .basket case!
                            History shows again and again,
                            How nature points out the folly of men!

                            Comment


                            • #89
                              Just reposting to add photos

                              Hey folks,

                              Due to the new interest in chain drive mod by a new member, I tried to insert as many of the original photos I had into this thread. I'm now also going to post them in a few posts so that they are all together along with the text that Patrick/PGGG had given about his work on this mod. This early text was regarding the 520 chain, he then had problems with his original setup, added more bracing and the larger 530 sprocket.

                              TC my diagram skills came to grief but this dogs breakfast pic and some explanation should do the trick. If the machinist has the removed bevel gear or the spline, they'll get the right pattern to cut. Sprocket(s) will need a collar. Depending on your rear wheels' sprocket to wheel C/L measurement, you have an option to move the front sprocket inwards to the right by machining a few more mm off the spline shoulder that the sprocket sits against. Having the sprocket collar on the left gains another 4 - 5 mm of inward movement as opposed to having the collar on the right.

                              My rear wheel had a sprocket to wheel C/L of 110mm. Ideal is around 112 - 114mm. To gain a few more mm for perfect front - rear sprocket alignment, I shimmed the rear sprocket with 2mm thick washers. That kept the sprocket still sitting on the hubs' raised inside collar and still inline with the rear hub bearing. Any further outward movement and problems arise. The flow-on effect -hub bearing would need moving, sprocket would be off hub collar and lots of other things would need altering as well. Spacers, swingarm dimensions etc.. etc.. TC this job is 80% figuring things and 20% actually doing!

                              The XS's adjustable swingarm pivots also give left/ right movement at the cost of wheel alignment movement, but 2 or 3mm is neither here nor there.


                              The pic shows the order of placement, but it's all pretty much common sense. C is the inner ring hacksawed from A then smoothed flat. I used 1 and 2 as spline spacers between sprocket and L/H bearing. 2 is the inner race taken from the removed R/H bearing and 1 is the chopped off bevel collar. You need a very precise measurement on the spacer length to lock the spline nut and L/H bearing accurately. (a lot of tedious emery paper work when you have no lathe!) The drive unit pic shows where the hacksaw lines are. Move the L/H cut even more to the left for more clearance if wanted. On the steel bracing plate, you need to get the holes positioned accurately so the 8mm threaded rods fit nicely. Use the drive unit as a template. The smaller 6mm bolt braces into one of the gearbox cover boltholes. I'll leave it at there for now - don't hesitate to fire anymore questions! Cheers.

                              I replaced them with sealed bearings $20 each
                              (NSK6006vvc3e & 6305vvc3).


                              520 chain HEAVY DUTY, 120links +/-

                              12T front
                              33T rear


                              continued next post
                              T. C. Gresham
                              81SH "Godzilla" . . .1179cc super-rat.
                              79SF "The Teacher" . . .basket case!
                              History shows again and again,
                              How nature points out the folly of men!

                              Comment


                              • #90
                                Part 2 of repost with photos


                                Continued....
                                T. C. Gresham
                                81SH "Godzilla" . . .1179cc super-rat.
                                79SF "The Teacher" . . .basket case!
                                History shows again and again,
                                How nature points out the folly of men!

                                Comment

                                Working...
                                X