If this is your first visit, be sure to
check out the FAQ by clicking the
link above. You may have to register
before you can post: click the register link above to proceed. To start viewing messages,
select the forum that you want to visit from the selection below.
Weather turned seasonally cold again, temporarily curbing work in my unheated garage.
Hi Frank,
It's that vicious wind that makes it so miserable outside at this time.
Hang in there it will soon get better. Throw another log on the fire
Phil
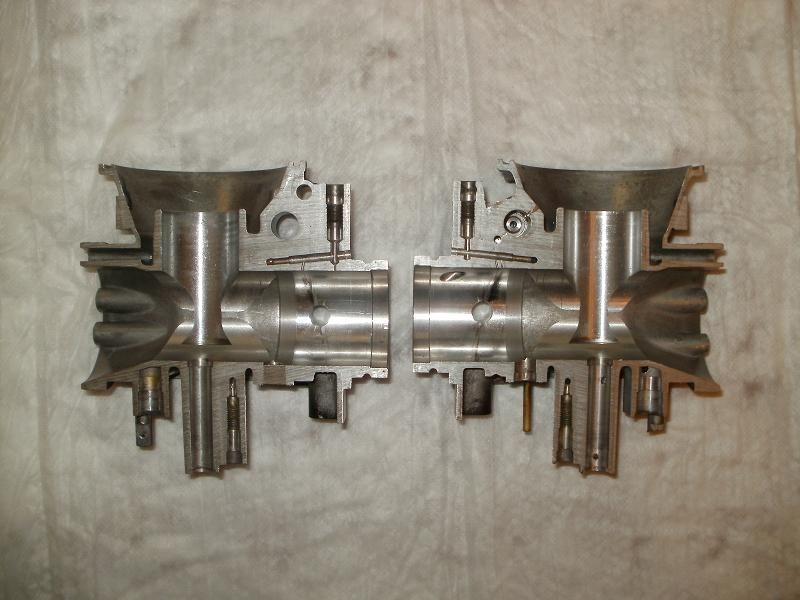
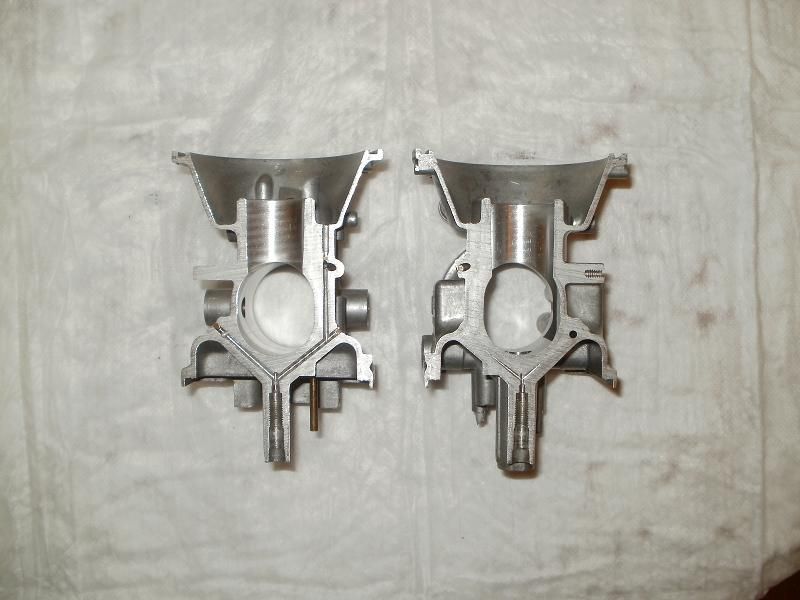
Mack donated a few carb bodies a couple of years ago, and I took a metal cutting band saw to them to get these views. Here are just a couple of the 80-81 series carbs sliced both across and length wise. You can click on the photos to get a larger/closer view.
T.C.
That was REALLY an amazing job. You could have been a surgeon.
Seems my best contribution to the carb fun is a copy of an earlier post :
Hi-- Besides these great guys on this site, I found this video to alleviate some fears, and give me some courage to tackle the xs carb rack. My bike runs super strong and smooth. You must use genuine Mikuni pilot jets!
Mack donated a few carb bodies a couple of years ago, and I took a metal cutting band saw to them to get these views. Here are just a couple of the 80-81 series carbs sliced both across and length wise. You can click on the photos to get a larger/closer view.
Here's the thread I posted showing the 78-79 model as well as showing the jets in place, and strings and such to try to show the fuel air flow passages.
If you want the bike to run right you will at least have to do a thorough carb clean. Be very careful pulling the float pins so you don't break the pivot stands. I just had to repair two broken ones on a project bike I just got. You will for sure have to clean the pilot jet, and it's pretty easy to get to. Find a good fitting sharp screwdriver to remove it so you don't strip it. You may need to grind down the screwdriver tip to get it in there. Next, you absolutely need to get the main emulsion tube out. It is the tube the slide needle goes into. I'll be you'll be very surprised how dirty it is. After you remove the main jet and the slides you can push the emulsion tube toward the carb top to remove it. I had to use a punch and drive them out. If you do that be aware there is a small brass pin in the carb body to orient the emulsion tube so use a tool of smaller diameter than the hole the tube is in to drive it out.
For sure get the floats to move freely and I've also looked into the float pin and seat and seen it pretty dirty so I used a Dremel tool with a small brush tip and aluminum polish to shine it up inside. Then a good clean out of course.
I just got two project bikes and the carburetors were disasters once I got in there. Both are now running well. Wouldn't hurt to check your compression if you can too so you'll know if the valves are working well enough for now.
Not having a gas tank at this preliminary stage, I used a syringe to inject gas into the 2 gas lines to the carbs to fill up the bowls, and I added a squirt of quick start fluid into the throats of each carb. The motor "caught" and almost started. There were definitely successful detonations in some cylinders.
I have to clean the carbs better now. There is probably another jet or needle that I haven't found. I'm not experienced with carb work. Is there an exploded view of parts in the carbs anywhere?
So, it's sort of alive. I placed a jumper wire in the connection block and hooked up a battery. The lights on the instrument cluster came on. The starter motor responded to the start button and turned the engine over. I put a spark plug in the lead, grounded it on the engine, and I see a spark while the starter cranks over the engine. Getting there.
Okay, on the Ignition switch, the large solid red wire is the power from the MAIN FUSE/Battery, and the large brown wire feeds the fuseblock and the other circuits. The Red/White/yellow striped is just to power the Emergency flashers, and the blue is just for the parking lights when the switch is turned to Park....which nobody ever does...on purpose!
Aside from the seat fitment with different tanks, there are other differences. The specials use gravity controlled petcocks and a separate vac. controlled valve/Octopus, and they don't fit/mount onto standard tanks, and vise versa...the holes are spaced differently. The Standards use vac. controlled petcocks. The Standards use a float/fuel level sender, the specials only use a Thermister idiot light switch. The Standards also have a vent tube that runs from the gas cap recess area THRU the tank to the bottom/end of the tank to drain away rain water/fuel that might get spilled into the recess. These tubes can also RUST thru causing fuel leaks. The Specials have a raised/elevated gas cap so don't have/use the drain tube. And the Specials are smaller less capacity tanks than the standards overall.
While I'm waiting for my key to arrive, what 2 colour wires do I jump on the wiring harness to ignition unit connecting block in order to activate the starter motor and energize the coils? Thanks!
Frank, if you're putting off getting a good gas tank that doesn't have holes in it because it's too expensive then tools and new fasteners are going to knock your budget through the roof. You are going to screw up some screws whatever you do but the screwdriver in the emergency toolkit has a JIS tip, use it when you can.
If the screws are stubborn, leave off the plastic handle and put the screwdriver in the screw, then rap on the shank to loosen the screw. Try not to mushroom the shank. If the screw wallows out you can usually smack the screw on the head with a hammer to peen the cross back down enough to let you 'set' the screwdriver tip into it with the hammer, then unscrew it.
Anyway, take care of what you need to get your project running with a polypropylene hot water bottle for a temporary fuel supply if that's what you have to do but be careful. When you're working with gasoline, take it outside to play and have a fire extinguisher nearby. If something pops, Mr. Hydrocarbon is not your friend and you don't want to burn down your bike/garage/house while you try to figure out how to put out a fuel fire.


Leave a comment: