 Tweet
Tweet
Well I finally completed the cafe conversion on this bike I picked up over 3 years ago. She's been in various slightly modified variations since pulling off all the cruiser garb the day I brought her home. The last few months were spent doing some major upgrades, and now shes back on the road. With the exception of some minor details I want to polish and fine tune, she's officially "cafe'd out". Hopefully the purists will see my attempts to preserve the feel and spirit of the bike as originally intended by the designers and engineers of the era.
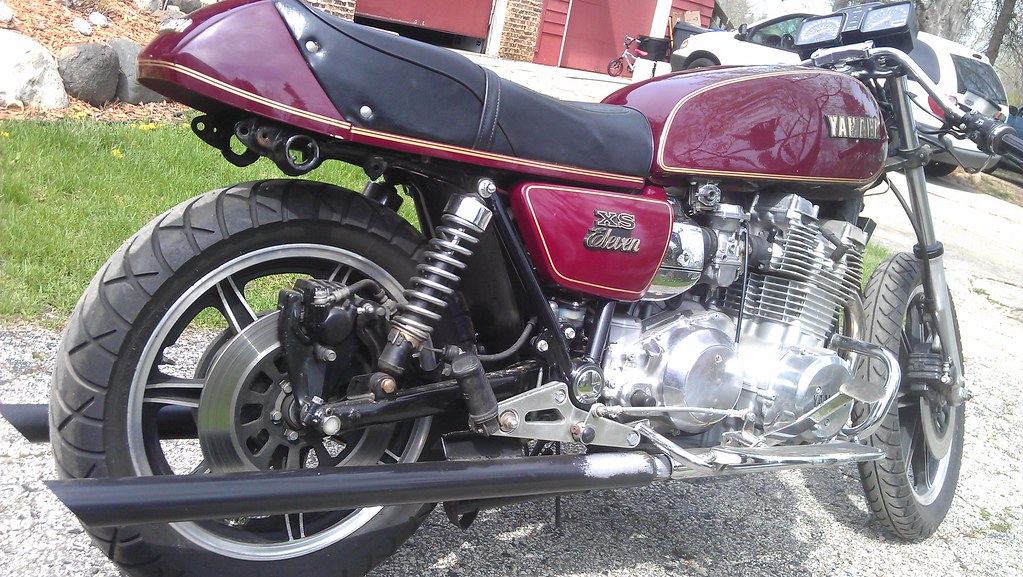
I started with an all original '78 I procured in basic running condition from a custodian, who obtained the bike after picking it up from the original owner's widow the prior season. The bike had 11k miles on her, and I paid 1100 bucks, all signs pointed to a go as it felt fitting for the theme of 11's. It seemed to have every option available from the full Vetter fairing complete with radio and glove boxes, to the luggage rack, sissy bar, floor boards and forward controls. I stripped it all down, pulled the bars off, flipped em over and put them back on backwards, imagine a faux clubman if you will. With no lighting or plates, tucked over the tank, my feet resting ahead upon forward controls, hands gripping flipped over, spun around cruiser bars, and open title in my pocket, I took her for her first run down an old country road by my house. I proceeded to rip through the gears, blasting away at WOT all the way into fifth. I climbed through the RPM range unwavering until she started leaning out and spitting. At that moment I looked down at the speedo to see a very pleasing 135MPH reading. I let off the throttle, dropped down through all five gears while pushing vigorously into the brake levers to squeeze all three disks, rolling to a rather expedient stop. After a quick U-turn in front of a corn field, I blasted past what had to have been a pre-war constructed barn as I went through the gear set once more, promptly reaching that 135MPH mark and now familiar spit of the carb jets leaning out. I putted home at a more sane speed and pulled into the garage. With what I assume was the biggest grin I've ever worn upon my face, I stepped off this mighty steed and said to myself, yes, we shall commence with a build on this one, she is most worthy. After little deliberation I settled upon the name of Kana, a not uncommon name for Japanese girls meaning strength and power. It seemed fitting for this beastly machine that in it's hay day, once boasted the first sub twelve second quarter mile time ever achieved on a factory motorcycle.
 IMAG2635 by alicari, on Flickr
 IMAG2641 by alicari, on Flickr
 IMAG2656 by alicari, on Flickr
 IMAG2671 by alicari, on Flickr
 IMAG2672 by alicari, on Flickr
 IMAG2673 by alicari, on Flickr
I essentially did some minor mods here and there over the next couple months, pushing the bike into a road worthy condition so that I could feel it out and determine where I wanted to go with it next. Winter hit and with it a move to a new state, both of these events caused the bike to sit in the then current state until I relocated cross country. It was at this point that I started to do the real work.
 upload by alicari, on Flickr
 upload by alicari, on Flickr
 IMAG3400 (1) by alicari, on Flickr
 IMG_0853 by alicari, on Flickr
I picked up a universal leather cafe seat from Dime City Cycles. After some rough placement, I then chopped down the rear of the frame to match the new lines the seat created. Next I capped the frame rails, made seat mounts, and picked up some external reservoir rear shocks with preload adjustments to appropriately adjust the stance of the rear end. Next on the docket was a modern sportbike front end to increase handling characteristics, and lower that sky high front end. While it provided for fantastic stability, it made the cycle unnecessarily heavy to maneuver into corners. I found a complete neck forward set up from a 2003 Suzuki GSXR 600. I selected this model because it offered large diameter 45mm fork tubes with modern fully adjustable valving and preload in a conventional upright fork design that didn't look futuristic Moto GP, but rather more inline with the aesthetics of the late 70s in which the bike was originally designed. The large 12.5" drilled multi-piece dual disc brakes and Tokico four pot calipers that accompanied them didn't hurt either. Not to mention the fact that the entire assembly came in around 35 pounds lighter than the stock XS set up, her diet was well underway.
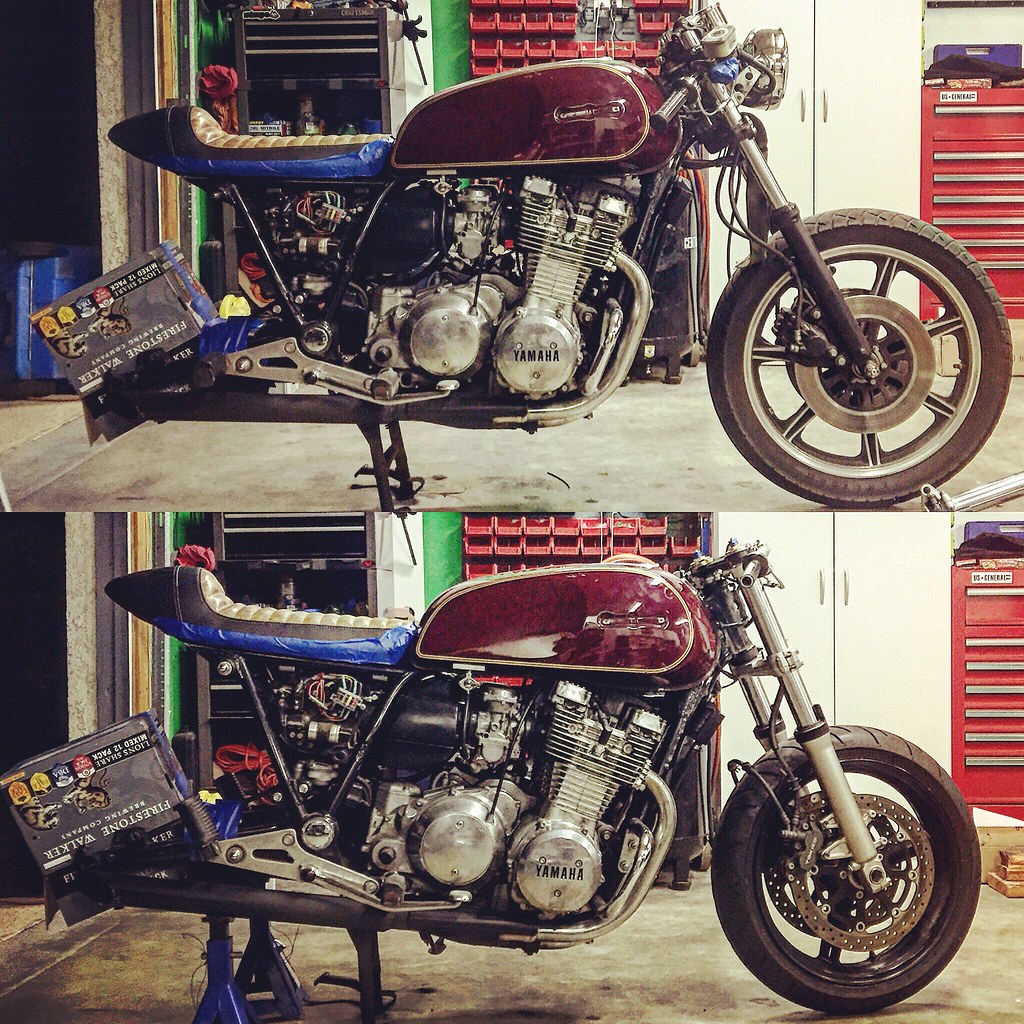
A simple steering stem bearing conversion set from All Balls racing made the mating of the 25 year separated trees and steering neck a straightforward matter of replacing two bearing races. After mock up was completed the difference the new components made became abundantly clear. An almost 4 inch drop overall, and a tall front wheel profile reflecting that of the rear created a very balanced and race inspired line set. The greatly reduced rake and trail had my concerns about high speed stability reach their peak however. This was addressed in the form of a craigslist find, a brushed aluminum aftermarket steering damper with 7-way adjustment. A bit of fab work and it was nestled comfortably below the left side of the fuel tank. Fine tuning of the components was next as I took a grinder and sand paper to the trees. Once all casting lines, mounting tabs, and switch mounts were removed, a much cleaner, machined appearance easily shown through. Some satin black paint rounded off the pieces nicely, a theme that I would carry on across the entirety of the bike, allowing the bare aluminum finish of that monstrous inline four cylinder engine become the focal point of the bike.
 IMG_1277 by alicari, on Flickr
 IMG_4798 by alicari, on Flickr
 12973137_10106137799876741_7793918025458900711_o by alicari, on Flickr
 13123080_1181750075168994_878280930306693256_o by alicari, on Flickr
A factory Suzuki brake master cylinder was reused to power the front stoppers. However the large plastic, remote mounted reservoir simply would not do. Some clear vinyl tubing and a stainless allen head bolt fit the bill quite nicely to fill my desire of a low profile vessel to hold the extra fluid necessary for the system. The original 1978 clutch perch and lever were also reused to stay within the bounds of this "budget bike". Unfortunately the length of the lever heavily outweighed the length of the gsxr clip-ons, so naturally out came the four inch angle grinder and cut off wheel. After chopping off the ball end and another half inch of lever, I took the remains to the bench grinder to smooth out a more approachable profile and remove the last of the chrome plating. After the rough shape was formed, sand paper, elbow grease, and time generated a smooth, brushed finish that any gloved hand would be more than pleased to grip. Rinse and repeat for the brake lever, and the Moto GP inspired shorty lever set was complete, at a cost of about three dollars mind you.
 IMG_5107 by alicari, on Flickr
 IMG_5109 by alicari, on Flickr
 IMG_5108 by alicari, on Flickr
Continuing on with the minimalist theme, only two switches would be present with the hand controls atop the custom trees. A stainless steel micro push button would do the job for triggering the starter relay, while an identical push button would fire the entire lighting system. While I retained the factory ignition wiring, I pulled every last wire pertaining to the bikes factory lighting and auxiliary systems. The removal of the switch housings, all wiring modules, and the accompanying wiring shed another five pounds off the overall weight. All was replaced with a single modern solid state relay and a handful of wires to run the headlight and new LED strip tail/brake light. I was inspired by a film sequence in which a rider is hailed by a police officer on the highway, he then pressed a button effectively killing all lighting on his bike, including the brake light, he then darts off around a truck, hits the brakes and hops off an exit ramp, then presses the same button to turn the lighting system back on. Naturally I felt an extreme urge to recreate that, so a simple circuit was designed where the brake lever switches were integrated within the rest of the lighting, and that one micro push button. I now had stealth mode on this street rocket. The electrical was finished off by integrating a modern fuse panel, relocating the ignition switch under the air box, a sealed AGM battery, and a 12V USB port on an auxiliary circuit to keep that phone topped off on long excursions.
 IMG_4722 by alicari, on Flickr
 IMG_4825 by alicari, on Flickr
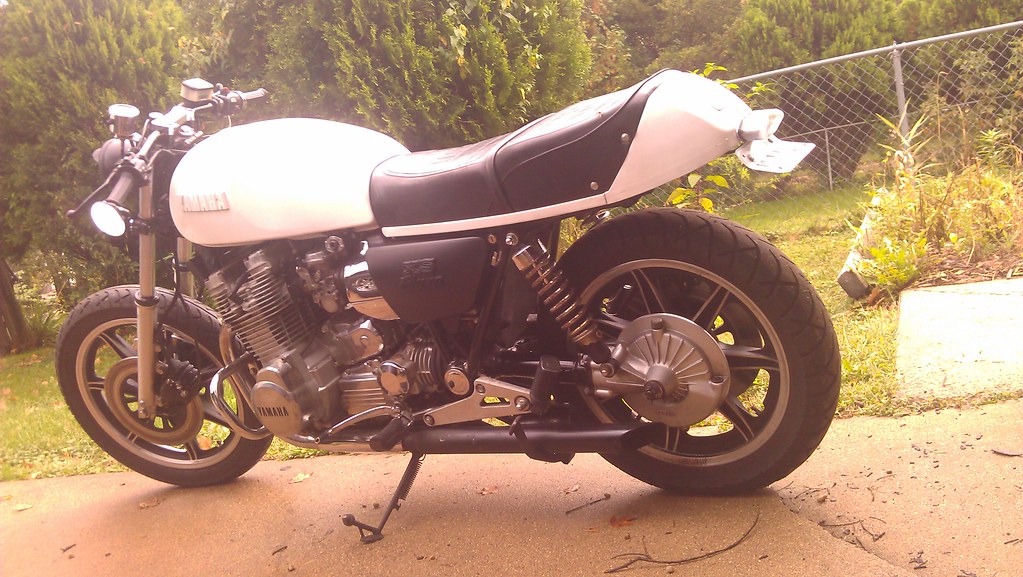
Finally some matte white paint for the fuel tank and headlight bucket pulled forth the simple color scheme I sought after. More custom brackets, mounts, and small tweaks all across the bike help to maintain the stripped down theme. Everything that wasn't bare metal affixed the engine or the fuel tank and headlight bucket, was coated satin black to accentuate those aforementioned pieces. All maintenance items were tended to... fluids, filters, lube for axles and cables, adjustments to brakes and cable pulls and critical fasteners were torqued. Rebuilds on all four of the Mikuni 34mm carburetors was next, rejetted and synced they were mated up to a set of new carb boots with custom vacuum port deletes. A UNI high flow air filter made its home within the factory airbox, sucking cool air from underneath the seat and evenly distributing it to the three inch velocity stacks feeding each carb. The flow continues through the combustion chamber across iridium tipped NGK plugs, then out to a pair of custom 2-1 headers and straight pipes, all hugged in fiberglass exhaust wrap. A set of new Bridgestone BattleAX sport tires, 150 rear and 130 front, ground this beast of a machine making it capable of sticking to the curviest of mountain switchbacks.
 IMG_4666 by alicari, on Flickr
 IMG_4688 by alicari, on Flickr
 IMG_4689 by alicari, on Flickr
With all the bits and pieces in place, the first test ride, and then the fine tuning, commenced. Over a period of a few days and many test rides, the carbs and idle were dialed in, all cables and lever positions adjusted to provide an intuitive feel, suspension sag and ride heights were set, then rebound and compression damping were tweaked to provide the feed back and confidence on the road a rider expects when carving canyon passes. After tuning I had this 1100cc DOHC inline four cylinder monster breathing fire to the tune of 100BHP at only 450lbs, thanks to the component upgrades and diet put forth from the angle grinder. That power to weight ratio combined with the modern suspension dynamics and improved geometry made this nearly 40 year old machine rip like a crotch rocket. A true cafe racer if I do say so myself.
 IMG_5104 by alicari, on Flickr
 IMG_5106 by alicari, on Flickr
 IMG_5105 by alicari, on Flickr
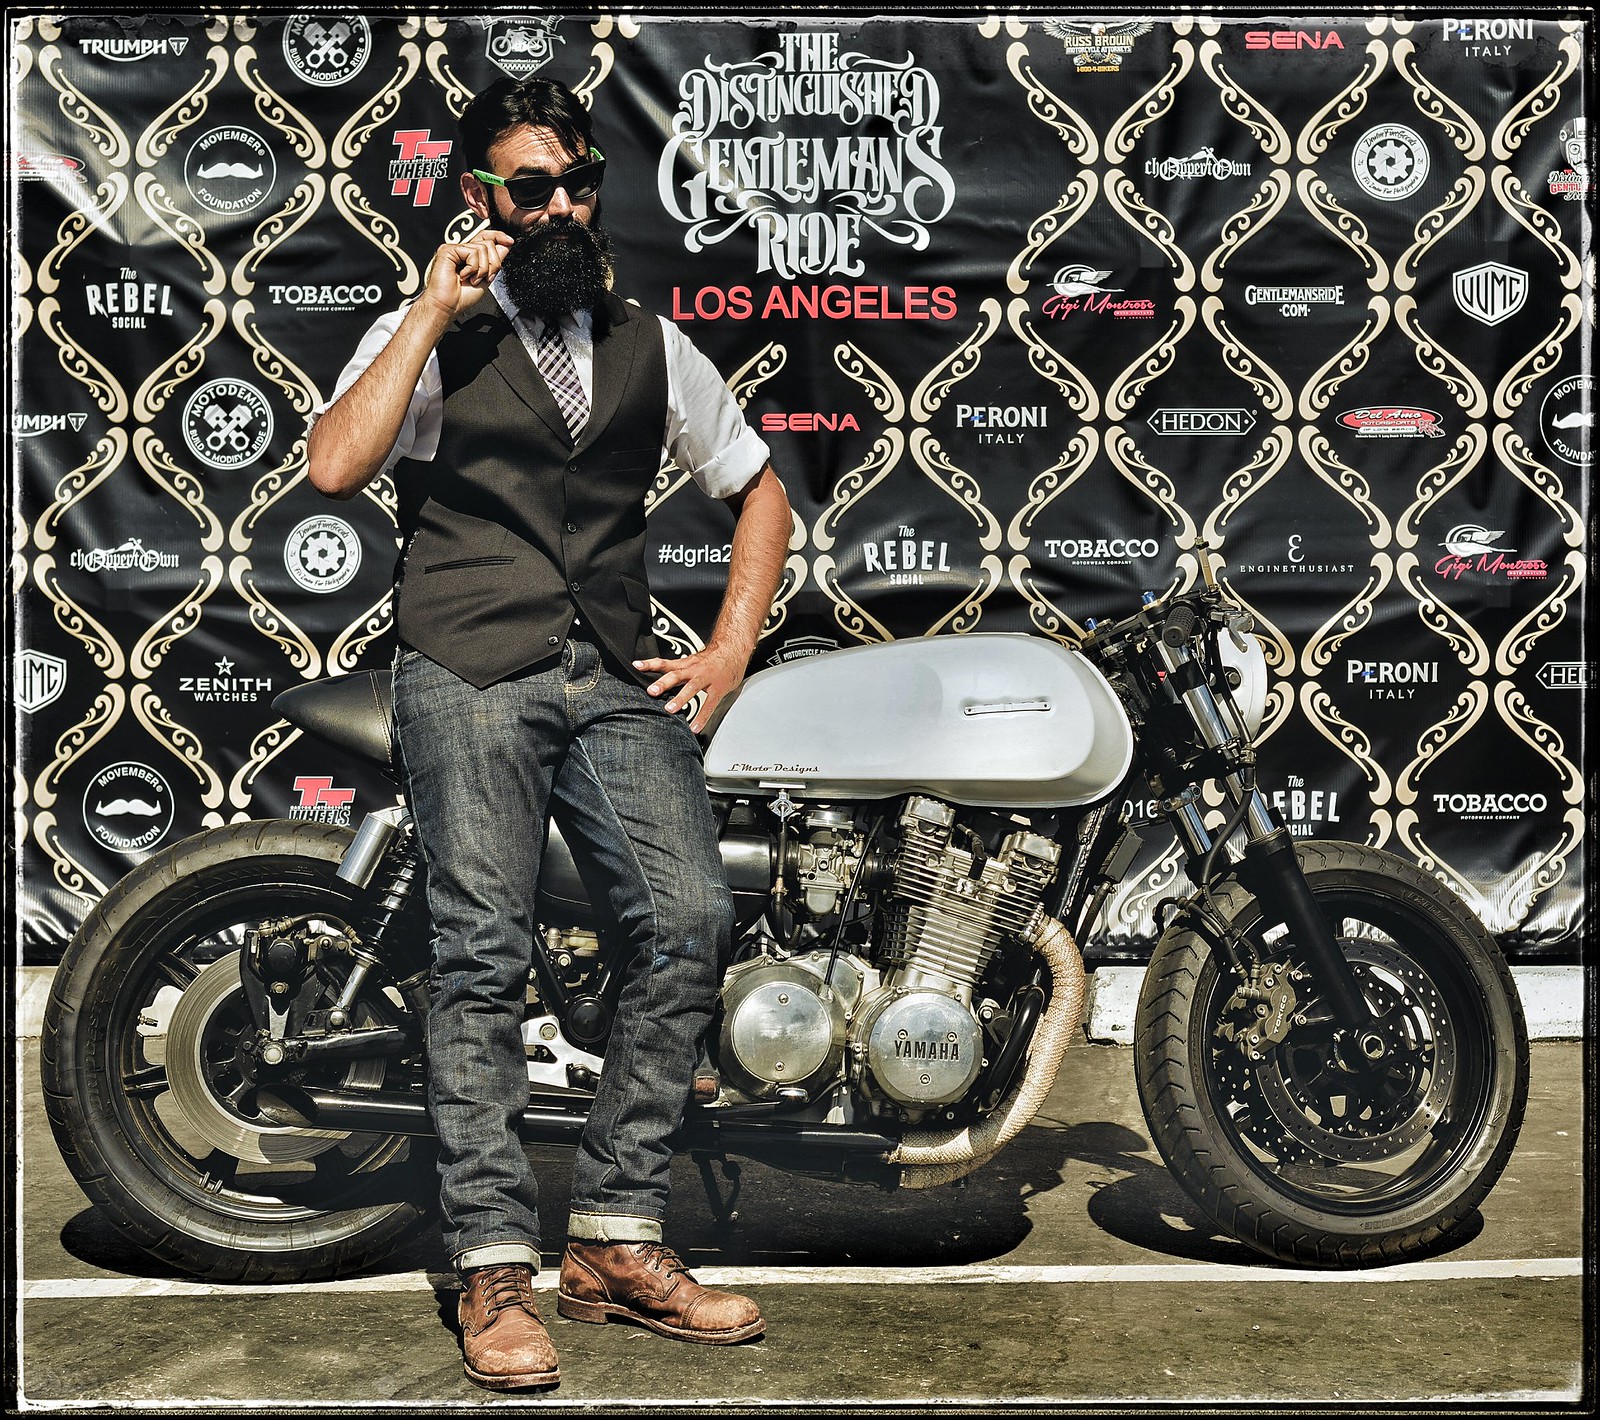
Somehow, I was able to get everything dialed in with enough time to hit the 2016 Distinguished Gentleman's Ride in LA. Rolling down Hollywood blvd on my freshly finished cafe racer among 1,000 other vintage motorcycles, all dressed to the nines supporting a worthwhile charity, was quite the surreal experience. I can only imagine what other adventures and places this fantastic machine will take me to.
 IMG_4933 by alicari, on Flickr
I started with an all original '78 I procured in basic running condition from a custodian, who obtained the bike after picking it up from the original owner's widow the prior season. The bike had 11k miles on her, and I paid 1100 bucks, all signs pointed to a go as it felt fitting for the theme of 11's. It seemed to have every option available from the full Vetter fairing complete with radio and glove boxes, to the luggage rack, sissy bar, floor boards and forward controls. I stripped it all down, pulled the bars off, flipped em over and put them back on backwards, imagine a faux clubman if you will. With no lighting or plates, tucked over the tank, my feet resting ahead upon forward controls, hands gripping flipped over, spun around cruiser bars, and open title in my pocket, I took her for her first run down an old country road by my house. I proceeded to rip through the gears, blasting away at WOT all the way into fifth. I climbed through the RPM range unwavering until she started leaning out and spitting. At that moment I looked down at the speedo to see a very pleasing 135MPH reading. I let off the throttle, dropped down through all five gears while pushing vigorously into the brake levers to squeeze all three disks, rolling to a rather expedient stop. After a quick U-turn in front of a corn field, I blasted past what had to have been a pre-war constructed barn as I went through the gear set once more, promptly reaching that 135MPH mark and now familiar spit of the carb jets leaning out. I putted home at a more sane speed and pulled into the garage. With what I assume was the biggest grin I've ever worn upon my face, I stepped off this mighty steed and said to myself, yes, we shall commence with a build on this one, she is most worthy. After little deliberation I settled upon the name of Kana, a not uncommon name for Japanese girls meaning strength and power. It seemed fitting for this beastly machine that in it's hay day, once boasted the first sub twelve second quarter mile time ever achieved on a factory motorcycle.
IMAG2635 by alicari, on FlickrIMAG2641 by alicari, on FlickrIMAG2656 by alicari, on FlickrIMAG2671 by alicari, on FlickrIMAG2672 by alicari, on FlickrIMAG2673 by alicari, on FlickrI essentially did some minor mods here and there over the next couple months, pushing the bike into a road worthy condition so that I could feel it out and determine where I wanted to go with it next. Winter hit and with it a move to a new state, both of these events caused the bike to sit in the then current state until I relocated cross country. It was at this point that I started to do the real work.
upload by alicari, on Flickrupload by alicari, on FlickrIMAG3400 (1) by alicari, on FlickrIMG_0853 by alicari, on FlickrI picked up a universal leather cafe seat from Dime City Cycles. After some rough placement, I then chopped down the rear of the frame to match the new lines the seat created. Next I capped the frame rails, made seat mounts, and picked up some external reservoir rear shocks with preload adjustments to appropriately adjust the stance of the rear end. Next on the docket was a modern sportbike front end to increase handling characteristics, and lower that sky high front end. While it provided for fantastic stability, it made the cycle unnecessarily heavy to maneuver into corners. I found a complete neck forward set up from a 2003 Suzuki GSXR 600. I selected this model because it offered large diameter 45mm fork tubes with modern fully adjustable valving and preload in a conventional upright fork design that didn't look futuristic Moto GP, but rather more inline with the aesthetics of the late 70s in which the bike was originally designed. The large 12.5" drilled multi-piece dual disc brakes and Tokico four pot calipers that accompanied them didn't hurt either. Not to mention the fact that the entire assembly came in around 35 pounds lighter than the stock XS set up, her diet was well underway.
A simple steering stem bearing conversion set from All Balls racing made the mating of the 25 year separated trees and steering neck a straightforward matter of replacing two bearing races. After mock up was completed the difference the new components made became abundantly clear. An almost 4 inch drop overall, and a tall front wheel profile reflecting that of the rear created a very balanced and race inspired line set. The greatly reduced rake and trail had my concerns about high speed stability reach their peak however. This was addressed in the form of a craigslist find, a brushed aluminum aftermarket steering damper with 7-way adjustment. A bit of fab work and it was nestled comfortably below the left side of the fuel tank. Fine tuning of the components was next as I took a grinder and sand paper to the trees. Once all casting lines, mounting tabs, and switch mounts were removed, a much cleaner, machined appearance easily shown through. Some satin black paint rounded off the pieces nicely, a theme that I would carry on across the entirety of the bike, allowing the bare aluminum finish of that monstrous inline four cylinder engine become the focal point of the bike.
IMG_1277 by alicari, on FlickrIMG_4798 by alicari, on Flickr12973137_10106137799876741_7793918025458900711_o by alicari, on Flickr13123080_1181750075168994_878280930306693256_o by alicari, on FlickrA factory Suzuki brake master cylinder was reused to power the front stoppers. However the large plastic, remote mounted reservoir simply would not do. Some clear vinyl tubing and a stainless allen head bolt fit the bill quite nicely to fill my desire of a low profile vessel to hold the extra fluid necessary for the system. The original 1978 clutch perch and lever were also reused to stay within the bounds of this "budget bike". Unfortunately the length of the lever heavily outweighed the length of the gsxr clip-ons, so naturally out came the four inch angle grinder and cut off wheel. After chopping off the ball end and another half inch of lever, I took the remains to the bench grinder to smooth out a more approachable profile and remove the last of the chrome plating. After the rough shape was formed, sand paper, elbow grease, and time generated a smooth, brushed finish that any gloved hand would be more than pleased to grip. Rinse and repeat for the brake lever, and the Moto GP inspired shorty lever set was complete, at a cost of about three dollars mind you.
IMG_5107 by alicari, on FlickrIMG_5109 by alicari, on FlickrIMG_5108 by alicari, on FlickrContinuing on with the minimalist theme, only two switches would be present with the hand controls atop the custom trees. A stainless steel micro push button would do the job for triggering the starter relay, while an identical push button would fire the entire lighting system. While I retained the factory ignition wiring, I pulled every last wire pertaining to the bikes factory lighting and auxiliary systems. The removal of the switch housings, all wiring modules, and the accompanying wiring shed another five pounds off the overall weight. All was replaced with a single modern solid state relay and a handful of wires to run the headlight and new LED strip tail/brake light. I was inspired by a film sequence in which a rider is hailed by a police officer on the highway, he then pressed a button effectively killing all lighting on his bike, including the brake light, he then darts off around a truck, hits the brakes and hops off an exit ramp, then presses the same button to turn the lighting system back on. Naturally I felt an extreme urge to recreate that, so a simple circuit was designed where the brake lever switches were integrated within the rest of the lighting, and that one micro push button. I now had stealth mode on this street rocket. The electrical was finished off by integrating a modern fuse panel, relocating the ignition switch under the air box, a sealed AGM battery, and a 12V USB port on an auxiliary circuit to keep that phone topped off on long excursions.
IMG_4722 by alicari, on FlickrIMG_4825 by alicari, on FlickrFinally some matte white paint for the fuel tank and headlight bucket pulled forth the simple color scheme I sought after. More custom brackets, mounts, and small tweaks all across the bike help to maintain the stripped down theme. Everything that wasn't bare metal affixed the engine or the fuel tank and headlight bucket, was coated satin black to accentuate those aforementioned pieces. All maintenance items were tended to... fluids, filters, lube for axles and cables, adjustments to brakes and cable pulls and critical fasteners were torqued. Rebuilds on all four of the Mikuni 34mm carburetors was next, rejetted and synced they were mated up to a set of new carb boots with custom vacuum port deletes. A UNI high flow air filter made its home within the factory airbox, sucking cool air from underneath the seat and evenly distributing it to the three inch velocity stacks feeding each carb. The flow continues through the combustion chamber across iridium tipped NGK plugs, then out to a pair of custom 2-1 headers and straight pipes, all hugged in fiberglass exhaust wrap. A set of new Bridgestone BattleAX sport tires, 150 rear and 130 front, ground this beast of a machine making it capable of sticking to the curviest of mountain switchbacks.
IMG_4666 by alicari, on FlickrIMG_4688 by alicari, on FlickrIMG_4689 by alicari, on FlickrWith all the bits and pieces in place, the first test ride, and then the fine tuning, commenced. Over a period of a few days and many test rides, the carbs and idle were dialed in, all cables and lever positions adjusted to provide an intuitive feel, suspension sag and ride heights were set, then rebound and compression damping were tweaked to provide the feed back and confidence on the road a rider expects when carving canyon passes. After tuning I had this 1100cc DOHC inline four cylinder monster breathing fire to the tune of 100BHP at only 450lbs, thanks to the component upgrades and diet put forth from the angle grinder. That power to weight ratio combined with the modern suspension dynamics and improved geometry made this nearly 40 year old machine rip like a crotch rocket. A true cafe racer if I do say so myself.
IMG_5104 by alicari, on FlickrIMG_5106 by alicari, on FlickrIMG_5105 by alicari, on FlickrSomehow, I was able to get everything dialed in with enough time to hit the 2016 Distinguished Gentleman's Ride in LA. Rolling down Hollywood blvd on my freshly finished cafe racer among 1,000 other vintage motorcycles, all dressed to the nines supporting a worthwhile charity, was quite the surreal experience. I can only imagine what other adventures and places this fantastic machine will take me to.
IMG_4933 by alicari, on Flickr

") , or maybe an extreme case of poetic license.
, or maybe an extreme case of poetic license. (Sold back to Maximan)
 Remember, he started with the 78E engine, the strongest, fastest of the series. The OEM is built and tuned for OVERALL performance, not necessarily top end type. He has more free breathing exhausts, and probably also jetted/tuned the bike perhaps for more top end type power. I can only assume that he put it on a DYNO to get the output results....and we know that each dyno is different and so the results may be different....but 5 hp more than the stock 95 BHP to me isn't too much of a stretch along with the variance in dyno testing equipment??


Comment