Announcement

Collapse
No announcement yet.

New to the Forum

Collapse
X
 
  • Filter
  • Time
  • Show
Clear All
new posts

  • #31
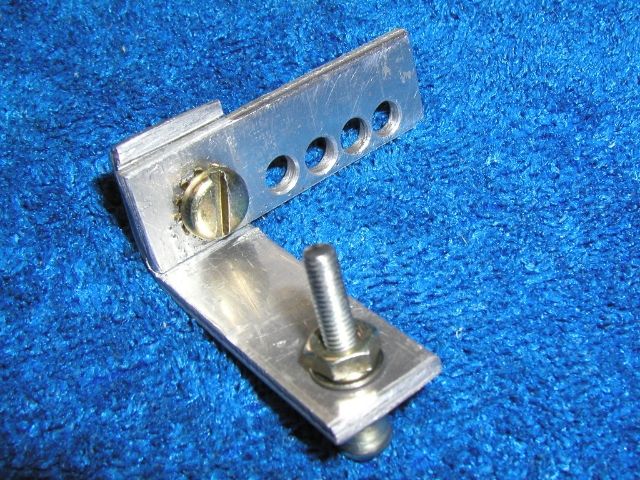
    That fule level jig is, like, totally tubular! I want one!

    The levels and plugs are close enough I'd leave the floats alone and just ride the snort out of it for a hundred thousand miles or so. Recheck the levels every now and then just to show off the jig and to make sure they don't creep up or down.

    .
    -- Scott
    _____

    2004 ST1300A: No name... yet
    1982 XJ1100J: "Baby" SS Brakes, '850 FD, ACCT
    1980 XS1100G: "Columbo" SS Brakes, '850 FD, ACCT
    1979 XS1100SF: "Bush" W.I.P.
    1979 XS1100F: parts
    2018 Heritage Softail Classic 117 FLHCS SE: "Nanuk" It's DEAD, it's not just resting. It is an EX cycle.

    Comment


    • #32
      79

      bike looks great. make sure fuel lines are under projection on air cleaner, the bend in the fuel line going across the top is enough to cause low fuel flow. i'm refering to the few inches of line coming off the petcocks
      Resigned

      Comment


      • #33
        Gonna go ride now!!

        3Phase- Thanks for confirming that the fuel levels and plugs look OK. I definitely will be putting some miles on it now!

        Also, the jig is simple to make. Its just two pieces of scrap aluminum bolted together-one bent at 90 degrees and the other with 4-1/4" holes for the clear tubes. The screw in upper part of the vertical piece has a 1/2" piece of 1/4" tubing that fits into the unbored vent hole on the left side of #1 carb. When the screw is tightened, the tubing expands and hold the jig tight.


        Loch- Thanks. I am real happy with the way it turned out. I am using the OCTI with L-1200 Tygon fuel lines and have routed them so as to avoid tight bends that could restrict fuel flow. Also, put two in-line filters in just before the fuel inlets.

        Thanks again,
        Linwood
        1979 XS1100SF
        Original Owner-purchased January 1980

        Comment


        • #34
          Schweet!


          Quixotically, the lowest fuel level is on carb #1 but #1 plug is the darkest while carb #3 has the highest level but #3 plug is the lightest -- ride it!

          .
          -- Scott
          _____

          2004 ST1300A: No name... yet
          1982 XJ1100J: "Baby" SS Brakes, '850 FD, ACCT
          1980 XS1100G: "Columbo" SS Brakes, '850 FD, ACCT
          1979 XS1100SF: "Bush" W.I.P.
          1979 XS1100F: parts
          2018 Heritage Softail Classic 117 FLHCS SE: "Nanuk" It's DEAD, it's not just resting. It is an EX cycle.

          Comment


          • #35
            Hot Fuse Block

            I have been riding the bike now on several local test rides and it has been performing great! Thanks to all of you who gave me help and encouragement in getting this thing running again after all these years. This site is awesome!!

            After coming home from a test ride yesterday, I turned the engine off with the kill switch so I could aim the headlight and adjust the rear brake light switch. After aiming the headlight, I left it on along with the ignition switch so I could check when the brake light came on. With the right side cover off, I accidentally touched the fuse block cover. It was real warm. So, I took it off to see what was going on. The fuses were so hot that I could barely touch them without burning my finger.

            As a part of the restoration, I cleaned all of the electrical connections and the fuse clips with contact cleaner. The fuse clips don't show any discoloration or distortion, are clean, and hold the fuses tightly. Is this normal?
            1979 XS1100SF
            Original Owner-purchased January 1980

            Comment


            • #36
              Hey Grey,

              Heat is not normal for the fuseblock, especially the old OEM style brass clips and glass fuses!!! Heat = resistance and loss voltage/amps. The old clips weaken, corrode, break, etc., and the glass fuses can go bad and still look good from the outside. This is why we highly suggest doing the ATCO/Solid style fuse block MOD to help eliminate this as a source for electrical gremlins!

              See this FORUM and review the several tips about fuseblocks:
              http://www.xs11.com/forum/forumdisplay.php?f=43

              See this for how to acquire a replacement fuseblock and connectors:
              http://www.xs11.com/forum/showpost.p...5&postcount=10

              T.C.
              T. C. Gresham
              81SH "Godzilla" . . .1179cc super-rat.
              79SF "The Teacher" . . .basket case!
              History shows again and again,
              How nature points out the folly of men!

              Comment


              • #37
                Ordered Fuse Block

                Thanks TC,
                I knew that I would need to make the fuse block mod at some point from my readings on the forums. Noticing how hot the fuse block was the other day just sped up my decision to go ahead and do the mod now.

                I just sent you an order for the fuse block and 12 terminals.

                Thanks again,
                Linwood
                1979 XS1100SF
                Original Owner-purchased January 1980

                Comment


                • #38
                  Direct battery ground

                  Originally posted by SouthernGrey64 View Post
                  Thanks TC,
                  I knew that I would need to make the fuse block mod at some point from my readings on the forums. Noticing how hot the fuse block was the other day just sped up my decision to go ahead and do the mod now.

                  I just sent you an order for the fuse block and 12 terminals.

                  Thanks again,
                  Linwood
                  Heat in the electrical system is a result of high resistance. Either poor ground or corrosion in the connectors.

                  Check all of the connectors especially ones behind fuse panel for corrosion.

                  Improve chassis grounds to direct battery grounds by adding wire between chassis ground points making a direct battery ground. Chassis grounds are poor grounds.
                  1981 XS1100H Venturer
                  K&N Air Filter
                  ACCT
                  Custom Paint by Deitz
                  Geezer Rectifier/Regulator
                  Chacal Stainless Steel Braided Brake Lines
                  Chrome Front Rotor & Caliper Covers
                  Stebel Nautilus Horn
                  EBC Front Rotors
                  Limie Accent Moves On In 2015

                  Mike

                  Comment


                  • #39
                    Ground Connections

                    MPittma100,
                    I cleaned all of the connectors during the restoration but didn't check the ground points. I'll check and clean them tomorrow and run "home run" ground wires back to the battery ground point. What size wire do I need to use?

                    Thanks for the advice!
                    Linwood
                    1979 XS1100SF
                    Original Owner-purchased January 1980

                    Comment


                    • #40
                      Clean the grounds and put anti-seize on them to keep them clean. A 12 gauge wire from the battery to the screw on the Reg/Rec the other grounds go to should take care of the ground problem.
                      Ray Matteis
                      KE6NHG
                      XS1100 E '78 (winter project)
                      XS1100 SF Bob Jones worked on it!

                      Comment


                      • #41
                        Originally posted by SouthernGrey64 View Post
                        MPittma100,
                        I cleaned all of the connectors during the restoration but didn't check the ground points. I'll check and clean them tomorrow and run "home run" ground wires back to the battery ground point. What size wire do I need to use?

                        Thanks for the advice!
                        Linwood
                        Use similar size of existing battery cable - 8 or 10 gauge. 12 will also work. Simply eliminate your chassis as a ground. You will see the difference.
                        1981 XS1100H Venturer
                        K&N Air Filter
                        ACCT
                        Custom Paint by Deitz
                        Geezer Rectifier/Regulator
                        Chacal Stainless Steel Braided Brake Lines
                        Chrome Front Rotor & Caliper Covers
                        Stebel Nautilus Horn
                        EBC Front Rotors
                        Limie Accent Moves On In 2015

                        Mike

                        Comment

                        Working...
                        X