Announcement

Collapse
No announcement yet.

Headlight/Electrical Issue

Collapse
X
 
  • Filter
  • Time
  • Show
Clear All
new posts

  • Headlight/Electrical Issue

    I was going to get my XJ inspected yesterday when I noticed the "headlight" warning is lit up on the dash. Seems I only have low beam, when switching to high beam the low beam stays on. I first thought it must be the sealed 7" headlight so I ran to NAPA and bought another for $10, still have the same issue. So I took the light I thought was bad and plugged it into my other XJ and found it works perfectly.

    Here are the voltage readings -- At the headlight connection, the bike with the working light shows 11.4v on the low beam wire and 4.5v on the high beam with the switch on low beam. When I put the switch on high beam, I get 4.5v on the low beam wire and 11.5v on the high beam wire. The bike with issues shows 11.5v on both the high and low beam wires regardless of what position the switch is in. The other thing I noticed with the problem bike is that the headlight doesn't come on immediately when I turn the key to "on" like it should, it takes a second or two to fully light up.

    Can somebody smarter than me help me figure this out please? Thanks - Billy
    Billy

    1982 XJ1100, Ceramic Coated Headers, Raptor ACCT, Barnett Clutch Springs, Dremmel Fix, TC's Fuse Block, De-Linked S/S Brake Lines, 850 Final Drive, Yahman's YICS Eliminator, Pods, stock jets

  • #2
    Billy it could be instead you only have High Beam and no low Beam.

    There is a failsafe built in that allows the bike to still have a headlight until its replaced.
    I might disconnect that failsafe relay and see if you get both beams back.
    You might have to search on how to bypass it.


    I found this:
    Originally posted by bikerphil View Post
    Wiring Bypass:

    Light Checker Unit : (79 Special only) Unplug unit and connect blu and blu/yel together at the harness plug.

    Headlight Relay : Unplug unit and connect red/yel and blu/blk together at the harness plug.

    Reserve Lighting Unit: Unplug unit and connect blu/blk and blu/yel together at the harness plug.

    John
    Last edited by jwhughes3; 07-29-2015, 11:52 AM.
    John is in an anonymous city with an Alamo (N29.519227,W-98.678980)

    Go ahead, click on the bikes - you know you want to...the electrons are ready.
    '81 XS1100H - "Enterprise"
    Bob Jones Custom Navy bike: Tkat brace, EBC floating rotors & SS lines, ROX pivot risers, Geezer rectifier, new 3H3 engine

    "Not all treasure is silver and gold"

    Comment


    • #3
      Originally posted by BillyRok View Post
      ...

      Here are the voltage readings --
      ...

      The bike with issues shows 11.5v on both the high and low beam wires regardless of what position the switch is in.

      The other thing I noticed with the problem bike is that the headlight doesn't come on immediately when I turn the key to "on"
      like it should, it takes a second or two to fully light up.
      ASSUMING! that the High and Low beam filaments are good and the Start button headlight bypass contacts aren't broken
      or otherwise screwing up the lighting circuit, the XJ11 electrical system can be more difficult to troubleshoot than the XS11
      but it looks like a bad Ground to me. I think one filament is using the other for its Ground, most likely the Low filament is using
      the HEAD warning light ground. How or why I'm not sure.

      The XJ11 RLU isn't the same as the one used on the XS11 but the lighting delay is most likely the RLU figuring out there's
      a lighting fault. Does the HEAD warning light come on first, followed by the Low beam filament or do they both come on at
      the same time?

      Does anything change when you start the engine?

      Do you have a manual? There are steps ....


      I put the XJ1100J Service Manual in a Dropbox folder along with a black/white JPG of the XJ1100J Schematic:-

      Complete 13MB Zipped XJ11 Folder


      Individual files:-

      XJ1100ServiceManual.pdf 12,438 KB


      xj1100.81on.JPG 603 KB


      .
      Last edited by 3Phase; 07-29-2015, 02:26 PM. Reason: Formatting
      -- Scott
      _____

      2004 ST1300A: No name... yet
      1982 XJ1100J: "Baby" SS Brakes, '850 FD, ACCT
      1980 XS1100G: "Columbo" SS Brakes, '850 FD, ACCT
      1979 XS1100SF: "Bush" W.I.P.
      1979 XS1100F: parts
      2018 Heritage Softail Classic 117 FLHCS SE: "Nanuk" It's DEAD, it's not just resting. It is an EX cycle.

      Comment


      • #4
        ASSUMING! that the High and Low beam filaments are good and the Start button headlight bypass contacts aren't broken
        or otherwise screwing up the lighting circuit
        I know that both low beam and high beam filaments are good because the headlight works fine in the other XJ I have. And I would guess? that the Start button headlight bypass contacts are OK because the headlight turns off while the starter is cranking the motor over. The light comes back on once the starter button is released.

        Does the HEAD warning light come on first, followed by the Low beam filament or do they both come on at
        the same time?
        Can't really say because as soon as the bike starts, the computer goes through 7 checks (in order they are Side Stand, Brake Fluid Level, Oil Level, Battery Level, Headlight, Tail Light, and Fuel Level) so by the time the sequence is completed the headlight is back on.

        My understanding (could be wrong!) is that the headlight relay bypasses the headlight and sends full voltage to the starter when the starter is engaged so it would appear that my relay is functioning properly? I will try John's suggestion from Phil and see if I can bypass the RLU and get both high and low beams back. Thanks for the tips so far gents!
        Billy

        1982 XJ1100, Ceramic Coated Headers, Raptor ACCT, Barnett Clutch Springs, Dremmel Fix, TC's Fuse Block, De-Linked S/S Brake Lines, 850 Final Drive, Yahman's YICS Eliminator, Pods, stock jets

        Comment


        • #5
          The RLU for the XJ is different from the one in John's post, and different color wires, too. So I took the RLU out of the "for sale" properly working XJ and put it in mine, no change, still only low beam no matter where the High/Low switch is set. So then I took the RLU out of my bike (and the one from my old parts bike out back) plugged them both into the working XJ and the headlight on the working XJ continues to function properly. So I guess I have 3 good RLUs and something else must be going on.
          the XJ11 electrical system can be more difficult to troubleshoot than the XS11
          but it looks like a bad Ground to me. I think one filament is using the other for its Ground, most likely the Low filament is using
          the HEAD warning light ground. How or why I'm not sure.
          Any thoughts on Scott's hypothesis and how to diagnose? Or ideas as to what else could be happening? Oh, one last thing...I'm running a WJV fairing with factory pigtail on the bike but all has been ok until a couple days ago. Thanks!
          Billy

          1982 XJ1100, Ceramic Coated Headers, Raptor ACCT, Barnett Clutch Springs, Dremmel Fix, TC's Fuse Block, De-Linked S/S Brake Lines, 850 Final Drive, Yahman's YICS Eliminator, Pods, stock jets

          Comment


          • #6
            There is no relay in the XJ headlight circuit, just the RLU. Check to see that your high/low circuits from the handlebar controls are working; if one of those is open, the RLU can 'read' that as a bad lamp. Also check/clean the connections at the instrument cluster; one of the peculiarities of the XJ is most of the lighting circuits go through the 'computer monitor' so a poor connection there can knock out some lighting. Try disconnecting the green and yellow wires going to the RLU; there's two of each. One set goes to the RLU, the other set to the monitor. If one of those monitor connections is bad, the RLU will 'overrule' the monitor and send power to the lamp. If with the RLU disconnected you have only one side (high or low) of the lamp working, the problem is in either the switch or the monitor.

            On further thought, if the low beam is the one that's working (no high beam), then the problem is in the high beam half of the circuit. The RLU will electronically 'dim' the high beam when switched to low, you'll see no change if the low beam is the only one working.
            Last edited by crazy steve; 07-29-2015, 07:42 PM.
            Fast, Cheap, Reliable... Pick any two

            '78E original owner - resto project
            '78E ???? owner - Modder project FJ forks, 4-piston calipers F/R, 160/80-16 rear tire
            '82 XJ rebuild project
            '80SG restified, red SOLD
            '79F parts...
            '81H more parts...

            Other current bikes:
            '93 XL1200 Anniversary Sportster 85RWHP
            '86 XL883/1200 Chopper
            '82 XL1000 w/1450cc Buell, Baker 6-speed, in-progress project
            Cage: '13 Mustang GT/CS with a few 'custom' touches
            Yep, can't leave nuthin' alone...

            Comment


            • #7
              Here you go!

              You have a fairing and the same voltage, ~12V, on both High and Low beam elements. Changing the RLU doesn't do anything.
              The HEAD warning light is ON and only the Low beam works.

              Where are you measuring the voltage, at the fairing pigtail connector or somewhere else?

              Check the pigtail plug at the fairing and make sure it's not burned, loose, crooked, or only partially plugged in. That'll drive the RLU and the computer crazy.

              Unplug the pigtail and check the resistance of the Black ground wire to the frame. It has to be 0 Ohms. That's zero as in, "No Ohms."

              If you haven't already done it, check the voltage on the White (High) and the Yellow (Low) wires. They should only be 12V when the element is selected at the High/Low switch.

              Pull back the black plastic pigtail insulating sleeve and check the wires at the connector plug to make sure the High (White) and Low (Yellow) beam wires aren't touching each other where they bend to fit into the connector.

              Check the High (White) and Low (Yellow) beam wires inside the fairing at the connector plug to see if they're shorted together.


              That's the easy stuff.

              Check the switch-to-harness connections for the left-hand handlebar control. You may have to pull the fuel tank top get at the connector.

              The schematic is wrong but the 6-pole connector should have a Blue/Black wire or a Blue/White wire coming from the RLU for the 12V supply to the High/Low switch. It should be ~12V.

              Check the High/Low beam switch. There is a 3-pole connector for the High/Low switch in the right-hand handlbar control.
              Green = Low beam
              Yellow = High beam
              Black = Ground

              Green should be 12V when the Low beam is selected.
              Yellow should be 12V when the High beam is selected.
              Black should be 0 Volts at all times.

              Here's a Windjammer V schematic:-

              Vetter Windjammer V Schematic


              .
              -- Scott
              _____

              2004 ST1300A: No name... yet
              1982 XJ1100J: "Baby" SS Brakes, '850 FD, ACCT
              1980 XS1100G: "Columbo" SS Brakes, '850 FD, ACCT
              1979 XS1100SF: "Bush" W.I.P.
              1979 XS1100F: parts
              2018 Heritage Softail Classic 117 FLHCS SE: "Nanuk" It's DEAD, it's not just resting. It is an EX cycle.

              Comment


              • #8
                A simplified XJ1100J Schematic on Dropbox:-


                XJ1100_Schematic.gif 195 KB


                .
                -- Scott
                _____

                2004 ST1300A: No name... yet
                1982 XJ1100J: "Baby" SS Brakes, '850 FD, ACCT
                1980 XS1100G: "Columbo" SS Brakes, '850 FD, ACCT
                1979 XS1100SF: "Bush" W.I.P.
                1979 XS1100F: parts
                2018 Heritage Softail Classic 117 FLHCS SE: "Nanuk" It's DEAD, it's not just resting. It is an EX cycle.

                Comment


                • #9
                  I'm a bonehead. I should stick to scraping pistons and jugs and just take my meds instead of trying to write.

                  Check the switch-to-harness connections for the left-hand handlebar control. You may have to pull the fuel tank to get at the connectors.

                  The schematic is wrong but the 6-pole connector should have a Blue/Black wire or a Blue/White wire coming from the RLU for the 12V supply to the High/Low switch. It should be ~12V.

                  Check the High/Low beam switch. There is a 3-pole connector for the High/Low switch on the left-hand handlebar control.
                  Green = Low beam
                  Yellow = High beam
                  Black = Ground

                  Green should be 12V when the Low beam is selected.
                  Yellow should be 12V when the High beam is selected.
                  Black should be 0 Volts at all times.

                  .
                  -- Scott
                  _____

                  2004 ST1300A: No name... yet
                  1982 XJ1100J: "Baby" SS Brakes, '850 FD, ACCT
                  1980 XS1100G: "Columbo" SS Brakes, '850 FD, ACCT
                  1979 XS1100SF: "Bush" W.I.P.
                  1979 XS1100F: parts
                  2018 Heritage Softail Classic 117 FLHCS SE: "Nanuk" It's DEAD, it's not just resting. It is an EX cycle.

                  Comment


                  • #10
                    Problem Solved

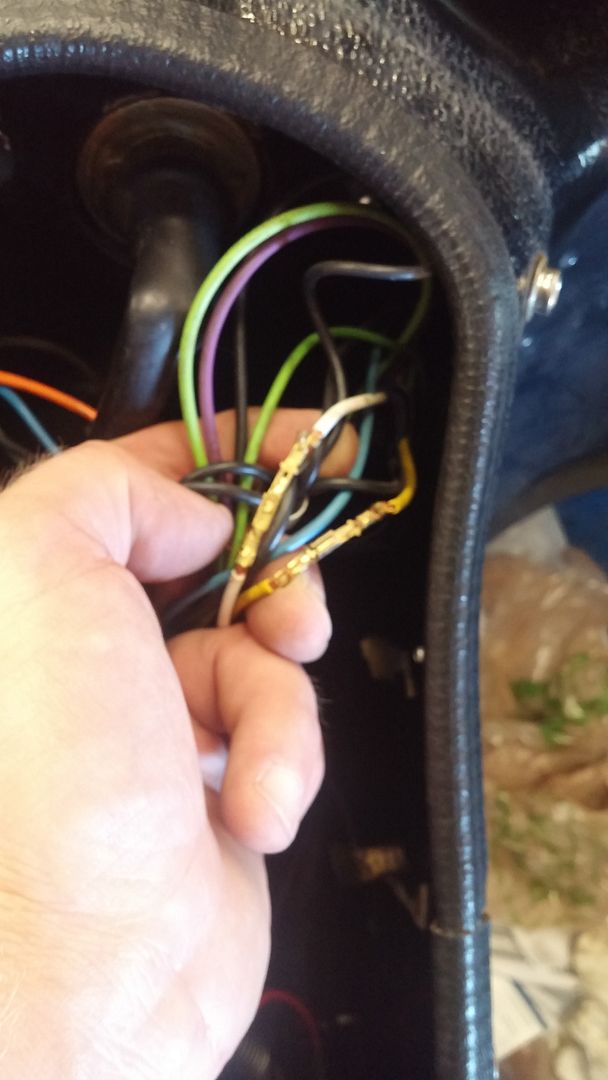
                    Well it's fixed now. I pulled the Windjammer off and took the headlight out of it and plugged it back into the factory headlight connector in the bucket, everything worked fine. Put the fairing back on and ran power through the pigtail to the same headlight and only got low beam whether the switch was on high bean or low beam. So then I tried the turn signals and noticed that when one signal was blinking, the other signal was also blinking slightly. I then dug into the wiring down in the left side of the fairing looking for the ground and found this --

                    [IMG][/IMG]

                    Somebody in the past at some point had messed with the power wires for high and low beam, you can see them spiced together in the pic, but they were not taped up. They must have been laying against each other in the bottom of the fairing and causing my issue. I ran it that way all last year and never had a problem, finally caught up to me.

                    I did check continuity from the ground from the Vetter headlight connector back to the frame ground by the battery and got .4-.5 ohms on the meter. I have already added another ground wire from the Regulator/Rectifier to the frame ground...is this an issue and is there a way to reduce this resistance?

                    Thanks for all the help, off to get it inspected!
                    Billy

                    1982 XJ1100, Ceramic Coated Headers, Raptor ACCT, Barnett Clutch Springs, Dremmel Fix, TC's Fuse Block, De-Linked S/S Brake Lines, 850 Final Drive, Yahman's YICS Eliminator, Pods, stock jets

                    Comment


                    • #11
                      Nice troubleshooting, Billy!

                      You could run the Black wire from the pigtail to the frame instead of to the original Headlight connector but then it's not "plug and play" any more.

                      You do need to find the resistance, it's probably dirty or scorched connectors. Use "divide and conquer" to find the resistance with the power off:

                      Check the resistance of the Black wire from the fairing Headlight connector to the original Headlight connector instead of to the frame. If you find the resistance, divide the circuit in half again and measure the resistance from the pigtail connector to the original Headlight connector.

                      You can also check the resistance from the original Headlight connector to the frame. The Black wire in the Headlight connector is supposed to splice directly into the front half of the bike's Main ground and it runs back to the frame ground screw at the Regulator/Rectifier. There shouldn't be a problem but you never know.

                      .
                      -- Scott
                      _____

                      2004 ST1300A: No name... yet
                      1982 XJ1100J: "Baby" SS Brakes, '850 FD, ACCT
                      1980 XS1100G: "Columbo" SS Brakes, '850 FD, ACCT
                      1979 XS1100SF: "Bush" W.I.P.
                      1979 XS1100F: parts
                      2018 Heritage Softail Classic 117 FLHCS SE: "Nanuk" It's DEAD, it's not just resting. It is an EX cycle.

                      Comment

                      Working...
                      X