There are no problems whatsoever with the use of them. Only with the installation of them. If installed correctly, they are far more reliable than the oem one. You are much more likely to damage the engine with the oem cct than with the acct. If you read the entire thread, you'll see that the oem tensioner is extremely low-tech and prone to coming undone, leaking oil, slackening the chain etc etc. If you have a suitable acct, I personally would advise that you fit it, following the correct installation procedure....
ACCT revisited
Collapse
X
-
XS1100F 1980 European model. Standard. Dyna coils. Iridium plugs. XS750 final drive (sometimes). Micron fork brace. Progressive front springs. Geezer regulator/rectifier. Stainless 4 into 2 exhaust. Auto CCT (Venturer 1300) SOLD. New project now on the go. 1980 European model. -
+1.......any hard decel WILL load front-side of chain, shoving tensioner back in. The shaft pinch bolt was at best a feeble attempt to call it suchThere are no problems whatsoever with the use of them. Only with the installation of them. If installed correctly, they are far more reliable than the oem one. You are much more likely to damage the engine with the oem cct than with the acct. If you read the entire thread, you'll see that the oem tensioner is extremely low-tech and prone to coming undone, leaking oil, slackening the chain etc etc. If you have a suitable acct, I personally would advise that you fit it, following the correct installation procedure.... , aside from the housing fracturing from not being designed to take much of a side-load from the tightened set bolt
 .
81H Venturer1100 "The Bentley" (on steroids) 97 Yamaha YZ250(age reducer) 92 Honda ST1100 "Twisty"(touring rocket) Age is relative to the number of seconds counted 'airing' out an 85ft. table-top.
.
81H Venturer1100 "The Bentley" (on steroids) 97 Yamaha YZ250(age reducer) 92 Honda ST1100 "Twisty"(touring rocket) Age is relative to the number of seconds counted 'airing' out an 85ft. table-top.Comment
-
Hey Cajun,
I had the OEM unit until this last year, worked just great for 30 years, even thru a top end big bore rebuild, and I always use engine breaking decel especially while running the twisties, just ask the other folks that I have attended the rallies with! Anyways, I should have posted that 30 minute cam chain tensioner mod thread link, because I posted/added to it my thoughts on it when I finally performed my MOD of the OEM unit vs. using an ACCT.
Regrettably it sounds like LOHO's chain was already worn to the max slack point, first even though his shorter ACCT measured to the correct ~45mm depth, it perhaps wasn't taking up the additional slack that had developed..
but more likely he had chain slack, and when removed the ACCT, the slack chain dropped down around the crank skipping a tooth or such.....even though he followed the adjustment positioning guidelines....that process puts the max SLACK of the chain along the front of the engine between the cam and crank, and so that's why it can drop/slip around the crank .....IF you don't take the extra steps I showed about taking the valve cover off, and using a wrench to rotate the exhaust cam a little to take up the excess slack on the ACCT front side WHILE you are removing the ACCT/oem CT unit before putting the new/modded one on.
IMHO, the ACCT's will allow a person to run the engine with more mile/hours and wear/stretch of the cam chain than the OEM would allow, and there's no quick/easy way of checking how much slack has developed in the chain....and there's this SET IT AND FORGET it mentality with the ACCT. Granted, they haven't been used that long on OUR engines, and so we haven't had anyone report a chain actually wearing/stretching so far as to FAIL/break! The OEM had a distance limit to the plunger, and when it reached that limit, the chain is considered to have worn/stretched beyond service limits, and should then be replaced. When it's stretched so far it can also allow the valve timing to be a few degrees more OFF as well that could also affect performance/mileage.
So...that's why I like the MANUAL MOD of the CCT and I provided the measurements that will allow folks to monitor how far in the tensioner plunger is IN towards the engine, so that I will KNOW WITHOUT having to take the CCT off when the chain has worn/stretched beyond service limits and when it will be time to replace it. YMMV!
T.C.T. C. Gresham
81SH "Godzilla" . . .1179cc super-rat.
79SF "The Teacher" . . .basket case!
History shows again and again,
How nature points out the folly of men!Comment
-
Once I actually got in there and did the job, I learned just how easy it is to replace a cam chain on the XS1100. It isn't very expensive either. For me, I think I'll just replace the chain every 60 thousand miles or so.
I think you can check it just like a drive chain. If you can pick it up off the cam gear, it's time to replace.Marty (in Mississippi)
XS1100SG
XS650SK
XS650SH
XS650G
XS6502F
XS650EComment
-
Another thing to think about with these ACCT's... I ran across one one time where it bound up after being installed in the engine and the pressure of the spring wasn't strong enough to push the ratchet. I had to file part of the side of the unit where it was binding for it to operate correctly. I always install them with the ratchet all the way out and push the actuator in with a screwdriver to verify it is working properly. BTW, running one now from a Vmax that has 90 K miles on the OEM chain and still going.2H7 (79) owned since '89
3H3 owned since '06
07 Triumph Tiger 1050
"If it ain't broke, modify it"
☮Comment
-
Bikes that I have owned and enjoyed...
1964 Allstate 250
1970 Yamaha DT1
1959 Mobylette
1970 Yamaha JT1
1995 Suzuki 80
1978 Yamaha XS650
1980 Yamaha XS1100LG
2005 BMW R1150RComment
-
It should be fine. I hope bolts came with the ACCT because the ones for the stock tensioner are too long for the ACCT. At least they are for the Venture tensioners I've been using.Greg
Everybody is a genius. But if you judge a fish by its ability to climb a tree, it will live its whole life believing that it is stupid.”
― Albert Einstein
80 SG Ol' Okie;79 engine & carbs w/pods, 45 pilots, 140 mains, Custom Mac 4 into 2 exhaust, ACCT,XS850 final drive,110/90/19 front tire,TKat fork brace, XS750 140 MPH speedometer, Vetter IV fairing, aftermarket hard bags and trunk, LG high back seat, XJ rear shocks.
The list changes.
Comment
-
VERIFY that the body of the new ACCT is AT LEAST the same size as the OEM. I tried the wrong one, and it would not seal properly. You WILL need the shorter bolts for it as well. I don't remember the length, but I was able to use some "spares" I have around the man cave.Ray Matteis
KE6NHG
XS1100 E '78 (winter project)
XS1100 SF Bob Jones worked on it!Comment
-
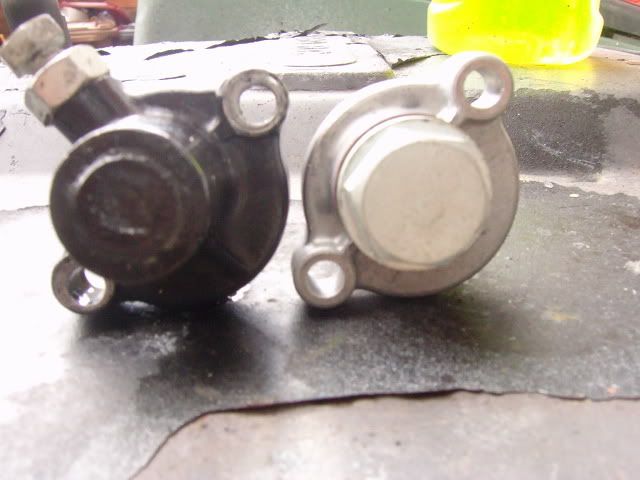
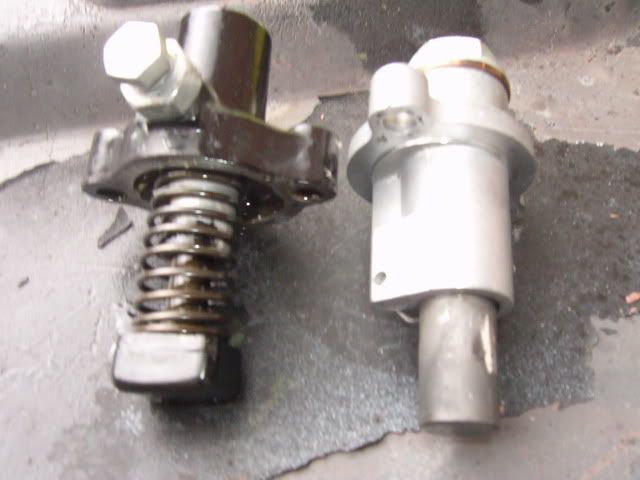
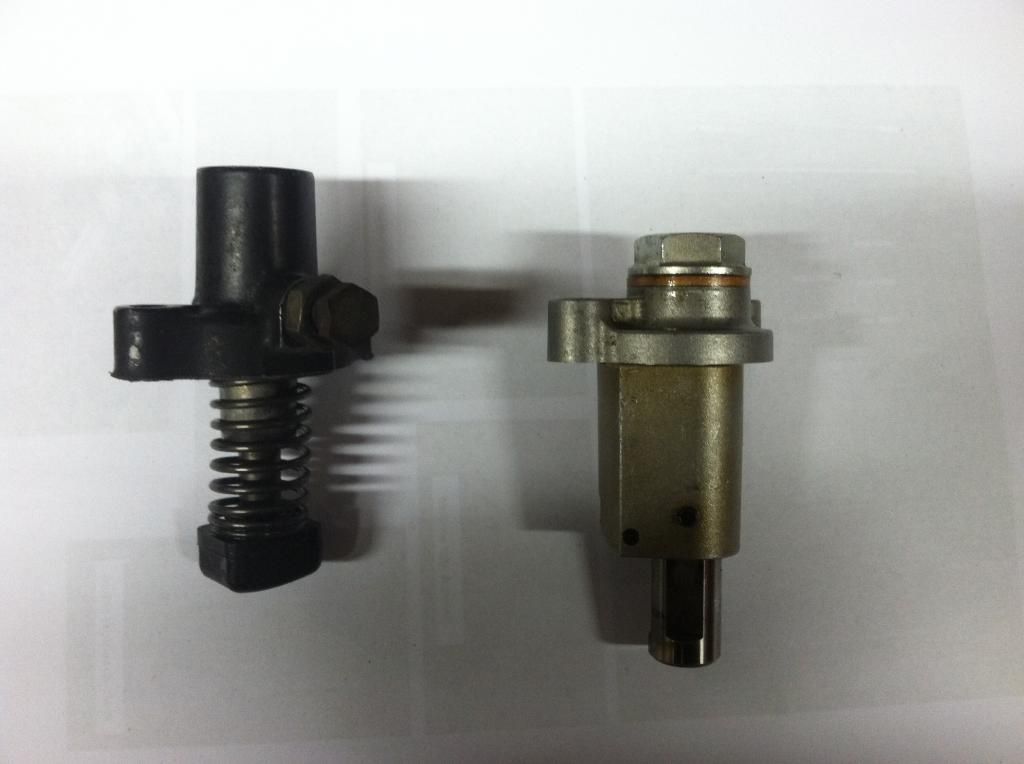
Looks OK to me. when I first did the swap, I wondered about the lack of rubber block on the end of the plunger but, after consultation here, It doesn't seem to matter. The plunger is pushing on the springy steel tensioner blade and the CCT swap does lead to metal to metal contact, rather than rubber to metal. But there's loads of oil in there and it doesn't seem to cause any damage.
Here's what I used...a VMax tensioner

 XS1100F 1980 European model. Standard. Dyna coils. Iridium plugs. XS750 final drive (sometimes). Micron fork brace. Progressive front springs. Geezer regulator/rectifier. Stainless 4 into 2 exhaust. Auto CCT (Venturer 1300) SOLD. New project now on the go. 1980 European model.
Comment
-
how did you come to realize that the timing was 180 out. Im having trouble getting my engine started after a installing new rings..What did you do to correct the problem?1979 F
1978 E touring model
1979 F Special Project
1978 E Standard Project
2002 NomadComment
-
With the cam cover off, and spark plugs removed, turn the crank to TDC on #1. Both valves must be closed. I watch the valves as I get close to TDC, and look for the intake valve to be closing. IF the exhaust valve is closing, you are probably 180 out with the cams.
Others who have done this more may be able to explain it easier, but this is the best I can do.Ray Matteis
KE6NHG
XS1100 E '78 (winter project)
XS1100 SF Bob Jones worked on it!Comment
-
I know chain tensioners are like tires and oil, a matter of choice that may or may not have consequences.
I tend to side with TC in that a manual tensioner requires YOUR input and does not leave anything to chance.
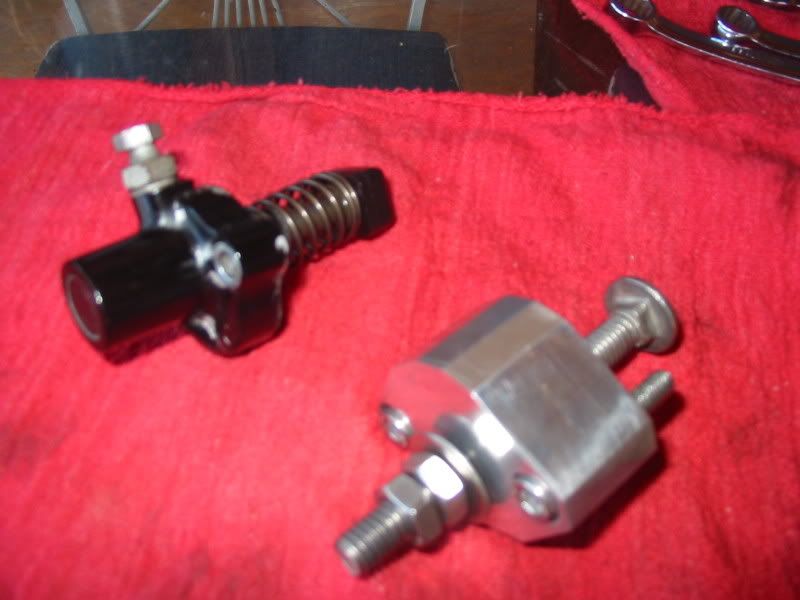
Here is the one I made years ago on a drill press from a piece of aluminum, a few nuts and o-rings and a carriage bolt. This thing works and never ever gives me any problems whatsoever. Granted, you need to pull the valve cover to adjust it properly but then you should be doing that every so often to check valves anyway, right?
No ACCT's for me.
 Mike Giroir
79 XS-1100 Special
Once you un-can a can of worms, the only way to re-can them is with a bigger can.Comment
-
LoHo,
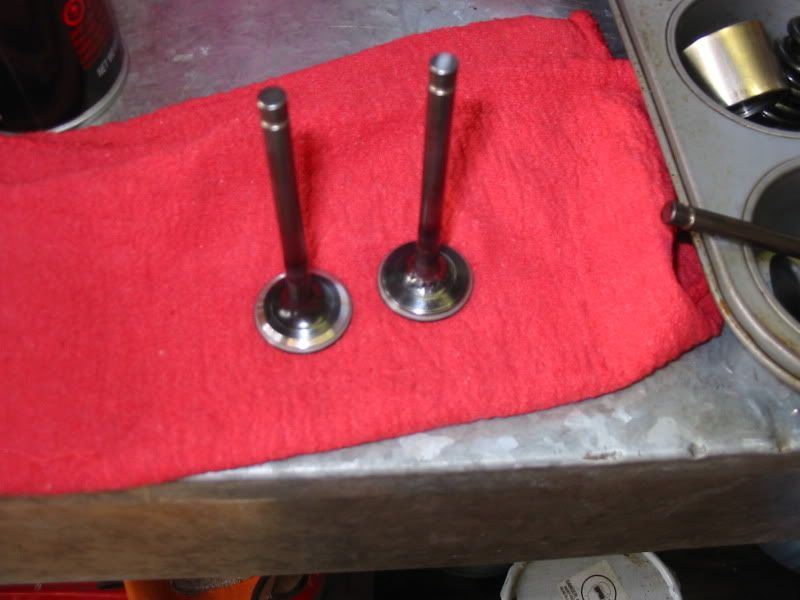
Since you will have your valves out (sorry about that), think about putting a 30 degree cut back on them all (especially the intake side) before you assemble the head. Its easy to do and any valve guy can grind them for you for just a few bucks each.
What it does is provide a smoother start to the flow of fuel when the intake valve starts to open during the overlap event. The process removes the little ridge that happens when the valves are stamped out.
Would I take the head off the bike and apart just to do this? Nope. But since you have your hands in the blood and guts already....... Its just one of those little things that add up to performance.
Before is on the right and after on the left.
 Mike Giroir
79 XS-1100 Special
Once you un-can a can of worms, the only way to re-can them is with a bigger can.Comment
-
Thanks for that tip Mike. I finished her off last weekend and rode her to work all week. I plan to do something stupid and bend some more valves next spring, so I'll keep your tip in mind.
Tobalcain, take off the valve cover and pull the plugs, then set the timing to T and verify that cylinder 1 is TDC. Make sure the dots on the cams line up with the marks on the cam bearing 3. Then go to the right side of the bike and see if the cam sprockets show a small molded-in tab that points up from where the cam-to-sprocket bolt fits in. If one or both of the sprockets are 180 out, the bike will almost run right, but will never really be quite there. Make sure that that is all correct before you start trying to solve the problem by fooling with other things.
I think Crazy Steve has a pictorial of setting the timing which is invaluable. Do yourself a favor and go through the whole timing process to make sure each step is correct. Shortcuts lead to threads like this one."Time is the greatest teacher; unfortunately, it kills all of its students."Comment
Comment