There always seems to be someone coming on to the site who, much like me when I first arrived, is fairly new to bike mechanics and or some of the more technical aspects of wrenching on bikes and multiple carb set ups.
For those of you who are old hats at synchronizing the four carb setup, this will seem quite basic. So just look at the pictures and find things to critique about my carbs.
 I wanted to make it useful for the less familiar with mechanics as well as these carbs, so bear with me in the parts that seem too basic.
I decided it might be worth the time to go over exactly what carb synching is and how it physically functions on the carbs. This may help those learning the process and the technique to understand what it is they are doing and why the sequence is important.
Here is a photo of the engine side of the carbs where the synch screws are located. You may note this is the early or 78-79 model carbs. The synch screws are in the same location on the 80-81 style, and the process is identical.
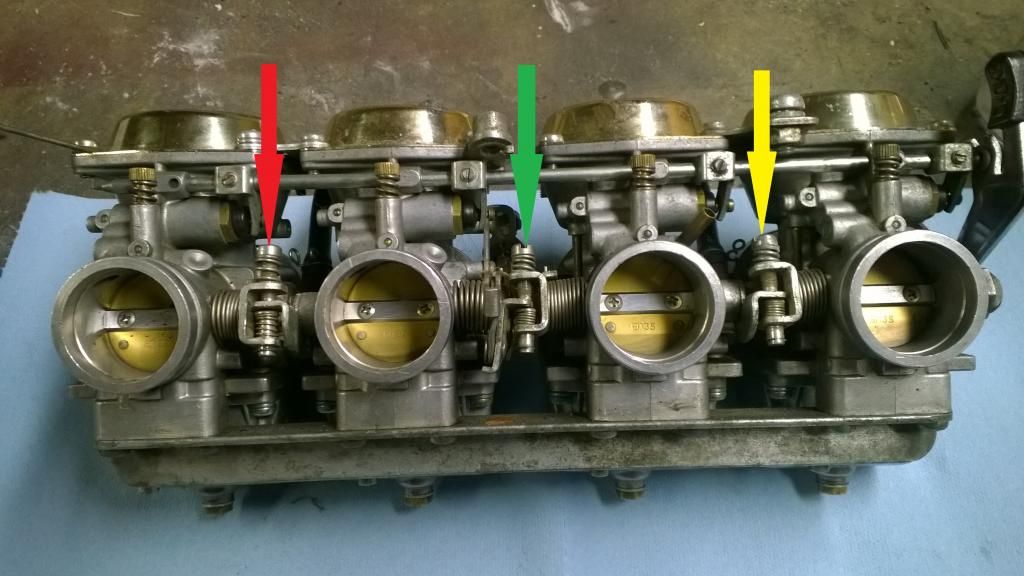
The Red arrow is the no 4 synch screw, the green arrow is the no 2 to 3 synch screw, and the yellow arrow is the no 1 synch screw. The naming will become clearer as we go through the process.
Start by setting the idle to about 1100 RPM. This is done by turning the idle adjustment screw. Since this is a 78-79 set, the idle screw is on the air intake side, shown with a green arrow in the photo below. The other green arrow shows the metal plate that gets raised or lowered as the idle adjustment screw is turned.
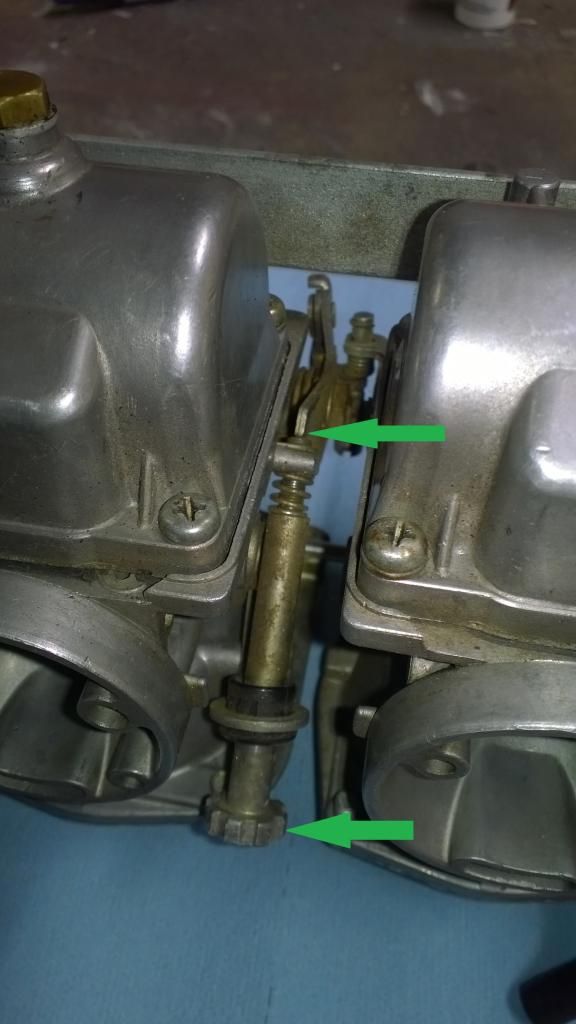
The 80-81 carbs have the same slotted kind of screw on the bottom of the engine side, and it adjust a similar plate.
In this photo the green arrows show the same plate as it comes up and mates to the no 3 carb butterfly shaft. So adjusting the idle screw DIRECTLY opens and or closes the no 3 butterfly valve.
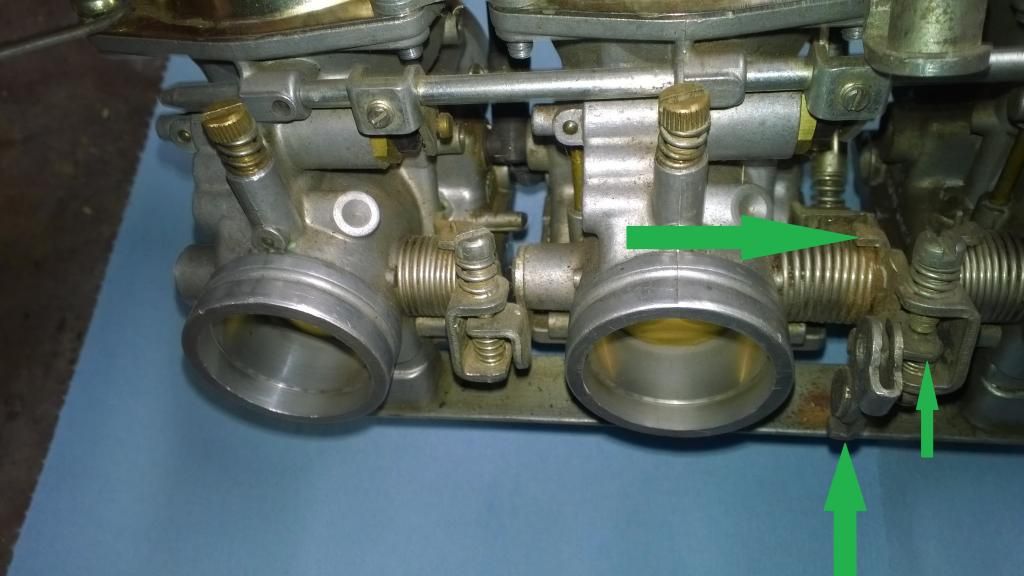
All of the green arrows are pointing to the same bracket or single piece of steel. This is the same plate that the throttle cable attaches to, so it also adjust the number three butterfly valve DIRECTLY. I emphasis directly, because it is important to understand that nothing else effects the no 3 butterfly valve opening or closing but the throttle cable and or the idle mixture screw. The synch screws have ZERO effect on how much the no 3 butterfly valve is open or closed.
Now that you have the idle adjusted, you can start by synching either the no1 or no 4 carbs, it is really not important which side you do first, but for continuity purposes, I am going to no 4 first.
In the photo below, the green arrows show both ends of the no 3 butterfly shaft. So adjusting the idle screw moves both ends at the same time. The ends of the shafts are square, and the plates shown have square holes that go over them. The blue arrows show plates on both ends of the no 2 butterfly shaft, the red arrow is the bracket on the end of no 4 butterfly shaft, and the black arrow with a yellow border, is the bracket on no 1 butterfly shaft.
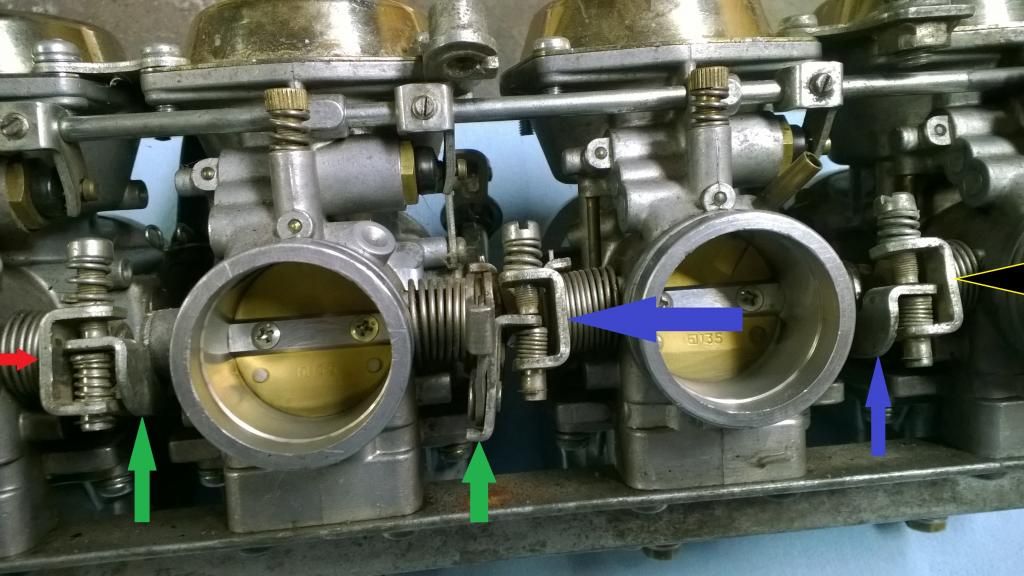
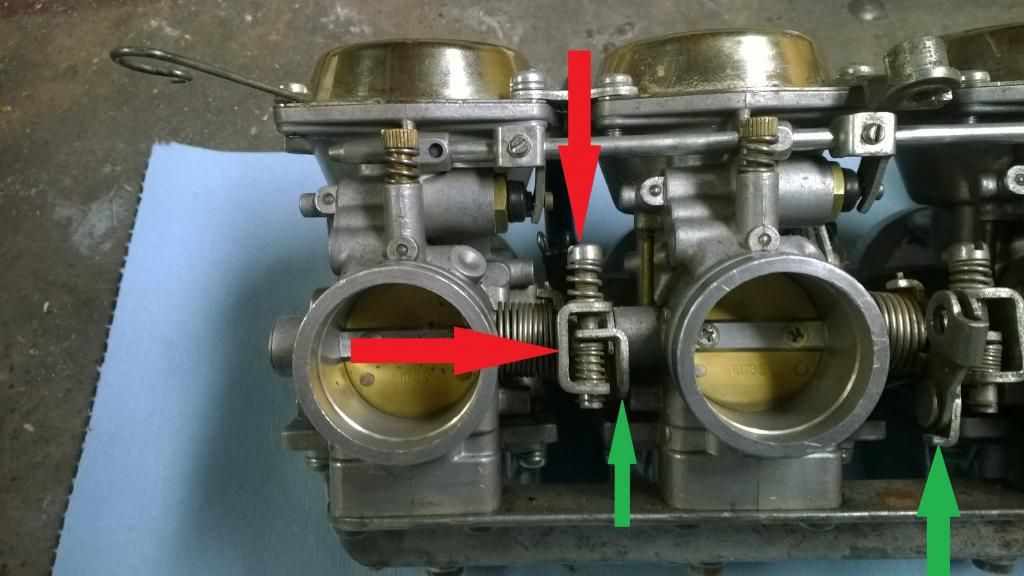
Now is where the adjustment begins, turning the synch screw between no3 and no 4 carbs with a red arrow pointing to it in the photo below, adjust how open or closed the no 4 butterfly valve is in relation to the no 3 butterfly valve. Adjusting the screw lets the springs push up or down the u shaped bracket with a red arrow pointing to it, setting the no 4 butterfly more open or closed. Again, turning that screw does not change how open or closed the no 3 butterfly valve is AT ALL.
Now I know when you adjust it the vacuum being drawn by no 3 does change. That is simply the marvel of physics adjusting how the cylinders work together since they attached to the same crank and cam shafts.
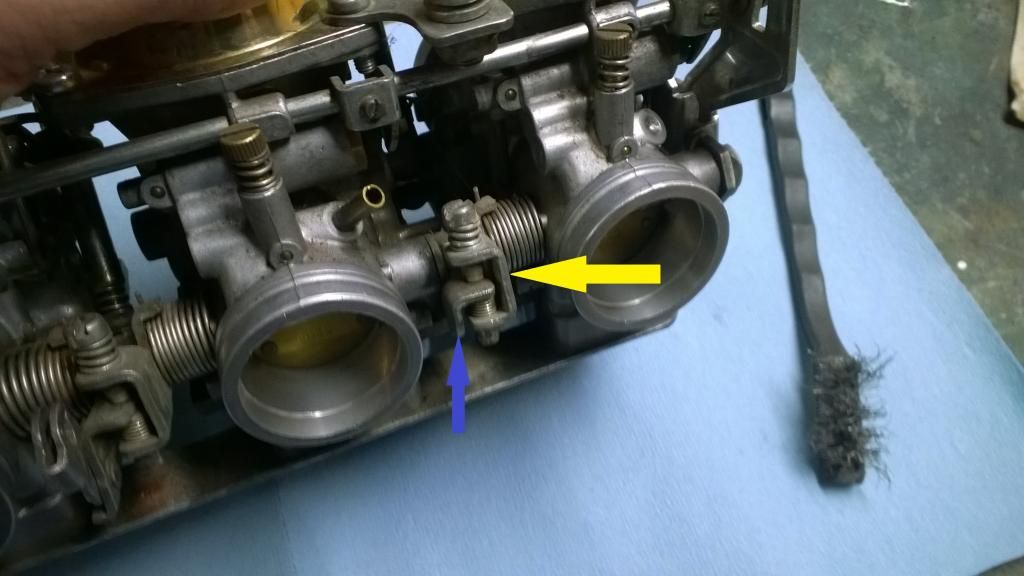
Once you have no 3 and 4 vacuum the same (or dang close to it anyway), you can move on to the synch screw between no 1 and no 2 carbs. The yellow arrow in the photo below shows that same sort of U shaped bracket that is attached to the no 1 carb butterfly shaft. SO turning the synch screw between no 1 and no 2 carbs only changes how open or closed the no 1 butterfly valve is in relation to the no 2 butterfly valve. The blue arrow is pointing to the bracket on the no 2 carb butterfly shaft. It also does not move when the synch screw is turned. The adjusting of this synch screw also has no effect on how open or closed the butterfly valves are on no. 3 or no. 4 carbs.
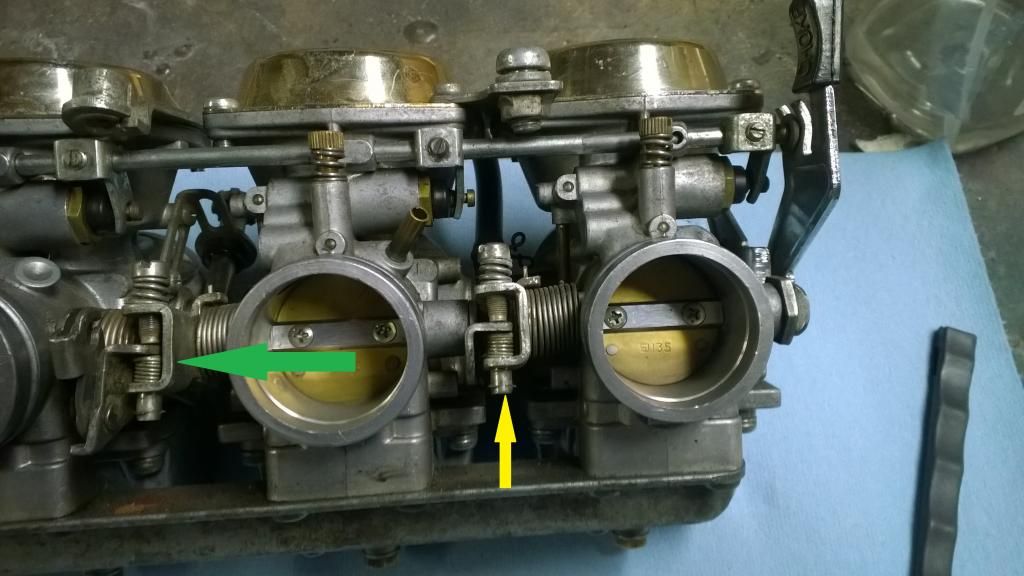
So now you have no 3 and 4 at the same vacuum, and you have no 1 and no 2 at the same vacuum. You guessed it, time for the synch screw between no 2 and no 3. Sorry for the lack of color coordination in this photo, I used green for plate on the other side of the carb 2 butterfly shaft. In the photo below you can see that adjusting this screw only changes how open or closed no 2 is in relation to no 3 butterfly valve position. However, no 1 is coming along for the ride when you adjust this screw. As you adjust the position of the no 2 butterfly valve, it changes the position of the brackets on both ends of the shaft. So moving the bracket on the no 1 carb side, also moves the no 1 carb butterfly valve, they move as a pair based upon that synch screw setting we did on the step above.
So now you should have all four carbs pulling the same vacuum (Or dang close to it anyway). The idle may have changed, so you will need to adjust the idle back to around 1100 RPM.
So what happens when you adjust the idle screw now that your all in sych??? Well, adjusting the idle screw DIRECTLY changes the position of the no 3 butterfly valve. However, it also adjust the position of no 4 and no 2 via those synch screw assemblies. And moving no 2 moves no 1 via that synch screw assembly. You directly adjust no 3 butterfly valve position with the throttle cable or the idle screw, and the others come along for the ride.

You may need to go back over the synch if your idle was high or low substantially when you finished synching.
You will also want to adjust mixture at this time, either by ear, by color tune, or by watching the vacuum in each cylinder and adjusting the mixture to achieve the highest vacuum reading in each cylinder. And once you finish adjusting the mixture, you will want to repeat the synching process.
Hope this helps some of you understand what the synching process really is and how it works in a physical sense anyway.
For those of you who are old hats at synchronizing the four carb setup, this will seem quite basic. So just look at the pictures and find things to critique about my carbs.

 I wanted to make it useful for the less familiar with mechanics as well as these carbs, so bear with me in the parts that seem too basic.
I decided it might be worth the time to go over exactly what carb synching is and how it physically functions on the carbs. This may help those learning the process and the technique to understand what it is they are doing and why the sequence is important.
Here is a photo of the engine side of the carbs where the synch screws are located. You may note this is the early or 78-79 model carbs. The synch screws are in the same location on the 80-81 style, and the process is identical.

The Red arrow is the no 4 synch screw, the green arrow is the no 2 to 3 synch screw, and the yellow arrow is the no 1 synch screw. The naming will become clearer as we go through the process.
Start by setting the idle to about 1100 RPM. This is done by turning the idle adjustment screw. Since this is a 78-79 set, the idle screw is on the air intake side, shown with a green arrow in the photo below. The other green arrow shows the metal plate that gets raised or lowered as the idle adjustment screw is turned.

The 80-81 carbs have the same slotted kind of screw on the bottom of the engine side, and it adjust a similar plate.
In this photo the green arrows show the same plate as it comes up and mates to the no 3 carb butterfly shaft. So adjusting the idle screw DIRECTLY opens and or closes the no 3 butterfly valve.

All of the green arrows are pointing to the same bracket or single piece of steel. This is the same plate that the throttle cable attaches to, so it also adjust the number three butterfly valve DIRECTLY. I emphasis directly, because it is important to understand that nothing else effects the no 3 butterfly valve opening or closing but the throttle cable and or the idle mixture screw. The synch screws have ZERO effect on how much the no 3 butterfly valve is open or closed.
Now that you have the idle adjusted, you can start by synching either the no1 or no 4 carbs, it is really not important which side you do first, but for continuity purposes, I am going to no 4 first.
In the photo below, the green arrows show both ends of the no 3 butterfly shaft. So adjusting the idle screw moves both ends at the same time. The ends of the shafts are square, and the plates shown have square holes that go over them. The blue arrows show plates on both ends of the no 2 butterfly shaft, the red arrow is the bracket on the end of no 4 butterfly shaft, and the black arrow with a yellow border, is the bracket on no 1 butterfly shaft.

Now is where the adjustment begins, turning the synch screw between no3 and no 4 carbs with a red arrow pointing to it in the photo below, adjust how open or closed the no 4 butterfly valve is in relation to the no 3 butterfly valve. Adjusting the screw lets the springs push up or down the u shaped bracket with a red arrow pointing to it, setting the no 4 butterfly more open or closed. Again, turning that screw does not change how open or closed the no 3 butterfly valve is AT ALL.

Now I know when you adjust it the vacuum being drawn by no 3 does change. That is simply the marvel of physics adjusting how the cylinders work together since they attached to the same crank and cam shafts.
Once you have no 3 and 4 vacuum the same (or dang close to it anyway), you can move on to the synch screw between no 1 and no 2 carbs. The yellow arrow in the photo below shows that same sort of U shaped bracket that is attached to the no 1 carb butterfly shaft. SO turning the synch screw between no 1 and no 2 carbs only changes how open or closed the no 1 butterfly valve is in relation to the no 2 butterfly valve. The blue arrow is pointing to the bracket on the no 2 carb butterfly shaft. It also does not move when the synch screw is turned. The adjusting of this synch screw also has no effect on how open or closed the butterfly valves are on no. 3 or no. 4 carbs.

So now you have no 3 and 4 at the same vacuum, and you have no 1 and no 2 at the same vacuum. You guessed it, time for the synch screw between no 2 and no 3. Sorry for the lack of color coordination in this photo, I used green for plate on the other side of the carb 2 butterfly shaft. In the photo below you can see that adjusting this screw only changes how open or closed no 2 is in relation to no 3 butterfly valve position. However, no 1 is coming along for the ride when you adjust this screw. As you adjust the position of the no 2 butterfly valve, it changes the position of the brackets on both ends of the shaft. So moving the bracket on the no 1 carb side, also moves the no 1 carb butterfly valve, they move as a pair based upon that synch screw setting we did on the step above.

So now you should have all four carbs pulling the same vacuum (Or dang close to it anyway). The idle may have changed, so you will need to adjust the idle back to around 1100 RPM.
So what happens when you adjust the idle screw now that your all in sych??? Well, adjusting the idle screw DIRECTLY changes the position of the no 3 butterfly valve. However, it also adjust the position of no 4 and no 2 via those synch screw assemblies. And moving no 2 moves no 1 via that synch screw assembly. You directly adjust no 3 butterfly valve position with the throttle cable or the idle screw, and the others come along for the ride.


You may need to go back over the synch if your idle was high or low substantially when you finished synching.
You will also want to adjust mixture at this time, either by ear, by color tune, or by watching the vacuum in each cylinder and adjusting the mixture to achieve the highest vacuum reading in each cylinder. And once you finish adjusting the mixture, you will want to repeat the synching process.
Hope this helps some of you understand what the synching process really is and how it works in a physical sense anyway.


 )
)
Comment