Announcement

Collapse
No announcement yet.

Timing Issue

Collapse
X
 
  • Filter
  • Time
  • Show
Clear All
new posts

  • #31
    Originally posted by oldnortonrider View Post
    Pics from previous thread re what is behind his timing plate ~~> http://www.xs11.com/forum/showthread...ce+differences

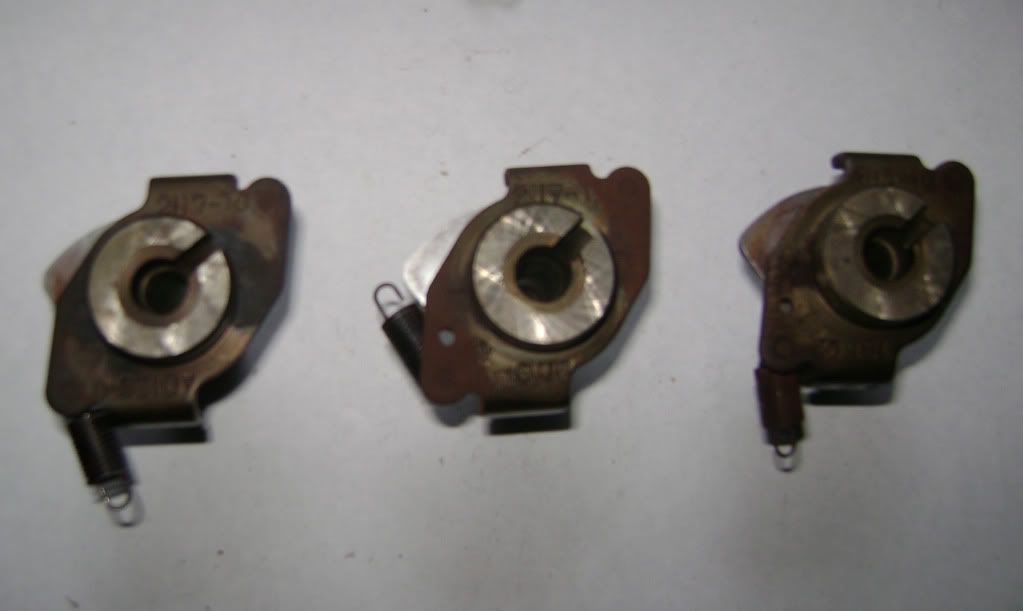
    This is an in-depth explanation as to differences in the 3 year models' centrifugal mechanical advance, and MUCH more. Spayne can take one look at these pics and guess at the "corroded, dry, and un-lubed" advance unit that's waiting on him behind that timing plate. Kudos to Crazy Steve for putting this thread up, nearly two years ago............................
    Originally posted by crazy steve View Post
    This comes up from time to time, so here's a 'illustrated' identifier...

    [IMG][/IMG]

    From left to right, you have 78, 79, and 80 advance units. At a glance, they look the same, but there's important differences. Some parts are the same though, and I'll point those out. Each one has a different 'curve', so there's a very real performance difference and this may be important depending on the motor you install it on and what initial timing number you use. Ok, the differences....

    The 78 unit offers 26 degrees of advance, starting at 2150 rpm and it's all in at 4750 rpm, for a 'range' of 2600 rpm. The slots in the reluctor are .515"/.530" long; this is what determines total advance. The springs have 13 coils, and a wire diameter of .033". Remember that the 78 uses 10 degrees of initial timing for a total of 36 degrees @ 4750 rpm.

    The 79 unit has 31 degrees, starting at 1800 rpm and it's all in at 5400 rpm, for a range of 3600 rpm. The slots in the reluctor are .565"/.585", and the springs have 15 coils with the same wire diameter as the 78 bits. Initial timing is retarded to 5 degrees, but you have the same total of 36 degrees, although at a higher rpm (5400).

    The 80 unit also has 31 degrees (OK, the manual says 30), also starting at 1800 rpm but this is all in by 3900 rpm, for a 2100 rpm range. The slots on the reluctor are the same as the 79 unit, but the springs are lighter; 14 coils with a wire diameter of .028". Again, the same initial 5 degrees and total timing of 36 degrees, but all in at only 3900 rpm.

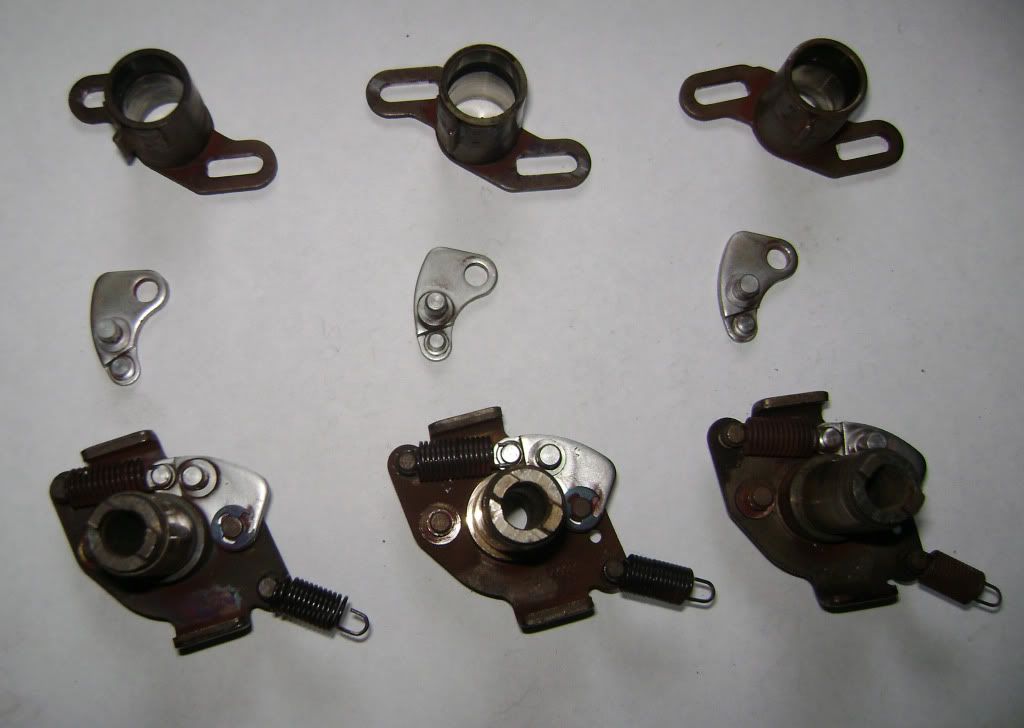
    As far as I can tell, the weights used are all the same (as are the 'bases'), with the differences being in the slots/springs. While the bases appear the same, they do have different numbers stamped into them...

    [IMG][/IMG]

    It may be hard to see, but the 78 has 2H7-10/AD126-01 on it, the 79 has 2H7-11/AD131-01, the 80 has 3H5-10/131-02.

    So, what's all this mean? Well, from my hot rod days, it was desirable to get your mechanical advance in as quickly as possible for the best power; remember the 'recurve kits' for distributors? But you had to be careful not to have too much advance or you risked detonation. The more initial advance you could run also helped off-idle power. So it appears that Yamaha put a fairly aggressive curve in the 78 models, then detuned the 79s a bit. They further detuned the motors in 80 (slightly less compression, milder cams) but tried to restore some of the lost power with a more aggressive curve. So, which one do you use if you're running a non-stock combo or are looking for more power? Well, if you're running the early cams, the 78 unit will give the best results, mainly because you can use 10 degrees initial timing. The 80 unit has possibilities too, particularly if you use a 78 reluctor or shorten the slots to match the early part. It may be too aggressive though, so be sure and watch/listen for pinging. Another thing to remember is these motors were designed to run on 'regular' grade fuel, so if you step up to premium you should be able to run more timing.

    Anyway, something to think about for the more adventurous among us...

    Every day I get on this site, I learn something new.
    I didn't know that all 3 (78-80) had different mechanical advance units.
    (ie. I seem to recall the manual saying something about the earlier bikes having a different curve, I guess I never put 2 and 2 together and realized that it is the differences in the mech advances that do that)
    Hi, my name is George & I'm a twisty addict!

    80G (Green paint(PO idea))
    The Green Monster
    K&N A/F, TC's fuse block, '81 oil cooler, TC's homemade 4-2 w/Mac Mufflers, Raptor 660 ACCT
    Got him in '04.
    bald tire & borrowing parts

    80SG (Black w/red emblems & calipers)
    Scarlet
    K&N A/F, TC's fuse block, WJ5, Shoei bags, Raptor 660 ACCT.
    Got her in '11
    Ready for the twisties!

    81H (previously CPMaynard's)
    Hugo
    Full Venturer, Indigo Blue with B/W painted tank.
    Cold weather ride

    Comment


    • #32
      All very interesting! Now I'll throw you another curve GLoweVA. My original Venturer motor came from factory with adjustable timing and degreed wheel. The screws of course have the tan colored epoxy on them as a deterent. The replacement 81 Venturer motor was only 81 in production numbers after the original motor, and the slots have a 'fill' piece in them with no before and after timing marks on the wheel. Buying it new, it also has the gold diaprham caps on the carbs that that were normally only associated to the MNS. Definitely doesn't follow the pattern.
      81H Venturer1100 "The Bentley" (on steroids) 97 Yamaha YZ250(age reducer) 92 Honda ST1100 "Twisty"(touring rocket) Age is relative to the number of seconds counted 'airing' out an 85ft. table-top.

      Comment


      • #33
        Hey Moto, I think we may be sidetracking this thread a little, but I do find it odd that the 78's, 79's & 81's had adjustable timing, whereas the 80's didn't.
        They had the tamper proof bolts on the timing plate.
        Damn EPA!

        When I put the donor 81 engine in my SG, I had to swap over the the mechanical advance from the 80 engine to the 81 engine and also the 'reluctor' too.
        I had to drill out the 80's tamper proof bolts to get those parts off.
        Hi, my name is George & I'm a twisty addict!

        80G (Green paint(PO idea))
        The Green Monster
        K&N A/F, TC's fuse block, '81 oil cooler, TC's homemade 4-2 w/Mac Mufflers, Raptor 660 ACCT
        Got him in '04.
        bald tire & borrowing parts

        80SG (Black w/red emblems & calipers)
        Scarlet
        K&N A/F, TC's fuse block, WJ5, Shoei bags, Raptor 660 ACCT.
        Got her in '11
        Ready for the twisties!

        81H (previously CPMaynard's)
        Hugo
        Full Venturer, Indigo Blue with B/W painted tank.
        Cold weather ride

        Comment


        • #34
          Originally posted by GLoweVA View Post
          Hey Moto, I think we may be sidetracking this thread a little, but I do find it odd that the 78's, 79's & 81's had adjustable timing, whereas the 80's didn't.
          They had the tamper proof bolts on the timing plate.
          Damn EPA!

          When I put the donor 81 engine in my SG, I had to swap over the the mechanical advance from the 80 engine to the 81 engine and also the 'reluctor' too.
          I had to drill out the 80's tamper proof bolts to get those parts off.
          Maybe you misunderstood..........80-81's did NOT have adjustable timing. My 81 Venturer DID, from factory, and is ALL a 4RO system. Guess if I was still into 'tinkering', could swap units off old motor to the replacement and get initial timing spot on, advancing a degree or two for the higher altitudes it mostly runs at and low BTU fuels of today. IMO, the effort would hardly be worth any noticable difference though.
          81H Venturer1100 "The Bentley" (on steroids) 97 Yamaha YZ250(age reducer) 92 Honda ST1100 "Twisty"(touring rocket) Age is relative to the number of seconds counted 'airing' out an 85ft. table-top.

          Comment


          • #35
            I got the 2H7 TCI in and put it on with the K&L jets and...no joy. It would sputter and then the starter would stop spinning and basically would not start.

            So I pulled the carbs and rejetted with the 145/45 Mikuni jets (since it would idle like a champ with those on) and same thing. Then I put the pod filters back on because I thought that maybe it was too lean and I eventually got it fired up, but it would not idle. Tried again with the 4RO (which I know allowed it to idle) and still would not idle. So switched back to the 2H7 and fired it up and then revved to about 3-4000 and it would die back down if I didn't keep revving the engine.

            I did set the static timing, so I know that that is correct (used a dial gauge and a degree wheel) but I can't get it running at idle to set the timing with the engine running.

            I'm not sure what the issue may be since it has previously run using this exact setup. The only change was the 2H7 computer and I gapped all the spark plugs to exactly .030" (there were a few that were a few hundredths off).
            79 SF 3H3 Engine, 145/45 Mikuni Jets, El Cheapo Pod Filter Mod w/ EMGO Pods, Coil Repower w/ Dyna Coils, Accell Wires and Side Gapped Plugs, 78 Mech Advance, 4-2 Turnouts

            Comment


            • #36
              Originally posted by spayne83 View Post
              I got the 2H7 TCI in and put it on with the K&L jets and...no joy. It would sputter and then the starter would stop spinning and basically would not start.

              So I pulled the carbs and rejetted with the 145/45 Mikuni jets (since it would idle like a champ with those on) and same thing. Then I put the pod filters back on because I thought that maybe it was too lean and I eventually got it fired up, but it would not idle. Tried again with the 4RO (which I know allowed it to idle) and still would not idle. So switched back to the 2H7 and fired it up and then revved to about 3-4000 and it would die back down if I didn't keep revving the engine.

              I did set the static timing, so I know that that is correct (used a dial gauge and a degree wheel) but I can't get it running at idle to set the timing with the engine running.

              I'm not sure what the issue may be since it has previously run using this exact setup. The only change was the 2H7 computer and I gapped all the spark plugs to exactly .030" (there were a few that were a few hundredths off).
              More likely a secondary ignition issue than a fueling issue......
              81H Venturer1100 "The Bentley" (on steroids) 97 Yamaha YZ250(age reducer) 92 Honda ST1100 "Twisty"(touring rocket) Age is relative to the number of seconds counted 'airing' out an 85ft. table-top.

              Comment


              • #37
                I am running relatively brand new (less than 500 miles) Dyna Coils with new coil wires and connectors, so I think that the coils can be ruled out. I also cleaned the spark plugs with alcohol when I reset the gap.
                79 SF 3H3 Engine, 145/45 Mikuni Jets, El Cheapo Pod Filter Mod w/ EMGO Pods, Coil Repower w/ Dyna Coils, Accell Wires and Side Gapped Plugs, 78 Mech Advance, 4-2 Turnouts

                Comment


                • #38
                  Originally posted by spayne83 View Post
                  the starter would stop spinning and basically would not start.
                  It wouldn't even spin? That sounds like a battery issue.
                  Greg

                  Everybody is a genius. But if you judge a fish by its ability to climb a tree, it will live its whole life believing that it is stupid.”

                  ― Albert Einstein

                  80 SG Ol' Okie;79 engine & carbs w/pods, 45 pilots, 140 mains, Custom Mac 4 into 2 exhaust, ACCT,XS850 final drive,110/90/19 front tire,TKat fork brace, XS750 140 MPH speedometer, Vetter IV fairing, aftermarket hard bags and trunk, LG high back seat, XJ rear shocks.

                  The list changes.

                  Comment


                  • #39
                    Yeah, I ran the battery down pretty fast, so I hooked up a charger and that was when it started running, but it wouldn't idle even with the charger on.

                    With the charger on it would sound like it was running with the starter pressed, but any throttle would kill it.
                    79 SF 3H3 Engine, 145/45 Mikuni Jets, El Cheapo Pod Filter Mod w/ EMGO Pods, Coil Repower w/ Dyna Coils, Accell Wires and Side Gapped Plugs, 78 Mech Advance, 4-2 Turnouts

                    Comment


                    • #40
                      A low battery will kill the ignition. Voltage needs to stay above 10.5 volts when cranking. A bad battery will crank the engine but it won't allow spark to be produced

                      On another note, it sounds to me like you may still have issues with the carbs.
                      Greg

                      Everybody is a genius. But if you judge a fish by its ability to climb a tree, it will live its whole life believing that it is stupid.”

                      ― Albert Einstein

                      80 SG Ol' Okie;79 engine & carbs w/pods, 45 pilots, 140 mains, Custom Mac 4 into 2 exhaust, ACCT,XS850 final drive,110/90/19 front tire,TKat fork brace, XS750 140 MPH speedometer, Vetter IV fairing, aftermarket hard bags and trunk, LG high back seat, XJ rear shocks.

                      The list changes.

                      Comment


                      • #41
                        I verified that the voltage didn't dip under 12 while cranking, so I had spark.

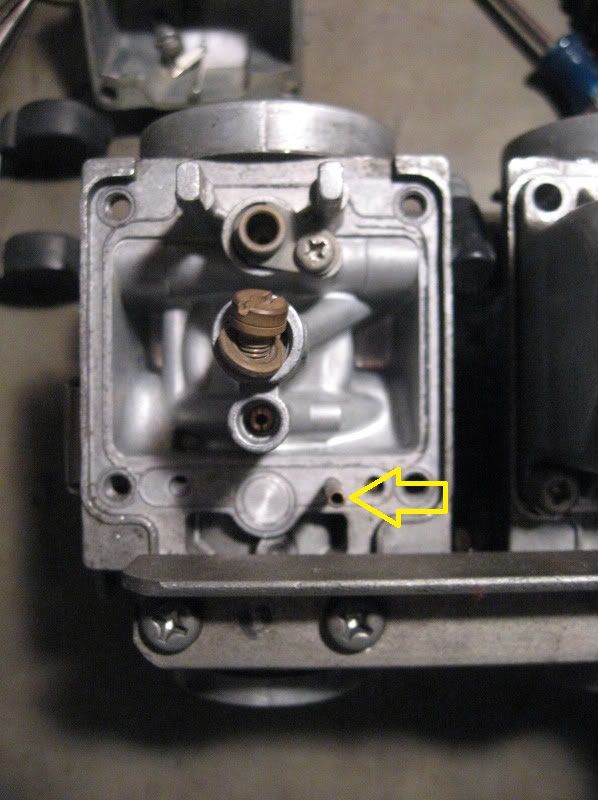
                        As for the carbs I sprayed them with carb cleaner in every passageway that I could, but I did notice that when I sprayed into this tube


                        I only had the spray coming out at the base of the tube

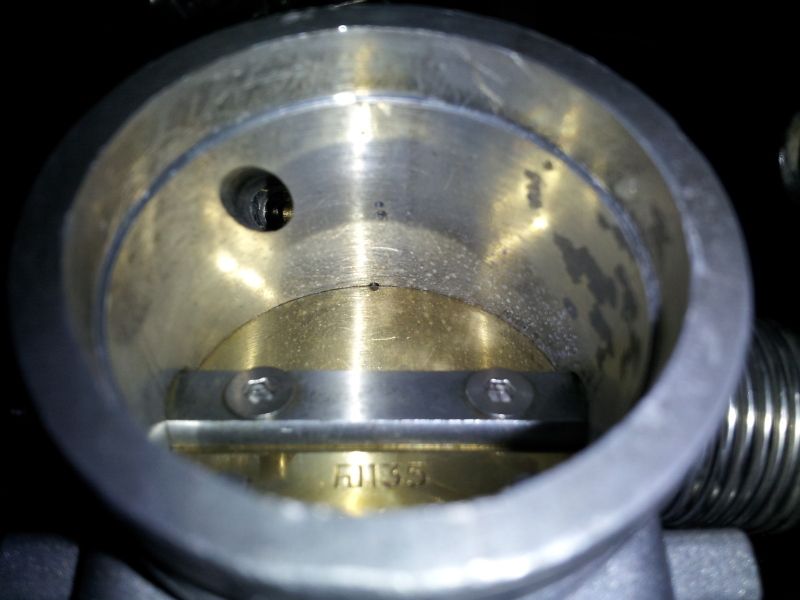
                        or when I sprayed into this hole


                        it only sprayed out of the #4 carb tube, all the others sprayed back at me. That is the idle air circuit correct? How can I clean that out? Would it have idled before if that was blocked? I did not change the idle screws at all when I rejetted, so they are all set at 2 turns out, which worked fine with the 45 jets.
                        79 SF 3H3 Engine, 145/45 Mikuni Jets, El Cheapo Pod Filter Mod w/ EMGO Pods, Coil Repower w/ Dyna Coils, Accell Wires and Side Gapped Plugs, 78 Mech Advance, 4-2 Turnouts

                        Comment


                        • #42
                          No, that is the enricher/choke circuit. The idle circuit is the pilot jet and the mixture screw oraface.

                          Your pilot cicuit(s) or pilot jets are blocked.
                          Greg

                          Everybody is a genius. But if you judge a fish by its ability to climb a tree, it will live its whole life believing that it is stupid.”

                          ― Albert Einstein

                          80 SG Ol' Okie;79 engine & carbs w/pods, 45 pilots, 140 mains, Custom Mac 4 into 2 exhaust, ACCT,XS850 final drive,110/90/19 front tire,TKat fork brace, XS750 140 MPH speedometer, Vetter IV fairing, aftermarket hard bags and trunk, LG high back seat, XJ rear shocks.

                          The list changes.

                          Comment


                          • #43
                            Originally posted by spayne83 View Post
                            I am running relatively brand new (less than 500 miles) Dyna Coils with new coil wires and connectors, so I think that the coils can be ruled out. I also cleaned the spark plugs with alcohol when I reset the gap.
                            Spayne, what I was leading to was the pick-up coil wires under the left side cover, a common issue, and 'looking' doesn't cut it. need to pull on those wires every quarter inch with both hands. A stretchy insulation IS a broken place. BA80 is correct, that circuit is still plugged up. While the carbs are off and gettin sorted out, check those wires.
                            81H Venturer1100 "The Bentley" (on steroids) 97 Yamaha YZ250(age reducer) 92 Honda ST1100 "Twisty"(touring rocket) Age is relative to the number of seconds counted 'airing' out an 85ft. table-top.

                            Comment


                            • #44
                              Ok, thanks.

                              I think using copper anti-seize has bit me in the ass. I had been finding it in my float bowls after I first reassembled. I only used it on the bolts holding on the float bowl, but apparently that seeped in through the gasket. I would think that dissolved in gasoline it wouldn't be that bad, but it seems to have gunked things up again.

                              I'll check the pick-up coil wires and go through the ignition system as well.
                              79 SF 3H3 Engine, 145/45 Mikuni Jets, El Cheapo Pod Filter Mod w/ EMGO Pods, Coil Repower w/ Dyna Coils, Accell Wires and Side Gapped Plugs, 78 Mech Advance, 4-2 Turnouts

                              Comment


                              • #45
                                This weekend I went through and rejetted to 145/45 and cleaned out the carbs thoroughly. I was able to get spray through every passage and jet but I am still having issues with starting and idling. When I was able to get the bike started it was with a full open throttle (Oops! Trying to let the vapor get out between start attempts) and it would run fine (with a few hiccups) around 2000, but was very rough much below that. It would not idle at all and was very difficult to keep in the 1000-1500 rpm range. I did get a cough through the #1 carb that blew off the carb sync cap and it felt like air was puffing back through the #1 and to a lesser extent #2 carbs instead of sucking.

                                I did manage to get the timing light on it and no more jumpy timing marks! I couldn't actually set the timing, but at least it appears to be a step in the right direction.

                                I just ordered the stock jets (main, pilot, air and needle) all genuine Mikuni parts to set a baseline.

                                I did manage to break off the idle mixture screw and in attempting to get it back out I opened the hole slightly, so I am not looking forward to the idle problems on #2.

                                Reading over a few things I think my next step is to tear down the carbs and rebuild them with the genuine parts and while I am in there I need to scrub out and polish the emulsion tube and the new jet needles. Is there a need to polish anything else while I am at it? The slide? Floats?
                                79 SF 3H3 Engine, 145/45 Mikuni Jets, El Cheapo Pod Filter Mod w/ EMGO Pods, Coil Repower w/ Dyna Coils, Accell Wires and Side Gapped Plugs, 78 Mech Advance, 4-2 Turnouts

                                Comment

                                Working...
                                X