Announcement

Collapse
No announcement yet.

Don't use Kem dip ?????

Collapse
X
 
  • Filter
  • Time
  • Show
Clear All
new posts

  • Don't use Kem dip ?????

    Over on GSR, we swear by that stuff, and I've cleaned a good 7-8 carb banks not needing to them twice, is there something specific to the Yummy carbs that the butterfly seals are more prone to damage than the cousin BS34's on a Suzuki? What is the best substitute cleaner? I've used the good Pine Sol with no real luck, don't want to use vinegar, and don't have access to an ultra sonic cleaner. Trying to to do this myself and at a reasonable price.
    I know it another dead horse getting beat again, but would like to hear from some success stories and specific products used. I want to do them right the first time, not the second or third.
    Thanks
    81 XS1100H

  • #2
    If carbs are both made by Mikuni then there is no difference in the seals. Those seals are put in by Mikuni, not Suzuki or Yamaha.

    There have been folks say they use dip on their carbs all the time with no ill effects. This may well be one of those better safe than sorry things. I myself have cleaned more than a few banks of carbs up with no real problems. But I do not dip the bodies.

    If you want to dip them but be safe about it, you could set up a trapeze type hanger to lower the bodies into the dip but not enough to get the butterfly seals in it.
    Life is what happens while your planning everything else!

    When your work speaks for itself, don't interrupt.

    81 XS1100 Special - Humpty Dumpty
    80 XS1100 Special - Project Resurrection


    Previously owned
    93 GSX600F
    80 XS1100 Special - Ruby
    81 XS1100 Special
    81 CB750 C
    80 CB750 C
    78 XS750

    Comment


    • #3
      I've dipped my BS34's from my GS1100's for about 12 hours each with no apparent ill affects(completely submerged). If they are pretty much the same, Mikuni, then I'm continuing with the Kem dip, I'll report the results when I get to them.
      81 XS1100H

      Comment


      • #4
        There is a safe carb dip for rubber seals, it's called Yamalube carb dip cleaner.
        2H7 (79) owned since '89
        3H3 owned since '06

        "If it ain't broke, modify it"

        ☮

        Comment


        • #5
          I've used the Berryman's chem dip in the 1 gallon can for a couple of carb banks. One was from a GSXR, the other my XJ1100. I haven't had any problems with the butterfly seals on either, though the GSXR was only around long enough to do a couple of tuning sessions.

          My thought on the XS would be if you have carbs with original seals, what's the worst that can happen? It damages the seals and you're replacing 30+ year old rubber seals. I would think if the chem dip damages them, they were probably on their way out anyway.

          Then the question would be is it worth the risk on new seals...
          82J · 81SH · 79SF Fire Damage · 78E · 79F Parts Bike · 04 Buell Blast
          Website/Blog

          Comment


          • #6
            Originally posted by bikerphil View Post
            There is a safe carb dip for rubber seals, it's called Yamalube carb dip cleaner.
            I have some of that and an old crock pot to go with it.

            The sure bet is to disassemble the carburetors, soak them in your favorite carb cleaner, and replace the shaft seals when you're done.

            I moonlighted in a big box power sports store a few short years ago. Their carburetor cleaning tank had the harsh stuff in it.
            Marty (in Mississippi)
            XS1100SG
            XS650SK
            XS650SH
            XS650G
            XS6502F
            XS650E

            Comment


            • #7
              From my perspective, I would rather avoid pulling those butterfly shafts out. I have only tried it once on a rather crusty set of carbs. It did not go well at all. Good thing I considered those carbs trash to start with, cause those shafts and butterflies were not getting re-used anyway.

              Perhaps those of you who have this down to science can enlighten us uneducated on how exactly to get those screws to come loose without drilling out the threads in the shaft.
              Life is what happens while your planning everything else!

              When your work speaks for itself, don't interrupt.

              81 XS1100 Special - Humpty Dumpty
              80 XS1100 Special - Project Resurrection


              Previously owned
              93 GSX600F
              80 XS1100 Special - Ruby
              81 XS1100 Special
              81 CB750 C
              80 CB750 C
              78 XS750

              Comment


              • #8
                well, to get those screws out all you have to do is to grind off staked end( for example with a small Dremell cutoff wheel)
                Nick

                1979 XS11 F,Yamaha fairings w/hard bags, TC's fuse box, K&N air filter

                1982 Virago 750 (it's alive!)

                1979 XS 11 F, Windjammer IV, Samsonite luggage cases(another rescue)

                Comment


                • #9
                  Some drill out the screw head and then thread the remainder all the way INward until its free. New screws will be mandatory. Throttle shaft seals when bad are a HUGE BUMMER!!!!

                  Comment


                  • #10
                    Originally posted by DGXSER View Post
                    Perhaps those of you who have this down to science can enlighten us uneducated on how exactly to get those screws to come loose without drilling out the threads in the shaft.
                    I can only relate what's worked for me; I use Chem-dip and always pull the butterflys/shafts on a rebuild....

                    If someone has been at the screws and chewed up the screw heads, you'll likely have to drill them.

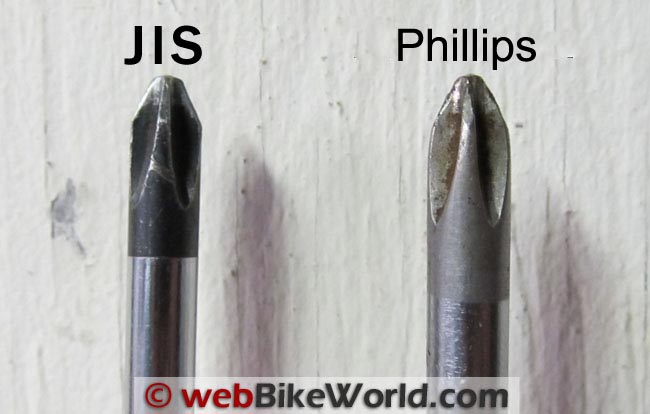
                    Use a like-new, tight-fitting screwdriver; if the driver is loose at all in the screw, you'll just strip the heads. I use a number 2 Phillips, but not all screwdriver brands are created equal so make sure it fits tight.

                    I don't remove the factory peening on the threads; I've found if care is taken in removing them the screws will come out as-is. Remove slowly, use some WD40 or similar oil, turn them in and out to 'work' the peened part out if you feel much resistance. Keep high pressure on the driver at all times.

                    For reassembly, just reverse but I do put a large drop of blue Loctite on each screw.

                    This isn't an absolutely guaranteed method, but I've only had one screw break off on me in multiple carb sets, so it's been pretty reliable for me. And the one that did break, broke when trying to loosen it, not at the peening. The real key to this is having a driver that fits the screws with no slop at all and not letting it 'slip' and chew up the head.

                    I've thought about tracking down some torx-head replacement screws for these to get rid of those Phillips-heads, but haven't had the need yet...
                    Fast, Cheap, Reliable... Pick any two

                    '78E original owner - resto project
                    '78E ???? owner - Modder project FJ forks, 4-piston calipers F/R, 160/80-16 rear tire
                    '82 XJ rebuild project
                    '80SG restified, red SOLD
                    '79F parts...
                    '81H more parts...

                    Other current bikes:
                    '93 XL1200 Anniversary Sportster 85RWHP
                    '86 XL883/1200 Chopper
                    '82 XL1000 w/1450cc Buell, Baker 6-speed, in-progress project
                    Cage: '13 Mustang GT/CS with a few 'custom' touches
                    Yep, can't leave nuthin' alone...

                    Comment


                    • #11
                      I believe those screws come out with a JIS (Japanese Industrial Standard) screwdriver. If you use one you should be able to back the screws out, staked or not.

                      Marty (in Mississippi)
                      XS1100SG
                      XS650SK
                      XS650SH
                      XS650G
                      XS6502F
                      XS650E

                      Comment


                      • #12
                        Anybody who thinks JIS screwdrivers a myth like the Unicorn, I'm here to tell you they are money well spent, less stripped carb screws, with the JIS screwdrivers I haven't had to use my impact screwdriver hardly at all. These are the ones I bought---> http://www.ebay.com/itm/Vessel-Japan...item20cf0e0442
                        There are a few other brands and sets, but these are the best for the money, and careful at some of them on eBay, they make the pictures look larger than actual size.

                        81 XS1100H

                        Comment


                        • #13
                          Originally posted by crazy steve View Post
                          The real key to this is having a driver that fits the screws with no slop at all and not letting it 'slip' and chew up the head.
                          And maybe a little grinding compound for extra grip?
                          Skids (Sid Hansen)

                          Down to one 1978 E. Stock air box with K&N filter, 81H pipes and carbs, 8500 feet elevation.

                          Comment


                          • #14
                            Originally posted by jetmechmarty View Post
                            I believe those screws come out with a JIS (Japanese Industrial Standard) screwdriver. If you use one you should be able to back the screws out, staked or not.

                            Thanks Marty,
                            I learned something to day
                            Phil
                            1981 XS1100 H Venturer ( Addie)
                            1983 XJ 650 Maxim
                            2004 Kawasaki Concours. ( Black Bear)

                            Comment


                            • #15
                              I think the difference in screwdriver tips can be how they're made and by who. Some are formed by squeezing them to shape which generally results in a stronger tip but less precise shape. Some are machined, which gives you sharper, more precise flutes but will break easier if inferior materials and/or heat treating is used. The driver I use is a NOS/NLA Proto 'machined type' which has held up extremely well to use. There are variations in tip shape (even for the 'same' size) between manufacturers (my Proto is marked #2 Phillips, but looks more like a JIS), so don't just depend on the given size but look for fit...
                              Fast, Cheap, Reliable... Pick any two

                              '78E original owner - resto project
                              '78E ???? owner - Modder project FJ forks, 4-piston calipers F/R, 160/80-16 rear tire
                              '82 XJ rebuild project
                              '80SG restified, red SOLD
                              '79F parts...
                              '81H more parts...

                              Other current bikes:
                              '93 XL1200 Anniversary Sportster 85RWHP
                              '86 XL883/1200 Chopper
                              '82 XL1000 w/1450cc Buell, Baker 6-speed, in-progress project
                              Cage: '13 Mustang GT/CS with a few 'custom' touches
                              Yep, can't leave nuthin' alone...

                              Comment

                              Working...
                              X