Announcement

Collapse
No announcement yet.

79 Special Cafe Custom Build Progress

Collapse
X
 
  • Filter
  • Time
  • Show
Clear All
new posts

  • #16
    Getting ready to fab...
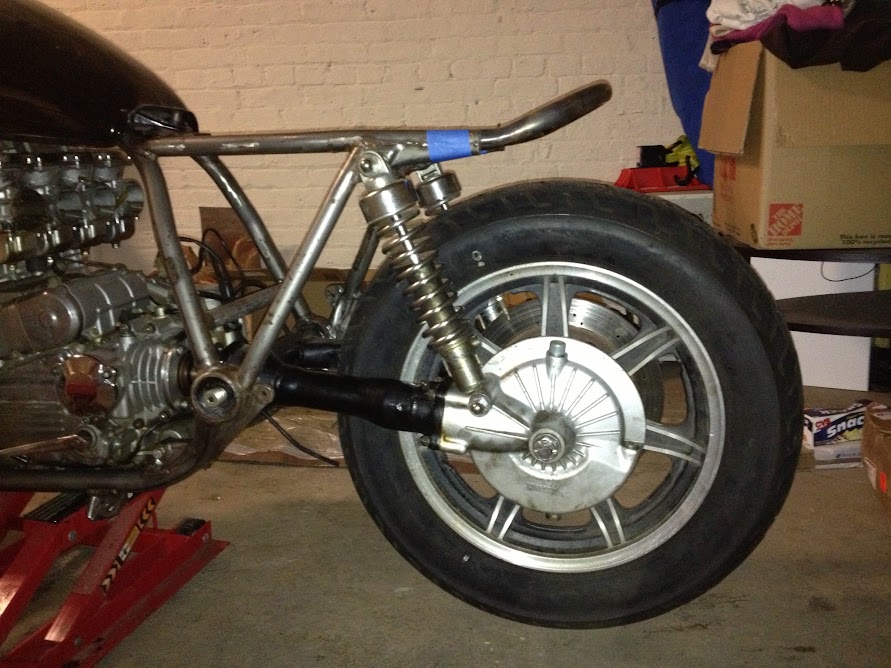


    Here is a picture of the rear hoop mocked up. Should be able to tack it or better today. Excited to get this part in so I can proceed to build the seat pan and send that out for leather.

    Slow and steady wins the (build) race.

    One question I had is how in the world is one supposed to put the engine back in the frame in a sane manner? I basically had to wrestle the two together, which should be ok for mock up work. But on final assembly the paint on the frame would be destroyed. I don't see an elegant way to hoist it into the frame.

    Ideas?
    '79 XS1100 Special "2-Up Cafe"

    Never Stop Building
    Custom fabrication. Bespoke furniture. Clean code. An obsession with the well-made.

    neverstopbuilding.com - Facebook - YouTube - Instagram

    Comment


    • #17
      roll the engine onto it's side. take off the oil filter housing and the valve cover.
      slip the frame over the engine. bolt it up and right the machine.

      i think it is easier on the left or right side, but i don't remember which one.
      Steven


      1981 XS 1100 LH
      1979 XS 1100 SF

      Comment


      • #18
        Wrap and tape some cardboard around the frame, take it off after the engine is in.
        2H7 (79) owned since '89
        3H3 owned since '06

        "If it ain't broke, modify it"

        ☮

        Comment


        • #19
          Originally posted by jrobertfox View Post
          One question I had is how in the world is one supposed to put the engine back in the frame in a sane manner? I basically had to wrestle the two together, which should be ok for mock up work. But on final assembly the paint on the frame would be destroyed. I don't see an elegant way to hoist it into the frame.
          Ideas?
          Hi Jason,
          lay the frame on it's side and protect the paint with cardboard about does it.
          What will also help is three or four burly friends who will work for food and beer.
          Fred Hill, S'toon
          XS11SG with Spirit of America sidecar
          "The Flying Pumpkin"

          Comment


          • #20
            Builds coming along nicely,keep the pic's coming.I think that brown seats gonna look awsome on that bike.By the way,glad your around to do this.Ride safe.
            FOXS-XS11SG

            2009 Suzuki V Strom 650,Adventure in Touring,I call her "Smooth" SW Motech engine guard,Coocase top case w/ LED brake and tail lights,20" MRA touring screen w/adjusable bracket,Grip heaters,fender ex-tender,Givi hard sidebags

            1980 XS11SG-sold
            1999 Vulcan classic-sold
            1982 XJ 650-sold

            Old is only a state of mind......John

            Comment


            • #21
              Thanks for the tips guys. I will certainly follow them on final assembly. I'm also thinking of ordering some tapered dowels for the engine mount holes to help align the go box.

              Today made a bunch of progress, welded on the rear hoop and seat mounts, and also made up the fiber glass seat pan with some metal inserts for strength. The little welder I have is kinda messy with the flux core, but it gets the job done, I guess if I tack most things in place I can rent a proper welder and finish it up cleanly.

              Excited to have the seat out for leather, its gonna look rockin.

              Here is the hoop to install:


              Messy weld:


              Finished hoop:


              Taped up ready for fiberglass:


              Seat pan all together:


              Next up is to trim the seat pan and get it ready for mounting/leather.

              Also going to start fabbing up the custom exhaust.
              '79 XS1100 Special "2-Up Cafe"

              Never Stop Building
              Custom fabrication. Bespoke furniture. Clean code. An obsession with the well-made.

              neverstopbuilding.com - Facebook - YouTube - Instagram

              Comment


              • #22
                Originally posted by fredintoon View Post
                Hi Jason,
                lay the frame on it's side and protect the paint with cardboard about does it.
                What will also help is three or four burly friends who will work for food and beer.
                Why so much help Fred............one helper, and the bike can be left upright and just lift motor out the right side. Gotta love it tho..............others with this FredFlintstone operation laying bike on its side and pulling frame off................sounds bought as efficient as rotating a house to install a light bulb.
                81H Venturer1100 "The Bentley" (on steroids) 97 Yamaha YZ250(age reducer) 92 Honda ST1100 "Twisty"(touring rocket) Age is relative to the number of seconds counted 'airing' out an 85ft. table-top.

                Comment


                • #23
                  This is looking great, and exactly in the direction I'm going with mine - so don't be shy with the pics and details as I'll probably end up copying most of your work
                  79 SF

                  Comment


                  • #24
                    Originally posted by jrobertfox View Post
                    Messy weld:

                    Next up is to trim the seat pan and get it ready for mounting/leather.
                    Also going to start fabbing up the custom exhaust.
                    Hi Jason,
                    final weld looks nice but didja put a sleeve inside the joint, leave a gap and weld down onto the sleeve so as to leave some weld metal after the cleanup?
                    And how easy did the FRP seat lift off? I've had wonderful times getting FRP parts to let go of their moulds, even after using professional release compounds on the moulds before layup.
                    Fred Hill, S'toon
                    XS11SG with Spirit of America sidecar
                    "The Flying Pumpkin"

                    Comment


                    • #25
                      Actually the seat cam off with only a little tugging, I really went to town with the duct tape and put a nice coat of car wax on top. Here is a picture of the trimmed up seat pan:


                      As far as the weld, thanks for the compliments, but it seems messy to me. And yeah I put in a sleeve in and tried to get the bead into the sleeve.

                      Update on the welder though, now that I'm running .023 wire and gas, the welds are starting to come out nice.

                      More to come on the exhaust mockup and fabrication.
                      '79 XS1100 Special "2-Up Cafe"

                      Never Stop Building
                      Custom fabrication. Bespoke furniture. Clean code. An obsession with the well-made.

                      neverstopbuilding.com - Facebook - YouTube - Instagram

                      Comment


                      • #26
                        Battery Box Fab

                        Recently did the main fabrication on the battery box, it's out of sheet steel:


                        Which I folded on scored lines, then welded the corners:


                        Then added little loops to hold a leather belt I'm having made to hold the battery down:


                        Tomorrow, with patience, I should be able to weld the associated mounting hardware into the bike. We shall see...
                        '79 XS1100 Special "2-Up Cafe"

                        Never Stop Building
                        Custom fabrication. Bespoke furniture. Clean code. An obsession with the well-made.

                        neverstopbuilding.com - Facebook - YouTube - Instagram

                        Comment


                        • #27
                          The welds can make or break any project.I went to school for welding a long time ago and therefore always practice on some scrap before the final project.Nice fabrication work though!
                          1980 XS1100 SG
                          Inline fuel filters
                          New wires in old coils-outer spark plugs
                          160 mph speedometer mod
                          Kerker Exhaust
                          xschop K & N air filter setup
                          Dynojet Recalibration kit
                          1999 Kawasaki ZRX1100
                          1997 Jeep Cherokee 4.5"lift installed

                          Comment


                          • #28
                            Leather hold down, going old school there. Should be nice, I can't wait to see the finished product.

                            Any thoughts about color, or lack thereof?
                            Guy

                            1980 XS1100G - Frankenstein - resurrected from the impound lot
                            1991 Suzuki GS500E (not running yet)
                            2003 Burgman AN400 - Blue Belle
                            2005 Burgman AN400 - Silver Belle

                            Comment


                            • #29
                              It's gonna be matt black throughout with some little metal details, the tank a super dark flat midnight blue with a single offset red and white stripe (small bit of patriotism thrown in there I think that will pair nicely with the leather seat/ grips.


                              And yeah for all the super important/finish welds I'm gonna rent a tig. Once you've used one its painful using a mig (imho)
                              '79 XS1100 Special "2-Up Cafe"

                              Never Stop Building
                              Custom fabrication. Bespoke furniture. Clean code. An obsession with the well-made.

                              neverstopbuilding.com - Facebook - YouTube - Instagram

                              Comment


                              • #30
                                More battery box mounting...

                                Few more pics from the weekend. I roughed out some mounts for the battery box and started the horrific task of figuring out the wiring for this beast. Since I'm moving stuff around and swapping out a bunch of stock stuff I'm gonna have to largely redo the wiring harness to achieve the clean look I want. Not too worried though, done this stuff before, its just going to be a project.

                                Angle grinder = Machine Shop


                                Box is going to be mounted with rubber vibration mounts.


                                This is going to look sweet when all painted and leathered up.
                                '79 XS1100 Special "2-Up Cafe"

                                Never Stop Building
                                Custom fabrication. Bespoke furniture. Clean code. An obsession with the well-made.

                                neverstopbuilding.com - Facebook - YouTube - Instagram

                                Comment

                                Working...
                                X