
 Tweet
Tweet
One other thing, make sure you have the proper draft on the part if you intend to mold it in any form. Perfectly parallel sides are a bitch to get out! SolidWorks (That's what it looks like you are using) should have a draft function in it.
-
-- Clint
1979 XS1100F - bought for $500 in 1989 -
Thanks for all the comments and interest. Sorry for the long post here, I had a backlog of things on my mind.
Right now I'm leaning toward molding the hole for the self-tapping screw. Who wants to screw with drilling?...screw hole...
Wow, I would think ABS injection molded parts would be great for this. The color shouldn't matter. I am also concerned about the complex shape of the part and air inclusions, whether it's injection molding or resin casting.FYI: I have access to a small ABS injection molding machine. It is the perfect size for making parts like this. The only downside is that we only have RED plastic for it, so... Once concern I have is how well it will handle the complex shape of this part (lots of places for air to get trapped).
I'll be the first to admit that I'm no tool maker, so we'd have to work together on this. Would a mold run on this machine also have stuff like coolant channels, ejector pins and springs, and a runner system for getting the material from the injector to the cavity?I'll try to find out what the dimensions of the molds this machine can take. But I am about 99.9% sure that these molds for this part would work perfectly. The molds would definitely have to be aluminum to handle the forces and heat involved.
When the CAD drawings are done and verified, I could also see if Jason would make a set on the Fadal so we could give this a try. It would also let us make any changes to the mold body to better fit the injector.
Cutting the cavity on a CNC would be great! I was going to use a KNC machine (Kevin Numeric Control) machine I have available to me. I was thinking of cutting the curved cavity by printing out a table of coordinates in maybe .010" steps. I was thinking of cutting the rectangular posts by orienting the work piece using an intermediate plate with dowel pins to position the part so that the posts correspond to the x or y axis. Unfortunately I don't have a rotary table available for the curved arc or positioning for the rectangular posts. The pins would be lathe parts.
I'm sure it would be far superior to run this on the Fadal CNC. My boss has a Tormach CNC, and if the "KNC" doesn't work out as well as I hoped, I might be able to twist his arm into cutting some parts for me to help in the validation.
Shrinkage and warpage are other issues I don't feel particularly comfortable addressing. I know shrinkage can be assumed to be 1%, maybe a little more, and knowing that might be enough for this particular part. Not sure if warpage would be a problem.
Yep, it's SolidWorks. I know I should have draft, but of course I'd rather have a part without draft!One other thing, make sure you have the proper draft on the part if you intend to mold it in any form. Perfectly parallel sides are a bitch to get out! SolidWorks (That's what it looks like you are using) should have a draft function in it. I see that end mills can be purchased which have draft built into them. I did a little reading last night, and it sounds like 1-degree draft is about the minimum that is recommended for a part with a relatively smooth surface. One thing I've noticed is that small diameter end mills deflect to some degree and tend to provide a little draft. I discovered that unintentionally earlier this year. I'm tempted to just try straight sides (or as straight as the end mill allows) and see what happens. With the resin casting mold, I can peel the mold apart, one layer at a time. That's typically not the case with injection molding. I realize I should take your advice, regardless what molding process is used.
Just another thought: how often is the thumb switch part lost when the switch breaks? I was fortunate to have had the switch off the bar, cleaning the contacts when it broke, so I had the thumb switch. It could break while riding, and be gone. What % of people lose the thumb part when their switch breaks? If I can help 90% of people with broken switches with just the piece we've been discussing, then I'd be happy. But if that were only 10% or so, I guess I'd have to put some serious consideration into where this is going. Either get into making the thumb pieces after this one is squared away, or reconsider the project.
And on that note, does the copper spring go right below the thumb piece, or is it inside the bar control unit?'81 XS11H Venturer - holed up in storage while life happened since 07/08/04
'81 Kawasaki KE175 enduro - 63 mph of smokey fun, now with collector plates!Comment
-
Flat copper tension plate is positioned on the outside of the bar control assembly between assembly and thumb switch handle. 1980 XS1100G "Dolly G" Full Dresser (with a coat of many colors
 )
)
1979 XS1100SF (stock-euro mods planned)
1984 XV700L Virago (to be hot-modded)
1983 XJ750MK Midnight Maxim (semi-restored DD)
1977 XS650D ( patiently awaiting resto)
Sometimes it takes a whole tank of gas before you can think straight.
Comment
-
Cool, thanks. That would be a bummer if the whole works blew off while cruising down the highway.'81 XS11H Venturer - holed up in storage while life happened since 07/08/04
'81 Kawasaki KE175 enduro - 63 mph of smokey fun, now with collector plates!Comment
-
No. This is a very small injector machine. It is designed for short runs (10s of parts) with a bit of time between shots (usually, because it takes a little bit of time to manually get the part out of the mold!). Due to the low cycle rate, no cooling is needed and due to the manual removal, no ejector pins.
The runner system is pretty simple: Just a hole with a path to the cavity on the top of the mold.
It would take a much better machinist than myself to manually make these molds! Especially with out a rotary table! As for the pins, I also have access to a CNC lathe as well. Plus, I am fairly decent with a manual lathe and we have a couple of very nice manual machines in the shop.
We have a couple of Tormach's as well. Needless to say, they do not have the rigidity or precision of the Fadal. I just hope I can con enough Fadal time to make the molds, otherwise they might end up on the Tormach's anyway.
I'm not an expert on injection molding either, though I am a mechanical engineer (still in school working on the masters) by training. I have had some rudimentary training on injection molding with assorted classes, but only minimal hands on experience.
As for warpage, I'm not too worried about it. The part is very small and is very symmetrical. We would need to ensure the plastic is injected in the correct location to maximize the flow. I suspect we would need to use the little tab as the inlet port so plastic is flowing through that small zone while it is hottest. But I'm sure I can find a few folks we can give much better advice!
Yeah.... I'm not an injection engineer, so I probably don't have much if any more info that you do!-- Clint
1979 XS1100F - bought for $500 in 1989Comment
-
My boss, the guy with the Tormach, left work early today to address some issues he was having. It seems he was having .010" runout on any tool he put in the machine. Internal pockets came out .010" larger than expected, and external things were .010" smaller.
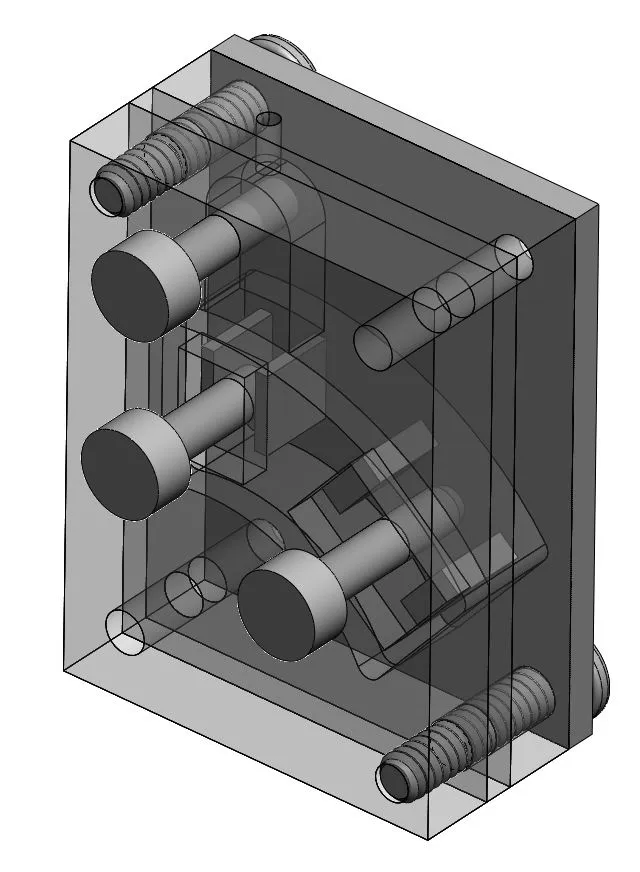
Didn't get anything done this weekend, but added the peg for the screw tonight. Also added a placeholder for the fill port. Probably need to add something for a vent too.
 '81 XS11H Venturer - holed up in storage while life happened since 07/08/04
'81 Kawasaki KE175 enduro - 63 mph of smokey fun, now with collector plates!Comment
-
Jat
Would filling the mould, from the bottom to the top, work best so the air will bleed ?1980 XS1100G "Dolly G" Full Dresser (with a coat of many colors )
1979 XS1100SF (stock-euro mods planned)
1984 XV700L Virago (to be hot-modded)
1983 XJ750MK Midnight Maxim (semi-restored DD)
1977 XS650D ( patiently awaiting resto)
Sometimes it takes a whole tank of gas before you can think straight.Comment
-
If we are injection molding it, it won't matter. The very high pressure the molten plastic is under will push the air out, but it does need a place (or possibly multiple places) to vent the air out and let the plastic in. We also need to figure out the best location(s) to inject the plastic to get the best fill. I'll need to chat with a few folks around school to see what they think.-- Clint
1979 XS1100F - bought for $500 in 1989Comment
-
I'll see if I can figure out anything about how to use the SolidWorks mold flow simulation.'81 XS11H Venturer - holed up in storage while life happened since 07/08/04
'81 Kawasaki KE175 enduro - 63 mph of smokey fun, now with collector plates!Comment
-
Current Results?
Don't know if the braintrust went on to other things, but I would be interested in having this replacemnt part available.
Where does this stand as of now?'80SG 'Velvet Hammer'
'80LG 'Black Velvet'
"Friends don't let Friends go Fat"
finitum non capax infinitiComment
-
No progress, but still here. Got distracted with other things. More likely a winter project for me. I got the switch off my bike which is 300 miles away for a sample (didn't take Schming up on the offer). After closer inspection, it looks like mine had previously been glued back on, which sort of explains why it crumbled in my hand! But it also makes it a poor "model". I would still like to do the first few anyway with Epoxy, but am still working out a reasonable way to "fill" the mold. Not sure if I want to do an injection port, or just squirt/pour/scoop epoxy into the cavity before closing it up.
Long story short, still in the back of my mind, not complete yet. It will probably be too late to be of any benefit to you, but it's motivating to know there's interest.'81 XS11H Venturer - holed up in storage while life happened since 07/08/04
'81 Kawasaki KE175 enduro - 63 mph of smokey fun, now with collector plates!Comment
-
I had a thought or two while I was reading the thread.
I used to make lost wax casting jewelry, then used a vacuum table with a bell jar to fill all the voids. It was pretty simple, the hardest thing was making the vulcanized rubber molds, but I had a mold-maker do the difficult ones. If I had an original to cast, it was a matter of mounting a tree with a sprue out of wax for the molten metal to flow into with vent tracks, depending on how many models were on the tree.
I can't see why you couldn't do the same just using epoxy or resin.
If you didn't want to go the vulcanized route, why not try something like this:
http://www.riogrande.com/Product/Bel...d/701033?Pos=3
and the frames, here:
http://www.riogrande.com/Product/Rio.../701050?Pos=13
I would think that you would then be able to press your model flush into the frame before it sets up (around a minute) to fill all the voids. You would have to do only minimal cutting and would need to take your time to remove the model or part once set.
Then, experiment with resins, etc. and sand out any imperfections on the open side of the finished part.
Advantages:
No special equipment, other than frames.
Quick.
Cheap.
Could make multiple molds to cast several at one time.
All the little nuances could be figured out as they are encountered.
What am I missing here?'80SG 'Velvet Hammer'
'80LG 'Black Velvet'
"Friends don't let Friends go Fat"
finitum non capax infinitiComment
-
Hey, CRX, while you're at it, would you please make a mold of front MC reservoir for a standard  ...you would make a lot of Xsesives very happy
Nick
...you would make a lot of Xsesives very happy
Nick
1979 XS11 F,Yamaha fairings w/hard bags, TC's fuse box, K&N air filter
1982 Virago 750 (it's alive!)
1979 XS 11 F, Windjammer IV, Samsonite luggage cases(another rescue)Comment


Comment