If you think the cam chain might have slipped off the crank sprocket, take a look down the chain tunnel with a flashlight and verify that it's on the sprocket and not just next to it.
Is it about time to change the cam chain?
Collapse
X
-
81H Venturer1100 "The Bentley" (on steroids) 97 Yamaha YZ250(age reducer) 92 Honda ST1100 "Twisty"(touring rocket) Age is relative to the number of seconds counted 'airing' out an 85ft. table-top.Comment
-
Nathan
KD9ARL
μολὼν λαβέ
1978 XS1100E
K&N Filter
#45 pilot Jet, #137.5 Main Jet
OEM Exhaust
ATK Fork Brace
LED Dash lights
Ammeter, Oil Pressure, Oil Temp, and Volt Meters
Green Monster Coils
SS Brake Lines
Vision 550 Auto Tensioner
In any moment of decision the best thing you can do is the right thing, the next best thing is the wrong thing, and the worst thing you can do is nothing.
Theodore RooseveltComment
-
Well I checked the oil filter for debris, it is clean. Put the auto cam chain tensioner back in and slowly and carefully rotated the crankshaft looking for any resistance. All felt good so I put the oil back in and started her up. Runs nice on the center stand.
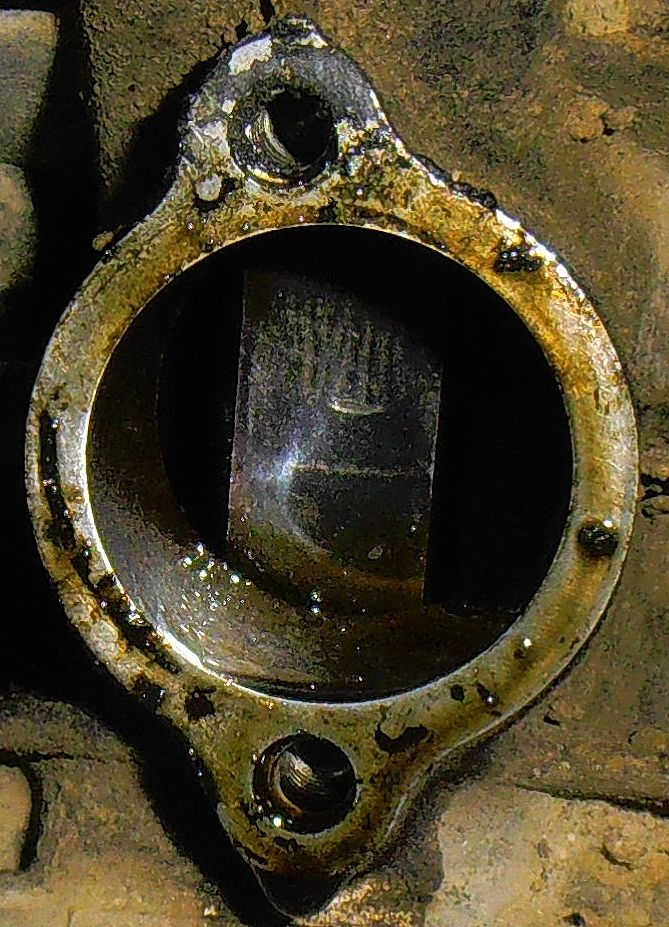
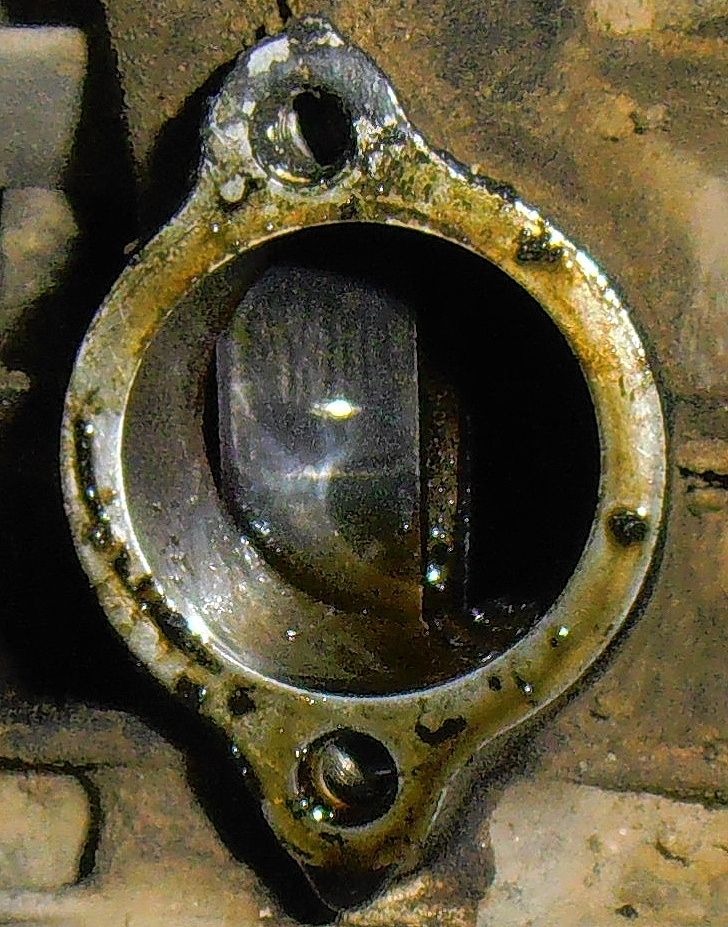
Here's 2 pics of the metal guide behind the tensioner. The pics show how much movement there is from left to right, kind of like how a windshield wiper moves- it's attached on some pivot point below, and the top has movement like it's not attached, but floating. And the whole plate can be pushed inward an inch and three quarters. When I jamb it hard with my finger it makes a metal clacking sound that sounds very similar if not the same that I hear when it's running under load. I think this is the source of the noise but I don't know why it's happening yet.


scootComment
-
Scoot, as you can see in the pic that Marty parted of the chain guide a few posts ago, that is what you see through the hole.
In the pic the left side points up and the top side of the pic faces forward. The part that faces forward is a metal tounge that acts as a barrier for the tensioner to ride against. The guide is supposed to move in and out to account for the wearing of the chain over time just like the travel of the tensioners plunger.Nathan
KD9ARL
μολὼν λαβέ
1978 XS1100E
K&N Filter
#45 pilot Jet, #137.5 Main Jet
OEM Exhaust
ATK Fork Brace
LED Dash lights
Ammeter, Oil Pressure, Oil Temp, and Volt Meters
Green Monster Coils
SS Brake Lines
Vision 550 Auto Tensioner
In any moment of decision the best thing you can do is the right thing, the next best thing is the wrong thing, and the worst thing you can do is nothing.
Theodore RooseveltComment
-
Thanks Nate, your description of the photo makes sense. And based on that, the guide feels normal even with that left/ right slack. Maybe it's just time for a new chain, it seems to be at the very end of the adjustment parameter, or not more than 1/16" to go.
I'm going to pull the valve cover again and see if I can ensure that the guide assembly is not worked loose or anything.
scootComment
-
mack
79 XS 1100 SF Special
HERMES
original owner
http://i946.photobucket.com/albums/a...ps6932d5df.jpg
81 XS 1100 LH MNS
SPICA
http://i946.photobucket.com/albums/ad305/mack-055/2.jpg
78 XS 11E
IOTA
https://youtu.be/wB5Jfbp6SUc
https://youtu.be/RaI3WYHSuWA
Have recovery trailer and shop if you breakdown in my area.
Frankford, Ont, Canada
613-398-6186Comment
-
nice video,I learned something today. FOXS-XS11SG
2009 Suzuki V Strom 650,Adventure in Touring,I call her "Smooth" SW Motech engine guard,Coocase top case w/ LED brake and tail lights,20" MRA touring screen w/adjusable bracket,Grip heaters,fender ex-tender,Givi hard sidebags
1980 XS11SG-sold
1999 Vulcan classic-sold
1982 XJ 650-sold
Old is only a state of mind......JohnComment
-
Wow! Mack that's an awesome effort on your part! Your video really explains the whole thing so clearly. Thank you.
The wobble that you demonstrated matches the wobble of my guide. I'm starting to believe that the chain is just worn to the end of its adjustment life, even though the noise came up suddenly. But I'll pull the valve cover again and borrow a boroscope to try to see the bottom end of the guide ass'y. Thanks to your video, I now know what I'm looking for/ at.
If I need to pull the cylinders it opens up a world of possible maintenance; valve guides & seals, cylinder honing, rings replaced...My biggest concern then would be getting the cylinders back over the pistons. Hmm, I'll have to tool up.
scootComment
-
videos worth
a lot of words. Lighting is terrible in my shop right now and I'm not too good with the camera yet but i figured since my motor is apart anyway, it was too easy to just show you what's inside. With 60k miles your chain could very well be an issue. To replace just break the chain at the master link and attach the new one to it and feed it around until you get back to the master link again. I would do this with the cams out myself, but I'm sure others have done it with the cam's in and the cc adjuster in. A good thing to remember is "Never rotate the motor with the cams in, without the adjuster in place!!!!!"
Ever, ever, ever ,evermack
79 XS 1100 SF Special
HERMES
original owner
http://i946.photobucket.com/albums/a...ps6932d5df.jpg
81 XS 1100 LH MNS
SPICA
http://i946.photobucket.com/albums/ad305/mack-055/2.jpg
78 XS 11E
IOTA
https://youtu.be/wB5Jfbp6SUc
https://youtu.be/RaI3WYHSuWA
Have recovery trailer and shop if you breakdown in my area.
Frankford, Ont, Canada
613-398-6186Comment
-
I may be a little ahead of myself, but
if I'm going to replace the cam chain, I'll have questions about how to exactly go about it. First I have to find the right replacement chain and master link. Will it already be the right length, will I need to remove a link to account for the master link? Do I cut the old chain master link pin with a dremel cut off wheel? Where is the best location to do the cutting and attaching, over the chain guide, maybe ahead of the front cam gear? Oh boy, what fun!
scootComment
-
Here's a link for the cam chain and master link, they are all the same length, no need to remove links. This one is supposedly a bit more heavy duty than some of the Chinese ones...
http://www.z1enterprises.com/ListIte...1100+cam+chain
Cut the old chain with a dremel, attach the new one to the end, pull it thru the motor, and attach the master link. You will have to peen the ends of the master link over. There is a special tool to do this or there are "backyard" methods.Last edited by bikerphil; 12-30-2012, 08:41 PM.2H7 (79) owned since '89
3H3 owned since '06
07 Triumph Tiger 1050
"If it ain't broke, modify it"
☮Comment
-
I used the chain recommended by bikerphil. I will now 2nd that recommendation.
The chain in your engine and the replacement chain are both continuous. There is no master link. The easy way to do this is with the proper tooling.

You can source this at lots of places including Z1 or Mike's XS.Marty (in Mississippi)
XS1100SG
XS650SK
XS650SH
XS650G
XS6502F
XS650EComment
-
I don't believe the original chain will have a master link. No biggie, you can just cut it if it is the original. Make sure that you get a replacement chain that does have a master link because I have seen continuous chains on ebay before!Skids (Sid Hansen)
Down to one 1978 E. Stock air box with K&N filter, 81H pipes and carbs, 8500 feet elevation.Comment
-
Thank you for the cam chain recommendations. The master link will replace one link if the new chain is a continuous chain, or becomes an additional link if the chain is open, right? By the photo on the Z1 website it looks to be continuous, needing to be broken open.
Pulling the chain thru via a wrench on the crank, with the auto cam chain tensioner installed, I predict an issue with bringing the chain ends together for the master link: the acct will be at max extension, the chain won't come together close enough, being prevented by the ratchet of the acct. How best to handle this? Hold the free end under tension with a bungee then remove the acct to install the master link? ( Think I read that somewhere.)
Thank you all for your help.
scootComment

Comment