Announcement

Collapse
No announcement yet.

HID Conversion: New Info 2012

Collapse
X
 
  • Filter
  • Time
  • Show
Clear All
new posts

  • #61
    Lens

    Oh,
    so if anyone wants to attempt this, i have an extra black lens as i bought a set up for an auto.
    1979 XS1100 SF
    1979 XS750 SF

    Previous Rides:
    1981 KZ650CSR
    2006 VTX 1300C
    1986 Radian 600

    Comment


    • #62
      Projector

      Top Cat,
      What size projector did you order? I see there are 2", 2.5", and 3".
      1979 XS1100 SF
      1979 XS750 SF

      Previous Rides:
      1981 KZ650CSR
      2006 VTX 1300C
      1986 Radian 600

      Comment


      • #63
        Hey Conquest,

        It's listed as a 2.5" but that's not the important measurement. The MC specific style are SHORTER front to back, so that they can fit into a small headlight housing. All of the regular car style units are too long front to back to fit inside the 7" round headlight housing. The special MC style is shorter to fit inside the aftermarket housing.

        The ebay seller is MTFansclub, and the unit is listed as a Bi-Xenon HID kit with ballast, has an ANGEL EYE, but we run our headlights all the time, so it's sorta useless, but could still be wired in with the running/tail lights. Their photos are sometimes misleading, they show 2 projectors sitting on the box, but it only has 1 projector in the kit, but you get the projector, kit, ballast, bulb for $59.99 with S&H included...albeit on a slow boat from China and will take 3-4 weeks to get to you. I ordered my CAR units from the same vendor several weeks ago, and they have still not arrived....but I got this one in 4 days because I paid the priority shipping fees!

        I'm just waiting for the 7x6" rectangular units to arrive so that I can take one apart and test fit to ensure that it will fit inside it before I mount it permanently on my special in the 7" round headlight.

        I'll be getting the other performance shots of this new projector soon.

        T.C.
        T. C. Gresham
        81SH "Godzilla" . . .1179cc super-rat.
        79SF "The Teacher" . . .basket case!
        History shows again and again,
        How nature points out the folly of men!

        Comment


        • #64
          Prying

          Yesterday I tried removing my lens. I even heated with a heat gun to melt the glue, but I couldn't get it apart. Heated to 200 and the housing darken at a spot before the glue would soften. Like JBW or something. Any technique used to remove them?
          1979 XS1100 SF
          1979 XS750 SF

          Previous Rides:
          1981 KZ650CSR
          2006 VTX 1300C
          1986 Radian 600

          Comment


          • #65
            Well, I thought I would be in for a little battle when I started in on mine, but they must have been made with a cheaper and less powerful adhesive because I just took a sharp edge like the canopener portion of my Swiss Army Knife, and I just pushed it in between the plastic and the glass, and then just twisted/pryed a little and the whole lens started to separate, I then just used it along the edge at several points to help reduce the localized stress on the glass so that I wouldn't cause a stress crack, and it separated fairly easily!

            They have a groove in the plastic and the glass is shaped with a lip that fits into that groove. But I guess depending on which factory in CHINA they are made may determine which type of glue they use, and how hard it will be to separate it.

            So...all I can say is to take something with a fine sharp edge that you can wedge in between the plastic and glass, you may need several to wedge at the same time, and try to pry it apart? OR you can take a dremmel and cut a small space between the glass and plastic case to allow more room for the wedges. You'll be able reseal it with either clear Silicone or such. Good Luck, let me know how it goes, also what the brand or where you got them from for the database for folks that may procure these in the future.

            T.C.
            T. C. Gresham
            81SH "Godzilla" . . .1179cc super-rat.
            79SF "The Teacher" . . .basket case!
            History shows again and again,
            How nature points out the folly of men!

            Comment


            • #66
              Update.

              Hey there folks,

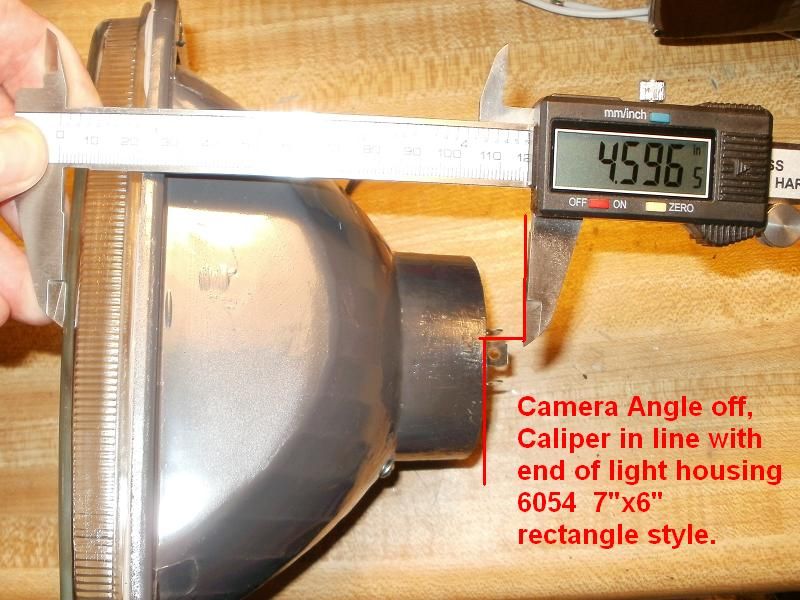
              Okay, finally got the 7"x6" rectangular reflector /combo pseudo projector housings in as well as the larger 3" diam. projectors for my CAR/SUV. Took some measurements, and the rect. reflector housing is deeper than the 7" round combo housing, so there will be no worries about being able to mount the MC specific short front to back length mini projector into either housing. And with the rect. housing you won't have to cut the large thick silicone washer any thinner, it will fit with plenty of room.

              Here's the photo of the housing with the caliper...the camera angle wasn't quite right but the caliper WAS at the end of the housing, not the end of the bulb prongs!


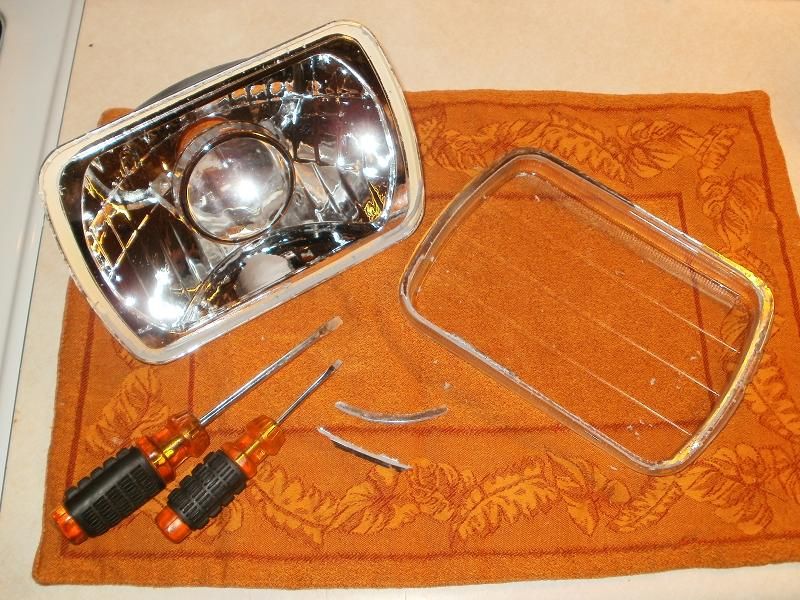
              Okay, as I stated earlier, these seemed to be glued together with a stronger glue. I took the advice of some other forums I had read about disassembling the AUTO car headlight housings by baking them in the oven at 300 degrees for 10 minutes...so I did!

              Took it out, and used a very small flat screwdriver to wedge into the edge at the corner and pry on it enough to get the plastic housing separated away from the glass to be able to wedge the small screwdriver in between the glass and housing. Then I just used a larger flat screwdriver, first tried prying on the glass/housing junction, but the edge of the glass kept chipping, so I finally just stuck the shaft of the blade into the gap, and pushed with it along the seam, and it was able to separate the glass from the housing. Turns out it was the Grey Silicone sealant, rather sticky, but not too tough once you get it separating. Here are the pieces with a few bits of the cured silicone and the 2 screwdrivers. I don't think the 300 heat had much affect on the silicone, but I think it helped to soften the housing to allow it to flex a little bit more.


              That's all for now, I'm having to go on a 1 day medical conference trip some 200 miles out of town on Saturday, leaving at 4 am, then all day there, the driving back home, so won't have any time to play then, but hopefully Sunday I will be able to finalize the mounting onto my bike and show how it looks and performs.

              Gotta review the how to bypass the RLU as well, otherwise because of the low load on the LOW BEAM, the RLU will switch it to the HI BEAM, and I won't have low/hi beam functionality!

              Stay Tuned. T.C.
              T. C. Gresham
              81SH "Godzilla" . . .1179cc super-rat.
              79SF "The Teacher" . . .basket case!
              History shows again and again,
              How nature points out the folly of men!

              Comment


              • #67
                Anxiously awaiting your results TC. Was out in the evening tonight after dark, love to improve on this headlight.
                Life is what happens while your planning everything else!

                When your work speaks for itself, don't interrupt.

                81 XS1100 Special - Humpty Dumpty
                80 XS1100 Special - Project Resurrection


                Previously owned
                93 GSX600F
                80 XS1100 Special - Ruby
                81 XS1100 Special
                81 CB750 C
                80 CB750 C
                78 XS750

                Comment


                • #68
                  Well,

                  I made it back safely, and worked all day on both my car/SUV conversion as well as the bike. CORRECTION, for anyone doing this to their CAR, to separate the sticky glue should only take 200-225 degrees....300 caused some of the protrusions/tabs and such to partly MELT and I lost one of the bolt securing sections to the housing...had to fab up one with some aluminium plate and such!

                  It won't be dark enough for at least another 1/2 hour or so, but I will then be going back out to that dark road and take some performance shots.

                  The HID ballast is rather small, but there's another little box attached to the bulb side that may be a separate booster transformer??? The cords are moderately short, so I mounted the ballast and extra box just on the INSIDE edge of the right headlight ear. I had to run the 3 prong headlight plug to the outside of the bucket...mostly to make room. I also added the transformer for the ANGEL/Ring light just for giggles. I ran the power line under the tank and to the battery side of the starter solenoid, it's a separtely fused line. Located the relay just on the front inside edge of the gas tank slot.

                  A pleasant surprise was after I had it all installed and wired up, I fired up the bike, and the headlight came on....but so did the RLU warning light. The HI-LO beam function still worked. SO....aside from the annoying headlight warning light being on, I won't have to bypass the RLU afterall. The controlling relay doesn't need much power, and apparantly since there's still 12 volts going thru the LOW BEAM side, it properly triggers the HID control/relay, but because there's very little load on the low beam circuit, the RLU thinks it's burned out..but it DOESN'T stop/cut out the low beam power, it supposedly just sends less power to the HI beam circuit. I can pull the warning light bulb which may be easier than bypassing the RLU.

                  The combo reflector isn't quite the same 7" round size as our OEM reflector!
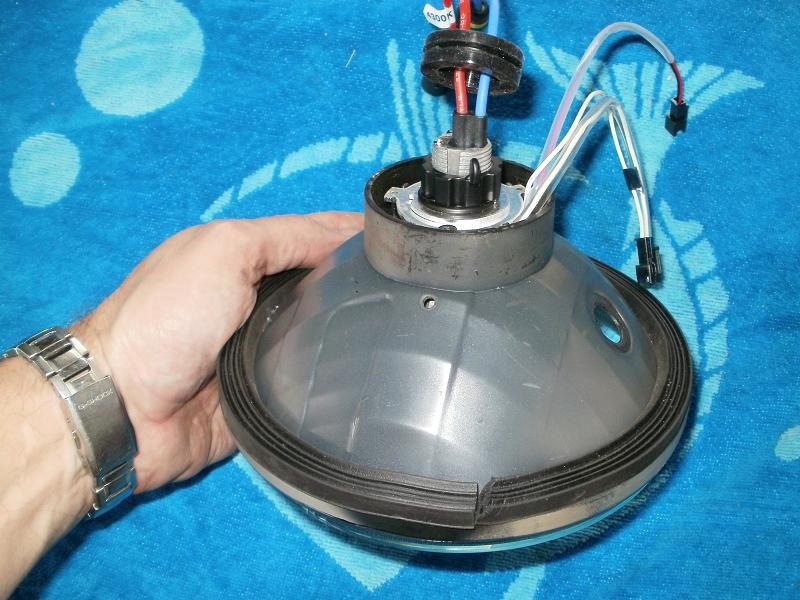
                  It also doesn't have the notches in the backside to help in aligning the right side up. I put a ring of weatherstripping on the backside of the reflector housing which allowed enough depth to provide some tension to the securing ring screws. The ring partially slid around/over the part of the edge of the reflector, but it won't slide OUT/Thru the ring, so I was still able to install it.

                  Later I may try to find something to make a ring/gasket/lip around the front edge of the reflector so that the securing ring will fit all around without trying to slip around/passed the edge.

                  Okay, it's DARK out, will return in a few!
                  T.C.
                  T. C. Gresham
                  81SH "Godzilla" . . .1179cc super-rat.
                  79SF "The Teacher" . . .basket case!
                  History shows again and again,
                  How nature points out the folly of men!

                  Comment


                  • #69
                    Photo Time

                    Well,

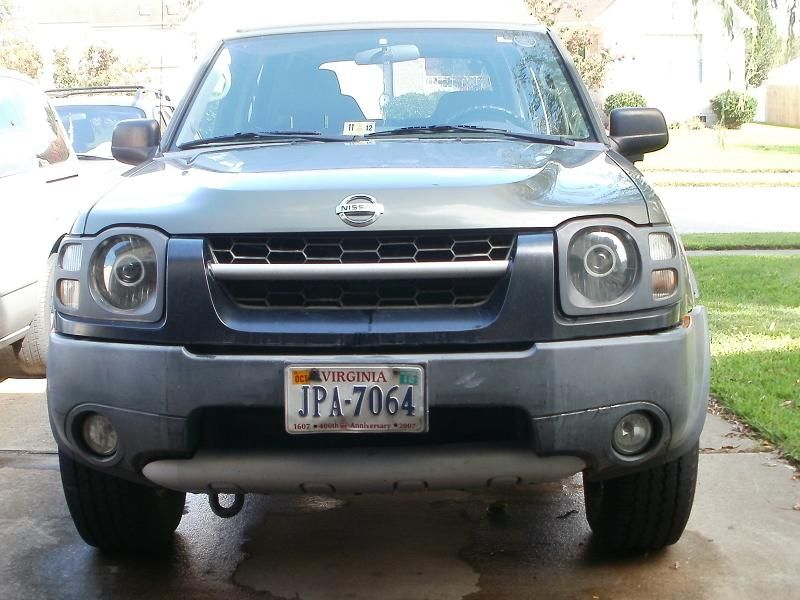
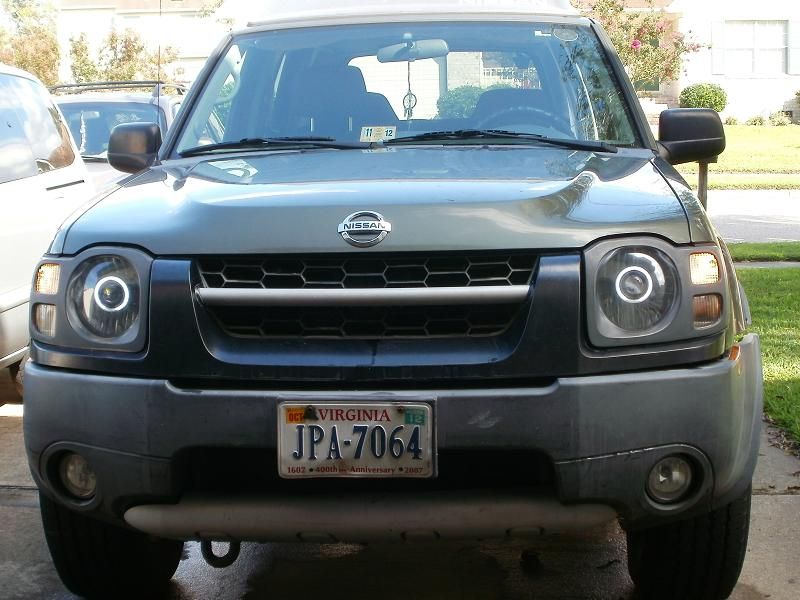
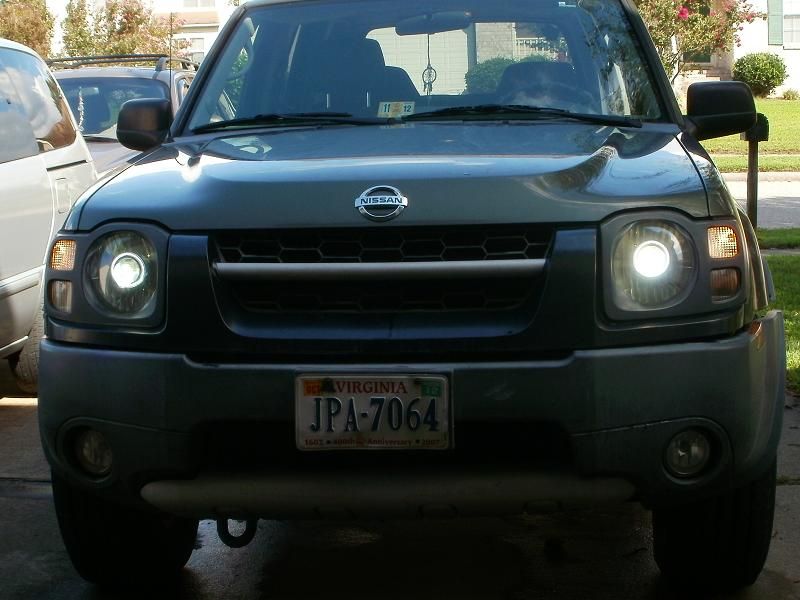
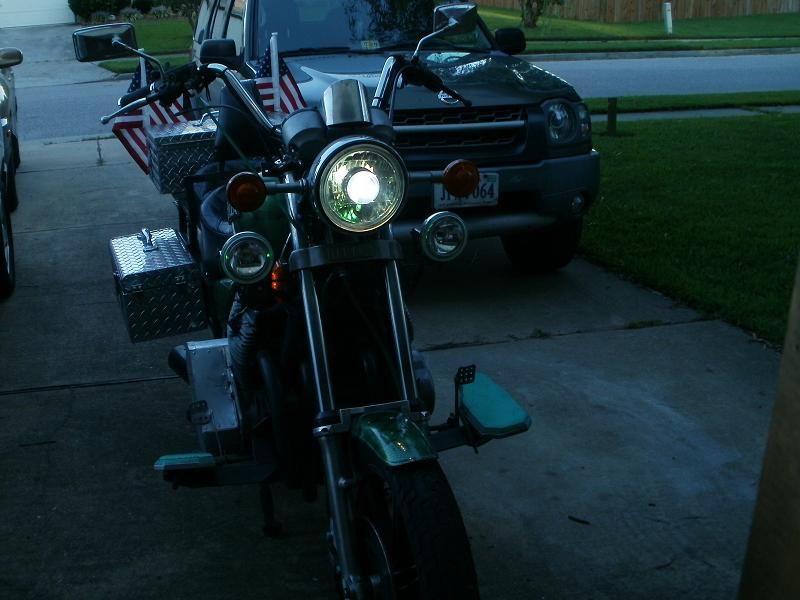
                    First are the photos of the SUV, I set the 3rd one down a few f-stops to try to show the lights instead of just a bunch of glare.


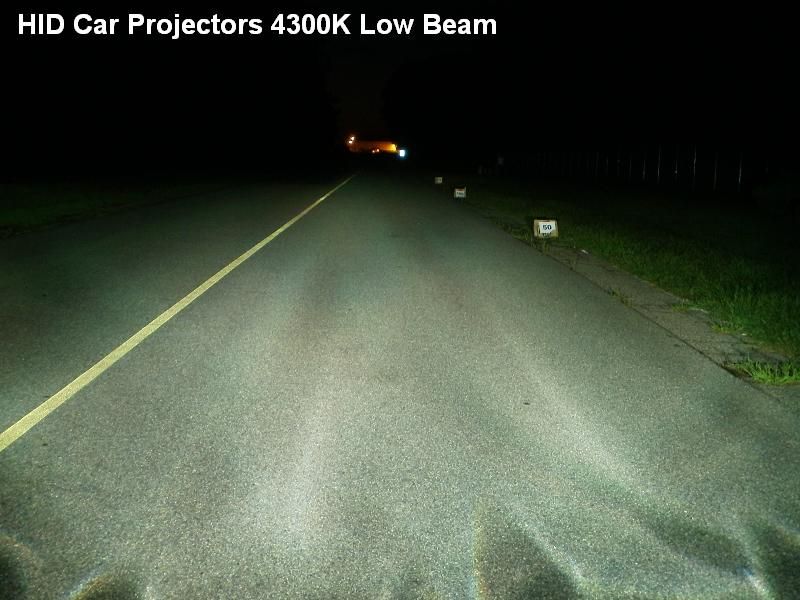
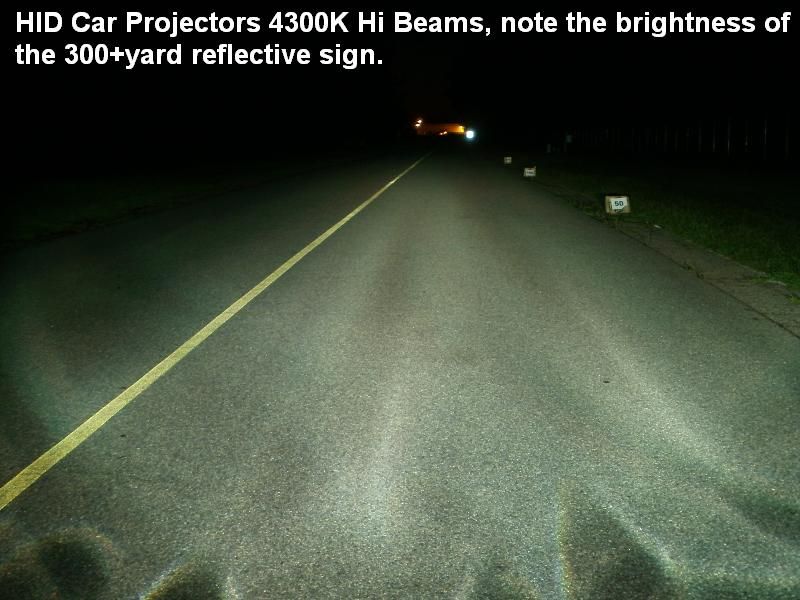
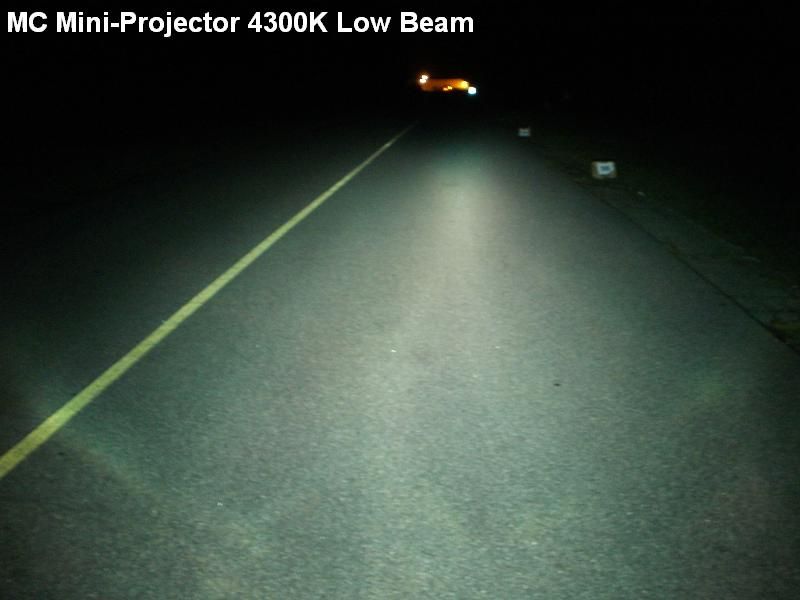
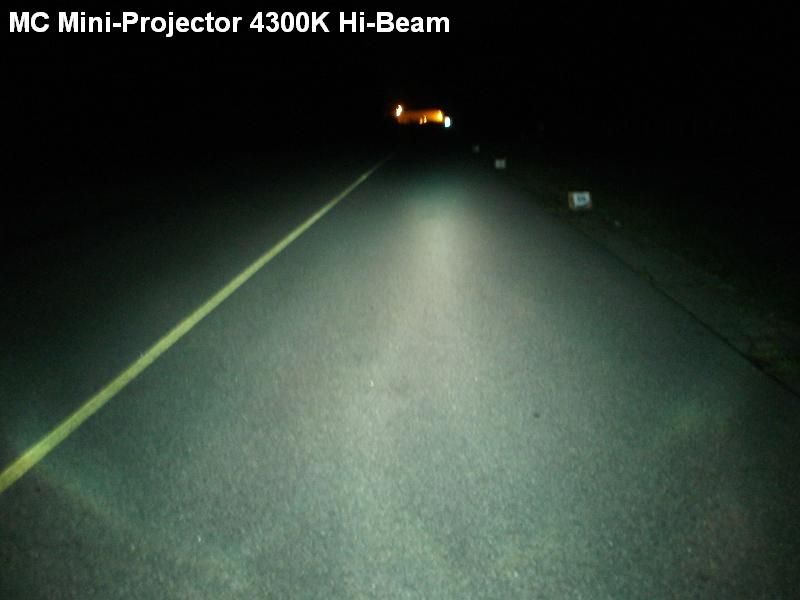
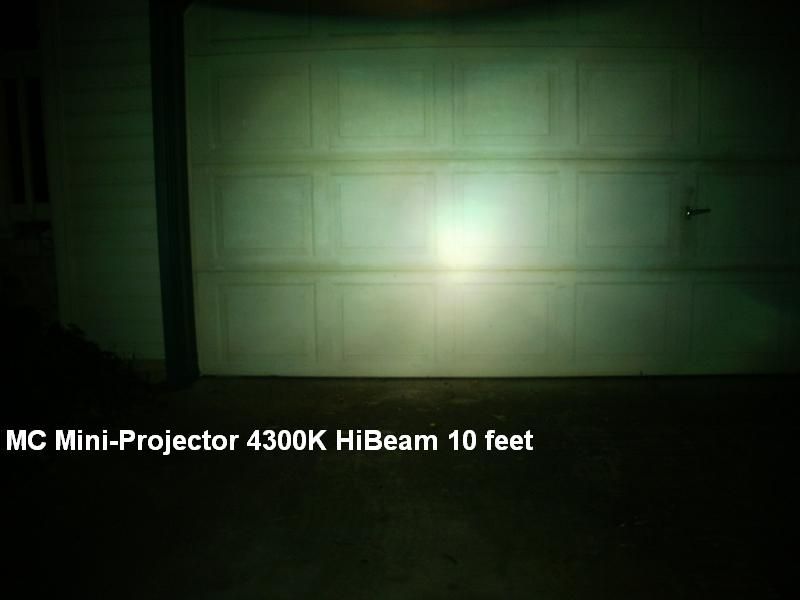
                    And here's the Dark Road performance. Note that the light is much whiter, not so BLUE..these are the 4300K pure White bulbs, not blue!


                    Here's the reflector housing with the band of weatherstripping around the back side!


                    Here's a shot of the bike with both the Angel eye and the HID working.


                    Here are the Dark Road shots to the best of my/camera's ability to approximate what I could see with my eyes, again, no tripod, so a little blurry!


                    So...I think it does provide a brighter light than the OEM Halogen, but with perhaps the metal domed HID bulbs MindWebs mentioned in the OEM projector, that you might get similar performance to the actual Mini-Projector mounted in the Combo/converted clear projector, and you "may" get the desired horizontal cutoff?? YMMV.

                    T.C.
                    T. C. Gresham
                    81SH "Godzilla" . . .1179cc super-rat.
                    79SF "The Teacher" . . .basket case!
                    History shows again and again,
                    How nature points out the folly of men!

                    Comment


                    • #70
                      TC, thanks for posting the results, looks very promising to me!

                      I have the same type bulb that MindWebs posted. I had it mounted in the OEM headlight assembly. That was the setup that made it very blinding to an oncoming car.

                      The only real concern I had with my setup was the effect on an oncoming car. To replicate the situation, I parked my bike at the end of my driveway, maybe 70 feet from my car, and had my car parked facing the bike. With the bike headlight on, I sat in my car, all I could see was the blue ball of light in front of me. So I would be interested in a similar test on the setup you now have.
                      Life is what happens while your planning everything else!

                      When your work speaks for itself, don't interrupt.

                      81 XS1100 Special - Humpty Dumpty
                      80 XS1100 Special - Project Resurrection


                      Previously owned
                      93 GSX600F
                      80 XS1100 Special - Ruby
                      81 XS1100 Special
                      81 CB750 C
                      80 CB750 C
                      78 XS750

                      Comment


                      • #71
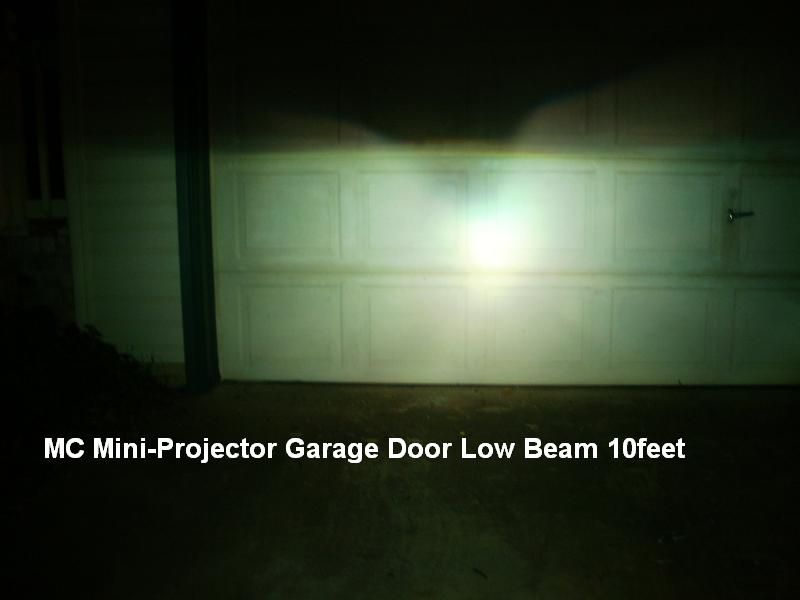
                        Hi T.C. Those pics of the new projector beam spread on the garage door look like you're still getting a bit of light scatter above the low beam cutoff line. Still, it's an improvement on the original halogen reflector.

                        I think you may still have to bypass the RLU, though. When I initially installed my HID kit, I had the same symptoms as you experienced with the warning light glowing when the lights were turned on. It wasn't till I took the bike for its first run to work that the RLU started to play games, changing beams all by itself while riding along. I ended up just pushing the headlight down till I got home from work to do the bypass operation.
                        Though the RLU design only sends limited voltage to the original halogen headlight, these kits have a relay in the harness, which if selected by the RLU, will switch beams and the relay supplies full power through to the light, which makes for a very awkward situation when it happens on the road.
                        79 SF Special W/ Stock all original motor @ 384,000klms
                        Stock exhaust, stock airbox, XJ sump, 78E carbs, Xs1100RH seat, Bosch superhorns, 5/8ths front M/c, braided lines, sintered SBS pads, drilled discs, progressive springs, 8" 50w HID headlight 4300K, 2 x 50w HID spiral driving lights, KONI shocks, Spade fuse box
                        *Touring mode - Plexistar 2 screen, Gearsack rack & bag & saddlebags, homebuilt towbar
                        *"The Keg"- UC torana hubs, XS11 discs, Tokico 4 spot calipers

                        Comment


                        • #72
                          TC, as for bypassing the RLU, it is very simple. I am certain you already know this, but you could simpl make up a jumper wire with the correct ends to fi the wirnign harness terminals, plug it in, then pack the rest of the connector with di-electric grease and wrap in electrical tape.

                          If your considering it permanent (which I did) you can simplet cut the wires off the RLU to use the factory harness connector, connect the two wires as you see fit, then pull the rest out of the connector, then add di-electric and tape.
                          Life is what happens while your planning everything else!

                          When your work speaks for itself, don't interrupt.

                          81 XS1100 Special - Humpty Dumpty
                          80 XS1100 Special - Project Resurrection


                          Previously owned
                          93 GSX600F
                          80 XS1100 Special - Ruby
                          81 XS1100 Special
                          81 CB750 C
                          80 CB750 C
                          78 XS750

                          Comment


                          • #73
                            Hey Everready,

                            Thanks for that, I had commented about not needing to remove the RLU BEFORE I actually test rode it, just tried it out in the driveway, and it "Seemed" to be working, but once on the road....I was seeing what seemed like a FLICKER, but it wasn't a HI/Low shutter type flicker, more of a BULB illumination? I have it wired directly to the battery essentially, and it's the same mini-ballast that is on the car units, same company, etc., and the car units were rock solid, no flickering. So...I'll probably be doing the RLU bypass just to rule it out.

                            Dgxser, Okay, glad to learn that you had tried/used the shielded/shrowed bulb that Mindwebs had, and that it still caused a lot of scatter/glare! When I went to pick up my distance markers, I left the bike running, and turned around and looked back at the bike. It's a SMALLER spot of light, it's bright...3 times brighter than a regular halogen, but it's a SPOT, not a large flaring glaring light. As noted, the cutoff zone was not quite as long/wide nor as distinct as the car units, not sure if it's because it's a smaller/shorter reflector shell, it has the same cutoff solenoid mechanism.

                            I was able to adjust my car lights to put the cutoff line just below the height of folks heads in cars just in front of me. I think if you aim the mini-projector that low that it will be only lighting the road fairly close to you, however it may still provide decent coverage downrange when on Hi beam? I'll play with it a little more later this week/weekend. As to trying to get some photos, not sure how well my cheap point/shoot camera will work, I'll try to remember to bring the tripod!

                            Now, I gotta look to see WHERE the RLU is!

                            T.C.
                            T. C. Gresham
                            81SH "Godzilla" . . .1179cc super-rat.
                            79SF "The Teacher" . . .basket case!
                            History shows again and again,
                            How nature points out the folly of men!

                            Comment


                            • #74
                              RLU is right in front of the reg/rect.
                              Nathan
                              KD9ARL

                              μολὼν λαβέ

                              1978 XS1100E
                              K&N Filter
                              #45 pilot Jet, #137.5 Main Jet
                              OEM Exhaust
                              ATK Fork Brace
                              LED Dash lights
                              Ammeter, Oil Pressure, Oil Temp, and Volt Meters

                              Green Monster Coils
                              SS Brake Lines
                              Vision 550 Auto Tensioner

                              In any moment of decision the best thing you can do is the right thing, the next best thing is the wrong thing, and the worst thing you can do is nothing.

                              Theodore Roosevelt

                              Comment


                              • #75
                                Final Update!

                                Okay, I'm back!

                                Got the bike out, pulled the seat and gastank to get to the RLU, pulled and jumped the Blue/Black and Blue/Yellow wires together, worked just fine.

                                I also did some other stuff, see the FIAMM horns thread!

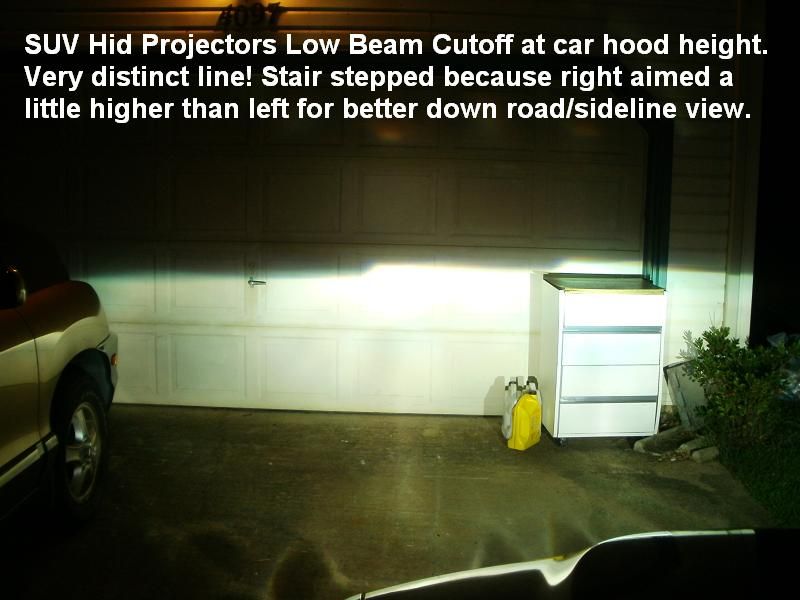
                                Realized that I didn't post the CAR cutoff lines on the garage wall with the projectors, so here it is, set as hood height as you can see by the Sante Fe in the driveway!


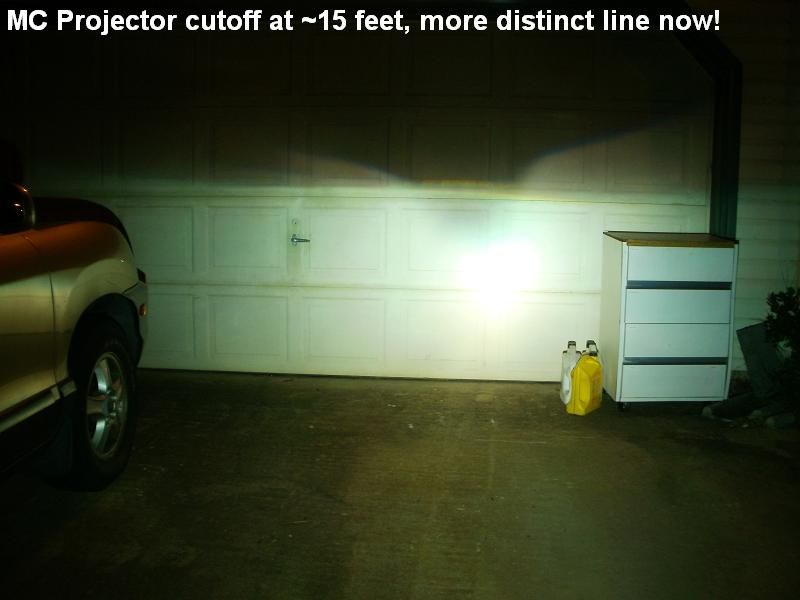
                                Okay, took another shot of the cutoff line on the MC Projector from a few more feet away, it seemed to be a bit more defined, yes, you can still see a "little" flare but it is quite distinct.


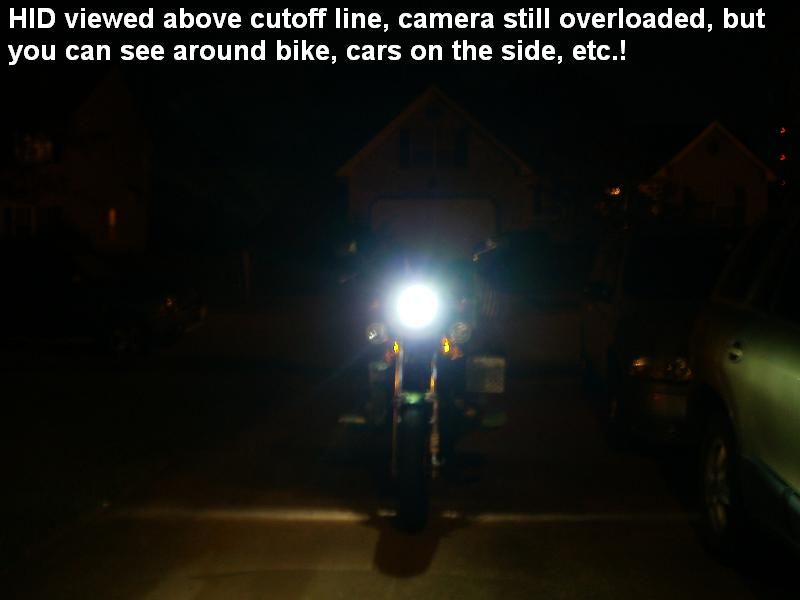
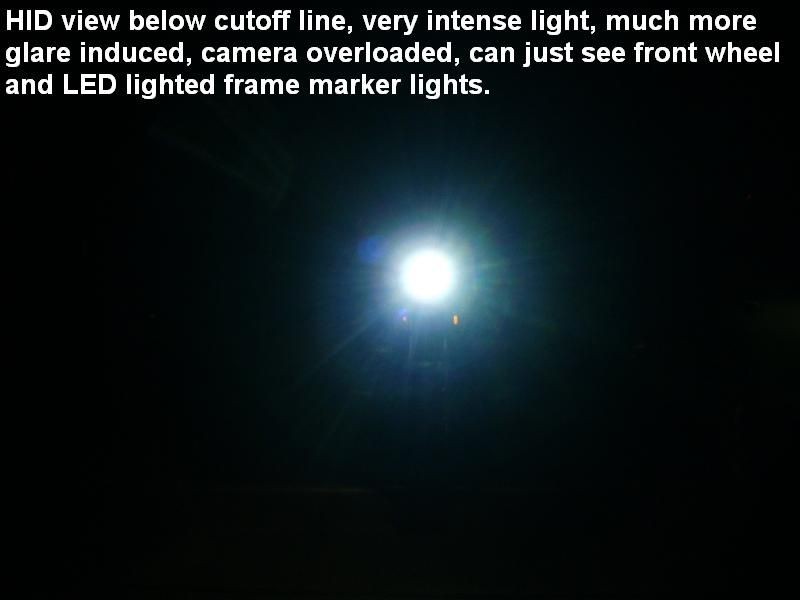
                                I also "tried" the kind of shots DGXSer was looking for, a car's view of the bike and headlight, so here they are to the best of my and my pathetic cameras ability. I commented on the photo, but here's the description as well. First shot is viewed from ABOVE the cutoff line...essentially in the dark zone, and even though the headlight still "looks" like it's glary, it really isn't, it's overloading the camera....NOTE you can see the cars in the driveway, and the details of the bike and such, and I had the F-stop adjusted as dark as it would go.


                                This view is down below the cutoff...much more glaring.....it's a very bright light, and note that you can NOT see anything else around except the light, but this is NOT where folks will be viewing it sitting in their cars at seat/hood height!


                                So...I hope this helps and possibly will give you confidence in doing this MOD to get a more legal looking and less overall glaring HID headlight on your bike!

                                T.C.
                                T. C. Gresham
                                81SH "Godzilla" . . .1179cc super-rat.
                                79SF "The Teacher" . . .basket case!
                                History shows again and again,
                                How nature points out the folly of men!

                                Comment

                                Working...
                                X