 Tweet
Tweet
You might find an old shock absorber (from a car or truck) that has a good dust shield you can use for a sleeve.
-
Marty (in Mississippi)
XS1100SG
XS650SK
XS650SH
XS650G
XS6502F
XS650E -
Pretty much what happens on thin metals with a wire feed. If you have the tanks, torch and rod(no hangers please), torch welding the break making a heavy wide bead, not worrying bout isolating heat, then cooling on its own will get you lasting results. Had both my pipes fracture after coming off an extra high curb to street, two-up a year after buying my Venturer new. At my work, run the stick welder leads out the window, made several tac-welds while in place and then removed both exhaust. Took them in shop and torch welded them, as this spread the heat over a larger area. After cooling off, smoothed up the weld with a sand disc on an angle-head grinder, leaving the weld hump of course. That fix survived me and two other PO's before I ended up with it back some 14yrs. later. For nicer looks, since the left-side muffler section underside chrome was getting pin-holes in it, I have since replaced the left side with a complete with heat shields, clamps and gaskets NOS some 4yrs. ago. Right side still looks like new and weld all the way around is as it was the day I did it. Several years back when I had exhaust off doing the tranny fix, I painted that area with DuplicolorHighTempSilver. No dicoloration and still looks like when first painted. That was just my experience T.C., so results may vary. FWIW, am certified welder up to and including 1" thickness.Last edited by motoman; 12-09-2012, 07:58 PM.81H Venturer1100 "The Bentley" (on steroids) 97 Yamaha YZ250(age reducer) 92 Honda ST1100 "Twisty"(touring rocket) Age is relative to the number of seconds counted 'airing' out an 85ft. table-top.Comment
-
Marty/Motoman,
I've got some 1.5" and 1.75" pipe stock that I have left over after my previous exhaust project, so I'm hoping that some of that will fit.
I don't have a torch welding rig or experience ; do have both wire feeder and TIG.
Was thinking of cleaning it up with the grinder first, then wire the original fracture, then TIG the sleeve over both pieces.
What do you think about possibly using Stainless Steel for the sleeve? I've heard that it's even more brittle/fragile than mild steel, but it wouldn't RUST as easily/quickly.
Thanks for the input, will see what happens next weekend.
T.C.T. C. Gresham
81SH "Godzilla" . . .1179cc super-rat.
79SF "The Teacher" . . .basket case!
History shows again and again,
How nature points out the folly of men!Comment
-
One bad thing about using gas welding is the greater heat put into the piece will discolor the chrome for a considerable distance from the weld. Probably further than what the heat shield will cover...Fast, Cheap, Reliable... Pick any two
'78E original owner - resto project
'78E ???? owner - Modder project FJ forks, 4-piston calipers F/R, 160/80-16 rear tire
'82 XJ rebuild project
'80SG restified, red SOLD
'79F parts...
'81H more parts...
Other current bikes:
'93 XL1200 Anniversary Sportster 85RWHP
'86 XL883/1200 Chopper
'82 XL1000 w/1450cc Buell, Baker 6-speed, in-progress project
Cage: '13 Mustang GT/CS with a few 'custom' touches
Yep, can't leave nuthin' alone...Comment
-
Sorry I haven't been posting in a few days, been real busy.
-Steve, I'm not so worried about the cosmetics as to the functionality of the repair.
-TC, I'll try to take the heat sheilds off tonight and get some measurments and pics to give you a better idea of what we're going to be dealing with. (also, glad the Mrs. is home and doing better.)
Update on the stumble, I swapped out the other good coil from the G and I also opened up the idle mix screws a few more turns, no change. The stumble/surge is still there. Really noticable around 3.5-4K steady throttle.
I'm really thinking it's a lean issue like she's starving for fuel. Maybe I need to check the actual fuel heights instead of just the float heights. Maybe the petcock filter screens are clogging up, thus restricting fuel too. JAT.
The plugs are looking really whitish and the MPGs are up near 37-39, even with my 70+mph commute.
Yesterday I experienced my first vacuum lock on the gas tank. Got about half way to work and she just fizzled right out, no power, like I had broken pick up wires. Pulled off the road, check the tank level and I had 1/2 a tank, she fired right up and got me to work. Happened on the way home twice, both times, I opened the tank and she ran okay. (still had the stumble though)
SO, I've got to pull the tank cap off an give it a good cleaning.Hi, my name is George & I'm a twisty addict!
80G (Green paint(PO idea))
The Green Monster
K&N A/F, TC's fuse block, '81 oil cooler, TC's homemade 4-2 w/Mac Mufflers, Raptor 660 ACCT
Got him in '04.
bald tire & borrowing parts
80SG (Black w/red emblems & calipers)
Scarlet
K&N A/F, TC's fuse block, WJ5, Shoei bags, Raptor 660 ACCT.
Got her in '11
Ready for the twisties!
81H (previously CPMaynard's)
Hugo
Full Venturer, Indigo Blue with B/W painted tank.
Cold weather rideComment
-
NOT the gas cap.
Rode to work this morning with the tank cap loose the whole ride and it died on me again.
So, on the side of the road, I switch to prime and it seemed to run a whole lot better, at least for the last 5 miles to work.
Maybe the petcock screens are the culprit and prime seems to get enough flow to the carbs.
Background: A long while back, I took the octy off and t'd the prime and regular lines together and ran them down to the carb inlets. (no in-line filters )
)
Can't work on her tonight, so Friday afternoon I'll tear her apart again.
Also got to take the pipes off so I can transport them cross town to TC'sHi, my name is George & I'm a twisty addict!
80G (Green paint(PO idea))
The Green Monster
K&N A/F, TC's fuse block, '81 oil cooler, TC's homemade 4-2 w/Mac Mufflers, Raptor 660 ACCT
Got him in '04.
bald tire & borrowing parts
80SG (Black w/red emblems & calipers)
Scarlet
K&N A/F, TC's fuse block, WJ5, Shoei bags, Raptor 660 ACCT.
Got her in '11
Ready for the twisties!
81H (previously CPMaynard's)
Hugo
Full Venturer, Indigo Blue with B/W painted tank.
Cold weather rideComment
-
I'm an idiot!
Okay so I go out to the parking lot after work and she's not idling well.
I look under at the fuel lines and one on each side are kinked.
Put one petcock on prime and the other to on and the whole ride home is just fine.
I still have the stumble, but that's all.Hi, my name is George & I'm a twisty addict!
80G (Green paint(PO idea))
The Green Monster
K&N A/F, TC's fuse block, '81 oil cooler, TC's homemade 4-2 w/Mac Mufflers, Raptor 660 ACCT
Got him in '04.
bald tire & borrowing parts
80SG (Black w/red emblems & calipers)
Scarlet
K&N A/F, TC's fuse block, WJ5, Shoei bags, Raptor 660 ACCT.
Got her in '11
Ready for the twisties!
81H (previously CPMaynard's)
Hugo
Full Venturer, Indigo Blue with B/W painted tank.
Cold weather rideComment
-
Hey George,
I wouldn't worry too much about trying to tune it UNTIL we get the exhausts fixed....them leaking would cause a lean condition like you reported!
Yeah kinked lines can cause some flow problems, but you really should look into putting some inline fuel filters on soon otherwise you may be clogging up the float valve screens!?
From what I saw of your fractures...I think it would be better to leave them on the bike so we can clean/grind of the old weld stuff, then TACK them in several spots first to get the proper position/alignment and THEN take them off...otherwise it could be difficult to ensure proper positioning during the re-welding process if they are totally loose/separate!
I hope the weather warms up a little for the weekend, would like to at least fire up Godzilla a bit and maybe let you take it for a little run now that you're a bit more experienced in riding a special!
Just measure the OD of the pipes at or near the fracture to see if it's close to the 1.5 to 1.75" range since I have sections that will fit over both sizes.
I was just wondering though how much space/room there is between the heat shield and the pipe....the sleeve will add some OD thickness and would hate to cause a vibration or contact point!?
T.C.T. C. Gresham
81SH "Godzilla" . . .1179cc super-rat.
79SF "The Teacher" . . .basket case!
History shows again and again,
How nature points out the folly of men!Comment
-
Yeah, I agree with that!Hey George,
I wouldn't worry too much about trying to tune it UNTIL we get the exhausts fixed....them leaking would cause a lean condition like you reported!
I know I should, but I've ran without filters on the G for years, just relying on the petcock screens.Yeah kinked lines can cause some flow problems, but you really should look into putting some inline fuel filters on soon otherwise you may be clogging up the float valve screens!?
There's enough pipe intact right now to hold the two sides together. I've had them off before when I did the valve job, but I see your point about the alignment thing and it would be better to have the bike there to fit them up as we go to make sure it all fits back up right.From what I saw of your fractures...I think it would be better to leave them on the bike so we can clean/grind of the old weld stuff, then TACK them in several spots first to get the proper position/alignment and THEN take them off...otherwise it could be difficult to ensure proper positioning during the re-welding process if they are totally loose/separate!That would be cool! Saturday is supposed to be warmer than Sunday, but I'm free either day, so whatever your schedule dictates. I'll baby it over there so the bike doesn't get too hot and shouldn't take too long to cool enough to get the pipes off.I hope the weather warms up a little for the weekend, would like to at least fire up Godzilla a bit and maybe let you take it for a little run now that you're a bit more experienced in riding a special!
We'd have to cut the rest of the joint off in order to get the sleeve on. I haven't had a chance to measure the OD yet. It's a stock setup, so it should be 1.5" I believe.Just measure the OD of the pipes at or near the fracture to see if it's close to the 1.5 to 1.75" range since I have sections that will fit over both sizes.
I was just wondering though how much space/room there is between the heat shield and the pipe....the sleeve will add some OD thickness and would hate to cause a vibration or contact point!?
T.C.
The heat shield gets bolted to the pipe with a little nut welded on the pipe, so there should be enough room, if not then I'll clamp them on.Hi, my name is George & I'm a twisty addict!
80G (Green paint(PO idea))
The Green Monster
K&N A/F, TC's fuse block, '81 oil cooler, TC's homemade 4-2 w/Mac Mufflers, Raptor 660 ACCT
Got him in '04.
bald tire & borrowing parts
80SG (Black w/red emblems & calipers)
Scarlet
K&N A/F, TC's fuse block, WJ5, Shoei bags, Raptor 660 ACCT.
Got her in '11
Ready for the twisties!
81H (previously CPMaynard's)
Hugo
Full Venturer, Indigo Blue with B/W painted tank.
Cold weather rideComment
-
George,
With the sleeve, we wouldn't necessarily need to cut the OEM apart!
We could cut the sleeve in half lengthwise, and then just reweld it along the seam, as well as at the ends to the other sections....should still be just as strong, and would preserve the remaining OEM section!
I've heard that the weather is supposed to possibly get WET this weekend, so we'll need to see which day will be the dryest..don't want to try to perform any welding with 100% humidity!
I can do the household grocery shopping in the rain if I have to!")
Another thing I was thinking about with your stutter is if you've checked the vac. adv. plate and actuator for smooth rotation action...that it's not getting hung up with the vac. plunger movement and such. Inspecting, cleaning and relubing would help eliminate that as a problem point.
T.C.T. C. Gresham
81SH "Godzilla" . . .1179cc super-rat.
79SF "The Teacher" . . .basket case!
History shows again and again,
How nature points out the folly of men!Comment
-
For curiosities sake Steve, it didn't. Torch weld is approx. 1/2" wide, ground smooth leaving a nice hump. As for T.C. and the fix, if you end up able the sleeve over, you can TIG another metric nut atop the original three for a bit more clearance. Run the nut up on the bolt a bit, screw that into existing nut and jam other nut against it. Spot weld it in a couple places and remove the bolt before all cools off and trys to sieze itself. That way the threads line up correctly for the two nuts. After all that, a shot of DuplicolorHighTempSilver on things and you'll never see the difference. Have used other assorted high temp brands and Duplicoler is the only one I've found to not yellow or change color from the heat. As I've stated, mine looks the same as when it was sprayed some 4yrs. ago, and you have to get on hands and knees about a foot away before noticing it had ever been broke.......and that was all the way around broke where they normally do just at start of 'collector'.81H Venturer1100 "The Bentley" (on steroids) 97 Yamaha YZ250(age reducer) 92 Honda ST1100 "Twisty"(touring rocket) Age is relative to the number of seconds counted 'airing' out an 85ft. table-top.Comment
-
Hey there Folks,
Okay, George came over yesterday, and we took the pipes off and were surprised at the extent of the damage.....and poor welding jobs!


It appears that the PO just tried to weld them together on the bike (Note clumpy bulky weld on Right Side pipe) as well as the large HOLE left in the LEFT side junction which was against the frame preventing their access!
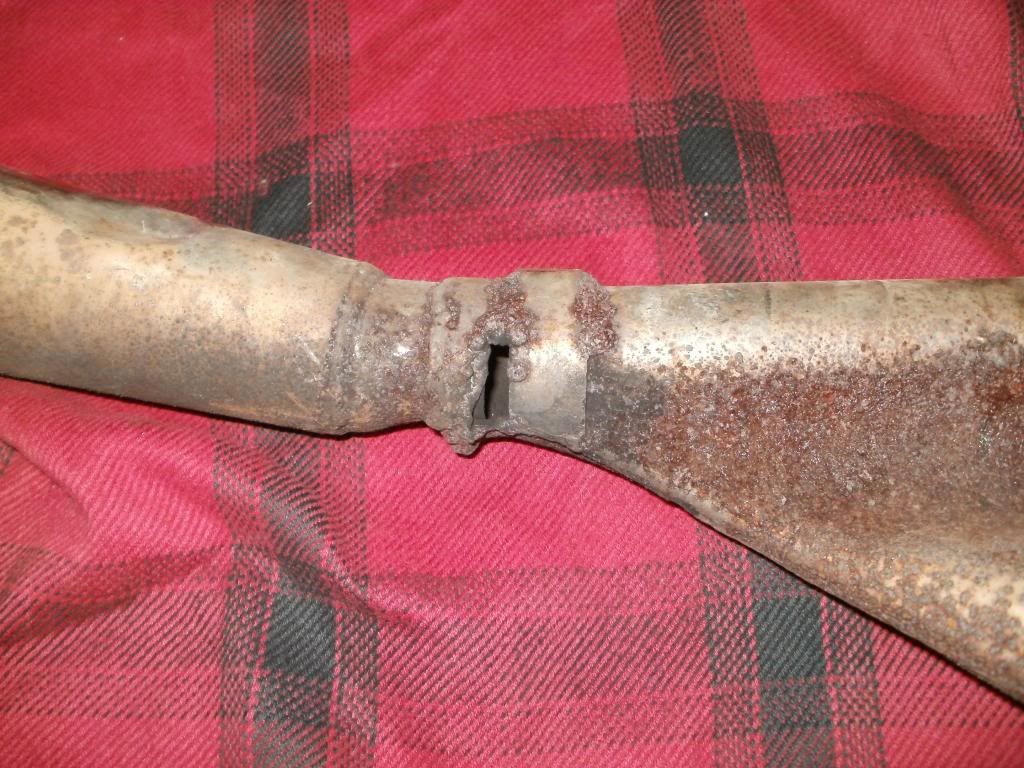
But their welding technique had gotten better by the time they got to the LEFT SIDE, it was still intact and no signs of cracks.
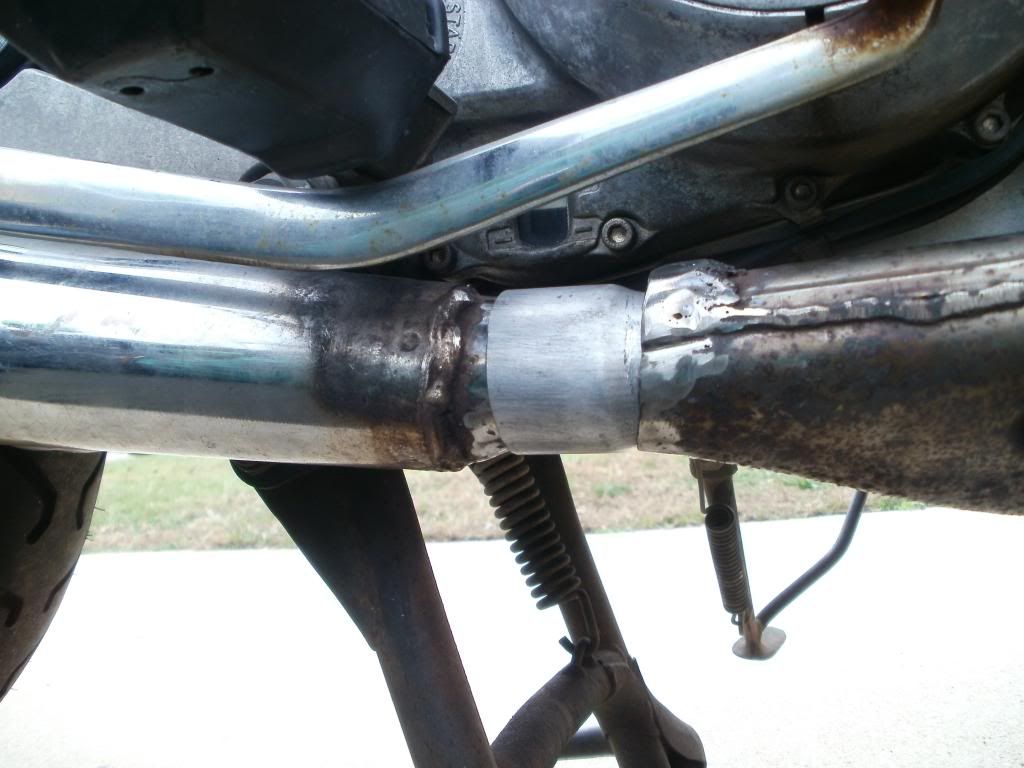
We removed all of the old weld and section of slip joint pipe from the old collector end that was stuck on the muffler end, also cut off the porous poor weld portions on the collector end, then had a nice section of presized 1.50-1.62" pipe that we were able to stick in between as a junction piece.
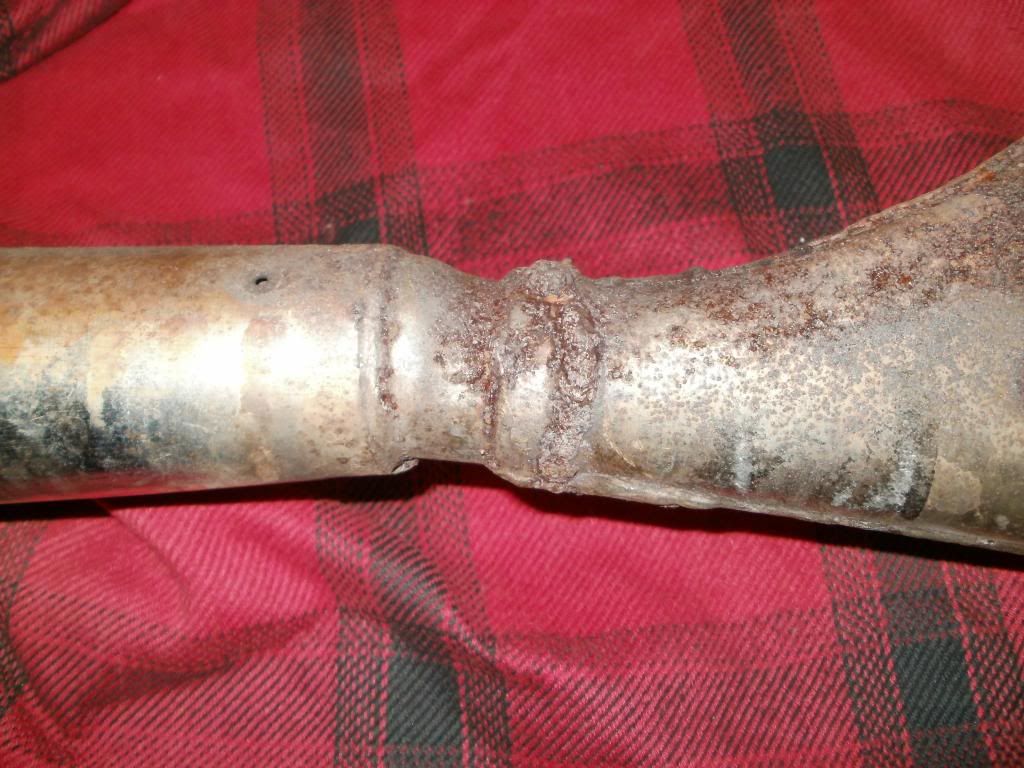
Then we mounted the right side back on the bike, and then placed 4 well spaced tacks onto both sections and the joint, then removed the whole thing, and finished the welding with the wire feeder afterall....needed the ability to FILL in a good bit of space to make the junction sealed!

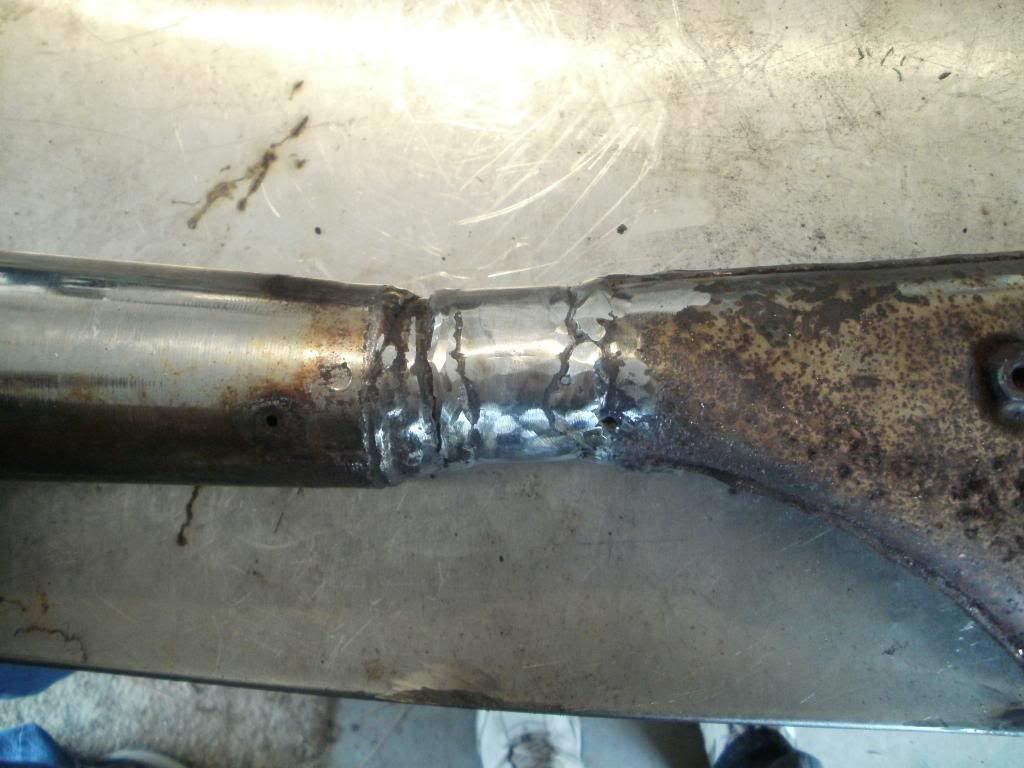
And then we cleaned up the welds and metal on the LEFT side and fashioned a patch and welded it into place....decent job I think!
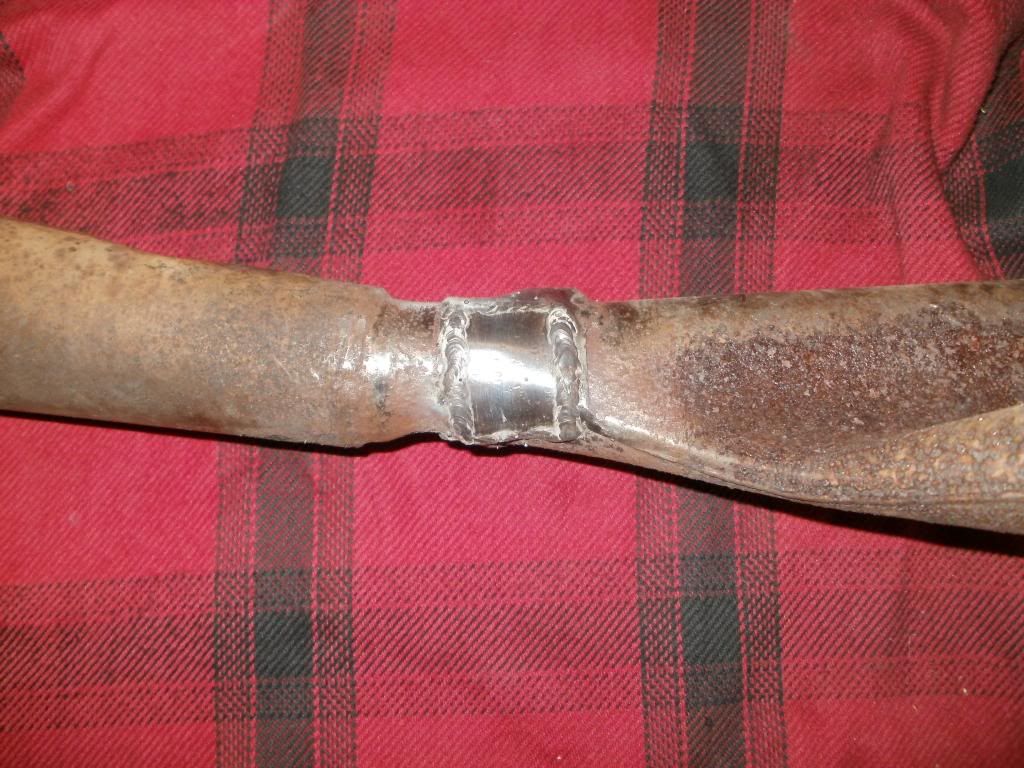
Then put them back on the bike with a great fit! Not a bad job for 3 hours.
Then George mentioned that just for giggles he'd like to do a compression test. Warmed up the bike, then pulled out the gauge, pulled all 4 plugs, turned off the fuel lines, and opened the throttle and took readings, 1-4 respectively!
90, 85, 120, 140
Put some oil into #'s 1 and 2, repeated, same readings!
George said he had repaired a bent valve on #3, but alas, he had not had a lapping tool and so didn't perform a lapping tune up on the other valves... he hadn't thought to ask his fellow Xsives , I had a lapping tool and lapping compound from when I had done my topend rebuild in 2000!
But now we know a little more about why it may not tune or run as well as he would like it to!
Then we took a little ride down the highway on each others bikes..... I'll just say that he was a "little" impressed with Godzilla's throttle response!
T.C.T. C. Gresham
81SH "Godzilla" . . .1179cc super-rat.
79SF "The Teacher" . . .basket case!
History shows again and again,
How nature points out the folly of men!Comment
-
I am sure it was quite a difference from those compression readings to the little big bore of Godzilla!!
Nice job on the welds!Life is what happens while your planning everything else!
When your work speaks for itself, don't interrupt.
81 XS1100 Special - Humpty Dumpty
80 XS1100 Special - Project Resurrection
Previously owned
93 GSX600F
80 XS1100 Special - Ruby
81 XS1100 Special
81 CB750 C
80 CB750 C
78 XS750Comment
-
Nice work there T.C., considering there was nothing there but rust to work with.81H Venturer1100 "The Bentley" (on steroids) 97 Yamaha YZ250(age reducer) 92 Honda ST1100 "Twisty"(touring rocket) Age is relative to the number of seconds counted 'airing' out an 85ft. table-top.Comment
-
The PO's welds are what I like to call "Globular Transfusion"."The Hooligan" XJ1100, Virago Gauge Pods, Screaming Eagle Mufflers, K&N Filter, hand made rear fender, side covers, and solo seat, round bar conversion, small headlight, tail light, and cat eye turn signals, chip fuses, rewired the right way.
Pics: http://s1236.photobucket.com/user/ya...?sort=6&page=1Comment


Comment