Announcement

Collapse
No announcement yet.

Troubleshooting XS wiring, Part 2

Collapse
X
 
  • Filter
  • Time
  • Show
Clear All
new posts

  • Troubleshooting XS wiring, Part 2

    Here's another 'tutorial' to help the 'electrically challenged' among us. I'll talk here about volt-ohm meters (VOMs) and what all the 'stuff' on them means. Part 3 I'll go over how to use one, specifically for our wiring. If you have the owners manual for your meter, be sure and read it thoroughly.

    For most of us, you'll have or will want to get a hand-held meter. There's all sorts out there, you may have one you've inherited, but there's two basic types; the analog meter and the digital meter. Here's a pic of the two types...

    [IMG][/IMG]

    The analog is on the left, the other two are digital. Both types will work for our purposes, but the analog type takes much better attention to reading it to get reasonable accuracy and usually can't match a good digital for that. One advantage analog has over some digital meters is it will 'read' moving values, while most digital meters take a moment to stabilise before giving a reading. I'll talk more about this in a moment. I'm not going to go into the analog type much due to their rarity these days.

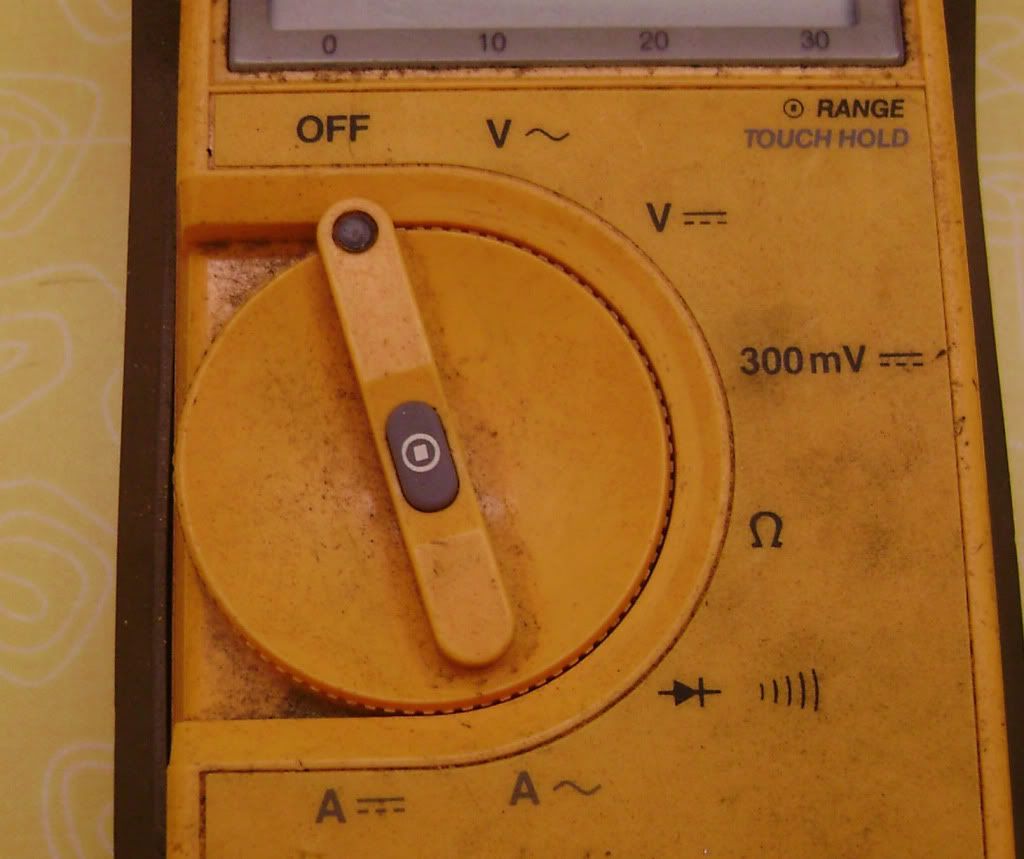
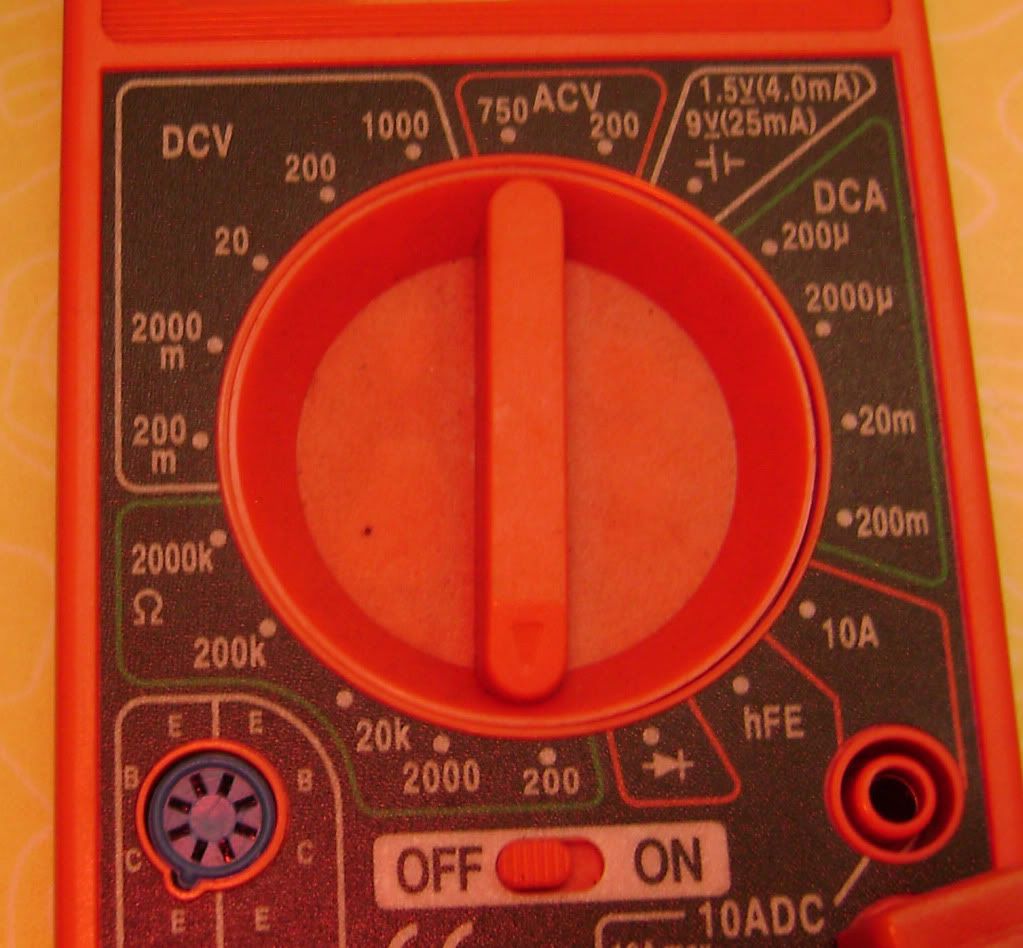
    So how do you 'set' the meter to get readings? Here's pics of the two digital meter selector switches...

    [IMG][/IMG]
    [IMG][/IMG]

    The top meter is a full-manual meter (and a analog meter will be similar); you have to turn the selector switch to the value you want to measure. You do have to take care here on live circuits, as using a wrong setting can kill the meter, such as selecting a 20 volt scale then trying to measure a voltage above that amount. The lower meter is a 'auto-ranging' type; it will automatically select the correct range, although this model also allows manual selection if desired (a very good feature to have). On the red meter, the test positions you'll be using will be the 20 DCV, the 200, 2000, and 20K ohm, the latter two for checking the ignition coils and spark plug caps only. You may also use the diode position once in a while to check the rectifier/regulator and the harness diode on the '80-81 bikes. On the yellow meter, the positions are (clockwise from 'off') AC volts, DC volts, 300 Millivolts, ohms, diode test, and AC then DC amps. Again, you'll be using the DC volts and ohms, and the diode test rarely. The button in the middle of the selector switch is for manually selecting range.

    Ok, What's the reading on the display mean? We'll start with the manual meter...

    [IMG][/IMG]

    In this case, the meter is set to the '200' ohm scale, so you'll get a direct reading in ohms of whatever you're checking as long as it's resistance is under 200 ohms. If it's over that, the display won't change. As you increase the range, the meter won't be able to measure small amounts and a low resistance will show as zero. For 99% of the resistance checks you'll want to do on a bike, this is the scale you'll use. You'll get the best accuracy by using the lowest scale (without going under the measured value) for both ohms and voltage.

    Here's the auto-range meter...

    [IMG][/IMG]
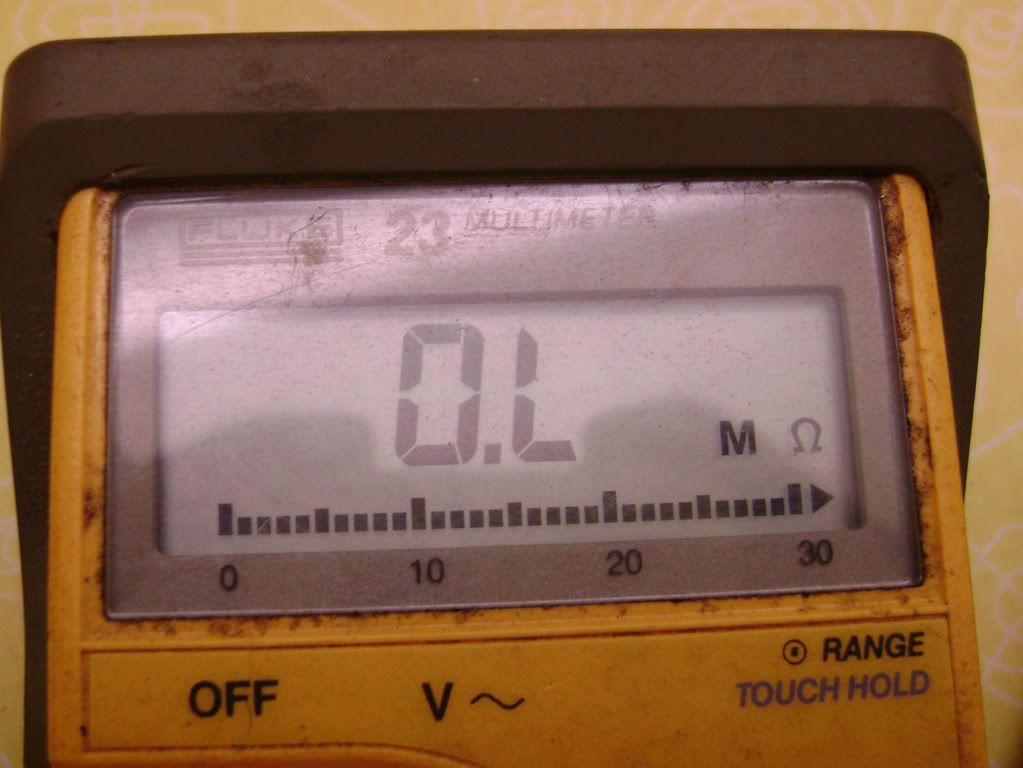
    There's more stuff going on here; first, this meter displays the type of measurement you're making, in this case ohms. It's also putting a 'M' in front of it, which means it's set to measure megohms (millions). A 'K' would mean thousands, no letter is straight ohms. The 'OL' it's displaying means 'open line'. Being an auto-range type, it will automatically switch to a lower scale if it measures a low resistance. The other thing to note is the 'bar' at the bottom of the display; this is a 'analog' graph (giving you the same function as an analog meter for reading moving values), extremely useful to have. Voltage values will be read out directly.

    Using the diode setting. You'll rarely use this unless you're checking a diode, unless you have a meter with an audible tone for testing. These can be used as a continuity tester (get a beep, you have continuity) but be aware that the numbers displayed ARE NOT in ohms; that's the pass-through voltage and when using as a circuit tester they'll usually show zero. To check for resistance, you must use a ohms scale. If testing a diode, typical values will be around .7 volt one direction only if the diode is good.

    Meter accuracy. This is where quality shows when buying a meter. You want a meter with the best 'resolution' you can afford, particularly if measuring resistance. Good quality hand-held meters can measure down to .1 ohm accurately, cheaper meters won't do as well. I'll show why this is important when I explain how to use the meter, but don't let this prevent you from picking one up, as even the cheap ones can be useful. The red meter shown in the pics is a $3 (yep, three) unit from HF that checked very close to my more-expensive Fluke when I first brought it home, but a few months in my damp garage seems to have skewed it's readings some (hey, they warned to keep it dry so my bad), I'll see how it does after it dries out...

    Any questions or comments welcome!
    Last edited by crazy steve; 02-04-2012, 04:07 PM.
    Fast, Cheap, Reliable... Pick any two

    '78E original owner - resto project
    '78E ???? owner - Modder project FJ forks, 4-piston calipers F/R, 160/80-16 rear tire
    '82 XJ rebuild project
    '80SG restified, red SOLD
    '79F parts...
    '81H more parts...

    Other current bikes:
    '93 XL1200 Anniversary Sportster 85RWHP
    '86 XL883/1200 Chopper
    '82 XL1000 w/1450cc Buell, Baker 6-speed, in-progress project
    Cage: '13 Mustang GT/CS with a few 'custom' touches
    Yep, can't leave nuthin' alone...

  • #2
    What, nobody has any comment???
    Fast, Cheap, Reliable... Pick any two

    '78E original owner - resto project
    '78E ???? owner - Modder project FJ forks, 4-piston calipers F/R, 160/80-16 rear tire
    '82 XJ rebuild project
    '80SG restified, red SOLD
    '79F parts...
    '81H more parts...

    Other current bikes:
    '93 XL1200 Anniversary Sportster 85RWHP
    '86 XL883/1200 Chopper
    '82 XL1000 w/1450cc Buell, Baker 6-speed, in-progress project
    Cage: '13 Mustang GT/CS with a few 'custom' touches
    Yep, can't leave nuthin' alone...

    Comment


    • #3
      well if you have made and error I would have but all I can say is good work.
      To fix the problem one should not make more assumptions than the minimum needed.

      Rodan
      https://www.youtube.com/watch?v=khm6...liHntN91DHjHiS
      1980 G Silverbird
      Original Yamaha Fairfing and Bags
      1198 Overbore kit
      Grizzly 660 ACCT
      Barnett Clutch Springs
      R1 Clutch Fiber Plates
      122.5 Main Jets
      ACCT Mod
      Mac 4-2 Flare Tips
      Antivibe Bar ends
      Rear trunk add-on
      http://s1184.photobucket.com/albums/z329/viperron1/

      Comment


      • #4
        Sorry Steve but I already knew the difference between the analog and DMM, so I thought I would pass. It is very informational for those who do not know the difference or how to use them however. A good example of how well the anaolg works would be a link to Randy Rago's site for checking the TCI. That is a single use of the analog that is not obtainable with a DMM. Keep on with your Tutorial as many here do not know how such stuff works and will definetly benefit.
        2-79 XS1100 SF
        2-78 XS1100 E Best bike Ever
        80 XS 1100 SG Big bore kit but not fully running yet.
        Couple of more parts bikes of which 2 more will live!

        Comment


        • #5
          Good job Steve!! BTW, the analog one rocks... been using that very one for over 30 years. Never did like the digital ones, altho I agree they may be more accurate.
          Brian
          1978E Midlife Crisis - A work in progress
          1984 Kawasaki 550 Ltd - Gone, but not forgotten

          A married man should forget his mistakes. There's no use in two people
          remembering the same thing!

          Comment


          • #6
            Originally posted by xssiveone View Post
            Good job Steve!! BTW, the analog one rocks... been using that very one for over 30 years. Never did like the digital ones, altho I agree they may be more accurate.
            A good analogue meter can be very accurate if you know how to use it properly. I just wish I could find a good quality one like I was trained on back in the day. But since most of the ones I can find locally are junk, I'll settle for a quality digital.
            Cy

            1980 XS1100G (Brutus) w/81H Engine
            Duplicolor Mirage Paint Job (Purple/Green)
            Vetter Windjammer IV
            Vetter hard bags & Trunk
            OEM Luggage Rack
            Jardine Spaghetti 4-2 exhaust system
            Spade Fuse Box
            Turn Signal Auto Cancel Mod
            750 FD Mod
            TC Spin on Oil Filter Adapter (temp removed)
            XJ1100 Front Footpegs
            XJ1100 Shocks

            I was always taught to respect my elders, but it keeps getting harder to find one.

            Comment


            • #7
              Originally posted by cywelchjr View Post
              A good analogue meter can be very accurate if you know how to use it properly. I just wish I could find a good quality one like I was trained on back in the day. But since most of the ones I can find locally are junk, I'll settle for a quality digital.
              Cy, you are correct... I should have said "easier to read" rather then "more accurate". Easier to read 45ohm on the screen, rather then look at the needle that is between 40ohm and 50ohm and wonder if it is exactly in the middle or not.
              Brian
              1978E Midlife Crisis - A work in progress
              1984 Kawasaki 550 Ltd - Gone, but not forgotten

              A married man should forget his mistakes. There's no use in two people
              remembering the same thing!

              Comment


              • #8
                One thing that a digital meter will beat most analog meters on every time is determining small amounts; it's pretty hard to see the difference between say, 3.4 ohms and 3.6 ohms or 13.5 and 13.7 volts on an analog meter with certainty. Small amounts I know, but on a 12V nominal system, that can count; definitely much easier for a novice...
                Fast, Cheap, Reliable... Pick any two

                '78E original owner - resto project
                '78E ???? owner - Modder project FJ forks, 4-piston calipers F/R, 160/80-16 rear tire
                '82 XJ rebuild project
                '80SG restified, red SOLD
                '79F parts...
                '81H more parts...

                Other current bikes:
                '93 XL1200 Anniversary Sportster 85RWHP
                '86 XL883/1200 Chopper
                '82 XL1000 w/1450cc Buell, Baker 6-speed, in-progress project
                Cage: '13 Mustang GT/CS with a few 'custom' touches
                Yep, can't leave nuthin' alone...

                Comment


                • #9
                  You can even get those harbor freight meters for free. Every few months that is there free item with purchase coupon. I think I have 6 of them scattered about. Makes a good "oh well I knew I was going to break that" meter.
                  Nathan
                  KD9ARL

                  μολὼν λαβέ

                  1978 XS1100E
                  K&N Filter
                  #45 pilot Jet, #137.5 Main Jet
                  OEM Exhaust
                  ATK Fork Brace
                  LED Dash lights
                  Ammeter, Oil Pressure, Oil Temp, and Volt Meters

                  Green Monster Coils
                  SS Brake Lines
                  Vision 550 Auto Tensioner

                  In any moment of decision the best thing you can do is the right thing, the next best thing is the wrong thing, and the worst thing you can do is nothing.

                  Theodore Roosevelt

                  Comment


                  • #10
                    Originally posted by crazy steve View Post
                    Here's another 'tutorial' to help the 'electrically challenged' among us. I'll talk here about volt-ohm meters (VOMs) and what all the 'stuff' on them means. Part 3 I'll go over how to use one, specifically for our wiring. If you have the owners manual for your meter, be sure and read it thoroughly.

                    For most of us, you'll have or will want to get a hand-held meter. There's all sorts out there, you may have one you've inherited, but there's two basic types; the analog meter and the digital meter. Here's a pic of the two types...

                    [IMG][/IMG]

                    The analog is on the left, the other two are digital. Both types will work for our purposes, but the analog type takes much better attention to reading it to get reasonable accuracy and usually can't match a good digital for that. One advantage analog has over some digital meters is it will 'read' moving values, while most digital meters take a moment to stabilise before giving a reading. I'll talk more about this in a moment. I'm not going to go into the analog type much due to their rarity these days.

                    So how do you 'set' the meter to get readings? Here's pics of the two digital meter selector switches...

                    [IMG][/IMG]
                    [IMG][/IMG]

                    The top meter is a full-manual meter (and a analog meter will be similar); you have to turn the selector switch to the value you want to measure. You do have to take care here on live circuits, as using a wrong setting can kill the meter, such as selecting a 20 volt scale then trying to measure a voltage above that amount. The lower meter is a 'auto-ranging' type; it will automatically select the correct range, although this model also allows manual selection if desired (a very good feature to have). On the red meter, the test positions you'll be using will be the 20 DCV, the 200, 2000, and 20K ohm, the latter two for checking the ignition coils and spark plug caps only. You may also use the diode position once in a while to check the rectifier/regulator and the harness diode on the '80-81 bikes. On the yellow meter, the positions are (clockwise from 'off') AC volts, DC volts, 300 Millivolts, ohms, diode test, and AC then DC amps. Again, you'll be using the DC volts and ohms, and the diode test rarely. The button in the middle of the selector switch is for manually selecting range.

                    Ok, What's the reading on the display mean? We'll start with the manual meter...

                    [IMG][/IMG]

                    In this case, the meter is set to the '200' ohm scale, so you'll get a direct reading in ohms of whatever you're checking as long as it's resistance is under 200 ohms. If it's over that, the display won't change. As you increase the range, the meter won't be able to measure small amounts and a low resistance will show as zero. For 99% of the resistance checks you'll want to do on a bike, this is the scale you'll use. You'll get the best accuracy by using the lowest scale (without going under the measured value) for both ohms and voltage.

                    Here's the auto-range meter...

                    [IMG][/IMG]

                    There's more stuff going on here; first, this meter displays the type of measurement you're making, in this case ohms. It's also putting a 'M' in front of it, which means it's set to measure megohms (millions). A 'K' would mean thousands, no letter is straight ohms. The 'OL' it's displaying means 'open line'. Being an auto-range type, it will automatically switch to a lower scale if it measures a low resistance. The other thing to note is the 'bar' at the bottom of the display; this is a 'analog' graph (giving you the same function as an analog meter for reading moving values), extremely useful to have. Voltage values will be read out directly.

                    Using the diode setting. You'll rarely use this unless you're checking a diode, unless you have a meter with an audible tone for testing. These can be used as a continuity tester (get a beep, you have continuity) but be aware that the numbers displayed ARE NOT in ohms; that's the pass-through voltage and when using as a circuit tester they'll usually show zero. To check for resistance, you must use a ohms scale. If testing a diode, typical values will be around .7 volt one direction only if the diode is good.

                    Meter accuracy. This is where quality shows when buying a meter. You want a meter with the best 'resolution' you can afford, particularly if measuring resistance. Good quality hand-held meters can measure down to .1 ohm accurately, cheaper meters won't do as well. I'll show why this is important when I explain how to use the meter, but don't let this prevent you from picking one up, as even the cheap ones can be useful. The red meter shown in the pics is a $3 (yep, three) unit from HF that checked very close to my more-expensive Fluke when I first brought it home, but a few months in my damp garage seems to have skewed it's readings some (hey, they warned to keep it dry so my bad), I'll see how it does after it dries out...

                    Any questions or comments welcome!
                    Great tread Steve. I think for many people the use of testing meters like these is confusing and intimidating. If used wrong the test results will mean nothing and as you pointed out, the meter can be damaged.
                    Rob
                    KEEP THE RUBBER SIDE DOWN

                    1978 XS1100E Modified
                    1978 XS500E
                    1979 XS1100F Restored
                    1980 XS1100 SG
                    1981 Suzuki GS1100
                    1983 Suzuki GS750S Katana
                    1983 Honda CB900 Custom

                    Comment


                    • #11
                      Originally posted by crazy steve View Post
                      What, nobody has any comment???
                      Hi Steve,
                      since you ask:- be careful to check the scale ranges when you buy.
                      A "bargain" meter can be missing the range you need.
                      Most affordable meters are +/- 3% accurate.
                      Thus with a meter having VDC scales range 0 - 10 and the next 0 - 200 you gotta use the 200V scale to read 12V and when you need to see if you have 11.9V or 13.2V and the accuracy on a 200V scale can be 6V out you are back to seeing if the headlight gets brighter as the engine is revved up.
                      And as for checking 3 Ohms vs 5 Ohms on the single 1,000 Ohm scale? Fugettaboutit.
                      Fred Hill, S'toon
                      XS11SG with Spirit of America sidecar
                      "The Flying Pumpkin"

                      Comment


                      • #12
                        Thanks Steve

                        It appears that most respondents have used these things and know what you/they are talking about. Thought I would chime in for the electrically challenged (I can change a light bulb on a good day). My neighbour is an electrical wizard to whom I take all wiring issues. I have always been impressed by those who could use and make sense of these meters and figured I should have one just in case. Lo and behold Santa dropped one down the chimney last Xmas.

                        So, under the tutorial of my good neighbour and now your excellent thread, I should be well on my way to making good use of this piece of black magic technology! Cheers.
                        1980 XS 1100 Special
                        Mostly stock & original
                        Added Yamaha fairing (w/ 8-track!)
                        Torpedo bags
                        New paint (still) pending
                        Stainless brake lines
                        Tkat forkbrace
                        Coils from Honda 1000

                        Previous bikes:
                        1968(?) 350 Harley Davidson
                        1977 Yamaha 650

                        Comment

                        Working...
                        X