Announcement

Collapse
No announcement yet.

intake/exhaust valves

Collapse
X
 
  • Filter
  • Time
  • Show
Clear All
new posts

  • intake/exhaust valves

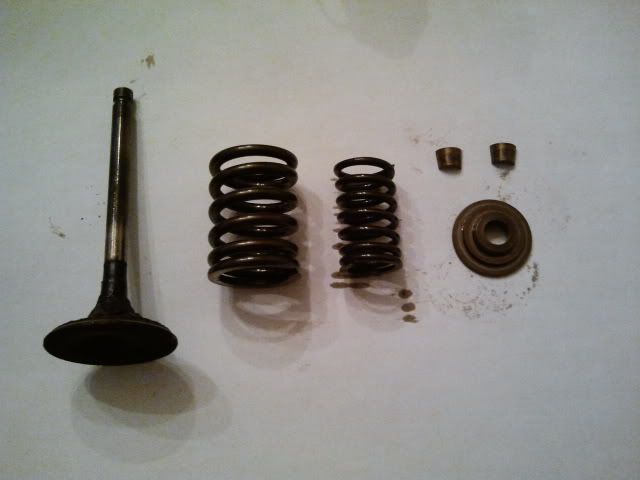
    I've pulled the heads and want to refurbish the valves. I lifted the cams, removed the bucket things, and fashioned a compression tool to remove the valve pins. This is what I've removed from each valve:


    Could anyone point me in the right direction with next steps? A friend suggests that I send the head to a chemical stripper, but I'm not sure if there are any rubber seals inside the valve. I'm checking out some how-tos on honing and lapping the valves right now.

    As always, thanks guys. Merry christmas!
    MayanTiger
    81 MNS learning as I go

  • #2
    Valves

    I have put my valves in a drill press and removed the carbon with emery cloth, being very careful not to thin down the shaft. If you have some skills, you can also cut the valve angle on the drill press, so lapping in is easy. As to the head, is it so bad it needs sent out? Most can be cleaned and just a lapping of the valves back into the seats is good Make sure the valve stem has a good grove for the keepers and the keepers are in good condition if re-useing, it is best to keep them on the valve stem they came off of also If you do send it out for a new valve seat grind, expect to re-do all the shims
    1979 XS1100 Special (Mad Max, OEM) Current
    1980 XS1100 Special
    1990 V Max
    1982 KZ750 LTD Twin
    1986 700 FZR Yamaha Fazer (faster then expected)
    1979 XS750 Special (my 1st Special)
    1974 CB750-Four


    Past/pres Car's
    1961 Catalina 389/1970 Torino GT 351/1967GTO 12to1 comp./ Roller cam/ T-10/ 456 gear/Tri-power/1967 GTO 400, 1969 Camaro, 1968 Z28, 2001 BMW M Roadster 0 to 60 in 4.5 sec. Jaguar XK8

    Comment


    • #3
      valves

      I have all the pieces baggied and labeled by valve (intake 1, 2, 3, 4, ex 1, 2,..etc). Unfortunately the buckets got mixed up (they started falling out when I inverted the heads..doh!). I hope that doesn't haunt me later, but it is what it is.

      Could I use some type of engine cleaner, seafoam or something, to soak the valve components?
      MayanTiger
      81 MNS learning as I go

      Comment


      • #4
        Buckets

        I wouldn't worry about the buckets, if they show no signs of ware, they should be fine

        Originally posted by mayantiger View Post
        I have all the pieces baggied and labeled by valve (intake 1, 2, 3, 4, ex 1, 2,..etc). Unfortunately the buckets got mixed up (they started falling out when I inverted the heads..doh!). I hope that doesn't haunt me later, but it is what it is.

        Could I use some type of engine cleaner, seafoam or something, to soak the valve components?
        1979 XS1100 Special (Mad Max, OEM) Current
        1980 XS1100 Special
        1990 V Max
        1982 KZ750 LTD Twin
        1986 700 FZR Yamaha Fazer (faster then expected)
        1979 XS750 Special (my 1st Special)
        1974 CB750-Four


        Past/pres Car's
        1961 Catalina 389/1970 Torino GT 351/1967GTO 12to1 comp./ Roller cam/ T-10/ 456 gear/Tri-power/1967 GTO 400, 1969 Camaro, 1968 Z28, 2001 BMW M Roadster 0 to 60 in 4.5 sec. Jaguar XK8

        Comment


        • #5
          Cool. Should I measure the springs? Ie, do they compress over time and need to be replaced?
          MayanTiger
          81 MNS learning as I go

          Comment


          • #6
            Yes and no

            Yes and no They do wear down on spring presure over time and the ones that are most compressed while sitting for years take the bigested beating, but, if you are going to just use the bike for everyday use and not planning on high RPM raceing of the motor, they should be fine IMHO

            Originally posted by mayantiger View Post
            Cool. Should I measure the springs? Ie, do they compress over time and need to be replaced?
            1979 XS1100 Special (Mad Max, OEM) Current
            1980 XS1100 Special
            1990 V Max
            1982 KZ750 LTD Twin
            1986 700 FZR Yamaha Fazer (faster then expected)
            1979 XS750 Special (my 1st Special)
            1974 CB750-Four


            Past/pres Car's
            1961 Catalina 389/1970 Torino GT 351/1967GTO 12to1 comp./ Roller cam/ T-10/ 456 gear/Tri-power/1967 GTO 400, 1969 Camaro, 1968 Z28, 2001 BMW M Roadster 0 to 60 in 4.5 sec. Jaguar XK8

            Comment


            • #7
              shims

              Mine had another thin shim washer under the spring you may want to check the head really good and see, expecially before you hand it over to anyone or do cleaning. The washers on mine were stuck very firmly in place. One thing you need to remove before soaking or cleaning is the half moon end caps on the head where the cam shafts are. I personally would replace the seals as removing the gum and varnish from the valves may leaks if you reuse the old ones. Make sure you do not remove much material from the valves or seats. I have been told the motorcycle valves go through a special heat temper process and that only reaches a slight depth into the metal. I am not sure how worn the valves and or seats are on yours mine had very little wear and no pits. I cleaned and soaked all the metal from mine in parts cleaner and my head. I had a relative do some polishing and port adjustments on the head. When I got the head back I just used some 2000 grit wet and dry paper and polished the surface area of the valves and seats. Understand if they were pitted or the angle worn this would not have been sufficent. When putting it back together. Since you may have mixed parts make sure when you put the lifters (barrel valve spring covers) on make sure they turn freely. If not they will not lubricate and wear evenly as typically the cam rotations make them spin. I put my head together and put paint thinner in the ports of intake and exaust and let it set with the head level and valve heads down on saw horses so I could look underneath at the valves. I checked after an hour to see if I had any leakage arround any valve. After an hour mine were still dry showing a good seat. Also since you may have mixed parts you probably do not have any idea what shim is needed on any valve. You can put the cams in measure and ruff adjust placement of shims with the head out of the bike its much easier. Make sure that the caps that bolt the cam down are in the correct place before you torque them down. They are matched and need to go back exactly or the cam will bind and in a few turns you can scratch the cam and etch or warp the cap. Its not like you can just buy new ones that fit right as they were made, bored, and pollished as part of that specific head. I hope this helps Merry Christmas
              To fix the problem one should not make more assumptions than the minimum needed.

              Rodan
              https://www.youtube.com/watch?v=khm6...liHntN91DHjHiS
              1980 G Silverbird
              Original Yamaha Fairfing and Bags
              1198 Overbore kit
              Grizzly 660 ACCT
              Barnett Clutch Springs
              R1 Clutch Fiber Plates
              122.5 Main Jets
              ACCT Mod
              Mac 4-2 Flare Tips
              Antivibe Bar ends
              Rear trunk add-on
              http://s1184.photobucket.com/albums/z329/viperron1/

              Comment


              • #8
                I think I need to hammer the valve seal out with some kind of rubber driver?
                MayanTiger
                81 MNS learning as I go

                Comment


                • #9
                  Also, the half-moon mounting brackets and nuts are baggied according to intake/exhaust chamber, (in1,2, ex 1, 2, etc), but no telling which nut goes on which stud (50/50 that it gets mixed). Live and learn.
                  MayanTiger
                  81 MNS learning as I go

                  Comment


                  • #10
                    Keepers

                    Are you talking about the valve keepers? If so, I am not a mix and match kinda guy on those. If you can, keep them as sets and on the valve stem the came from

                    Originally posted by mayantiger View Post
                    Also, the half-moon mounting brackets and nuts are baggied according to intake/exhaust chamber, (in1,2, ex 1, 2, etc), but no telling which nut goes on which stud (50/50 that it gets mixed). Live and learn.
                    1979 XS1100 Special (Mad Max, OEM) Current
                    1980 XS1100 Special
                    1990 V Max
                    1982 KZ750 LTD Twin
                    1986 700 FZR Yamaha Fazer (faster then expected)
                    1979 XS750 Special (my 1st Special)
                    1974 CB750-Four


                    Past/pres Car's
                    1961 Catalina 389/1970 Torino GT 351/1967GTO 12to1 comp./ Roller cam/ T-10/ 456 gear/Tri-power/1967 GTO 400, 1969 Camaro, 1968 Z28, 2001 BMW M Roadster 0 to 60 in 4.5 sec. Jaguar XK8

                    Comment


                    • #11
                      Originally posted by mayantiger View Post
                      I think I need to hammer the valve seal out with some kind of rubber driver?
                      the valve guide seals are just a push fit on,
                      grab a pair of long needle nose pliers, it doesnt
                      take much to pull them off.
                      pete


                      new owner of
                      08 gen2 hayabusa


                      former owner
                      1981 xs1100 RH (aus) (5N5)
                      zrx carbs
                      18mm float height
                      145 main jets
                      38 pilots
                      slide needle shimmed .5mm washer
                      fitted with v/stax and uni pod filters

                      [url]http://www.youtube.com/watch?v=3pA8dwxmAVA&feature=mfu_in_order&list=UL[/url]

                      Comment


                      • #12
                        You mentioned that the buckets got mixed up, and unless you got the shims removed and logged before the buckets got mixed up, you don't know where your shims were or what your inital measurements were. I think Ron refered to that issue. The best you can do now it get it back together on a temporary basis, take your clearance measurements and go from there. What made you think you needed to go into the valves in the first place? If you still plan to lap or grind your valves, the clearance issue will be the last thing you'll have to worry about.
                        Can't beat the smell of gas & oil

                        Comment


                        • #13
                          Heads

                          I've done a few now and there is no easy way or magic to it. If your trying to clean the out side, the easiest way is to glass bead it. Make sure it is well sealed though. Particularly the cam gallery. I've also soaked one in Varsol/paint thinner for a week, then took a series of brushes to it, then soaked again. Took a long time but it did work. Thing with beading is it polishes at the same time. This last one I did was a bitch, the valve seats were encrusted with hardened lead type deposits. I spent a week with a dental pick and acetone gently removing the stuff. I did that so I wouldn't have to lap as long or hard to get the valves to seal properly. The valves themselves are hardend metal so a soft brass brush works fine on them. As for the measurements. Check the springs for free length. "Kible and white" stock XS11 springs. The allowable tolerence I believe was 1.6 mm off spec. You should also inspect the valves closely. The book has a good write up on what and how to inspect all these components. And DO find the washers at the bottom of the valve spring slots. Very important. My buckets I always hand polish to clean and inspect as well as their chambers. It's a knuckle buster but the tollerences are so close, you can't afford to be too agressive. Good luck.
                          mack
                          79 XS 1100 SF Special
                          HERMES
                          original owner
                          http://i946.photobucket.com/albums/a...ps6932d5df.jpg

                          81 XS 1100 LH MNS
                          SPICA
                          http://i946.photobucket.com/albums/ad305/mack-055/2.jpg

                          78 XS 11E
                          IOTA
                          https://youtu.be/wB5Jfbp6SUc
                          https://youtu.be/RaI3WYHSuWA


                          Have recovery trailer and shop if you breakdown in my area.
                          Frankford, Ont, Canada
                          613-398-6186

                          Comment


                          • #14
                            Cap nuts

                            The cap nuts and washers on the bearring caps should not be an issue but make sure each has a washer as it can make a difference in the torque. Also what can be helpful is to get a tube of engine assembly lube from the local auto store and lubricate the cam bearings top and bottom and the threads of the cap screws when assembing. It takes for oil to reach them. You need to torque the cam bearing caps back on according to the center out in two stages procedure as it pevents warping the cams. Also if you can not find the shim washer defined as a seat that goes under the valve springs against the head you should check with a dealer to see if it’s missing on that model. All information I see shows this (seat) washer that is hardened metal to prevent the springs from digging into the head is on all models and provides a smooth surface for the spring to rotate on. It is also part of the overall spring tension on the valve.


                            Sorry Mack must have been doing my response at the same time but wanted to make sure he found the seats washers under springs.
                            Last edited by ViperRon; 12-24-2011, 08:27 AM. Reason: Mack's reply
                            To fix the problem one should not make more assumptions than the minimum needed.

                            Rodan
                            https://www.youtube.com/watch?v=khm6...liHntN91DHjHiS
                            1980 G Silverbird
                            Original Yamaha Fairfing and Bags
                            1198 Overbore kit
                            Grizzly 660 ACCT
                            Barnett Clutch Springs
                            R1 Clutch Fiber Plates
                            122.5 Main Jets
                            ACCT Mod
                            Mac 4-2 Flare Tips
                            Antivibe Bar ends
                            Rear trunk add-on
                            http://s1184.photobucket.com/albums/z329/viperron1/

                            Comment


                            • #15
                              OEM- no, I am talking about parts 4,5, & 8 on this schematic. But I have the keepers, stems and springs organized by valve as well (everything in that photo above, plus a random bucket+shim).

                              http://www.bikebandit.com/houseofmot...m8246sch220914

                              Pete- easier than I expected, thanks!

                              Don- Pure curiosity. But now, the only way out is through!

                              Mack/Ron- Yep, this is what I was looking for. Gnar. Wish I'd have know about glass beading before I tore it down. Now its off to the store for a caliper.
                              MayanTiger
                              81 MNS learning as I go

                              Comment

                              Working...
                              X