Announcement

Collapse
No announcement yet.

#2 cylinder dead at low RPM

Collapse
X
 
  • Filter
  • Time
  • Show
Clear All
new posts

  • #2 cylinder dead at low RPM

    '79 XS1100 Special #2 cylinder dead at lower RPM. It has very nice top end, but runs rough at lower rpm. I stopped at a local park and took one plug wire off at a time and found the rpm didn't change when I removed the #2 plug wire. Ran it down the road like that and it acted the same as with the wire on.
    Got home and put an old spark plug on the end of the wire and found nice hot spark. Soooo, my question is which jet in the number two carb is more likely than not the culprit?

    I just got back from an "all expense paid visit" to Afghanistan, but before I left I put SeaFoam in the tank. The bike started right up, but I'm afraid maybe in spite of the preventive seafoam it may still have a gummed jet. I don't know, but before I go through the trouble of taking off the carb and cleaning it, I would run this by you guys. Any thoughts??

    Ray

  • #2
    After sitting for a while, seafoam or not, it wouldn't hurt to go through and clean the carbs.
    Nathan
    KD9ARL

    μολὼν λαβέ

    1978 XS1100E
    K&N Filter
    #45 pilot Jet, #137.5 Main Jet
    OEM Exhaust
    ATK Fork Brace
    LED Dash lights
    Ammeter, Oil Pressure, Oil Temp, and Volt Meters

    Green Monster Coils
    SS Brake Lines
    Vision 550 Auto Tensioner

    In any moment of decision the best thing you can do is the right thing, the next best thing is the wrong thing, and the worst thing you can do is nothing.

    Theodore Roosevelt

    Comment


    • #3
      Sounds like R/I the carbs for cleaning. You could run some carb cleaner tank add through, but if it is not fireing at all, will not be good on the cyl, good luck
      1979 XS1100 Special (Mad Max, OEM) Current
      1980 XS1100 Special
      1990 V Max
      1982 KZ750 LTD Twin
      1986 700 FZR Yamaha Fazer (faster then expected)
      1979 XS750 Special (my 1st Special)
      1974 CB750-Four


      Past/pres Car's
      1961 Catalina 389/1970 Torino GT 351/1967GTO 12to1 comp./ Roller cam/ T-10/ 456 gear/Tri-power/1967 GTO 400, 1969 Camaro, 1968 Z28, 2001 BMW M Roadster 0 to 60 in 4.5 sec. Jaguar XK8

      Comment


      • #4
        Had this happen in september. One cyl was dead until 2000-2500rpm then it was on all 4. The pilot jet in that carb is plugged. Pilot jet delivers fuel at lower rpm. Above 2500ish RPM that circuit does not supply fuel and the main jet takes over. have a long thin blade screwdriver with a good robust tip and unscrew the pilot jet and clean. Mine had a brown gritty paste plugging it. I removed the needle/seat assembly and cleaned the same gunk from the dome screen. Its an easy fix- the most undesirable part is removing and re installing the carbs as the boots to the air box make it a pain. On a scale of 1 to 10 (10 being the most difficult) I rate this task at 4.

        Comment


        • #5
          Originally posted by mharrington View Post
          Had this happen in september. One cyl was dead until 2000-2500rpm then it was on all 4. The pilot jet in that carb is plugged. Pilot jet delivers fuel at lower rpm. Above 2500ish RPM that circuit does not supply fuel and the main jet takes over. have a long thin blade screwdriver with a good robust tip and unscrew the pilot jet and clean. Mine had a brown gritty paste plugging it. I removed the needle/seat assembly and cleaned the same gunk from the dome screen. Its an easy fix- the most undesirable part is removing and re installing the carbs as the boots to the air box make it a pain. On a scale of 1 to 10 (10 being the most difficult) I rate this task at 4.
          Yeah but he said it acts the same while driving with the plug wire off as when it is on, so that means it is most likely never firing, so everything in there is clogged up.
          Nathan
          KD9ARL

          μολὼν λαβέ

          1978 XS1100E
          K&N Filter
          #45 pilot Jet, #137.5 Main Jet
          OEM Exhaust
          ATK Fork Brace
          LED Dash lights
          Ammeter, Oil Pressure, Oil Temp, and Volt Meters

          Green Monster Coils
          SS Brake Lines
          Vision 550 Auto Tensioner

          In any moment of decision the best thing you can do is the right thing, the next best thing is the wrong thing, and the worst thing you can do is nothing.

          Theodore Roosevelt

          Comment


          • #6
            disconnect the spark plug crank it over a couple times and pull the spark plug to see if it is "wet" if not trace the flow of gas back from there
            1980 xs1100sg

            Comment


            • #7
              Originally posted by natemoen View Post
              Yeah but he said it acts the same while driving with the plug wire off as when it is on, so that means it is most likely never firing, so everything in there is clogged up.
              I stand corrected. Since the crabs come off in one bank he should just clean all 4 carbs and both petcocks. When I got my XS1100F in sept of 2010 the dome screens that fit over the seat unit was plugged with gunk as well as the fuel tank petcock screens. I currently have 2 fuel filters in each line but I think filters with the paper element will filter better than the porous metal element? Unfortunately with old bikes it mandates this type of tinkering. On the plus side- clean everything real good, quality fuel line and inline filters and it should be a long time before it needs to be done again.

              Comment


              • #8
                Oh- make sure all the plugs are securely covering the nipples on the intake rubber boots! I forgot to reinstall one and was ready to hang it up when I started up after a thorough cleaning just to hear the sound of 3 cylinders hitting.

                Comment


                • #9
                  Originally posted by mharrington View Post
                  Its an easy fix- the most undesirable part is removing and re installing the carbs as the boots to the air box make it a pain.
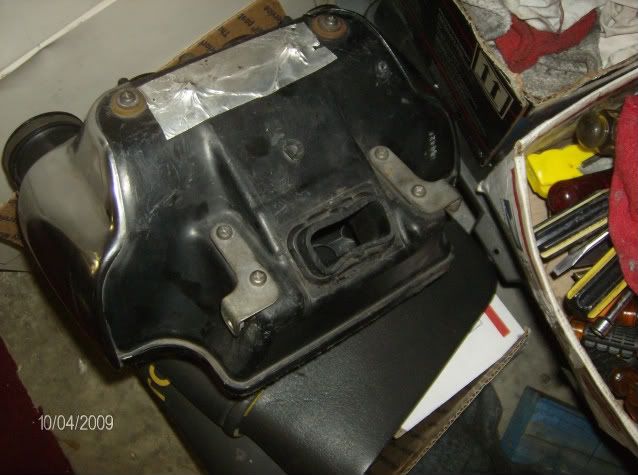
                  It needn't be that way though. After reading a thread here, I removed my carbs. The trick is to partially undo the bolts which hold the top of the airbox to the frame... not too far though, as they come disconnected inside the box if you unscrew too much. After removing the bottom half of the airbox and the filter, of course. This gives just enough slack to push the front bracket of the airbox forward and down and the airbox will drop down towards the engine, backwards and away from the carb mouths. It really is very easy to remove and replace the carbs if you do this.
                  XS1100F 1980 European model. Standard. Dyna coils. Iridium plugs. XS750 final drive (sometimes). Micron fork brace. Progressive front springs. Geezer regulator/rectifier. Stainless 4 into 2 exhaust. Auto CCT (Venturer 1300) SOLD. New project now on the go. 1980 European model.

                  Comment


                  • #10
                    I pop the upper bracket that slides back and forth over the post that is welded to the frame, off it with a large screwdriver, then drop down the air box with filter removed. When I reassemble, I can guild the intake tubes on one at a time by reaching up inside the airbox and pushing them on one at a time

                    Originally posted by James England View Post
                    It needn't be that way though. After reading a thread here, I removed my carbs. The trick is to partially undo the bolts which hold the top of the airbox to the frame... not too far though, as they come disconnected inside the box if you unscrew too much. After removing the bottom half of the airbox and the filter, of course. This gives just enough slack to push the front bracket of the airbox forward and down and the airbox will drop down towards the engine, backwards and away from the carb mouths. It really is very easy to remove and replace the carbs if you do this.
                    1979 XS1100 Special (Mad Max, OEM) Current
                    1980 XS1100 Special
                    1990 V Max
                    1982 KZ750 LTD Twin
                    1986 700 FZR Yamaha Fazer (faster then expected)
                    1979 XS750 Special (my 1st Special)
                    1974 CB750-Four


                    Past/pres Car's
                    1961 Catalina 389/1970 Torino GT 351/1967GTO 12to1 comp./ Roller cam/ T-10/ 456 gear/Tri-power/1967 GTO 400, 1969 Camaro, 1968 Z28, 2001 BMW M Roadster 0 to 60 in 4.5 sec. Jaguar XK8

                    Comment


                    • #11
                      Originally posted by XS1100_OEM4ME View Post
                      I pop the upper bracket that slides back and forth over the post that is welded to the frame, off it with a large screwdrive
                      Exactly. Prising it forward is just a bit less forceful if the four bolts are loosened a bit though. Until I read the thread here, I'd struggled for years with those damned boots
                      XS1100F 1980 European model. Standard. Dyna coils. Iridium plugs. XS750 final drive (sometimes). Micron fork brace. Progressive front springs. Geezer regulator/rectifier. Stainless 4 into 2 exhaust. Auto CCT (Venturer 1300) SOLD. New project now on the go. 1980 European model.

                      Comment


                      • #12
                        I just cut that little part off that bracket, no problems since
                        Nathan
                        KD9ARL

                        μολὼν λαβέ

                        1978 XS1100E
                        K&N Filter
                        #45 pilot Jet, #137.5 Main Jet
                        OEM Exhaust
                        ATK Fork Brace
                        LED Dash lights
                        Ammeter, Oil Pressure, Oil Temp, and Volt Meters

                        Green Monster Coils
                        SS Brake Lines
                        Vision 550 Auto Tensioner

                        In any moment of decision the best thing you can do is the right thing, the next best thing is the wrong thing, and the worst thing you can do is nothing.

                        Theodore Roosevelt

                        Comment


                        • #13
                          The trick to reinstalling the carbs/airbox is simple... To remove the carbs, take the airbox bolts out and push back as far as it'll go. This will disengage the carbs so you can pull them.

                          To reinstall, put the carbs on the intake boots, then angle the airbox so you can get two of the boots started. You'll get the outer boot almost all the way on, the next one in partially; it doesn't matter which side you do. Install the rear airbox bolt on that side (so the box can't move back), then lever the other side on. Once I figured that out, getting the airbox back on the carbs became a few-minute exercise....
                          Fast, Cheap, Reliable... Pick any two

                          '78E original owner - resto project
                          '78E ???? owner - Modder project FJ forks, 4-piston calipers F/R, 160/80-16 rear tire
                          '82 XJ rebuild project
                          '80SG restified, red SOLD
                          '79F parts...
                          '81H more parts...

                          Other current bikes:
                          '93 XL1200 Anniversary Sportster 85RWHP
                          '86 XL883/1200 Chopper
                          '82 XL1000 w/1450cc Buell, Baker 6-speed, in-progress project
                          Cage: '13 Mustang GT/CS with a few 'custom' touches
                          Yep, can't leave nuthin' alone...

                          Comment


                          • #14
                            I don't know if there is much difference on the 79SF I have, but if I dont get the airbox off the frame shaft and down and back, It is too tight to get the carbs out without bending the intake manifolds Just my experance on my bike, not saying others have the same clearance
                            Originally posted by crazy steve View Post
                            The trick to reinstalling the carbs/airbox is simple... To remove the carbs, take the airbox bolts out and push back as far as it'll go. This will disengage the carbs so you can pull them.

                            To reinstall, put the carbs on the intake boots, then angle the airbox so you can get two of the boots started. You'll get the outer boot almost all the way on, the next one in partially; it doesn't matter which side you do. Install the rear airbox bolt on that side (so the box can't move back), then lever the other side on. Once I figured that out, getting the airbox back on the carbs became a few-minute exercise....
                            1979 XS1100 Special (Mad Max, OEM) Current
                            1980 XS1100 Special
                            1990 V Max
                            1982 KZ750 LTD Twin
                            1986 700 FZR Yamaha Fazer (faster then expected)
                            1979 XS750 Special (my 1st Special)
                            1974 CB750-Four


                            Past/pres Car's
                            1961 Catalina 389/1970 Torino GT 351/1967GTO 12to1 comp./ Roller cam/ T-10/ 456 gear/Tri-power/1967 GTO 400, 1969 Camaro, 1968 Z28, 2001 BMW M Roadster 0 to 60 in 4.5 sec. Jaguar XK8

                            Comment


                            • #15
                              I cut the snorkel down and the air box comes out easily before the carbs, no center top bracket either.

                              2H7 (79)
                              3H3

                              "If it ain't broke, modify it"

                              Comment

                              Working...
                              X