Announcement

Collapse
No announcement yet.

Three Days In

Collapse
X
 
  • Filter
  • Time
  • Show
Clear All
new posts

  • Three Days In

    I've got three days into the new project bike (80 SG) and so far I've found a mouse nest in the air box
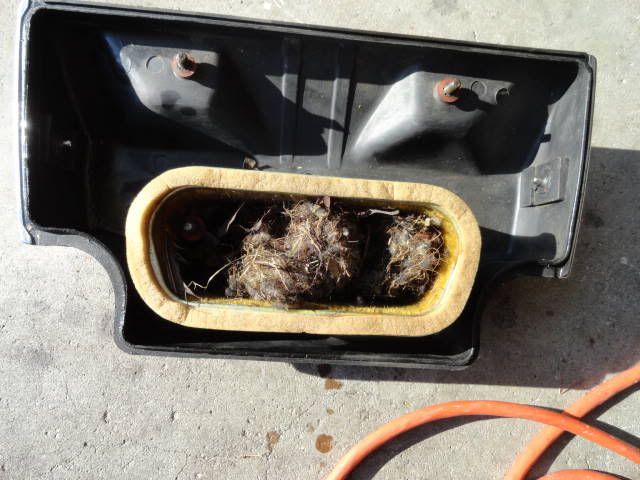
    and some fine rust in all the float bowls. The faring wasn't what I wanted so it's off and I may decide to redo it at a later date but it will take quite a going over to remove a bunch of junk I don't care to keep. While getting the carbs off I noticed that Yamaha put a vacuum fuel pump on and I couldn't believe the rat's nest of hoses between the petcocks and the fuel rails on the carbs. I don't have my manual yet, but from what I can figure, on each petcock there is an outlet for the "on" position and one for the "reserve" position". Is that correct?
    Can't beat the smell of gas & oil

  • #2
    octy

    You found what is lovingly referred to as the octopus.

    Standards have a vacuum operated petcock built into the petcock with a single outlet.Rather large.
    specials used smaller petcocks to keep profile low I guess so vacuun diaphragm was moved to the octy. Search here on ways to eliminate it or just plan to put it back because you got to have a way to cut off fuel.

    John

    PS look for member Catatonic Bug and download a manual from his signature.
    John is in an anonymous city with an Alamo (N29.519227,W-98.678980)

    Go ahead, click on the bikes - you know you want to...the electrons are ready.
    '81 XS1100H - "Enterprise"
    Bob Jones Custom Navy bike: Tkat brace, EBC floating rotors & SS lines, ROX pivot risers, Geezer rectifier, new 3H3 engine

    "Not all treasure is silver and gold"

    Comment


    • #3
      Hey LoneRider... Nice looking Special.
      Those little critters get in everything... Check your exhaust also.. Your air box does not look too bad - The mice had nested in mine so long the air filter element was all gone and the box was full of rust and mold. I threw it away and got another off ebay $10... Anyway - the critters bring in mold and moisture that can rust up the valve stems on open intake valves. If you have any intakes the have clearance > .020 pull the head and clean them up. Compression check too can indicate sticky valve that can mate with it's piston when things get spinning fast.
      Good luck with your restoration.
      When the horse is dead, dismount.

      Bagapotomus - '80G Attempted Rescue, '78 Engine, Vetter Bags and Trunk.

      Comment


      • #4
        The Octy is an added fuel shutoff for when the bike is not running. On the Standard models, the petcock does nto have an off position, so you rely on the vacuum valves to turn off the fuel. On the Special models, the petcock has an off position. So you can simply manually shut off the fuel when not running, and eliminate the Octy and all its fuel lines. You also eliminate the need for prime, so you can plug the forward outlets of the petcocks, which is the PRIME outlet. Then run fuel lines from the rear petcock outlets to the fuel inlet Ts on each set of carbs. You may also want to install in line fuel filters in the lines either way.
        Life is what happens while your planning everything else!

        When your work speaks for itself, don't interrupt.

        81 XS1100 Special - Humpty Dumpty
        80 XS1100 Special - Project Resurrection


        Previously owned
        93 GSX600F
        80 XS1100 Special - Ruby
        81 XS1100 Special
        81 CB750 C
        80 CB750 C
        78 XS750

        Comment


        • #5
          The further I get into this project, the more worried I get. When I have started and run it, I didn't dee any smoke, but when I pulled the plugs and looked in the holes, the top of #2 piston looked a little wet??? The vacuum for the advance was just hanging between the carbs and the block so that may be some of the reason it ran rough at low RPM. But my biggest job now is valve lash. Every single valve was Tight and some TIGHT. The readings were as follows, #1 to #4: intake, .038, .051, .102, .102: exhaust .127, .152, .127, .127. All in MM. I tried to use te motion pro tool and could not master the damned thing even after reading every post I could find. Seeing how I have to replace every single shim and it doesn't look like it's likely I'll be using any of the ones in the bike, I'm going to pull the cams. I honestly think that will be quicker. I believe I saw a post that someone suggested getting shims that were much cheaper than Yamaha's. Does anyone know a source that's affordable?
          Can't beat the smell of gas & oil

          Comment


          • #6
            Valve shims...

            http://www.newmotorcycleparts.com/mo...lve_shims.html
            2H7 (79) owned since '89
            3H3 owned since '06

            "If it ain't broke, modify it"

            ☮

            Comment


            • #7
              Personally, I prefer to pull the cams out, particularly if you're going to be changing all the shims. Keep in mind you may not need to buy a full set of shims; I was able to swap around what I had and ended up only needing two...

              As to the MotionPro tool, some of those need mods to fit right on a XS, you may be one of the 'lucky' ones that got one that needs some grinding on it to get it to fit.
              Last edited by crazy steve; 11-20-2011, 04:16 PM.
              Fast, Cheap, Reliable... Pick any two

              '78E original owner - resto project
              '78E ???? owner - Modder project FJ forks, 4-piston calipers F/R, 160/80-16 rear tire
              '82 XJ rebuild project
              '80SG restified, red SOLD
              '79F parts...
              '81H more parts...

              Other current bikes:
              '93 XL1200 Anniversary Sportster 85RWHP
              '86 XL883/1200 Chopper
              '82 XL1000 w/1450cc Buell, Baker 6-speed, in-progress project
              Cage: '13 Mustang GT/CS with a few 'custom' touches
              Yep, can't leave nuthin' alone...

              Comment


              • #8
                Mm

                The MM tool will work fine on all the valves, just did mine a while back. What you have to do is rotate the cam till it moves the lifter "JUST BELOW" deck hight, not all the way open. Then position the tool on place and "if needed" back the cam (turning AWAY from the bottom of the tool) out till the tool drops in place. Line up the bolt and tighten down, move the cam lobe back to completly opposit the lifter, pop the shim out with a small jewlers screwdriver and pull out with a magnet or needle nose pilers, adjust size, turn cam lobe back down pushing lifter just below head deck hight again "MAKEING SURE YOU DONT" push the tool into the head, Remove tool, go to the next one and do the same
                Originally posted by Lonerider62 View Post
                The further I get into this project, the more worried I get. When I have started and run it, I didn't dee any smoke, but when I pulled the plugs and looked in the holes, the top of #2 piston looked a little wet??? The vacuum for the advance was just hanging between the carbs and the block so that may be some of the reason it ran rough at low RPM. But my biggest job now is valve lash. Every single valve was Tight and some TIGHT. The readings were as follows, #1 to #4: intake, .038, .051, .102, .102: exhaust .127, .152, .127, .127. All in MM. I tried to use te motion pro tool and could not master the damned thing even after reading every post I could find. Seeing how I have to replace every single shim and it doesn't look like it's likely I'll be using any of the ones in the bike, I'm going to pull the cams. I honestly think that will be quicker. I believe I saw a post that someone suggested getting shims that were much cheaper than Yamaha's. Does anyone know a source that's affordable?
                1979 XS1100 Special (Mad Max, OEM) Current
                1980 XS1100 Special
                1990 V Max
                1982 KZ750 LTD Twin
                1986 700 FZR Yamaha Fazer (faster then expected)
                1979 XS750 Special (my 1st Special)
                1974 CB750-Four


                Past/pres Car's
                1961 Catalina 389/1970 Torino GT 351/1967GTO 12to1 comp./ Roller cam/ T-10/ 456 gear/Tri-power/1967 GTO 400, 1969 Camaro, 1968 Z28, 2001 BMW M Roadster 0 to 60 in 4.5 sec. Jaguar XK8

                Comment


                • #9
                  Thanks a ton for the info on the shims. The place is in my favorites now. That will save me about 75% on the shims. At Bike Bandit they were $22 each. As to the tool. I think it's one of those things where having someone to show you exactly how the thing fits and how to work it in place would be invaluable. That's again to all who replied. I'm truckin on.
                  Can't beat the smell of gas & oil

                  Comment


                  • #10
                    Regarding the octy (which has been covered, but I'm doing it again ), I removed mine, ran Tygon fuel line from each petcock outlet into a "T" connection on each side, then from there into an inline filter, and then into the carb inlets on each side. Bam, rats nest gone, and remembering to turn it on/off is second nature once you do it a few times. When your bike drains the bowls after you forget to turn it on, you find out very quickly that you forgot to turn it to the on position! Also, the yellow Tygon looks cool .

                    Some like the octy because you don't have to remember to turn the petcocks off, but simplicity rules in my world . I turn the gas on, it flows. I turn it off, it doesn't.
                    XS11SH :: K&N Pods, 4->1, Dynojet kit, Barnett clutch springs, TC's fuse block, ATGATT

                    Well, goodness. Look what we've got here.

                    Comment


                    • #11
                      Originally posted by Lonerider62 View Post
                      Thanks a ton for the info on the shims. The place is in my favorites now. That will save me about 75% on the shims. At Bike Bandit they were $22 each. As to the tool. I think it's one of those things where having someone to show you exactly how the thing fits and how to work it in place would be invaluable. That's again to all who replied. I'm truckin on.
                      Hi 'lone,
                      if you are totally broke but have a friendly contact in a machine shop, there's a no-cost shim option.
                      Have the shims thinned down on a surface grinder.
                      Grind the side with the writing on it and mark the new thickness with an electric etching tool.
                      Fred Hill, S'toon
                      XS11SG with Spirit of America sidecar
                      "The Flying Pumpkin"

                      Comment


                      • #12
                        You can also send a PM to member WildKat, as she has control of the shim library. Send her the shims that you cannot reuse, with the sizes you need, and you should have them back via US Mail in just a few days.
                        Welcome to our sickness!
                        Ray Matteis
                        KE6NHG
                        XS1100 E '78 (winter project)
                        XS1100 SF Bob Jones worked on it!

                        Comment


                        • #13
                          Thanks again for all the great information. I was thinking about having the shims ground by a machine shop if necessary and checking what's in the "shim pool". I'm not broke yet but at every turn I see the bucks flying. I think the rear brake isn't bleeding back to the reservoir properly because after applying the brake (which works fine as far as stoping the wheel goes) the thing drags pretty bad.
                          Can't beat the smell of gas & oil

                          Comment


                          • #14
                            Brakes

                            Check to see if the plunger in the M/C is sticking (especialy if the dust boot is missing) If not, remove and clean the spoge hole and everything else. If it is not leaking now, a good cleaning and reassembly should fix it And yes, welcome to our nightmare

                            Originally posted by Lonerider62 View Post
                            Thanks again for all the great information. I was thinking about having the shims ground by a machine shop if necessary and checking what's in the "shim pool". I'm not broke yet but at every turn I see the bucks flying. I think the rear brake isn't bleeding back to the reservoir properly because after applying the brake (which works fine as far as stoping the wheel goes) the thing drags pretty bad.
                            1979 XS1100 Special (Mad Max, OEM) Current
                            1980 XS1100 Special
                            1990 V Max
                            1982 KZ750 LTD Twin
                            1986 700 FZR Yamaha Fazer (faster then expected)
                            1979 XS750 Special (my 1st Special)
                            1974 CB750-Four


                            Past/pres Car's
                            1961 Catalina 389/1970 Torino GT 351/1967GTO 12to1 comp./ Roller cam/ T-10/ 456 gear/Tri-power/1967 GTO 400, 1969 Camaro, 1968 Z28, 2001 BMW M Roadster 0 to 60 in 4.5 sec. Jaguar XK8

                            Comment


                            • #15
                              Shims

                              Here is 8 shims for the price of one, with some spare lifters You can send him an email and ask for the sizes, if 2 or 3 help you now, might be worth it
                              http://www.ebay.com/itm/Yamaha-XS110...sories&vxp=mtr
                              Originally posted by Lonerider62 View Post
                              The further I get into this project, the more worried I get. When I have started and run it, I didn't dee any smoke, but when I pulled the plugs and looked in the holes, the top of #2 piston looked a little wet??? The vacuum for the advance was just hanging between the carbs and the block so that may be some of the reason it ran rough at low RPM. But my biggest job now is valve lash. Every single valve was Tight and some TIGHT. The readings were as follows, #1 to #4: intake, .038, .051, .102, .102: exhaust .127, .152, .127, .127. All in MM. I tried to use te motion pro tool and could not master the damned thing even after reading every post I could find. Seeing how I have to replace every single shim and it doesn't look like it's likely I'll be using any of the ones in the bike, I'm going to pull the cams. I honestly think that will be quicker. I believe I saw a post that someone suggested getting shims that were much cheaper than Yamaha's. Does anyone know a source that's affordable?
                              1979 XS1100 Special (Mad Max, OEM) Current
                              1980 XS1100 Special
                              1990 V Max
                              1982 KZ750 LTD Twin
                              1986 700 FZR Yamaha Fazer (faster then expected)
                              1979 XS750 Special (my 1st Special)
                              1974 CB750-Four


                              Past/pres Car's
                              1961 Catalina 389/1970 Torino GT 351/1967GTO 12to1 comp./ Roller cam/ T-10/ 456 gear/Tri-power/1967 GTO 400, 1969 Camaro, 1968 Z28, 2001 BMW M Roadster 0 to 60 in 4.5 sec. Jaguar XK8

                              Comment

                              Working...
                              X