Announcement

Collapse
No announcement yet.

Rear wheel mounting

Collapse
X
 
  • Filter
  • Time
  • Show
Clear All
new posts

  • Rear wheel mounting

    Hey everybody,

    1979 XS1100Sf. Trying to get this bike back together after cleaning off 10 years of grime and repacking bearings. Swingarm bearings repacked. Driveshaft cleaned and lubed, splines painted with moly paste. New tire on rear wheel. Final drive serviced, wheel hub splines cleaned, moly-pasted and greased. Trying to get the rear wheel on now. Does not want to go. There's a gap (about 3/16") between the plastic shield and the FD, is this right? Wheel doesn't feel seated in FD, it rocks a little. I've tried repositioning it about 5 times already...is there some special position?

    Somebody had a link on here to some manual other than Clymer, but it didn't work. Any hints on good picture books for idjits like me? I'm not a mechanic, I need clear, simple directions. Still have lots to go here, fork seals, brakes, steering head bearings, not to mention every single item in the maintenance lists, and the Clymer is just too arcane for me. No Haynes available, I understand.

    Thanks
    Ben

  • #2
    Ben, welcome to the forum!

    You will have to move the wheel around until it goes into the final drive but there shouldn't be anything too difficult about it. Try putting your foot or a board under the wheel to support it at the same height as the final drive, then move it over and into the final drive, then slide the axle through the swingarm to hold it in place.

    If you can't download a copy of the Yamaha manual the only other resource I can think of that has pictures is this site, XS11.com, and we do like lots of pictures (hint, hint).

    There are pictures of our bikes and adventures; pictures in the Tech Tips section that explain some common services and modifications; pictures of successes when we win and manage to fix our bikes in spite of ourselves and pictures to go along with the tales of woe when the bikes seem to be winning.
    -- Scott
    _____

    2004 ST1300A: No name... yet
    1982 XJ1100J: "Baby" SS Brakes, '850 FD, ACCT
    1980 XS1100G: "Columbo" SS Brakes, '850 FD, ACCT
    1979 XS1100SF: "Bush" W.I.P.
    1979 XS1100F: parts
    2018 Heritage Softail Classic 117 FLHCS SE: "Nanuk" It's DEAD, it's not just resting. It is an EX cycle.

    Comment


    • #3
      Like Scott stated, you want the wheel lifted in the same height as when it is mounted, and also parallel to the plane of the surfaces. You will also need to rotate the wheel so the splines line up. So basically, you need the splines on the wheel in position to slide directly into the corresponding splines on the FD in both horizontal and vertical planes, with the rotation correct that they mesh together. I do find it best to put my foot under the wheel and use my ankle to raise or lower the wheel while I use both hands to keep it vertical and rotate if required.
      Life is what happens while your planning everything else!

      When your work speaks for itself, don't interrupt.

      81 XS1100 Special - Humpty Dumpty
      80 XS1100 Special - Project Resurrection


      Previously owned
      93 GSX600F
      80 XS1100 Special - Ruby
      81 XS1100 Special
      81 CB750 C
      80 CB750 C
      78 XS750

      Comment


      • #4
        You will end up with a small gap between the dust shield and the FD, and about 3/16" is about right....
        Fast, Cheap, Reliable... Pick any two

        '78E original owner - resto project
        '78E ???? owner - Modder project FJ forks, 4-piston calipers F/R, 160/80-16 rear tire
        '82 XJ rebuild project
        '80SG restified, red SOLD
        '79F parts...
        '81H more parts...

        Other current bikes:
        '93 XL1200 Anniversary Sportster 85RWHP
        '86 XL883/1200 Chopper
        '82 XL1000 w/1450cc Buell, Baker 6-speed, in-progress project
        Cage: '13 Mustang GT/CS with a few 'custom' touches
        Yep, can't leave nuthin' alone...

        Comment


        • #5
          Lots of pictures

          Originally posted by 3Phase View Post
          and we do like lots of pictures (hint, hint).
          I took lots of pictures of the reassembly. How do I post them?

          Comment


          • #6
            Have to upload pics to a hosting site like Photobucket. Then you can link to them here. Typically just find the IMG link for the photo on the hosting site and paste it into your post here.
            Life is what happens while your planning everything else!

            When your work speaks for itself, don't interrupt.

            81 XS1100 Special - Humpty Dumpty
            80 XS1100 Special - Project Resurrection


            Previously owned
            93 GSX600F
            80 XS1100 Special - Ruby
            81 XS1100 Special
            81 CB750 C
            80 CB750 C
            78 XS750

            Comment


            • #7
              Originally posted by Retroben View Post
              I took lots of pictures of the reassembly. How do I post them?
              Open a free picture account somewhere (Photobucket is popular), then upload the pics to that. When posting to here, open your pic account in another tab. To post a pic, right-click on the 'image code', selecting 'copy'. Then click the picture icon in the header for your post, enable it ('temporarily allow scripted windows'), then re-select the icon. Click 'paste', then 'ok'. That should do it...
              Fast, Cheap, Reliable... Pick any two

              '78E original owner - resto project
              '78E ???? owner - Modder project FJ forks, 4-piston calipers F/R, 160/80-16 rear tire
              '82 XJ rebuild project
              '80SG restified, red SOLD
              '79F parts...
              '81H more parts...

              Other current bikes:
              '93 XL1200 Anniversary Sportster 85RWHP
              '86 XL883/1200 Chopper
              '82 XL1000 w/1450cc Buell, Baker 6-speed, in-progress project
              Cage: '13 Mustang GT/CS with a few 'custom' touches
              Yep, can't leave nuthin' alone...

              Comment


              • #8
                Background on Neglected Nellie

                Just in case anybody takes me for an XS1100 enthusiast...This is not my bike, and I'm not much of a mechanic. Had to sell my last bike (81 Honda GL500) loved it to pay the rent. Buddy felt my pain, knew I'd done some work on that bike. Said he'd let me ride his bike regularly if I would do some long-overdue maintenance on it, and he pays for all the parts and supplies the Clymer. The bike is a 79 XS1100SF with approx. 45k miles on it. I figured what the hell, I just restored one 30-year-old Japanese bike, how hard can it be? And I kinda like wrenching, long as things go smooth...uh,oh...

                The bike sat for a long time, owner couldn't get it started even with fresh gas. I read the owner's manual and the bike started immediately when following the directions with the choke on "Prime". He said he hadn't been riding it much, and complained of the rear brakes locking up, weird handling, and misfiring. I foolishly rode it home (2 miles or so on a twisty), scariest ride of my life, clunky and squirrelly as all heck and lunging, tranny skips...I'm a cruiser not a thrillseeker, 'bout crapped myself. I should have quit right away, but nooooooooo...

                So first thing I pull the seat and tank and start lookin' and pokin'. I see I'm in deep. I think I have inspected everything, and if it's not mentioned below, I've determined it's OK (for now at least).

                Am assuming the engine is sound -- should have done a compression check first, but trusted the owner's word. We'll see once I get another couple of parts back on.
                Read up on the gear issue, and there's no way I'm taking the transmission apart, just going to have to live with it.

                Now: perform all maintenance as per the front of the Clymer. Some of the sched maintenance had never been done in the 20+ years the guy has owned the bike. I inspected front to rear, but I'm working rear to front because I wanted to get the easy stuff out of the way first. Or so I thought.

                Done so far:

                Replace rear tire;
                Replace rear brake pads;
                Remove rear caliper assembly and MC, disassemble and clean (not rebuilding yet - sounds OK and I think it was the spooge hole locking up the rear brake);
                Clean final drive, re-lube splines (moly assembly paste plus moly grease), replace hypoid;
                Remove swing arm, clean, repack bearings (almost no grease left, just a little earwax, some galling but no pits, seals OK), clean&lube driveshaft (moly assembly paste + moly grease), reassemble & reinstall swing arm, adjust for center.
                Change middle case oil (done, gooey but no metal flakes);

                Still to do:

                replace front tire (done);
                remove broken speedo cable (speedo doesn't work anyway-replace later);
                replace toasted front wheel bearings with all-balls;
                pads&rotors OK;
                replace toasted steering head bearings with all-balls ("notch" is not a big enough word to describe the canyon I can feel in the races - the handlebars actually jump);
                replace front brake fluid, clean out MC (front brakes worked fine, but I'm not risking leaving any fluids in this thing unchanged);
                replace leaky fork seals and broken dust covers;
                remove exhaust (4 into 1), take to shop for repairs from bottoming out (done);
                Set cam chain tension and fix oil leak at tensioner;
                Replace broken #4 spark plug cap (done);
                Change engine oil & filter;
                Change air filter, clean air intake;
                Clean carbs.

                I actually think I'm going to give this thing back to the owner as soon as I get the rear wheel back on. I don't think the time and frustration will pay off -- even if my buddy lets me ride it forever, it's probably too much bike for me anyway.


                .
                Last edited by Retroben; 06-10-2011, 12:16 PM.

                Comment


                • #9
                  Rear wheel pics

                  OK, let's see if this works.


                  Rear wheel drive side, cleaned and lubed


                  Rear wheel brake side


                  Final drive, cleaned and lubed


                  Wheel installed on final drive. Driveshaft turns, so the splines must be lined up.


                  Spacer installed. Right place? Dropped it during removal.


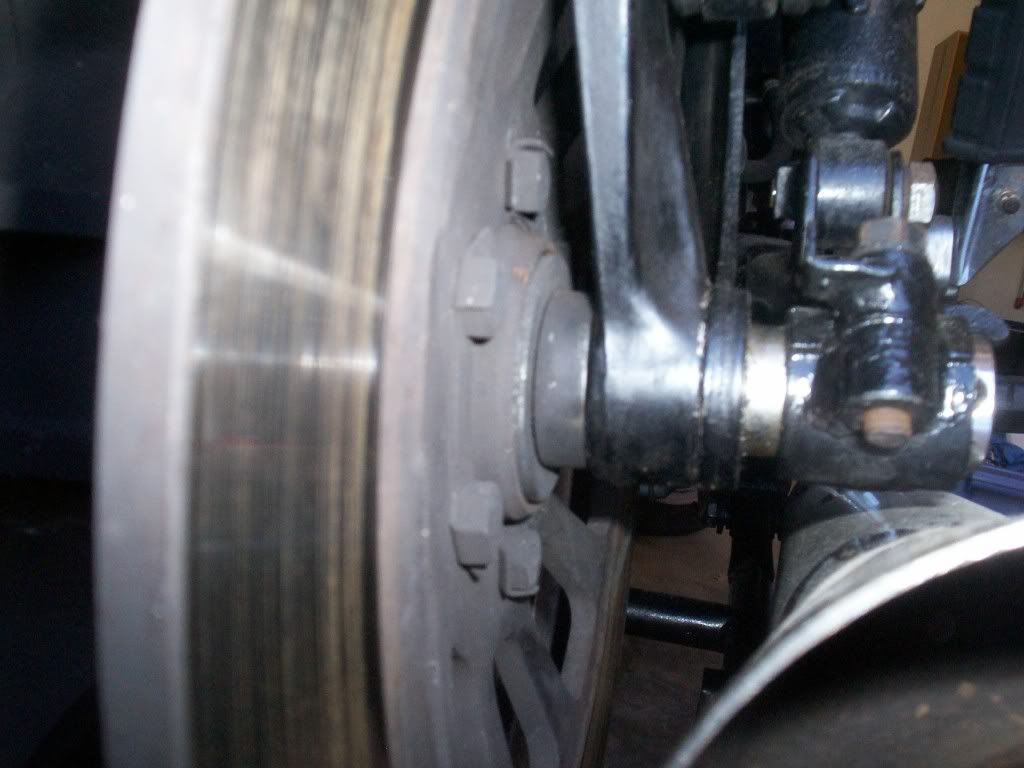
                  Axle went in this far by hand. Why is it crooked? Not bent. I did have to drive it out when I removed the rear wheel, but I thought it was just binding from the rust (plenty of that).

                  Comment


                  • #10
                    Originally posted by Retroben View Post

                    Axle went in this far by hand. Why is it crooked? Not bent. I did have to drive it out when I removed the rear wheel, but I thought it was just binding from the rust (plenty of that).
                    You've got the spacer in the right place; the reason for the poor axle fit is the swingarm is tweaked. The gap you have between the caliper bracket and the arm is much too wide, so closing that up will help a bunch. It should be less than 1/8", so use a piece of wood against the arm (so you don't deform the axle hole) and give it some good whacks with a BFH (big ****** hammer) until the gap shrinks. Brace the bike so you don't knock it over...
                    Fast, Cheap, Reliable... Pick any two

                    '78E original owner - resto project
                    '78E ???? owner - Modder project FJ forks, 4-piston calipers F/R, 160/80-16 rear tire
                    '82 XJ rebuild project
                    '80SG restified, red SOLD
                    '79F parts...
                    '81H more parts...

                    Other current bikes:
                    '93 XL1200 Anniversary Sportster 85RWHP
                    '86 XL883/1200 Chopper
                    '82 XL1000 w/1450cc Buell, Baker 6-speed, in-progress project
                    Cage: '13 Mustang GT/CS with a few 'custom' touches
                    Yep, can't leave nuthin' alone...

                    Comment


                    • #11
                      Looks correct for the special model as far as order of parts, gap does look big compared to any I have worked on....


                      It is not uncommon to need to move the axle a little to get it to line up. Yours does seem to be off more than typical. Does your rear wheel move enough to get it to line up?
                      Life is what happens while your planning everything else!

                      When your work speaks for itself, don't interrupt.

                      81 XS1100 Special - Humpty Dumpty
                      80 XS1100 Special - Project Resurrection


                      Previously owned
                      93 GSX600F
                      80 XS1100 Special - Ruby
                      81 XS1100 Special
                      81 CB750 C
                      80 CB750 C
                      78 XS750

                      Comment


                      • #12
                        A couple of things are bugging me here. First, like I said above, seems the hub is not seating all the way in the FD, rocking just a little.
                        When I look at the rear hub, I see an oil seal on each side seated into the hub, with a metal collar in the middle. From the diagrams I understand that collar is sitting on top of my wheel bearings. On the drive side, that collar protrudes about 2mm or so beyond the lip of the seal - taking it even a bit beyond the hub rim. It feels like this is why my wheel is not seating all the way on the FD. On the brake side, that collar is about 2mm inside the hub beyond the seal. But when I put the spacer on, the middle of it seems to reach inside the seal and contact both the collar in the middle and around the seal. I did not disassemble the rear hub.

                        Sorry, I'm not only not a mechanic, but not a technical writer either

                        Comment


                        • #13
                          Took apart rear hub (brake side), cleaned& repacked, and understood my last post was B.S.

                          Comment


                          • #14
                            Like I said, give it some whacks until that gap is closed up. I had the same problem when I modified one of these arms, and after 'realigning' the brake side, my axle now slides in by hand.

                            The brake side isn't braced all that well, and can move around in use. It doesn't take too much for the axle hole to be off like that...
                            Fast, Cheap, Reliable... Pick any two

                            '78E original owner - resto project
                            '78E ???? owner - Modder project FJ forks, 4-piston calipers F/R, 160/80-16 rear tire
                            '82 XJ rebuild project
                            '80SG restified, red SOLD
                            '79F parts...
                            '81H more parts...

                            Other current bikes:
                            '93 XL1200 Anniversary Sportster 85RWHP
                            '86 XL883/1200 Chopper
                            '82 XL1000 w/1450cc Buell, Baker 6-speed, in-progress project
                            Cage: '13 Mustang GT/CS with a few 'custom' touches
                            Yep, can't leave nuthin' alone...

                            Comment


                            • #15
                              Originally posted by Retroben View Post
                              Took apart rear hub (brake side), cleaned& repacked, and understood my last post was B.S.
                              One other thing, if I understand your post right, was that you took the final drive off of the swing arm. Is that right?
                              If so, I have found that the best method of putting it back on is to snug up the 4 bolts holding it to the swing arm, using fingers only, then put in the back wheel and axle. Tighten the axle, then go back and torque the 4 final drive bolts. cz

                              Comment

                              Working...
                              X