If this is your first visit, be sure to
check out the FAQ by clicking the
link above. You may have to register
before you can post: click the register link above to proceed. To start viewing messages,
select the forum that you want to visit from the selection below.
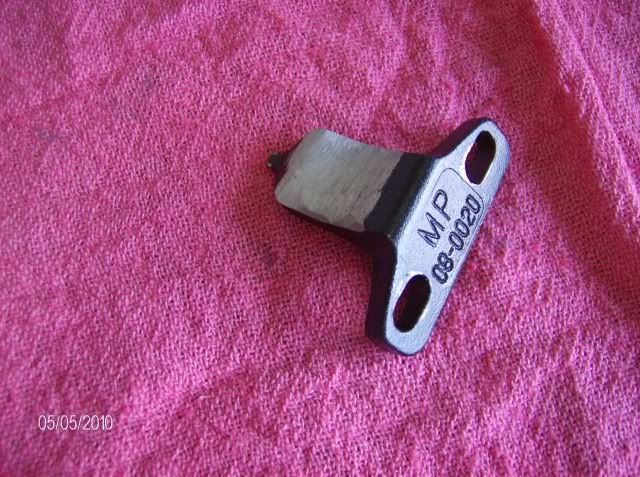
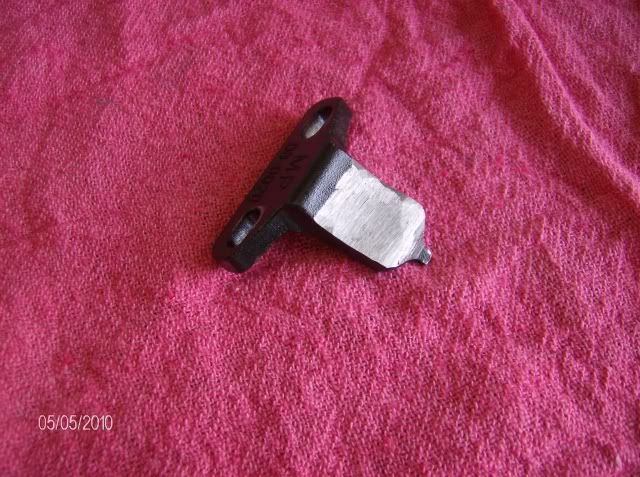
I have been trying to find what modification has to be done to the motion pro valve tool but all i can find is that is has to be modified to work can anyone help me and let me know what has to be modified to make it work. tia Laurier.
mine is the same one but it doesn't seem long enough to press down on the bucket, but now i am not sure if that is the case or is it that it can't get close enough to the bucket by the camshaft.
mine is the same one but it doesn't seem long enough to press down on the bucket, but now i am not sure if that is the case or is it that it can't get close enough to the bucket by the camshaft.
It shouldn't be touching the cam at all. The cam needs to be rotated after the tool is installed in order to remove the shim. IIRC, I tried to slip a feeler guage between the tool and the cam and it wouldn't go, which led me to grinding the tool down. I had to take a pretty good amount off but it works perfectly now. I also had to ream the 2 bolt holes in the tool out slightly, just be careful, the key word is slightly.
I just did mine this last weekend, and the tool worked perfectly out of the box. No modification needed.
Use a small screwdriver to rotate the bucket, so the slot/notch is at the top. Turn the cam so it presses the shim and bucket down all the way. Install the tool, so it is centered with the cam (generally all the way to one side or the other). Turn the cam in whatever direction moves the lobe AWAY from the tool, so it is pointing directly AWAY from the shim. The tool holds the bucket down, just above flush with the head. You can verify clearance by sticking the largest feeler gauges in there between the shim and the cam. Use a small flat-blade screwdriver to pry the shim out of the bucket, using the slot/notch you found in the first step. The shim should pop up with little effort. A thin pair of needle-nose pliers should be able to grip the shim and pull it out.
Be careful when re-insterting the shim, and make sure that it seats down in the bucket properly. I found that it tends to squeeze a bit of oil out around it's edges when it seats. Rotate the cam so the lobe presses the shim down again, and remove the tool.
Repeat 7 more times.
1980 XS850SG - Sold
1981 XS1100LH Midnight Special (Sold) - purchased 9/29/08
Fully Vetterized and Dynojet Kit added, Heated Grips, Truck-Lite LED headlight, Accel Coils, Irridium plugs, TKAT Fork Brace, XS850LH Final Drive & Black SS Brake lines from Chacal.
Here's my web page devoted to my bike! XS/XJ User's Manuals there, and the XJ1100 Service Manual and both XS1100 Service manuals (free download!).
Whether you think you can, or you think you cannot - You're right.
-H. Ford
AFAIK, there's only one modification of that tool that actually works --- THROW IT AWAY.
Just cause you cant get it to work doesnt mean others cant, you need to be smarter than the tool though Randy!
Nathan
KD9ARL
μολὼν λαβέ
1978 XS1100E K&N Filter
#45 pilot Jet, #137.5 Main Jet
OEM Exhaust
ATK Fork Brace LED Dash lights
Ammeter, Oil Pressure, Oil Temp, and Volt Meters Green Monster Coils SS Brake Lines
Vision 550 Auto Tensioner
In any moment of decision the best thing you can do is the right thing, the next best thing is the wrong thing, and the worst thing you can do is nothing.
But I am! I find it much easier to loosen the cams rather than rock...install..rock..uninstall...EIGHT TIMES
Depends, how many shims do you need to do
Nathan
KD9ARL
μολὼν λαβέ
1978 XS1100E K&N Filter
#45 pilot Jet, #137.5 Main Jet
OEM Exhaust
ATK Fork Brace LED Dash lights
Ammeter, Oil Pressure, Oil Temp, and Volt Meters Green Monster Coils SS Brake Lines
Vision 550 Auto Tensioner
In any moment of decision the best thing you can do is the right thing, the next best thing is the wrong thing, and the worst thing you can do is nothing.
I just did mine this last weekend, and the tool worked perfectly out of the box. No modification needed.
Use a small screwdriver to rotate the bucket, so the slot/notch is at the top. Turn the cam so it presses the shim and bucket down all the way. Install the tool, so it is centered with the cam (generally all the way to one side or the other). Turn the cam in whatever direction moves the lobe AWAY from the tool, so it is pointing directly AWAY from the shim. The tool holds the bucket down, just above flush with the head. You can verify clearance by sticking the largest feeler gauges in there between the shim and the cam. Use a small flat-blade screwdriver to pry the shim out of the bucket, using the slot/notch you found in the first step. The shim should pop up with little effort. A thin pair of needle-nose pliers should be able to grip the shim and pull it out.
Be careful when re-insterting the shim, and make sure that it seats down in the bucket properly. I found that it tends to squeeze a bit of oil out around it's edges when it seats. Rotate the cam so the lobe presses the shim down again, and remove the tool.
Repeat 7 more times.
Just like C-bug says. No problem at all with mine.
2-79 XS1100 SF 2-78 XS1100 E Best bike Ever 80 XS 1100 SG Big bore kit but not fully running yet.
Couple of more parts bikes of which 2 more will live!
There was a thread years ago about this. There are usually two mods needed: the grinding down of the top of the curved surface, and grinding the underside of the flange that gets bolted down. Without these mods, most tools will either not reach the cam bucket or not reach around the cam lobe.
"Time is the greatest teacher; unfortunately, it kills all of its students."

 Tweet
Tweet


") I find it much easier to loosen the cams rather than rock...install..rock..uninstall...EIGHT TIMES
I find it much easier to loosen the cams rather than rock...install..rock..uninstall...EIGHT TIMES
Comment