Announcement

Collapse
No announcement yet.

Alternative Alternator Options

Collapse
X
 
  • Filter
  • Time
  • Show
Clear All
new posts

  • those bolts look good
    considering you've already tapped the holes
    for the previous bolts they'l be sweet.

    i wouldnt worry about locktite on the rotor to
    the crank the tapered designed of both would
    hold it in place and the rotor can be a bugger to
    get off at the best of times.
    pete


    new owner of
    08 gen2 hayabusa


    former owner
    1981 xs1100 RH (aus) (5N5)
    zrx carbs
    18mm float height
    145 main jets
    38 pilots
    slide needle shimmed .5mm washer
    fitted with v/stax and uni pod filters

    [url]http://www.youtube.com/watch?v=3pA8dwxmAVA&feature=mfu_in_order&list=UL[/url]

    Comment


    • Holy rotors, T.C., that's awesome! My computer crashed and you fine-tuned the pulley while I was setting up the new hardware and restoring the backups.
      -- Scott
      _____

      2004 ST1300A: No name... yet
      1982 XJ1100J: "Baby" SS Brakes, '850 FD, ACCT
      1980 XS1100G: "Columbo" SS Brakes, '850 FD, ACCT
      1979 XS1100SF: "Bush" W.I.P.
      1979 XS1100F: parts
      2018 Heritage Softail Classic 117 FLHCS SE: "Nanuk" It's DEAD, it's not just resting. It is an EX cycle.

      Comment


      • Update!

        Thanks Scott.

        It's been a few weeks, took a while to get my larger 8" x 12" plate, and then the weather was yucky, etc., so I finally got back to working on this project again! And of course, I have pictures!

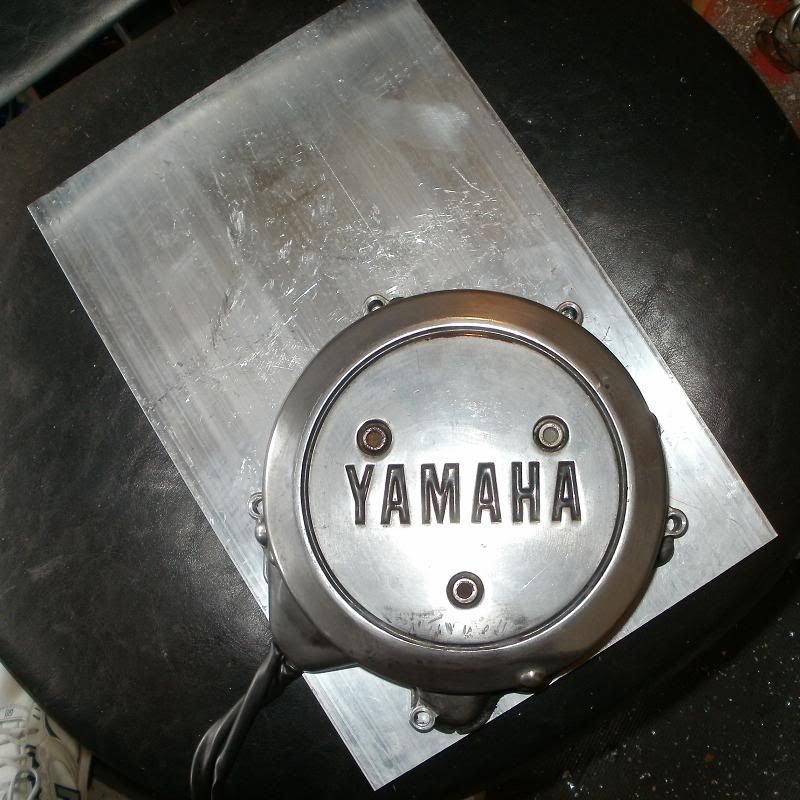
        First shows the full sized plate, and the OEM alt cover in place for drawing a template and centerpunching the 5 mounting holes, as well as later using the loose rotor to mark the center cut out area, center of the remaining plate.


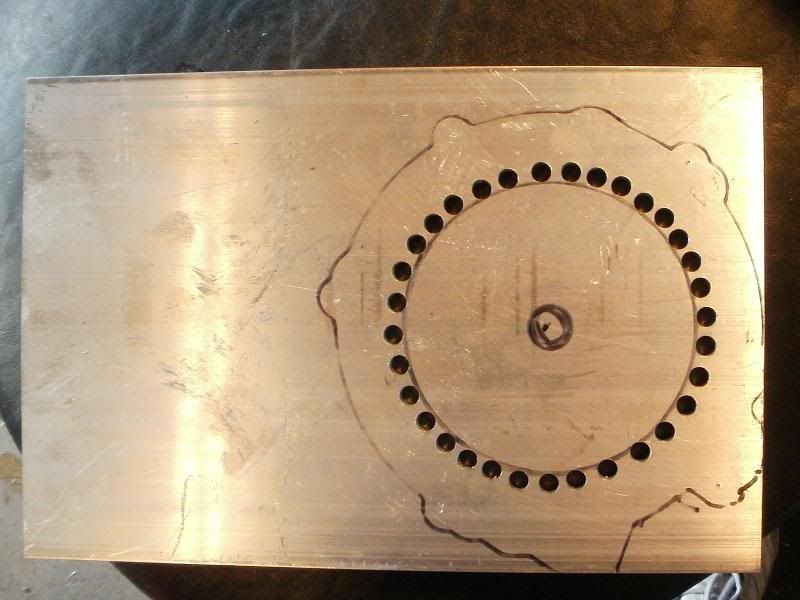
        This just shows making the 30 some odd drilled holes to make cutting out the center plate easier and perhaps more precise with the jigsaw. I'll provide all of the measurements in the formal tech tip...ie. how far from the bolt holes the edge of the rotor is to ensure proper center positioning!


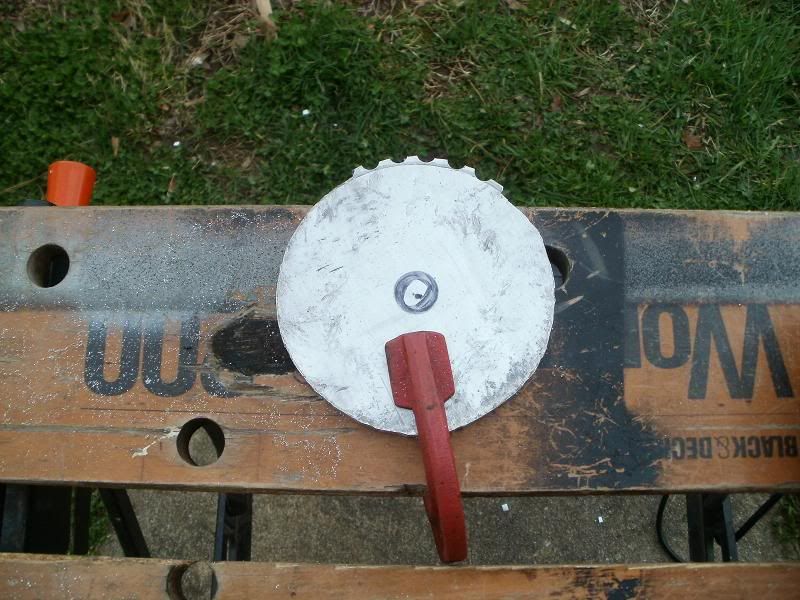
        Just showing the remaining center plate after I had gone back and again used the jigsaw to cut off the nubs to get as close to a circle as possible!


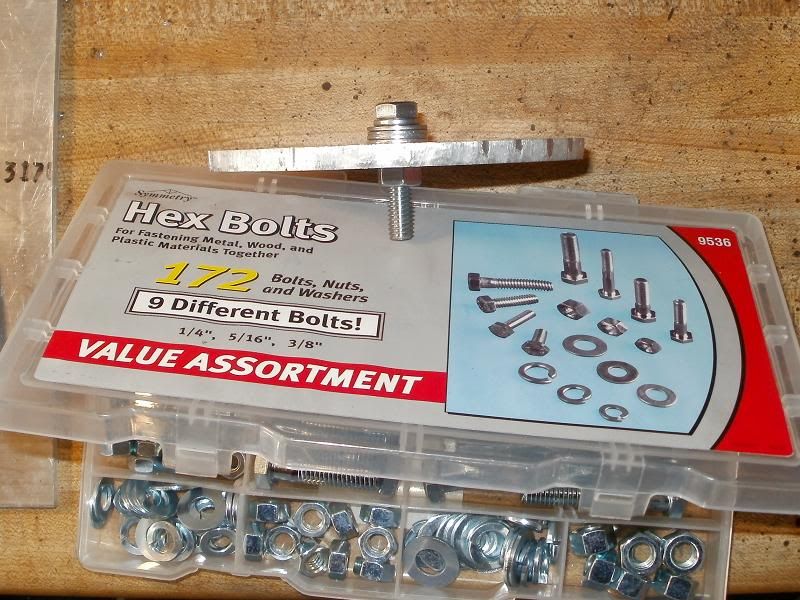
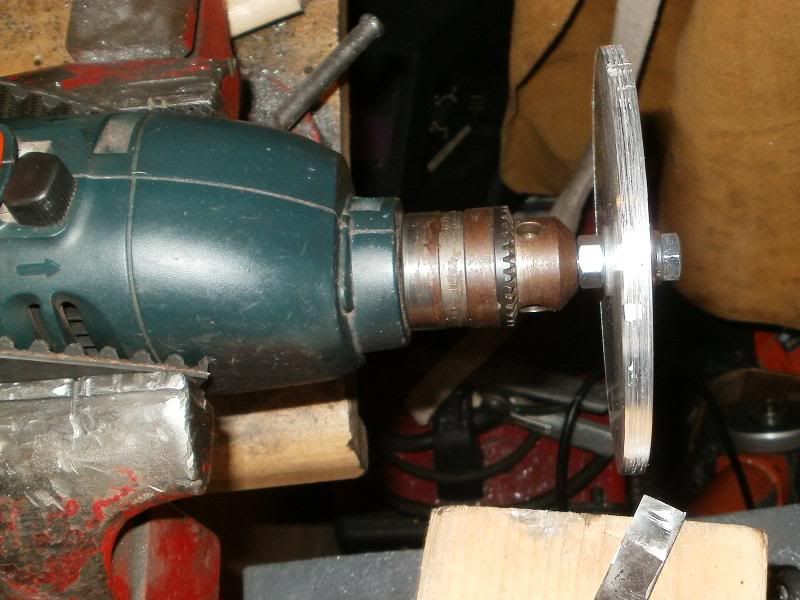
        After using the calipers to mark the true center of the round plate, I drilled a small hole, then put a bolt/nut/washer combo in it to act as an arbor so that I could mount it in my poormans lathe (Thanks Bug for the idea)!


        Since balance is a concern, using a sharp chisel I was able to whittle down the rough edge of the plate down to a fairly even smooth round edge!!


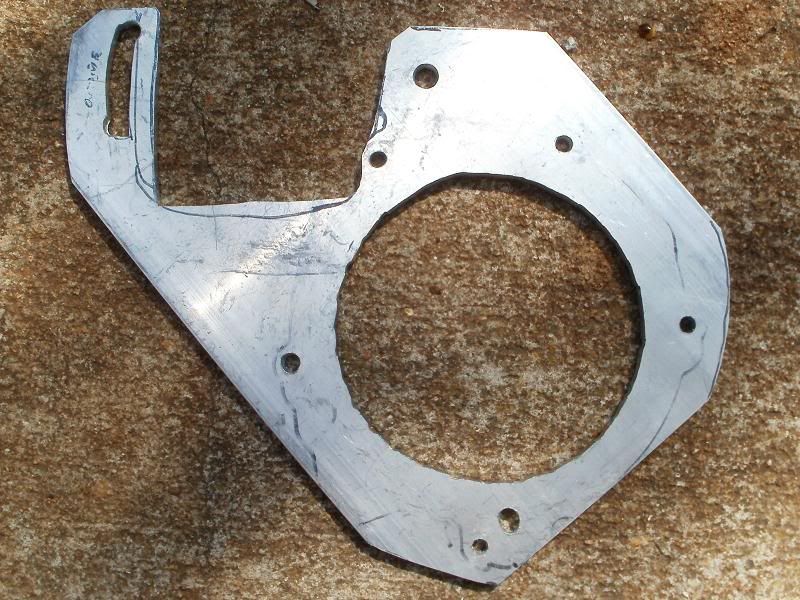
        Here's the mounting bracket/plate with the engine case holes drilled, the ALT's mounting hole and adjustment slot cut, along with the opening for the actual Alt's body! I think I might have cut a little too much space out below the alt, especially in the lower left corner area, but it's still quite strong, will just recommend others allow more material in that area.


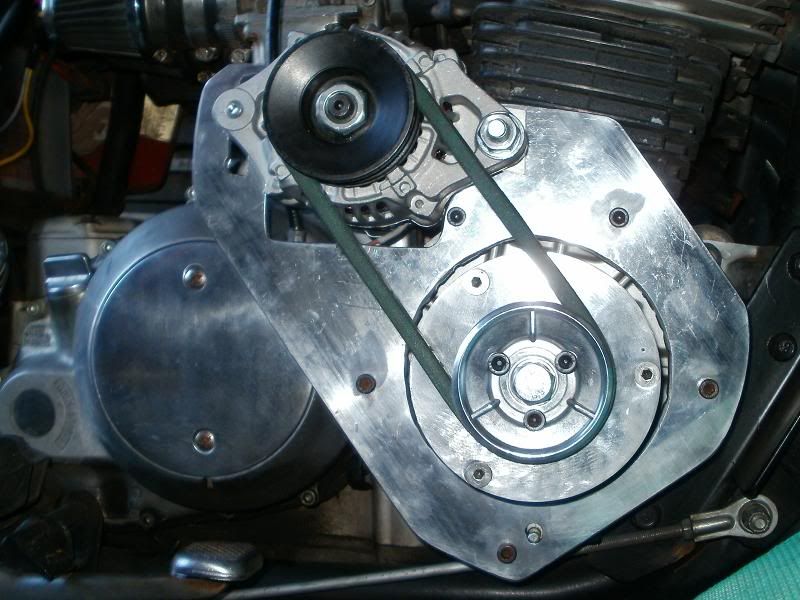
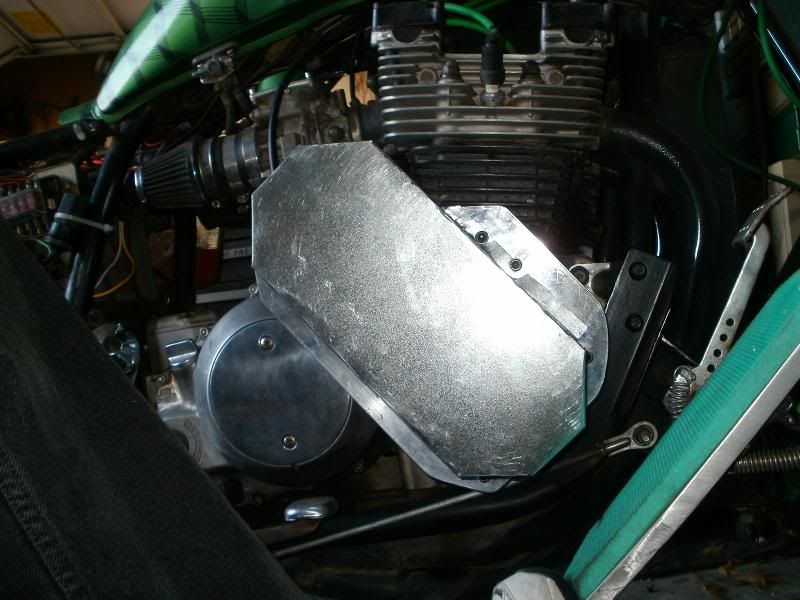
        Here's the full sized plate, Rotor with it's pulley stabilizing plate, pulley, and center bolt all mounted. I polished the plates a little!


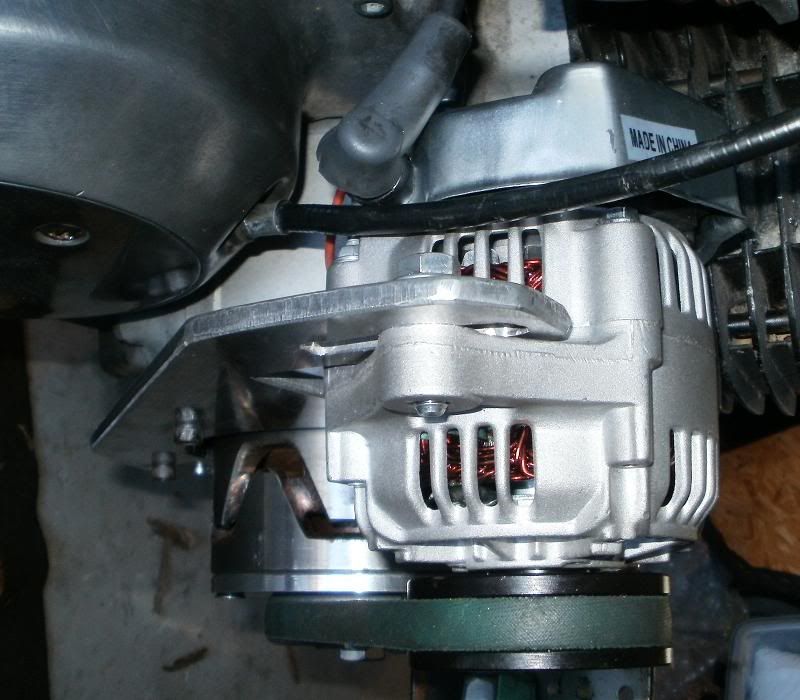
        This just shows the alt, the clutch cable with much less bend/stress on it since I moved the ALT mounting hole 1/4" farther to the right, it's very close to the heads now! And you can see that the plate will NOT interfere with performing the clutch cable adjustment!


        And here's the template for the sheet metal cover. Since the modification to the pulley, the bolt didn't stick out as far, and so I was able to take a 1/2" off the overall depth of the cover, it only sticks out 3.5" instead of 4" from the surface of the mounting plate. I had first thought of using the plate mounting bolts for the cover, but then "DUH", realized that it would involve removing them to get the pulley cover off! SO..I'll be making some additional holes/tapped to take the 6mm bolts, and will allow removal of the cover without messing with the mounting plate!


        I know the cover looks intricate, but after making the RECTANGULAR one, it just stuck out too far all over, and this design will be much closer fitting to the ALT/pulleys/rotor area, and will provide a modest rain shield for the ALT!

        I'll be working on this cover hopefully this coming weekend, it's amazing how much time this fabrication takes, and I had essentially done it before with the half plate! But I wanted to show how this could be done with relatively common home tools vs. fancy lathe/mill/bandsaw type tools!

        Stay Tuned! T.C.
        T. C. Gresham
        81SH "Godzilla" . . .1179cc super-rat.
        79SF "The Teacher" . . .basket case!
        History shows again and again,
        How nature points out the folly of men!

        Comment


        • Very nice looking TC! How is that pudding tasting today
          Nathan
          KD9ARL

          μολὼν λαβέ

          1978 XS1100E
          K&N Filter
          #45 pilot Jet, #137.5 Main Jet
          OEM Exhaust
          ATK Fork Brace
          LED Dash lights
          Ammeter, Oil Pressure, Oil Temp, and Volt Meters

          Green Monster Coils
          SS Brake Lines
          Vision 550 Auto Tensioner

          In any moment of decision the best thing you can do is the right thing, the next best thing is the wrong thing, and the worst thing you can do is nothing.

          Theodore Roosevelt

          Comment


          • Wow awesome mod TC. how far from the engine does this stick out?
            79 XS1100 Special
            Kerker 4-1, Pods, BS34 old style carbs, plastic floats, 147.5 mains, progressive rear suspension (restoring)

            Comment


            • Looks to be about even with the original ALT cover from here....
              Last edited by DAVINCI; 04-04-2011, 02:11 PM.
              Former owner, but I have NO PARTS LEFT!

              Comment


              • T.C. I am seriously looking at doing this mod but I am having trouble tracking down the pulley you used. also are there any things that you would do differently?
                79 XS1100 Special
                Kerker 4-1, Pods, BS34 old style carbs, plastic floats, 147.5 mains, progressive rear suspension (restoring)

                Comment


                • Hey there Penquin,

                  I'll be making a formal Tech Tip once I get it all done, still mulling over about the pulley/alt cover. Steve came up with a not so "crazy" design that utilizes several sections instead of trying to make it all out of one piece. A lot less fancy angled cutting and folding and such.

                  The pulley is from Grainger, #3LC06, it's 2.75" outside diameter; 3/8" plain bore, for 4L V-belts.
                  http://www.grainger.com/Grainger/she...z0nwfmZ1z0o4pk

                  While you're at it, you'll want to also get the 4L series 20" long 1/2" wide Vbelt #4L200.

                  http://www.grainger.com/Grainger/v-b...ecatalog/N-cc2

                  You'll save $10-$15 on the belt this way ordering both from grainger, and you won't have to settle for one that's GREEN!

                  And as noted by the others, it doesn't really stick out any farther than the OEM case, but there's more up behind the heads/beside the carbs, but it's well out of the way of our legs/knees, see the photos in the previous pages. But due to the fast moving parts, a safety guard is definitely needed to protect your leg, as well as providing a guard against direct rain fall!

                  T.C.
                  T. C. Gresham
                  81SH "Godzilla" . . .1179cc super-rat.
                  79SF "The Teacher" . . .basket case!
                  History shows again and again,
                  How nature points out the folly of men!

                  Comment


                  • Quite a project TC !
                    80 SG
                    81 SH in parts
                    99 ST1100
                    91 ST1100

                    Comment


                    • Believe it or not, FINAL UPDATE!

                      Hey Folks,

                      Okay, I was finally able to get to designing and making the pulley cover after doing some Honeydo stuff!! Again, thanks to Crazy Steve for helping me to see a simpler way of doing it, involved 3 pieces, but much simpler than trying to make it out of 1 piece with so many bends/cuts!!
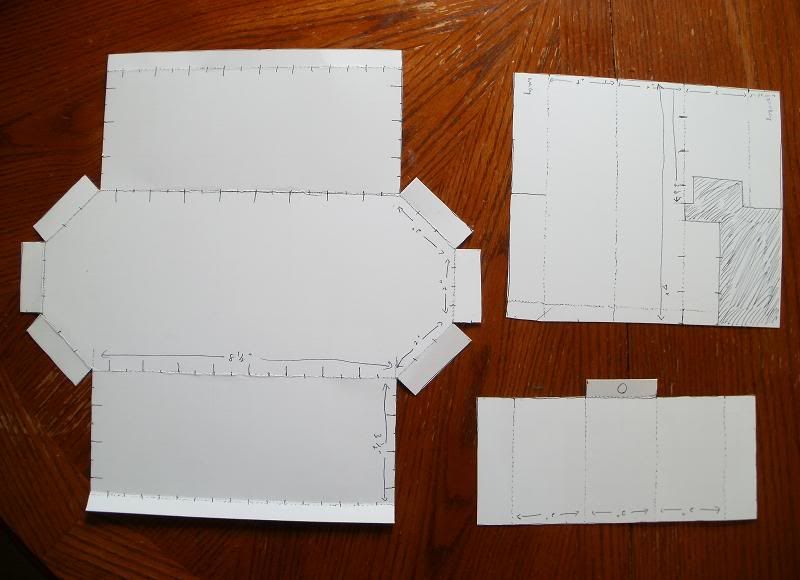
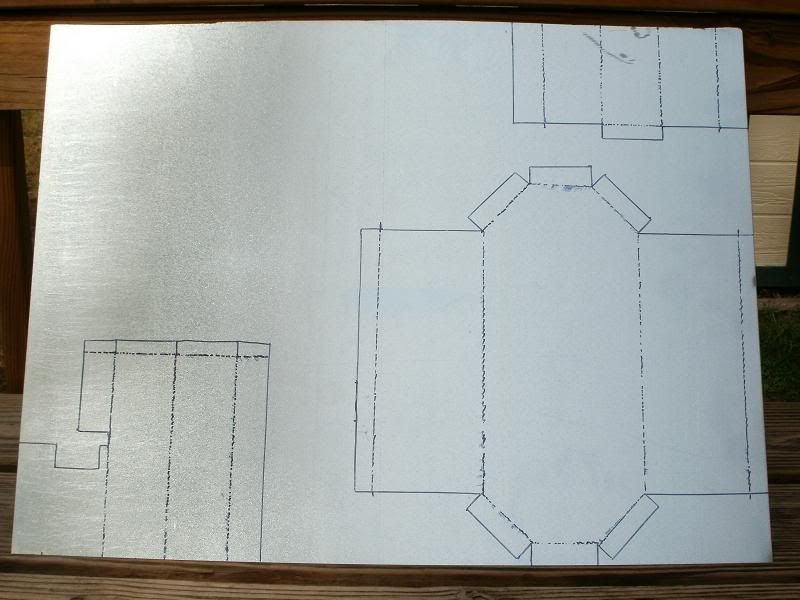
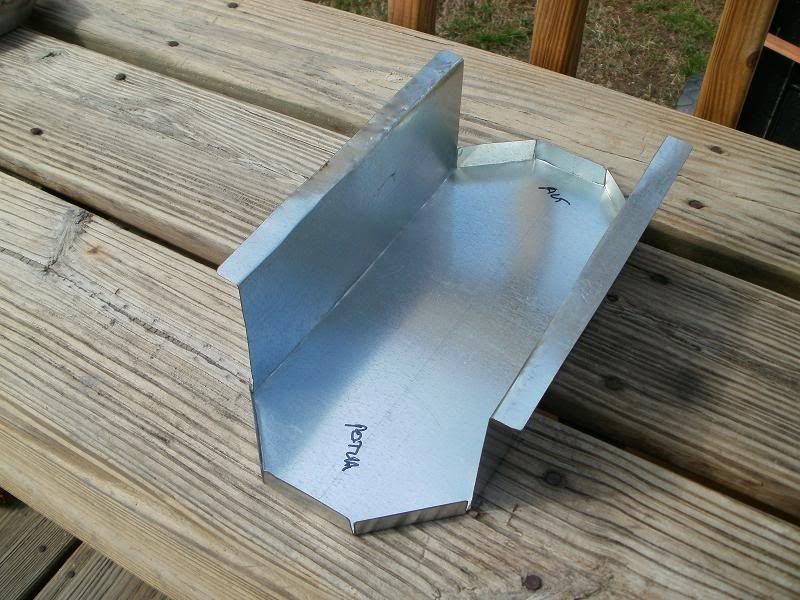
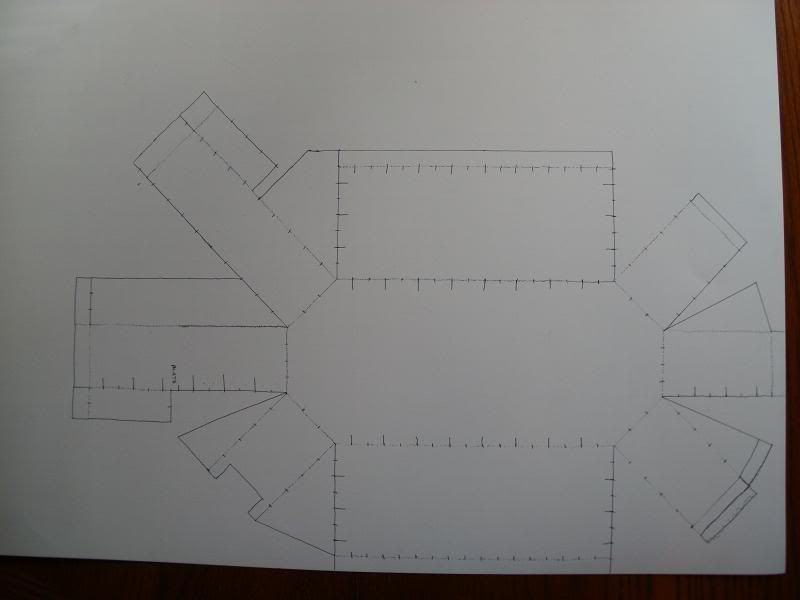
                      SO...here's the template that I was able to come up with. He had suggested ROUND corners, but they are a bit harder to measure, and then bend the pieces to a nice contour, etc., so I combined my angular design with his and came up with this! Of course I have pictures!!


                      Then here it is transcribed onto the sheet metal, dotted lines denote bends!


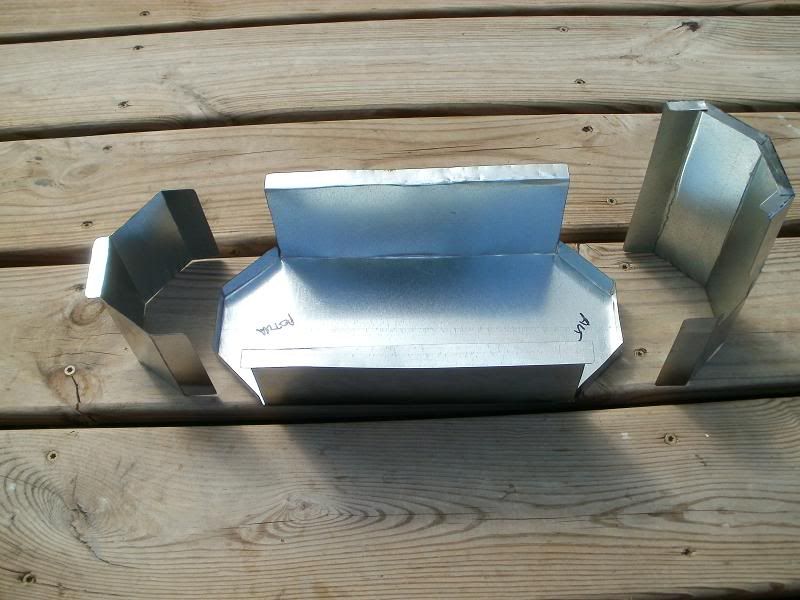
                      Here's the main section cut out and bent to shape.


                      Here are the 2 end pieces, the smaller one for the ROTOR end, the larger/longer one for the ALT end to extend over the ALT!


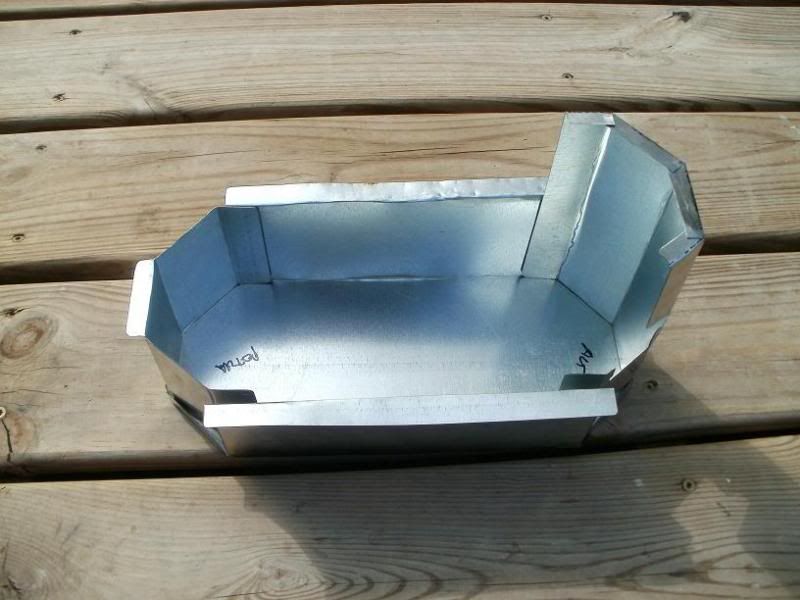
                      Just showing them positioned together, I then Riveted the little overhang flaps of the top to the pieces, and then the 1" overhang of the sides to the long sides of the main panel!


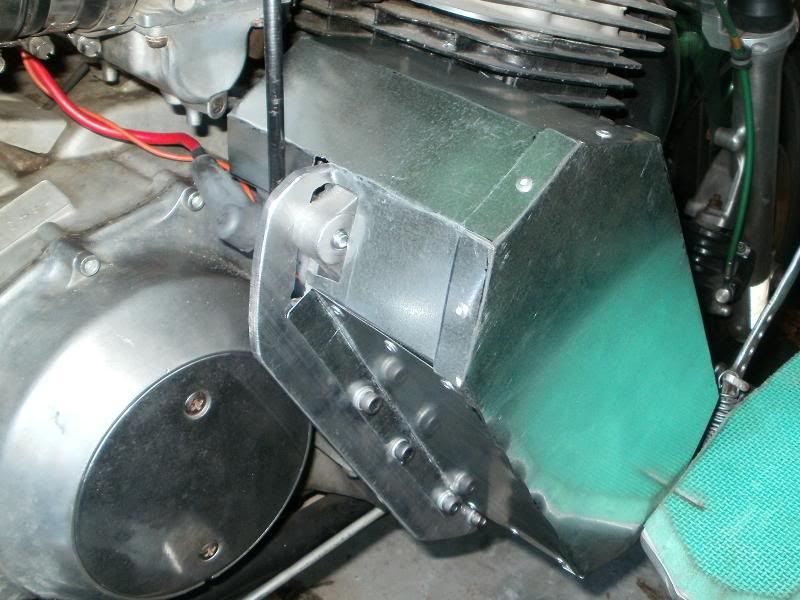
                      Here it is mounted over the rotor/alt, sorry for the fisheye lens affect!


                      This angle shows that it doesn't protrude out very far, I can still utilize my large footplates, you can see the extra mounting bolts used to hold it in place.


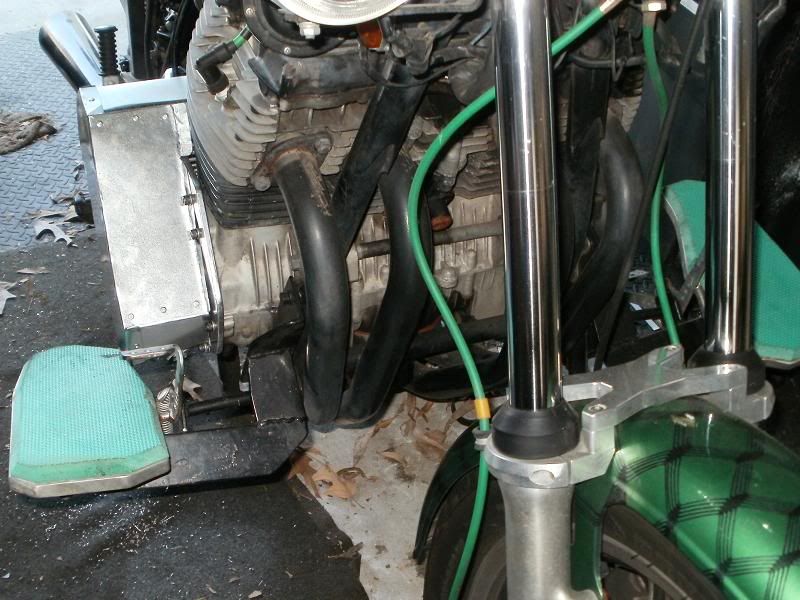
                      Another angle shown from the front.


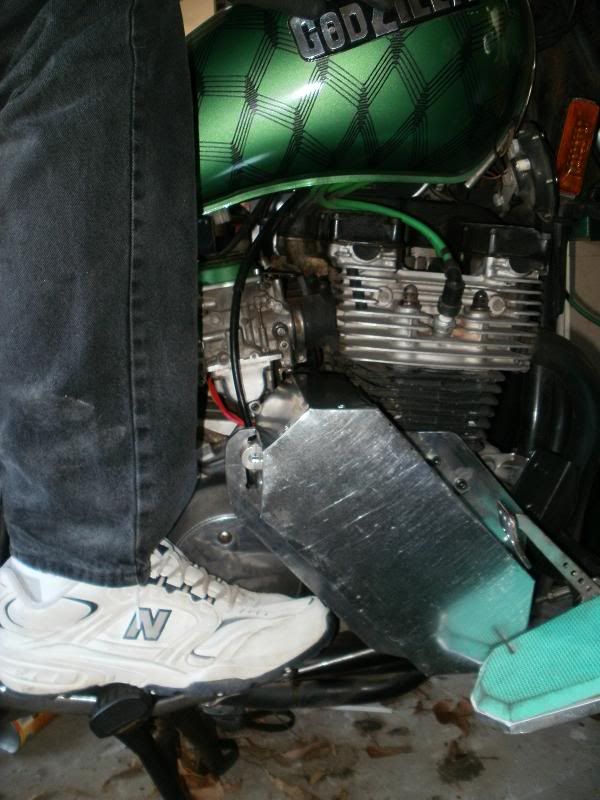
                      And then one with my foot on the pegs showing plenty of room for using the controls and such!


                      I'm charging up the battery after having it sit a few weeks, and then next weekend I'll be able to take it to the inspection station to get it's safety sticker for the year!

                      Once I can access the site directly, I'll then finalize and create a formal tech tip with measurements, etc.! Thanks for following and playing along, appreciated the tips and such!!

                      PS, one little concern with this cover is that it's galvanized steel, but where I've made the cuts, it will be susceptible to rusting, so I guess I'll need to put a layer of clear coat on it to help seal the cut raw edges to try to prevent or slow down any rust that may try to occur.

                      Also, I'll be putting a bead of silicone sealant around the inside areas to also help in keeping rain water from being blown thru the seams!? I may even put a stick on weather strip along the edge just to help in keeping the dust down, but remember, it's fairly OPEN behind the cover at the ALT mount and such. Also, was suggested that folks may want to PAINT their ROTOR to help prevent it from rusting too much also!? YMMV!
                      T. C. Gresham
                      81SH "Godzilla" . . .1179cc super-rat.
                      79SF "The Teacher" . . .basket case!
                      History shows again and again,
                      How nature points out the folly of men!

                      Comment


                      • Silicone caulk and steel don't get along, either use an acrilic caulk, gasket maker, or a duct sealant.

                        Nice work though!
                        Nathan
                        KD9ARL

                        μολὼν λαβέ

                        1978 XS1100E
                        K&N Filter
                        #45 pilot Jet, #137.5 Main Jet
                        OEM Exhaust
                        ATK Fork Brace
                        LED Dash lights
                        Ammeter, Oil Pressure, Oil Temp, and Volt Meters

                        Green Monster Coils
                        SS Brake Lines
                        Vision 550 Auto Tensioner

                        In any moment of decision the best thing you can do is the right thing, the next best thing is the wrong thing, and the worst thing you can do is nothing.

                        Theodore Roosevelt

                        Comment


                        • How is it going? Did you ever write the official tech tip? I was curious how much more work would be required to do this on an XJ1100.

                          My father's a machinist with all the equipment needed to do this.

                          Thanks,
                          Jon
                          __________________________
                          Jon Groelz

                          '82 XJ1100J-John
                          '78 XS1100E-Name Forthcoming (It's a Girl!)

                          Comment


                          • Originally posted by Hepcat View Post
                            How is it going? Did you ever write the official tech tip? I was curious how much more work would be required to do this on an XJ1100.

                            My father's a machinist with all the equipment needed to do this.

                            Thanks,
                            Jon
                            I would think it would be almost exactly the same to do this on an XJ. It I ever find the time to troubleshoot and get my existing charging system working, maybe this can get added to the list of future upgrades to consider
                            82J · 81SH · 79SF Fire Damage · 78E · 79F Parts Bike · 04 Buell Blast
                            Website/Blog

                            Comment


                            • Originally posted by Ken Talbot View Post
                              Hey TC, have you given any thought to trying a link belt for this application? This might help solve some of the alignment issues.
                              According to the end of the Instructions on that page, that is a PowerTwist Plus they resell by the foot. Everywhere else appear to sell a minimum of 5ft.

                              I started looking into link belts and I would imagine they would work for this application, but at $47 (+ship) for a minimum 5ft length, it's a hard sell.

                              http://www.grainger.com/Grainger/POWERTWIST-PLUS-Link-VBelt-6PTY2?Pid=search


                              There is a lot of information about this brand here:

                              http://www.fennerdrives.com/high_per...wist_home.aspx
                              82J · 81SH · 79SF Fire Damage · 78E · 79F Parts Bike · 04 Buell Blast
                              Website/Blog

                              Comment

                              Working...
                              X