Announcement

Collapse
No announcement yet.

Brake disc alignment

Collapse
X
 
  • Filter
  • Time
  • Show
Clear All
new posts

  • Brake disc alignment

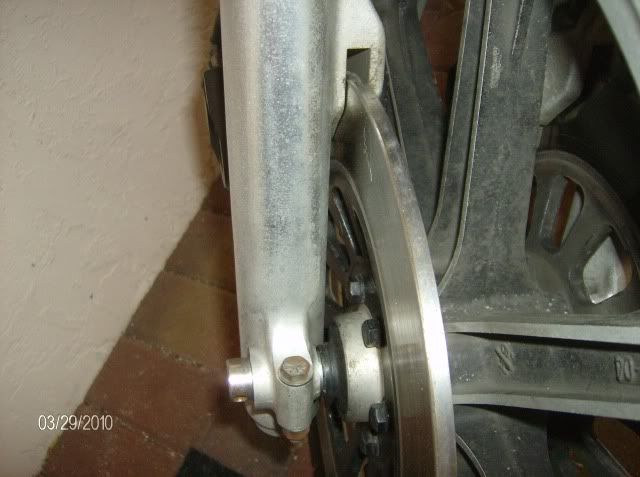
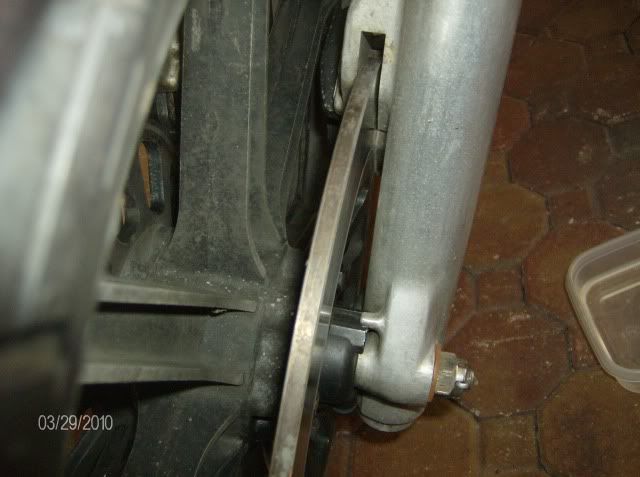
    Something isn't right and I don't like what I did to fix it so I am hoping you guys can set me straight. I didn't have a problem with the front disc alignment before I had the tires replaced, I noticed the disc on the right side (right when sitting on the bike) wasn't centered but all seemed OK. Got new tires and as soon as I rode away I knew something wasn't right. Took it back and they tinkered with it but it still wasn't right. I ended up putting a couple of spacers (thick washers) between the right fork and the bearing dust cover. That got the spacing right but now there is presure on the dust cover. I have only been able to find one picture on the site that gives me an idea of how it should be. it was on an 80' model special, mine is a 79' and the dust cover looks completely different. At first I thought mine had been installed backward because the neck on the cover went in toward the bearing rather than out toward the fork. It didn't seem to fit when I turned it around and it didn't stay in place either way without something holding it in.
    Does anyone have an SF that has a picture of both sides they could send me? Any advice would be welcome.

    Thanks
    "Do the right thing, even if nobody's looking"

    SR500E Black
    XS750SF Carmine Red
    XS1100SF Mustang Red Metalic
    (Bob worked on this one)

  • #2
    Try this schematic. Bikebandit has them all listed, but I prefer the benefiscal.co.uk, as they include actual photos for most of the items. You have to register there (free) though.
    1980 XS850SG - Sold
    1981 XS1100LH Midnight Special (Sold) - purchased 9/29/08
    Fully Vetterized and Dynojet Kit added, Heated Grips, Truck-Lite LED headlight, Accel Coils, Irridium plugs, TKAT Fork Brace, XS850LH Final Drive & Black SS Brake lines from Chacal.
    Here's my web page devoted to my bike! XS/XJ User's Manuals there, and the XJ1100 Service Manual and both XS1100 Service manuals (free download!).

    Whether you think you can, or you think you cannot - You're right.
    -H. Ford

    Comment


    • #3
      Loosen the axle pinch bolt on your right fork. Use a pry-bar of some sort to pull out your fork until the disc is centered in the caliper slot... tighten the pinch bolt.


      Tod

      P.S. Take those spacers back out.
      Try your hardest to be the kind of person your dog thinks you are.

      You can live to be 100, as long as you give up everything that would make you want to live to be 100!

      Current bikes:
      '06 Suzuki DR650
      *'82 XJ1100 with the 1179 kit. "Mad Maxim"
      '82 XJ1100 Completely stock fixer-upper
      '82 XJ1100 Bagger fixer-upper
      '82 XJ1100 Motor/frame and lots of boxes of parts
      '82 XJ1100 Parts bike
      '81 XS1100 Special
      '81 YZ250
      '80 XS850 Special
      '80 XR100
      *Crashed/Totalled, still own

      Comment


      • #4
        Ok, the left side speedo hub must be aligned. The tabs on the inside of the hub must mate with the tabs on the wheel, and also the outer slot must mate with the tab on the fork leg.


        On the right, it is normal for there to be a space in between the fork and the spacer hub. The shoulder on the axle draws against the hub and pulls the wheel tight when the nut is tightened.


        Proper tightening sequence is

        1. Tighten the axle to spec, 70ft/lb. IIRC. You might have to hold the right side with a Phillips screwdriver thru the hole.
        2. Center the right disk in the caliper bracket that is part of the fork. It's ok if it's not perfectly centered, just don't want it rubbing.
        3. Tighten the right pinch bolt.
        4. Tighten the fender bolts.
        5. Install the calipers and speedo cable.

        HTH
        Last edited by bikerphil; 03-29-2010, 09:06 AM.
        2H7 (79) owned since '89
        3H3 owned since '06

        "If it ain't broke, modify it"

        Comment


        • #5
          Is it possible that they didn't follow the proper installation procedure? It's kinda funky because your supposed to install the axle and then pull the right fork leg in or out to allign the disks with the calipers...

          From the manual....
          6. On special models. tighten the axle nut to 76
          ft.-lb. (103 N.m) and install a new cotter pin. Move
          the front forks up and down several times. Move the
          right-hand fork sideways until the left-hand disc is
          centered within the caliper assembly figure 13).
          Tighten the axle pinch bolt to 14.5 ft.-lb. (20 N.m).
          1979 xs1100 Special -
          Stock air box/K&N Filter, MAC 4-2 exhaust, Bad-Boy Air horn, TC fuse box, Windshield, Soft bags, Vetter Fairing, Blinkers->Run/Turn/Brake Lights, Headlight Modulator, hard wire GPS power

          Short Stack - 1981 xs1100 Standard - lowered for SWMBO.

          Originally posted by fredintoon
          Goes like a train, corners like a cow, shifts like a Russian tractor, drinks like a fish, you are gonna love it.
          My Bike:
          [link is broken]

          Comment


          • #6
            Originally posted by psycoreefer View Post
            Is it possible that they didn't follow the proper installation procedure? It's kinda funky because your supposed to install the axle and then pull the right fork leg in or out to allign the disks with the calipers...

            From the manual....
            I don't know about the specials, but on my standard the last couple of times I worked on it, I had to tighten the left side pinch bolts first to pull the fork lower into where it's supposed to be. Took a little jockeying to get it just right with the disk centered in the caliper, but once I got it right everything seems to work well. And I don't let nobody else touch those parts but me. I may get it wrong (hope not) but if I do it's my fault, not some other dummy.
            Cy

            1980 XS1100G (Brutus) w/81H Engine
            Duplicolor Mirage Paint Job (Purple/Green)
            Vetter Windjammer IV
            Vetter hard bags & Trunk
            OEM Luggage Rack
            Jardine Spaghetti 4-2 exhaust system
            Spade Fuse Box
            Turn Signal Auto Cancel Mod
            750 FD Mod
            TC Spin on Oil Filter Adapter (temp removed)
            XJ1100 Front Footpegs
            XJ1100 Shocks

            I was always taught to respect my elders, but it keeps getting harder to find one.

            Comment


            • #7
              I think I see part of my problem, well, the bikes problem anyway. On the right side my bearing dust cover is completely different. By the way, what keeps that cover in place? does it snap in ir what?
              "Do the right thing, even if nobody's looking"

              SR500E Black
              XS750SF Carmine Red
              XS1100SF Mustang Red Metalic
              (Bob worked on this one)

              Comment


              • #8
                There is an oil seal behind it. The dust collar fits over the oil seal loosely. The axle holds it in. My dust seal in the photo looks different because I painted it black. They are usually metallic color.
                Last edited by bikerphil; 03-29-2010, 06:04 PM.
                2H7 (79) owned since '89
                3H3 owned since '06

                "If it ain't broke, modify it"

                Comment


                • #9
                  That adjustment procedure goes against everything I know about setting up forks....

                  One of the main issues with telescoping forks is the importance of both tubes being as close as possible to being exactly parallel to each other to prevent binding and insure smooth operation. So purposely moving one side out of alignment is not a good thing. I can't believe Yamaha did this...

                  '78E original owner
                  Fast, Cheap, Reliable... Pick any two

                  '78E original owner - resto project
                  '78E ???? owner - Modder project FJ forks, 4-piston calipers F/R, 160/80-16 rear tire
                  '82 XJ rebuild project
                  '80SG restified, red SOLD
                  '79F parts...
                  '81H more parts...

                  Other current bikes:
                  '93 XL1200 Anniversary Sportster 85RWHP
                  '86 XL883/1200 Chopper
                  '82 XL1000 w/1450cc Buell, Baker 6-speed, in-progress project
                  Cage: '13 Mustang GT/CS with a few 'custom' touches
                  Yep, can't leave nuthin' alone...

                  Comment


                  • #10
                    I like this fork alignment procedure much better...

                    FORK ALIGNMENT

                    You need
                    a center stand or engine jack to do this. You must be able to keep your front
                    wheel in the air with the bike immobile.

                    Put the bike on its center stand. Do whatever is necessary to get the front
                    wheel in the air ½" is fine
                    Remove the fork caps so that your springs are loose and your front end moves
                    up and down freely
                    Loosen the front axle, the fender bolts, and all the triple clamp bolts. If
                    you have a fork brace, loosen that too
                    Lift the front wheel, sliding it up the fork tubes until you hit the
                    bottoming stops inside the forks. Use a tie-down to hold the wheel up in this
                    position, with the forks bottomed out.
                    Now, with the forks bottomed out, the fork sliders are inside the fork
                    lowers as much as they ever will be, and the forks are lined up as perfectly as
                    they can be. Now is the time to tighten everything, the triple clamp bolts
                    first, then the axle, then the fender bolts. If you have a fork brace, tighten
                    that last
                    Release the front wheel so that the forks extend fully, topping out. Replace
                    the fork caps.
                    That's it, that's as good a front end alignment as you can get
                    2H7 (79) owned since '89
                    3H3 owned since '06

                    "If it ain't broke, modify it"

                    Comment


                    • #11
                      Originally posted by bikerphil View Post
                      I like this fork alignment procedure much better...

                      FORK ALIGNMENT

                      You need
                      a center stand or engine jack to do this. You must be able to keep your front
                      wheel in the air with the bike immobile.

                      Put the bike on its center stand. Do whatever is necessary to get the front
                      wheel in the air ½" is fine
                      Remove the fork caps so that your springs are loose and your front end moves
                      up and down freely
                      Loosen the front axle, the fender bolts, and all the triple clamp bolts. If
                      you have a fork brace, loosen that too
                      Lift the front wheel, sliding it up the fork tubes until you hit the
                      bottoming stops inside the forks. Use a tie-down to hold the wheel up in this
                      position, with the forks bottomed out.
                      Now, with the forks bottomed out, the fork sliders are inside the fork
                      lowers as much as they ever will be, and the forks are lined up as perfectly as
                      they can be. Now is the time to tighten everything, the triple clamp bolts
                      first, then the axle, then the fender bolts. If you have a fork brace, tighten
                      that last
                      Release the front wheel so that the forks extend fully, topping out. Replace
                      the fork caps.
                      That's it, that's as good a front end alignment as you can get
                      I'm going to have to ty this...

                      Makes very good sense having the forks completely compressed. I had issues when I replaced my front wheel bearings and brake pads for the first time last year. Clamping down one side and prying on the other to "center" it didn't make much sense to me either, but it's what the book said to do.
                      79 XS1100 Special - slowing breathing life back into it...

                      Comment


                      • #12
                        I could be wrong, but Phil's last procedure there seems to be for a standard.

                        On the Specials, there is no getting around the fact you will need to pull or push the right side fork to center the disc in the center of the disc slot in the fork. Compressed or not, you will still need to do so.
                        Life is what happens while your planning everything else!

                        When your work speaks for itself, don't interrupt.

                        81 XS1100 Special - Humpty Dumpty
                        80 XS1100 Special - Project Resurrection


                        Previously owned
                        93 GSX600F
                        80 XS1100 Special - Ruby
                        81 XS1100 Special
                        81 CB750 C
                        80 CB750 C
                        78 XS750

                        Comment


                        • #13
                          No, you need to do the same on the standards too. One side locks in and the caliper is always centered on it, but the other just has the pinch bolt system and has to be moved back and forth to the right place. Can take a bit of doing, but once it's there it seems to stay pretty good. It's part of the reason nobody else touches mine. I might let one of the members here, but they understand the bike (well, maybe I speak to soon.) <gd&r>
                          Cy

                          1980 XS1100G (Brutus) w/81H Engine
                          Duplicolor Mirage Paint Job (Purple/Green)
                          Vetter Windjammer IV
                          Vetter hard bags & Trunk
                          OEM Luggage Rack
                          Jardine Spaghetti 4-2 exhaust system
                          Spade Fuse Box
                          Turn Signal Auto Cancel Mod
                          750 FD Mod
                          TC Spin on Oil Filter Adapter (temp removed)
                          XJ1100 Front Footpegs
                          XJ1100 Shocks

                          I was always taught to respect my elders, but it keeps getting harder to find one.

                          Comment


                          • #14
                            I agree with cywelchjr. I took my front rim off to have a new tire put on and when I reassembled it I only have to move the left (when sitting on the bike) fork at the most 0.075" in so the inside break pad had clearnace. The right side lines right up because the break caliper stays on and nothing should move on that side... Wasnt that difficult for me, and I had no problems with wobble or handling. I suggest taking out that washer you put in there and installing the rim per manual.
                            Last edited by WMarshy; 04-09-2010, 05:44 PM.
                            '79 XS11 F
                            Stock except K&N

                            '79 XS11 SF
                            Stock, no title.

                            '84 Chevy K-10 "Big Blue"
                            GM 350, Muncie SM465, NP208, GM 10 Bolt with 3.42gears turnin 31x10.5 Baja Claws

                            "What they do have is an implacable, unrelenting presence and movement that bespeaks massive power lurking behind paint and chrome. They don't wail like a screeching ninja, the don't rumble like a harley. They just growl like a spactic, stressed out badger waiting to rip your face off and eat your soul." Trainzz~RIP~

                            Comment


                            • #15
                              Originally posted by cywelchjr View Post
                              No, you need to do the same on the standards too.
                              Nope, not true. The standards have floating calipers (unlike the weird 'pivoting' ones on the special) and will slide to fit. Phils' procedure is the one to use on any bike that has 'conventional' calipers.

                              '78E original owner
                              Fast, Cheap, Reliable... Pick any two

                              '78E original owner - resto project
                              '78E ???? owner - Modder project FJ forks, 4-piston calipers F/R, 160/80-16 rear tire
                              '82 XJ rebuild project
                              '80SG restified, red SOLD
                              '79F parts...
                              '81H more parts...

                              Other current bikes:
                              '93 XL1200 Anniversary Sportster 85RWHP
                              '86 XL883/1200 Chopper
                              '82 XL1000 w/1450cc Buell, Baker 6-speed, in-progress project
                              Cage: '13 Mustang GT/CS with a few 'custom' touches
                              Yep, can't leave nuthin' alone...

                              Comment

                              Working...
                              X