If this is your first visit, be sure to
check out the FAQ by clicking the
link above. You may have to register
before you can post: click the register link above to proceed. To start viewing messages,
select the forum that you want to visit from the selection below.
What the heck are you talking about?? Just saw the title and threw a post in?? lol..
Tod
Try your hardest to be the kind of person your dog thinks you are.
You can live to be 100, as long as you give up everything that would make you want to live to be 100!
Current bikes:
'06 Suzuki DR650
*'82 XJ1100 with the 1179 kit. "Mad Maxim"
'82 XJ1100 Completely stock fixer-upper
'82 XJ1100 Bagger fixer-upper
'82 XJ1100 Motor/frame and lots of boxes of parts
'82 XJ1100 Parts bike
'81 XS1100 Special
'81 YZ250
'80 XS850 Special
'80 XR100
*Crashed/Totalled, still own
Perhaps you're shopping in the wrong places, OR are talking about some VERY LARGE types?? I have one similar to this that I got on Ebay,this is a NEW one from this company.....yeah, they are a CHINESE supplier!
Product Pricing
Your Price: $239.00
Product Code
202-2001
Note, it shows that one full crank of the handle is 4 degrees. On mine, I have to crank it 15 times to get 60 degrees...so that's the same....I had to get one to be able to mill out my SOFA's and such!
My other question is would folks want/need to be able to rotate the sprockets in both directions to be able to either retard or advance the cam timing? I would think so. And as has been mentioned perhaps only 5 degrees of total advance AND total retard for an arc of 10 degrees??
I'm not saying that I would be able/willing to do this..my equipment is just some cheap home style mill/lathe, all manual controls....no CNC stuff!!
T.C.
T. C. Gresham
81SH "Godzilla" . . .1179cc super-rat.
79SF "The Teacher" . . .basket case! History shows again and again,
How nature points out the folly of men!
And then we're back to the talk of..(This was before I understood much of this) since we're talking 5 degrees...which is usually measured at the CRANK... would we really just need 2 1/2 degrees cut on the cam sprocket to equal 5 degrees? ( takes two turns at the crank to one cam turn). Or when they talk of advancing the cam 5 degrees.. are they talking about actual degrees on the cam sprocket.. which would be a 10 degree CRANK advancement.
Try your hardest to be the kind of person your dog thinks you are.
You can live to be 100, as long as you give up everything that would make you want to live to be 100!
Current bikes:
'06 Suzuki DR650
*'82 XJ1100 with the 1179 kit. "Mad Maxim"
'82 XJ1100 Completely stock fixer-upper
'82 XJ1100 Bagger fixer-upper
'82 XJ1100 Motor/frame and lots of boxes of parts
'82 XJ1100 Parts bike
'81 XS1100 Special
'81 YZ250
'80 XS850 Special
'80 XR100
*Crashed/Totalled, still own
Well, TC, if you already have an indexing table, you should be able to machine a spud that fits the center of the table and a shoulder that fits the center of the cam on a lathe. Then it would simply be a matter of centering the mill on one axis, say Y, then moving in X until the endmill aligns with the bolt hole in the sprocket, and mill the slot either side.
IIRC cams are measured in degrees of crank rotation, so it would need to be machined half as much. Only 2.5 degrees either side of the original hole. I think that equates to 3/4 a turn of the handle.
the problem with me buying even a cheap one, is that any bonehead in the shop has access to the mill and lots of them like to turn it on and crash it into the table and such because they would rather be texting or playing their PSP than working, and if the mill is shot, they can hide and do what ever. Lugging that thing back and forth to my tool box every night would be a pain.
If we really get going, maybe we coudl design a spring loaded advance that will adjust the cam timing according to RPM. (not that I think this would ever work well...)
Ok, I just lumbered out to the garage and checked out the set of cams I have out of the motor. There are 34 teeth on the sprocket, which makes each tooth about 10.5 degrees.
The retaining bolts are so close to the centerline of the sprocket, getting enough of a slot to make a 5º change in cam timing would be easily done with a dremel and a stone. We're only talking about maybe 1/16 of an inch elongation.
I may have to rethink the strategy and figure a way to drill another set of holes in the sprockets that would allow a neutral and a 5º advance and a 5º retarded setting. Lots of aftermarket V8 cams have three holes for the dowel pin, which does exactly the same thing.
It's been awhile since I was into the engine that far, but I vaguely remember that there was a little play in the sprocket on the cam shoulder even with a bolt in place, so the bolt hole was already a little larger than the bolt which would allow a small amount of variance in it's position/degree. I don't recall any pin for positioning, since it uses 2 bolts to secure it. I think I remember on the old cars, they used a central mounting bolt, and so they used/needed a positioning pin!?
I know when I've done the Dremmel gear fix, that I use a small stone for the slots, and it does a fairly quick job of it, so I think you're right in that folks could do this at home without a fancy mill and rotary table!
T.C.
T. C. Gresham
81SH "Godzilla" . . .1179cc super-rat.
79SF "The Teacher" . . .basket case! History shows again and again,
How nature points out the folly of men!
I actually did fill the ports with water on my 78 head after I pulled it off the bike.All the valves held water.No leaks.So I think my old head is ok.I havent disassembled the head becuase the valve spring compressor I have for autombile engines is too big to get on the valves.
Does anyone have an easy trick to disassemble an XS head?Or do I need a special valve spring compressor?
I figur I will disassemble the head ,check the valve seats and relapp and new seals.
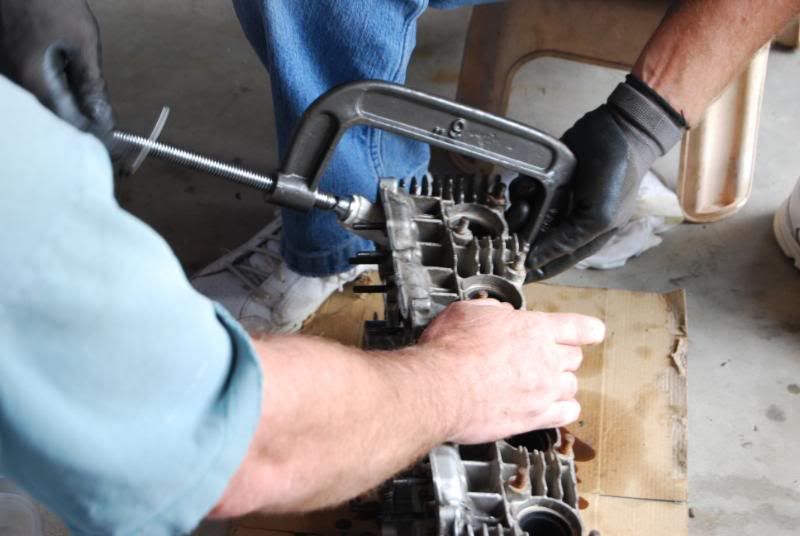
I was just over at dbeardslee's mancave this weekend and we were disassembling a head off an XS. He simply used one BFC (Big F....ing C-Clamp) and a pice of 3/4" PVC pipe with a "window" cut out of it. I think Biker Phil or some others have posted how to make one before. It was slicker than snail snot. Just make sure the window is turned the correct direction and tighten the clamp. The non-moving end of the clamp was on the head and the other end on the cap on the end of the PVC pipe piece. The keepers mostly fell right out of the valves and a magnet pulled them right out through the window, loosen the clamp and the springs and valve come right out.
I have a clamp that big, so if I should need to remove valves at some point, that PVC pipe is the trick in my opinion.
Dang Phil is quick. At least I gave him credit so I do not look like I was bogarting his idea!!
Life is what happens while your planning everything else!
When your work speaks for itself, don't interrupt.
81 XS1100 Special - Humpty Dumpty
80 XS1100 Special - Project Resurrection
Previously owned
93 GSX600F
80 XS1100 Special - Ruby
81 XS1100 Special
81 CB750 C
80 CB750 C
78 XS750
Tod,
lol, Sorry, I read his post not the heading, didnt notice any reply to his valve question.
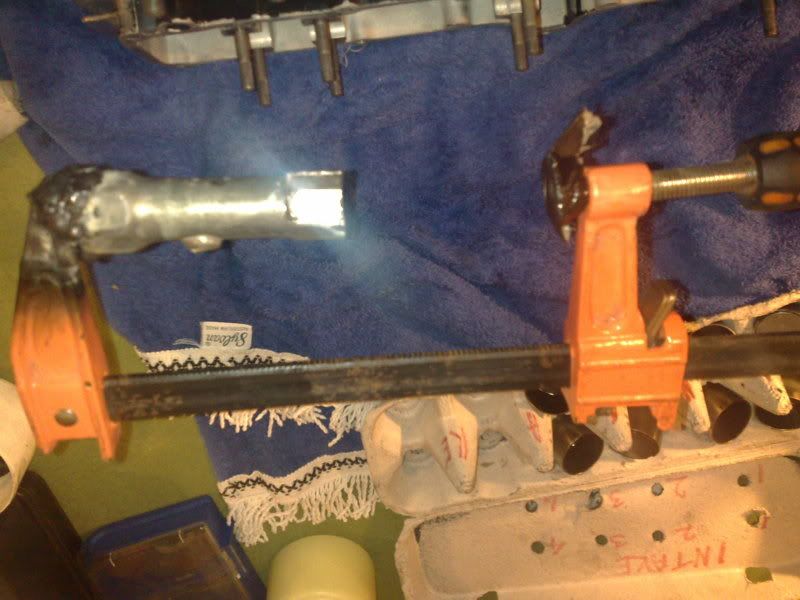
Tarzan,
Heres a pic of the clamp i used with a lawn mower plug socket welded
to the end and a cut out to get to the collets. This works great, is strong and allows
you to use both hands.
I originally used the pvc but found it bend and flex was ok for a cpl of valves.
former owner
1981 xs1100 RH (aus) (5N5)
zrx carbs
18mm float height
145 main jets
38 pilots
slide needle shimmed .5mm washer
fitted with v/stax and uni pod filters
I originally used the pvc but found it bend and flex was ok for a cpl of valves.
Sounds like you were using regular PVC instead of the thicker schedule 40 stuff.
I have lots of extra parts, so I drilled the middle out of one of the shim buckets. (Not an easy task...that's some good steel) I just run the clamp down onto that bucket and the keepers come right out of the center hole. Not an option for everyone to do though.
Tod
Try your hardest to be the kind of person your dog thinks you are.
You can live to be 100, as long as you give up everything that would make you want to live to be 100!
Current bikes:
'06 Suzuki DR650
*'82 XJ1100 with the 1179 kit. "Mad Maxim"
'82 XJ1100 Completely stock fixer-upper
'82 XJ1100 Bagger fixer-upper
'82 XJ1100 Motor/frame and lots of boxes of parts
'82 XJ1100 Parts bike
'81 XS1100 Special
'81 YZ250
'80 XS850 Special
'80 XR100
*Crashed/Totalled, still own
Sounds like you were using regular PVC instead of the thicker schedule 40 stuff.
I have lots of extra parts, so I drilled the middle out of one of the shim buckets. (Not an easy task...that's some good steel) I just run the clamp down onto that bucket and the keepers come right out of the center hole. Not an option for everyone to do though.
Tod
Pic? Sounds like a great tool, but I am having trouble visualizing it.
Steppenwolf took some pics on saturday, and here's a shot of the pvc tool in action. I took the 3/4" pvc and glued an end cap on it to make it a little more serviceable. I originally made it based on Bikerphil's recommendation. Works great, and it's cheap. You just have to make sure the 'window' stays towards the center of the head for access. Also, as Don said, a small telescopic magnet and a pick come in real handy to get the valve keepers out.
I used my drill press and 3/4" PVC with a notch cut in it. I have a shop towel balled-up under the valve (under the head) to hold the valve while the spring(s) is/are compressed. Pulled the keepers with a magnet.
Pat Kelly
<p-lkelly@sbcglobal.net>
1978 XS1100E (The Force)
1980 XS1100LG (The Dark Side)
2007 Dodge Ram 2500 quad-cab long-bed (Wifes ride)
1999 Suburban (The Ship)
1994 Dodge Spirit (Son #1)
1968 F100 (Valentine)
"No one is totally useless. They can always be used as a bad example"
Comment