For the last FOUR years I have been dreaming and planning to convert Megathrust to fuel injection. Not because there is anything wrong with my carbs, but because unlike most people, the project is just as fun as the riding. MainlyLinux, Dan Mann, was the first to do it here on the site. Then Stan Squirted his XJ and added a GM DIS ignition system that MS also controls. Stan did an excellent job and created an excellent web site to share his experience. Stan is currently in the process of Squirting an XS.
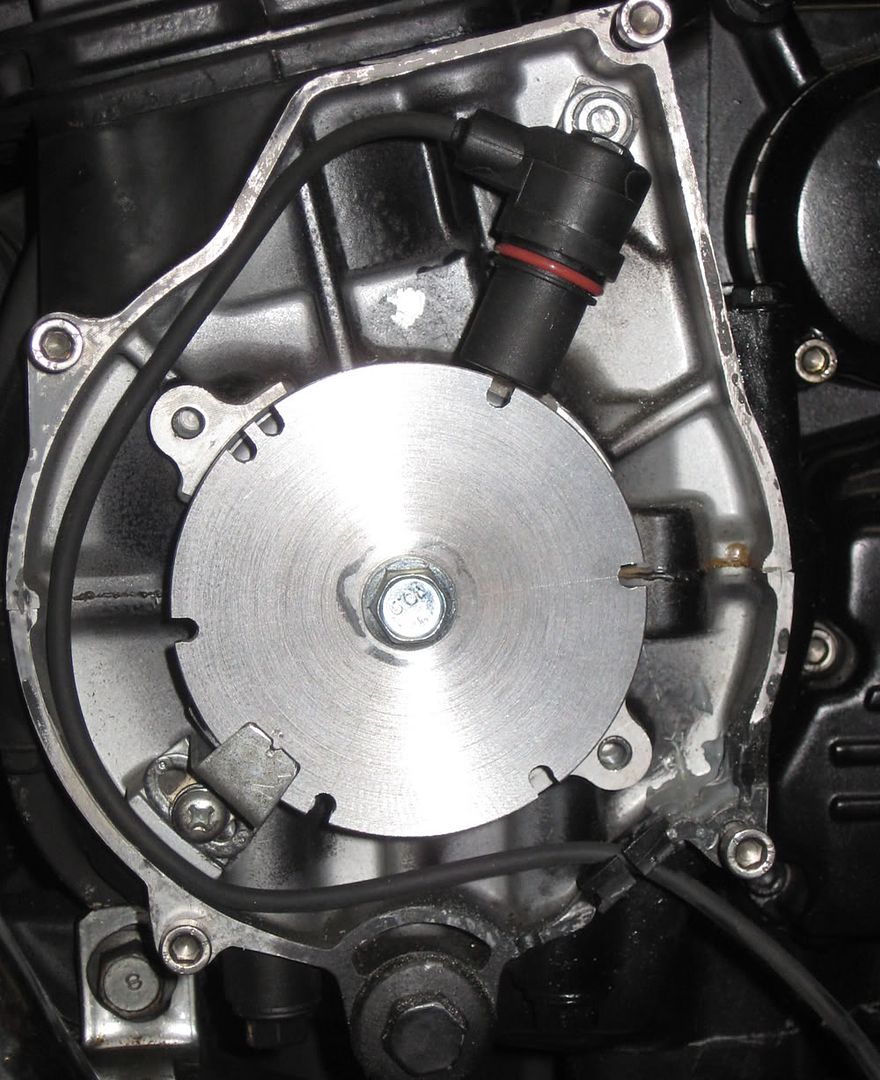
I have slowly been accumulating parts since way back when Dan told us here at Channel 11 about MS. Two parts have been the biggest hurdles. The reluctor wheel, and the fuel pump. Unlike Stan's first wheel, I cheated and had it made at a machine shop. Because the '81 already had an electronic timing curve, there is no mechanical advance unit, just a solid rotor. I took the stock rotor to the shop and told the nice man to cut it down to 1" and to weld on a circular plate 3.5" in diameter and 5/16" thick. This is what I got;


The next step was to mount the VR (variable reluctor) sensor. This has to be done first and then the timing marks on the wheel based off of its postion.

Here, I had the wheel on the bike while I used cam position and a dial indicator to find true TDC. Once that had been established, I made a mark on the wheel edge at the VR sensor and one on the face of the wheel to match a notch I made when I modified my stock timing pointer.
I downloaded an image of a degree wheel off of the internet and, in Photoshop, changed the size to be the same as the reluctor wheel.
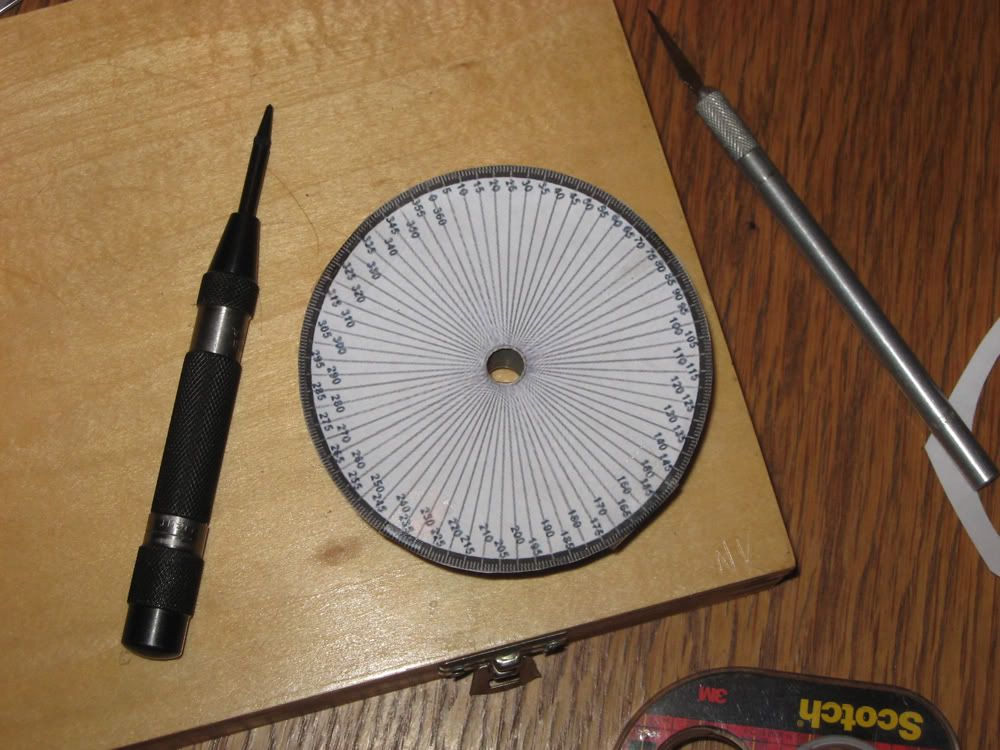
I then taped it to the face of the RW lined up with the TDC mark I had made while it was on the bike. I used my automatic center punch and a tungsten-carbide scribe to make marks for the timing notches. The only notch that lines up with an actual event is the notch to the right of the double notch. This notch is aligned with TDC.
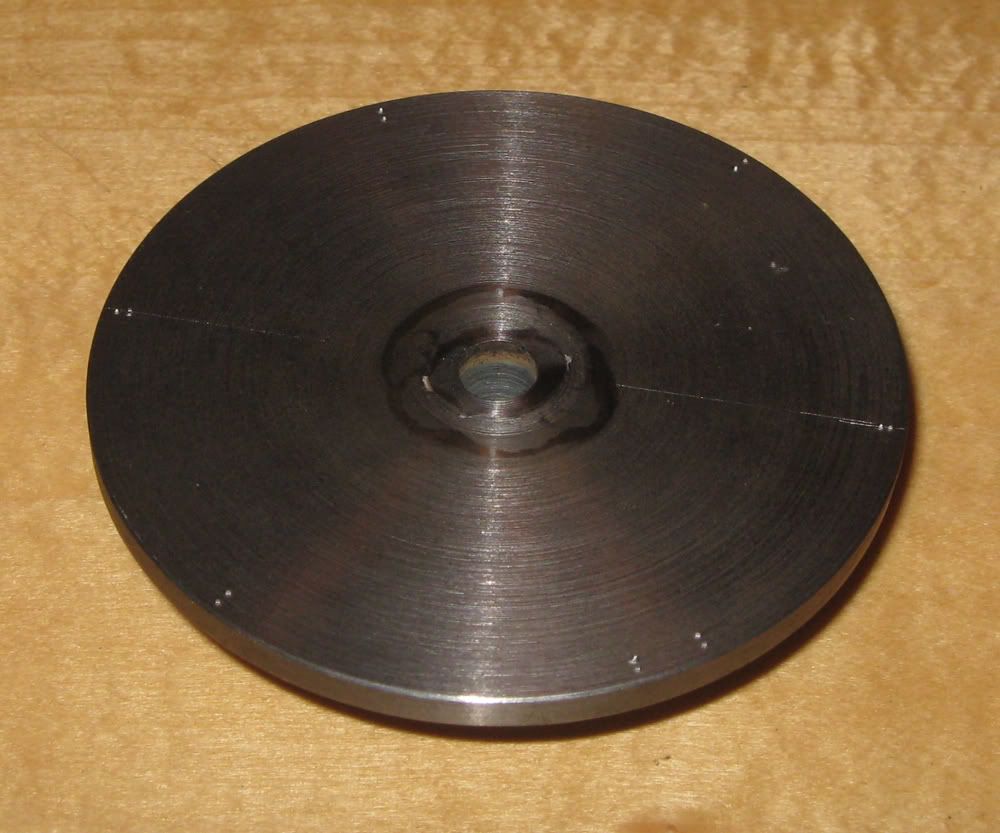
Off to the drill press to drill holes as starters for the timing notches.
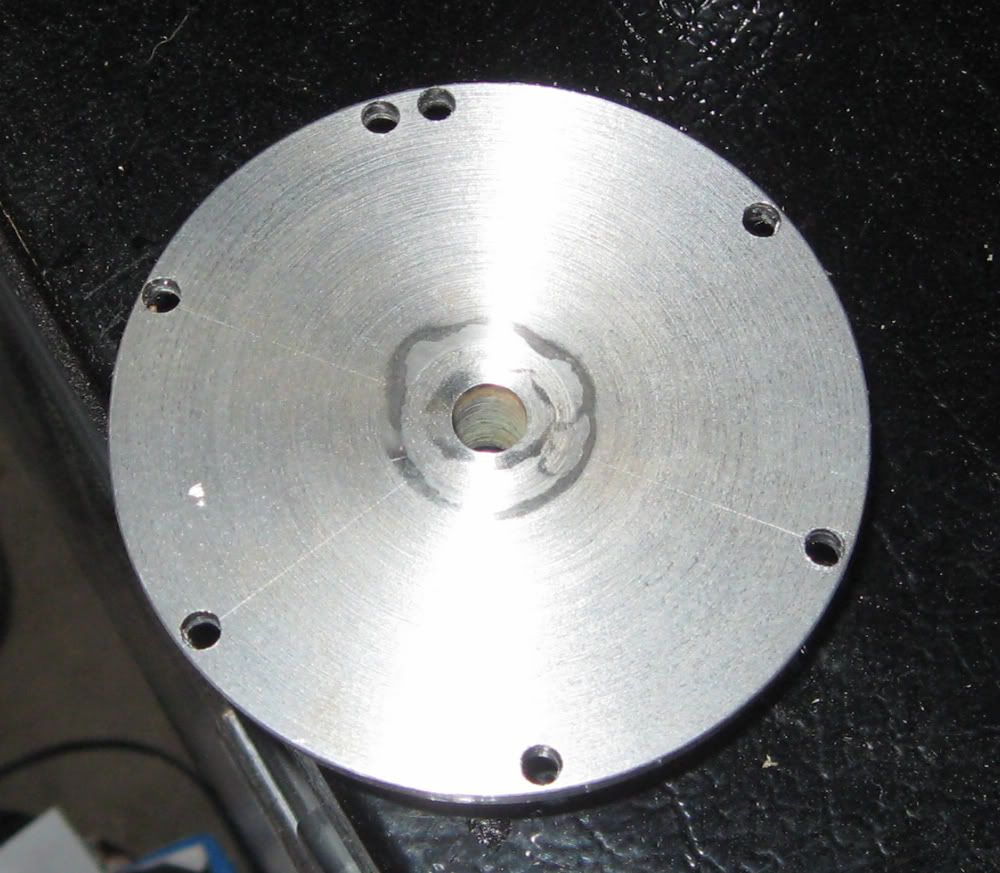
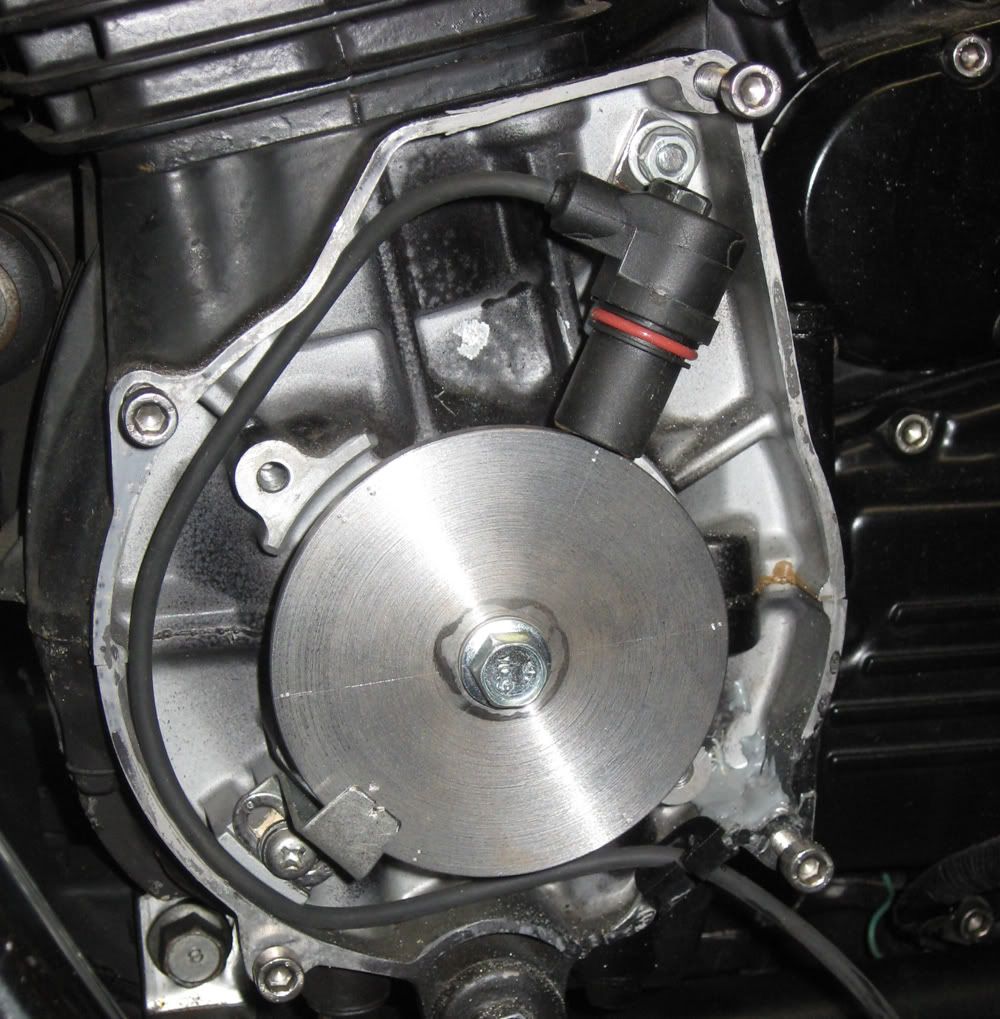
Here it is all notched out and mounted on the bike.
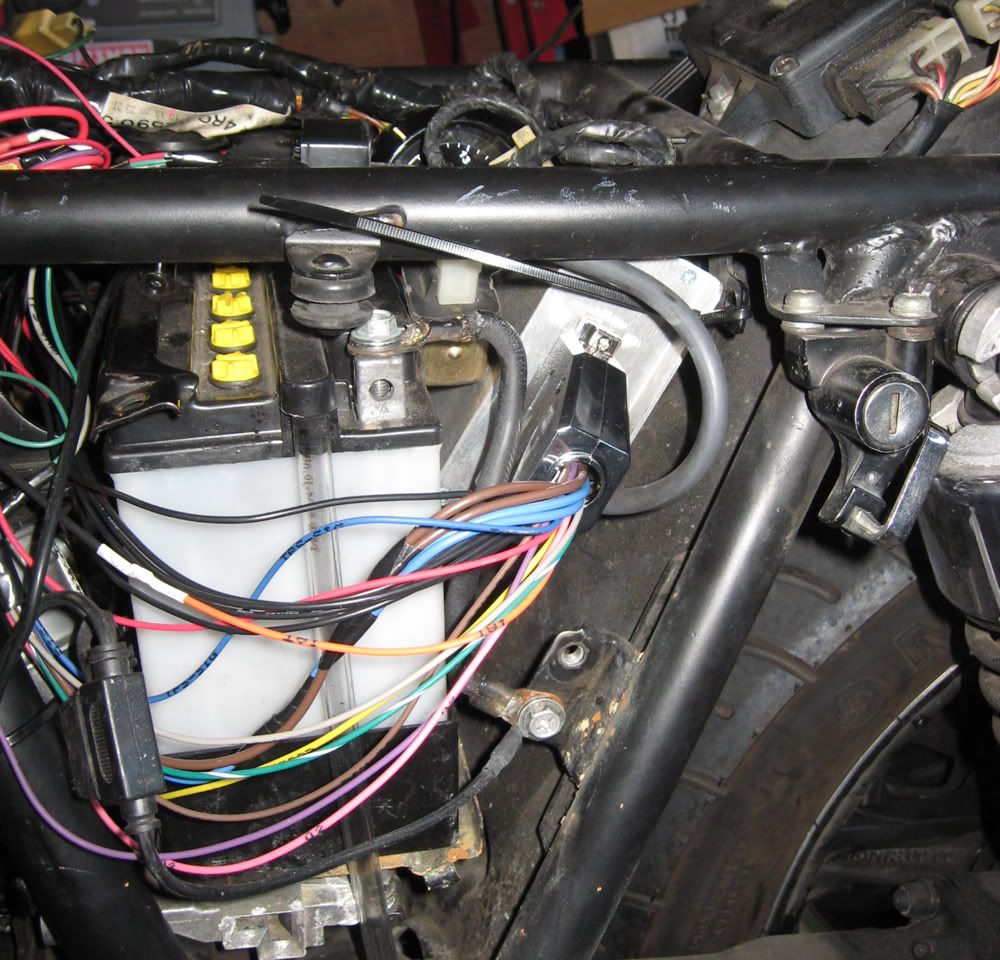
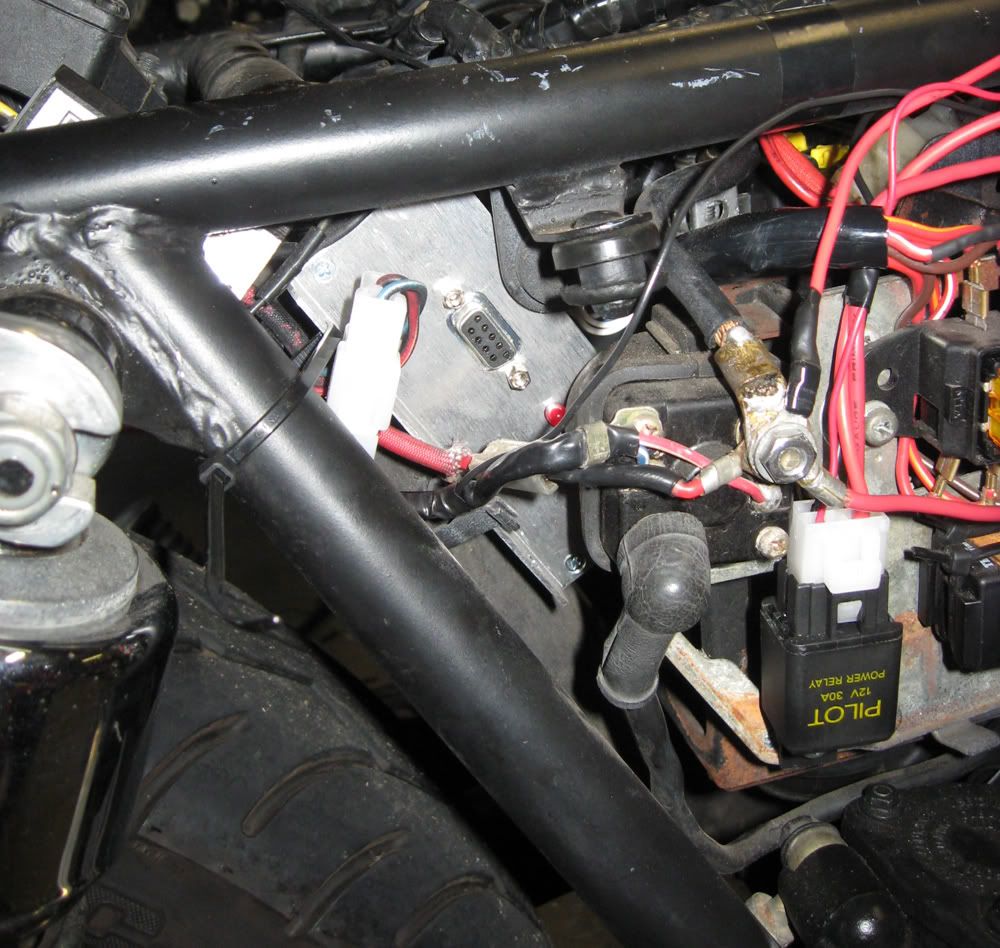
Here is where I mounted the GM DIS unit. The unit came out of a '92 Saturn. The coil on the left is 2&3, the right, 1&4.
As you can see, everything is mounted with zip-ties for now. Until everything works, I am trying to do minimum modifications to the bike. However, this spot is perfect, and will certainly be retained. I had to cut off the front coil mount to get it up in there.

I decided to mount the MS box behind the battery. It is a nice fit, and it gives great access to ports. You can see the serial port on the right side where you plug in the computer for setup, tuning, and data logging.
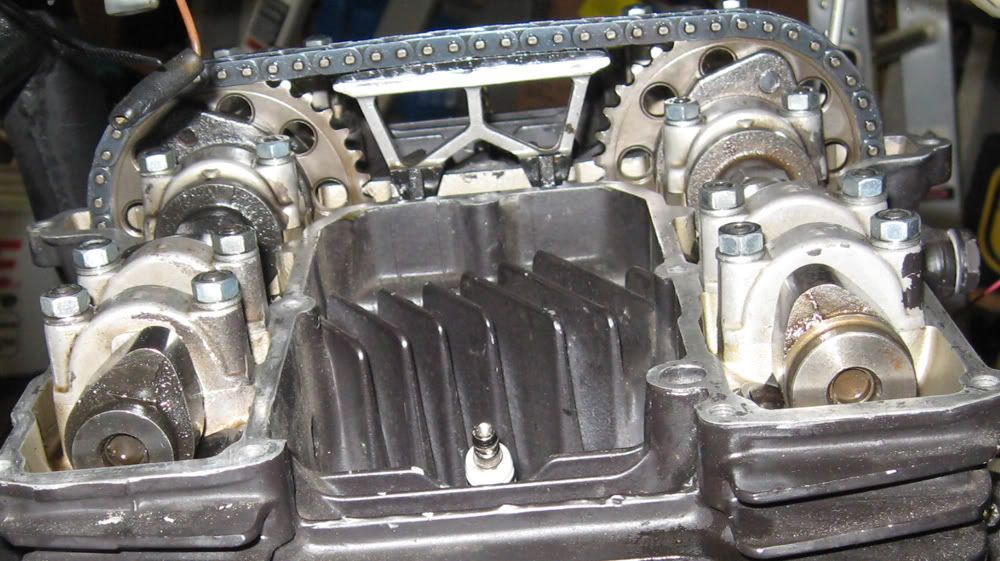
While I had things apart and the bike disabled, I decided I would finally try the old-cam-new-cam combo often mentioned by Dan Hodges. In the past, I had tried running both intake and exhause 2H7 cams. The top end was AMAZING! However, I didn't like how much I had lost on the bottom end. So, I installed and re-shimmed the 2H7 intake cam with the stock 3H5 exhaust cam. I took some pics for folks to be able to see the difference in the came shapes between the two.
Other than this, I wanted to avoid inputting any unnecessary variables. So, I decided to set up the bike for everything, but run it with just carbs and the new ignition first. The wiring took FOREVER! It must have taken me weeks (I don't have much spare time) just to get the wiring all deciphered and mapped out on paper. Turns out that while all the GM DIS units are the same, there are about a zillion different combinations of pin position and wire color for different applications. Boy, am I glad I did. I had some some configuration issues the first time I started it up. It ran like crap and the timing was WAY off. However, once it was properly configured and the timing in the tables matched the timing seen on the timing light, it purred nicely. I took it out for a spin yesterday. It ran great. The cam combo really felt nice. I didn't notice much loss on the bottom and the top seemed noticeably more powerful. Obviously, the cam swap wouldn't be a great mod for all of those running the 750/850 final drive swap. The bike seem very smooth and refined as it went up through the RPM. I don't know if that was the ignition system or just that it has been so long since I rode Megathrust, but it ran really nice.
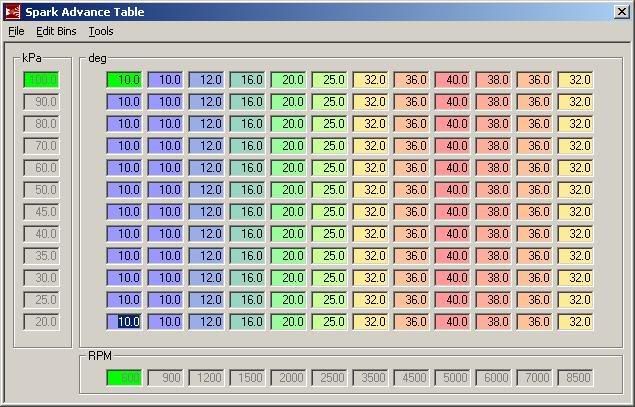
Coming up with the timing curve wasn't too bad, but I am not done yet, either. I based the timing table off of Stan's diagrams he posted on his web site and some discussions I had with Dan Hodges. Dan recommended (if I remember correctly) an initial timing of 10 degrees becoming fully advanced to to 40 degrees by 4500 RPM. He also stated that as the RPM got higher and higher, advance actually became less desirable. None of this is in quotes for a reason. Dan will probably get on here and tell me that I should have listened better and that I have it all wrong. Obviously, I haven't taken the manifold pressure into account yet. This is how the vacuum portion of the stock 11's advance works. When manifold pressure is low/negetive there is very little load and the timing is further advanced to increase economy. However, until I do some data logging and get some actual pressure numbers, I will leave it as a basic RPM based table only. I am posting the table and am open to suggestions on possible improvements to the numbers posted.
Although I really didn't want to, I tore the carbs off last night and started rigging up the fuel system. If you remember from reading earlier, I stated the the second big hurdle in this process was obtaining a fuel pump. The '99-'00 Hayabusa inline fuel pumps are near impossible to get/find. If one does come up on ebay, they get expensive quick. The rest of the GSXR's and other FI bikes all run in-tank pumps. My plan before I found my current fuel pump was to have a chunk of aluminum pipe tigged up to mount a gixxer in-tank pump in. I have one sitting in my garage in case my small pump doesn't work out. I found out that most of the new FI quads run external pumps. I found some that looked awesome that came off a Suki LTR450. I ran some tests on it and found that it can push .5 liters in a minute and 7 seconds past the regulator. A couple months back, I found several fuel pump/horsepower calculators with no problems. With some numbers from some earlier tests, they all led me to believe that the pump put out enough fuel at pressure to run up to 120hp. Since then, with more accurate numbers, I can't find ANY calculators. It's really weird. I hope the pump will be sufficient because the size is awesome.

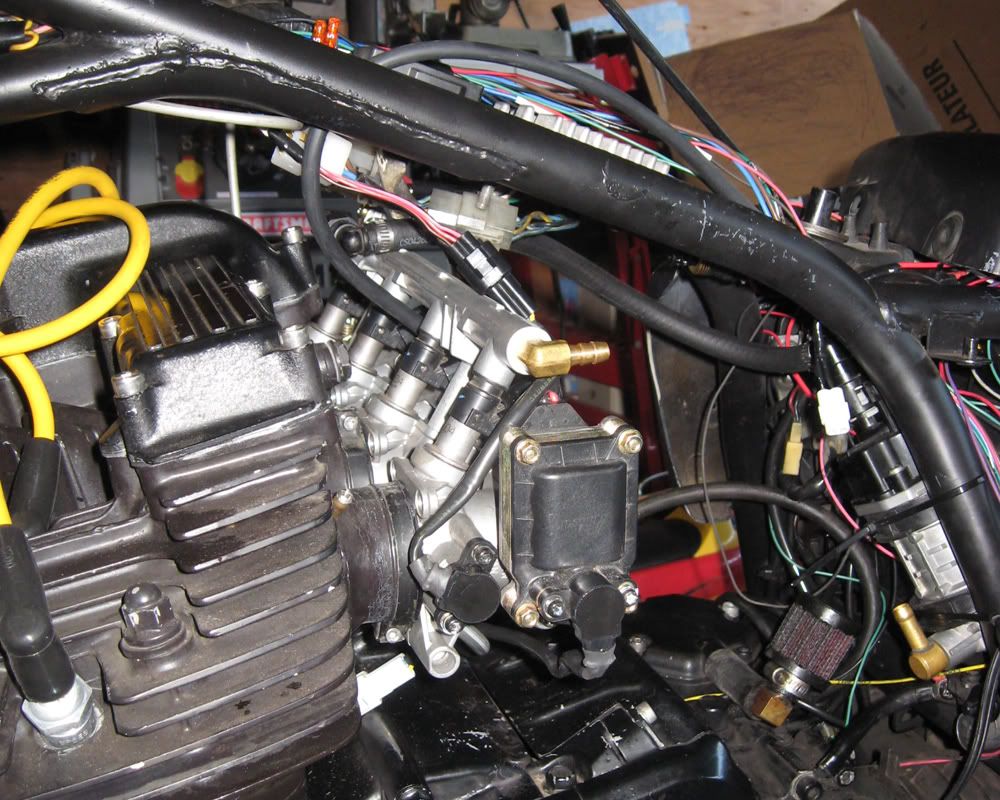
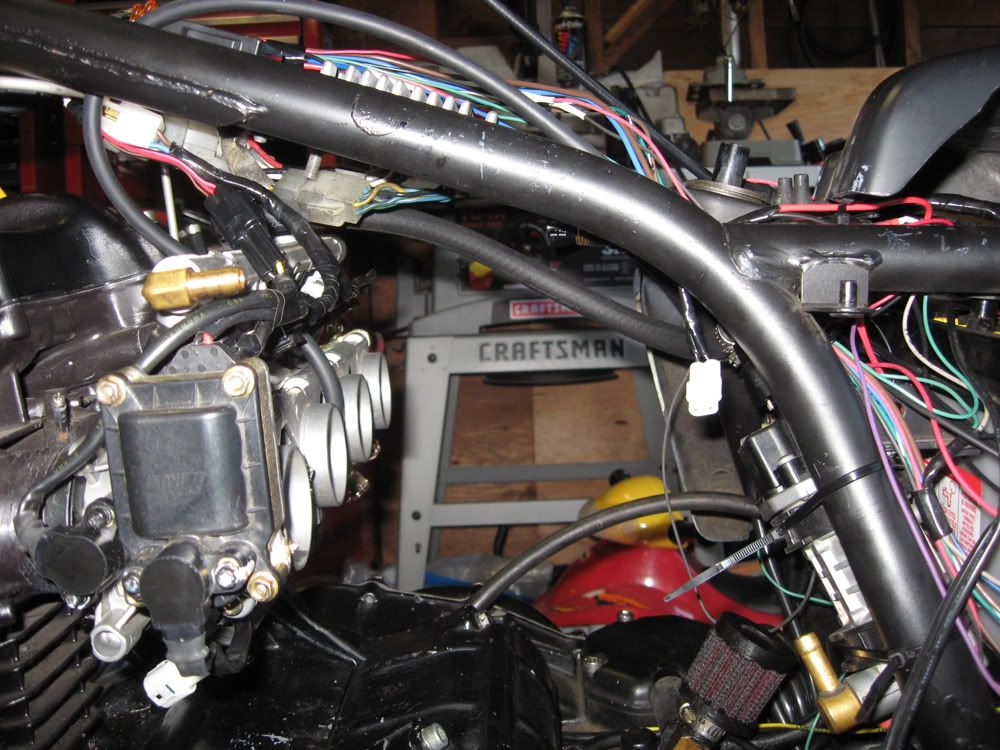
I have the '03 GSXR 600 throttle bodies now mounted and wired in. The fuel pump is temporarily mounted (in case it doesn't work out). A made a seconds set of Accel 8mm spark plug wires from the box that I bought a while back. The great part is that there is still enough wire and fittings to make a THIRD set. Best 40-something bucks I ever spent. If you look in the pis below, you can see the brass fitting coming out the end of the fuel rail. I drilled it out and installed the fitting so that fuel would always be circulating through the rail, thus keeping it cooler. The regulator will be beyond this fitting and send fuel back to the tank.
This week the new 44mm Uni pod filters show up and I have to order a custom throttle cable from Motion Pro. It should be fairly straight forward though. I already had a GSXR right throttle grip and control. So, all I need is one that is TWICE as long.
I still have LOTS of tidying up to do with the wiring, but not until I know that everything is working as it should. I don't wanna hear the phrase "birds nest" outta anybody!
I will continue to update this thread as I make more progress. I am sure I am forgetting to mention tons of details.

I have slowly been accumulating parts since way back when Dan told us here at Channel 11 about MS. Two parts have been the biggest hurdles. The reluctor wheel, and the fuel pump. Unlike Stan's first wheel, I cheated and had it made at a machine shop. Because the '81 already had an electronic timing curve, there is no mechanical advance unit, just a solid rotor. I took the stock rotor to the shop and told the nice man to cut it down to 1" and to weld on a circular plate 3.5" in diameter and 5/16" thick. This is what I got;


The next step was to mount the VR (variable reluctor) sensor. This has to be done first and then the timing marks on the wheel based off of its postion.

Here, I had the wheel on the bike while I used cam position and a dial indicator to find true TDC. Once that had been established, I made a mark on the wheel edge at the VR sensor and one on the face of the wheel to match a notch I made when I modified my stock timing pointer.

I downloaded an image of a degree wheel off of the internet and, in Photoshop, changed the size to be the same as the reluctor wheel.

I then taped it to the face of the RW lined up with the TDC mark I had made while it was on the bike. I used my automatic center punch and a tungsten-carbide scribe to make marks for the timing notches. The only notch that lines up with an actual event is the notch to the right of the double notch. This notch is aligned with TDC.

Off to the drill press to drill holes as starters for the timing notches.

Here it is all notched out and mounted on the bike.

Here is where I mounted the GM DIS unit. The unit came out of a '92 Saturn. The coil on the left is 2&3, the right, 1&4.
As you can see, everything is mounted with zip-ties for now. Until everything works, I am trying to do minimum modifications to the bike. However, this spot is perfect, and will certainly be retained. I had to cut off the front coil mount to get it up in there.

I decided to mount the MS box behind the battery. It is a nice fit, and it gives great access to ports. You can see the serial port on the right side where you plug in the computer for setup, tuning, and data logging.


While I had things apart and the bike disabled, I decided I would finally try the old-cam-new-cam combo often mentioned by Dan Hodges. In the past, I had tried running both intake and exhause 2H7 cams. The top end was AMAZING! However, I didn't like how much I had lost on the bottom end. So, I installed and re-shimmed the 2H7 intake cam with the stock 3H5 exhaust cam. I took some pics for folks to be able to see the difference in the came shapes between the two.

Other than this, I wanted to avoid inputting any unnecessary variables. So, I decided to set up the bike for everything, but run it with just carbs and the new ignition first. The wiring took FOREVER! It must have taken me weeks (I don't have much spare time) just to get the wiring all deciphered and mapped out on paper. Turns out that while all the GM DIS units are the same, there are about a zillion different combinations of pin position and wire color for different applications. Boy, am I glad I did. I had some some configuration issues the first time I started it up. It ran like crap and the timing was WAY off. However, once it was properly configured and the timing in the tables matched the timing seen on the timing light, it purred nicely. I took it out for a spin yesterday. It ran great. The cam combo really felt nice. I didn't notice much loss on the bottom and the top seemed noticeably more powerful. Obviously, the cam swap wouldn't be a great mod for all of those running the 750/850 final drive swap. The bike seem very smooth and refined as it went up through the RPM. I don't know if that was the ignition system or just that it has been so long since I rode Megathrust, but it ran really nice.
Coming up with the timing curve wasn't too bad, but I am not done yet, either. I based the timing table off of Stan's diagrams he posted on his web site and some discussions I had with Dan Hodges. Dan recommended (if I remember correctly) an initial timing of 10 degrees becoming fully advanced to to 40 degrees by 4500 RPM. He also stated that as the RPM got higher and higher, advance actually became less desirable. None of this is in quotes for a reason. Dan will probably get on here and tell me that I should have listened better and that I have it all wrong.
 Obviously, I haven't taken the manifold pressure into account yet. This is how the vacuum portion of the stock 11's advance works. When manifold pressure is low/negetive there is very little load and the timing is further advanced to increase economy. However, until I do some data logging and get some actual pressure numbers, I will leave it as a basic RPM based table only. I am posting the table and am open to suggestions on possible improvements to the numbers posted.
Although I really didn't want to, I tore the carbs off last night and started rigging up the fuel system. If you remember from reading earlier, I stated the the second big hurdle in this process was obtaining a fuel pump. The '99-'00 Hayabusa inline fuel pumps are near impossible to get/find. If one does come up on ebay, they get expensive quick. The rest of the GSXR's and other FI bikes all run in-tank pumps. My plan before I found my current fuel pump was to have a chunk of aluminum pipe tigged up to mount a gixxer in-tank pump in. I have one sitting in my garage in case my small pump doesn't work out. I found out that most of the new FI quads run external pumps. I found some that looked awesome that came off a Suki LTR450. I ran some tests on it and found that it can push .5 liters in a minute and 7 seconds past the regulator. A couple months back, I found several fuel pump/horsepower calculators with no problems. With some numbers from some earlier tests, they all led me to believe that the pump put out enough fuel at pressure to run up to 120hp. Since then, with more accurate numbers, I can't find ANY calculators. It's really weird. I hope the pump will be sufficient because the size is awesome.

I have the '03 GSXR 600 throttle bodies now mounted and wired in. The fuel pump is temporarily mounted (in case it doesn't work out). A made a seconds set of Accel 8mm spark plug wires from the box that I bought a while back. The great part is that there is still enough wire and fittings to make a THIRD set. Best 40-something bucks I ever spent. If you look in the pis below, you can see the brass fitting coming out the end of the fuel rail. I drilled it out and installed the fitting so that fuel would always be circulating through the rail, thus keeping it cooler. The regulator will be beyond this fitting and send fuel back to the tank.
This week the new 44mm Uni pod filters show up and I have to order a custom throttle cable from Motion Pro. It should be fairly straight forward though. I already had a GSXR right throttle grip and control. So, all I need is one that is TWICE as long.
I still have LOTS of tidying up to do with the wiring, but not until I know that everything is working as it should. I don't wanna hear the phrase "birds nest" outta anybody!

I will continue to update this thread as I make more progress. I am sure I am forgetting to mention tons of details.


 The grommet is IN the cover.


 All it is, is a clutch switch actuated lower rpm limiter. I don't know if I will ever actually go to the drag strip, but after having it on the MSD I was running for a while, I wouldn't mind having it again. Once things are all worked out, maybe I will give it a try.
Comment