Announcement

Collapse
No announcement yet.

Correct float height '79XS F

Collapse
X
 
  • Filter
  • Time
  • Show
Clear All
new posts

  • Correct float height '79XS F

    Brief recap. Bike revs too high - around 2500 to 3000 when hot. After searching earlier posts for the root of my problem I am starting to wonder if the float heights are off enough to cause this. When I cleaned the carbs I used a caliper and reset the float height at 25.7mm, which I believe is stock. I measured both sides and twisted the floats enough so that both sides appeared dead on.

    Question: do these bikes run better when the float height is other than stock? Did I read the specs wrong and set the float height incorrectly?

    When I first start the bike on full choke it idles well at frst, then the rev starts to climb as the bike warms up. When it starts revving high I put it on half choke and it goes back to a good idle for a while, then starts to climb again. When I take the choke off completely the idle is fine until the bike warms up completely and the idle revs high again.

    This could still be a synch issue, but I'm skeptical. When cleaned the carbs I bench synched them. I then synched them with vacuum gauges when the carbs were mounted. They were very close from the bench synch and dialing them in required only a quarter turn or less on any of the adjusters.

    I've sprayed WD40 around all of the intake manifolds looking for a leak and got no reaction.

    I'm getting frustrated. Ideas welcome.

    Patrick
    The glorious rays of the rising sun exist only to create shadows in which doom may hide.

    XS11F (Incubus, daily rider)
    1969 Yamaha DT1B
    Five other bikes whose names do not begin with "Y"

  • #2
    Idle creeping up when the motor heats up is a lean idle/pilot circuit, unscrew the idle screws a turn or two and see what happens.

    Comment


    • #3
      Good Point PGGG,

      Also, a dumb question, but do you have the MAIN throttle idle screw adjusted out. Have you tried turning it out a bit when the idle is running high again, or is it already turned all the way out so that the butterflies are fully closed?? IF so, then turning the PILOT screws out a 1/4 turn or more each may help to richen it up a touch and help to bring the idle back down. Your float heights are probably just fine.
      T.C.
      T. C. Gresham
      81SH "Godzilla" . . .1179cc super-rat.
      79SF "The Teacher" . . .basket case!
      History shows again and again,
      How nature points out the folly of men!

      Comment


      • #4
        I hate my petcocks.

        They can’t turn them off, you just have to trust them. And it’s a trust without verification. If they want to wreck something they get a head start of at least several hours.

        Sometimes the needle valves in these old carbs don’t seat real well when you first put them in. They have to vibrate for a while to find their comfortable position. Even after that they often leak. That’s why I like a petcock you can turn off. I always turn off the petcocks on my bikes when I park them, no matter how long they'll be there. Otherwise the drip of a slightly askew needle can overfill the carb, causing gas to leak out into the air filter and then all over the ground. I might have done that a couple times.

        Sometimes the gas just fills up the air filter housing.

        I had a brand new UNI air filter in my bike. It's surprising how much gasoline the shell on our air filters will hold without significant dripping. And it can really affect the drivability of your cycle, particularly if you are the kind who never believes the problem could possibly be the brand new air filter will try anything else before resorting to something so basic.

        Give me a petcock with an off switch. That's trust with verification. Anyone know a direct cross-over?

        Succubus is better. She sounds real different, now that the gas is coming from inside the carbs. The weird stuff suddenly makes sense, such as why my bike had the symptoms of a lean condition yet I was pulling out plugs with thick soot on them. Tomorrow I start over with the tuning. Meanwhile, I have to go dry and clean my used UNI filter.

        And look for some better petcocks.

        Patrick
        The glorious rays of the rising sun exist only to create shadows in which doom may hide.

        XS11F (Incubus, daily rider)
        1969 Yamaha DT1B
        Five other bikes whose names do not begin with "Y"

        Comment


        • #5
          You're lucky (well, not really, you'ld be lucky if you scored an old bike with no issues!) the gas just goes into the air box! Mine went into the engine! I think once it's flowing freely through the stuck needle it depends on how the bike is sitting as to where the gas is going to go. I would also like to change out those petcocks. Normally I shut my gas off about a block from home so as to reduce the amount of gas in the carb also. That way I feel a little safer from the leaky petcock syndrome.
          If it aint broke....it aint mine!:(
          80G The Big unit
          72 BSA Rocket Three "Main Squeeze"
          84 GS1150ES "Big Sue"
          79 Special (Tomcat's) as yet unnamed

          Comment


          • #6
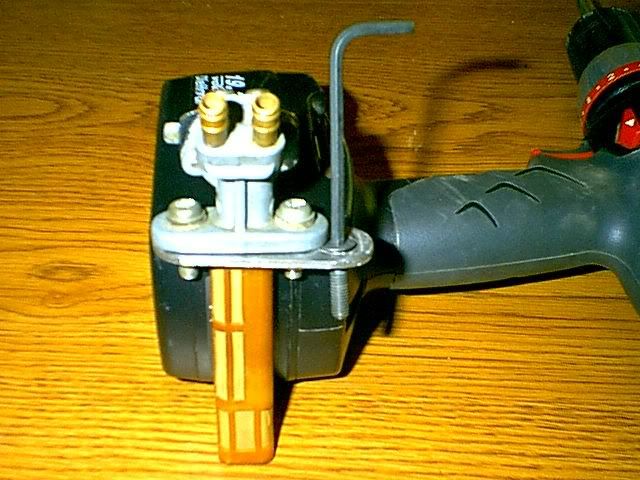
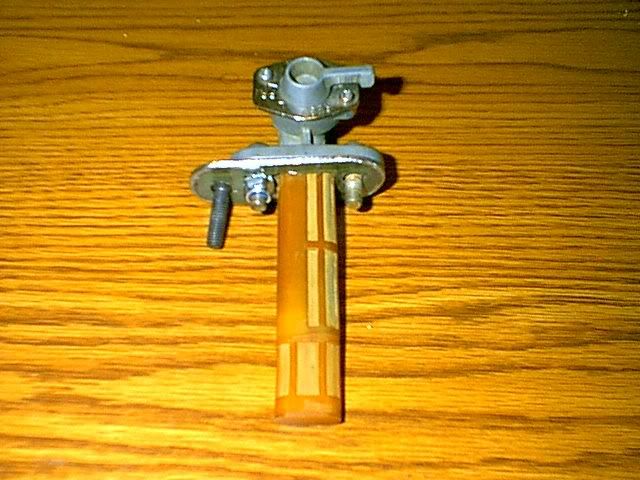
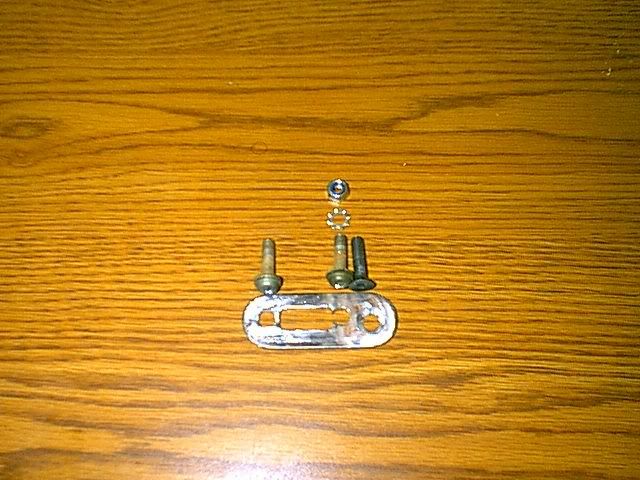
            You can try this. I had made a set of adapter plates to convert the standard petcocks over to special petcocks. That way you have On & Off. All you need is either a steel plate or aluminum to make it. The first set I done was with steel. Just wanted to see if it could be done. And it worked great. But since these pictures were taken I had made a new set using a drill press. My new ones look a lot better then the one's pictured here but it will give you an idea. You can reuse your old screws, you just need to get 2 counter sink bolts and two nuts and make a rubber gasket from a old innertube. You can see everything in the pictures. This set up has and still works for me. Hope this may help you out.

            [IMG][/IMG]

            [IMG][/IMG]

            [IMG][/IMG]
            Chris

            79 XS1100 Standard aka: Mutt
            87 Honda TRX350D 4X4: Old Blue!
            93 NewYorker Salon: Sleeper...
            71 RoadRunner 440 Magnum: Mean Green!
            69 Charger 440 Magnum: Pleasure Ride!

            Gimme Fuel Gimme Fire!

            Comment


            • #7
              Now that's clever. Maybe we could get TC to fab some up in his 'machine shop'.

              Comment


              • #8
                Hey John,

                Why reinvent the wheel!? Also, folks might NOT have the Special petcocks to substitute for the Standards, so these from PNM may work. I haven't measured the screw to screw spacing, but there are 2 sizes available, from the XS11 section of PNM!?
                UNIVERSAL FUEL PETCOCK
                Universal Fuel Petcock.
                Can be set up as a single or dual outlet petcock.

                Comes with 1 Piece straight outlet, and 2 Pieces ninety degree outlets. Includes a blockoff plug to install when using as a single outlet. The petcock is a direct fit to a 3/8"NPT (female threaded) tank bung, or use one of our adaptor plates or adaptor nuts.
                Ideal economical replacement for troublesome vacuum or manual petcocks.
                Features trouble free compact design, has ON, OFF & RESERVE


                $29.00US EA.

                Part#20-0100
                ********************************************
                PETCOCK ADAPTER PLATE - 34mm
                34mm Adapter Plate - 34mm (1.338") center to center mounting holes. Use this plate to adapt our Universal Fuel Tap 3/8"NPT petcock part # 20-0100 to fuel tanks with 34mm (1.338") center to center mounting holes.


                $6.00US EA.

                Part#20-0101
                ***********************************************
                PETCOCK ADAPTER PLATE - 46mm
                Fits: XS1100 (78-81) Standard model.
                46mm Adapter Plate - 46mm (1.811") center to center mounting holes.
                Use this plate to adapt our Universal Fuel Tap 3/8"NPT petcock part # 20-0100 to fuel tanks with 46mm (1.811") center to center mounting holes. some slight modification maybe be required to enlarge tank opening as petcock will protrude through adapter plate about an eighth of an inch when tightened in place.


                $6.00US EA.

                Part#20-0103
                My little machine shop is essentiall all manual! DennyZ has the CNC stuff, try asking him!

                T.C.
                T. C. Gresham
                81SH "Godzilla" . . .1179cc super-rat.
                79SF "The Teacher" . . .basket case!
                History shows again and again,
                How nature points out the folly of men!

                Comment


                • #9
                  Teachers pet

                  Again, you did your homework. Good find. Are there any rebuild kits available for the petcock, should it need rebuilding in the future?

                  Comment


                  • #10
                    I saw those, TC, but for some reason I went ahead and ordered the standard rebuild kits. There's another post that has a link to a site that talks about reversing the gasket in the petcocks to eliminate the vacuum on setting and give the petcocks an off position. I might give that a try. After the frustration of the leaking petcocks filling my air filter with gas and losing me a weekend of riding, I still want to keep the bike as original as possible.

                    I learn slow, sometimes.

                    Patrick
                    The glorious rays of the rising sun exist only to create shadows in which doom may hide.

                    XS11F (Incubus, daily rider)
                    1969 Yamaha DT1B
                    Five other bikes whose names do not begin with "Y"

                    Comment

                    Working...
                    X