Announcement

Collapse
No announcement yet.

Oh man, weird valve clearences

Collapse
X
 
  • Filter
  • Time
  • Show
Clear All
new posts

  • Oh man, weird valve clearences

    Ok, so I'm almost done fixing up my bike and taking it out for the first ride. I got down to beginning to tune the engine. I was surprised to find out that under the valve cover it was pristine clean. The head bolts were all up to torque. So I decided to check the valve clearences....

    Intake are all set to .002 and exhaust is .006??!

    What's going on with this? Any reason however was fiddling with this engine made it so tight? As I understand it intake is supposed to be .006 - .008 and exhaust .008 - .010. Most importantly, can I run it like this ok without burning up my valves?

    Thanks
  • #2
    Not trying to be smart or anything, but are you sure you grabbed a metric feeler gauge and not a standard? If it IS a metric gauge, Those clearances ar too tight. While running, I doubt your valves would close fully and would burn them up. Also just making sure you turned the cam lobe straight up at each shim you were checking. I don't know what all you did to the motor, but did you have the cams and shims out? A layer of oil could still be between the bucket and the shims if you did.
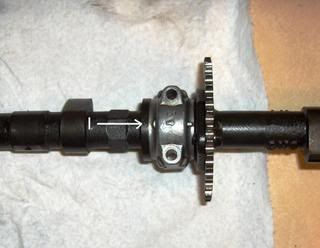
    Over time, your valves will start to get set deeper and deeper into the head.. it's a normal wearing process... which in turn makes the clearances SMALLER at the top. I would definately re-shim it. You will need a valve hold-back tool if you are going to do them one at a time. Some work, some don't. Do a search and read up on it. If you are absolutely sure of your measurements, you can take the left side cover off and rotate your engine to the "T" mark, then you can just take your cams off. It's pretty easy to do, just make sure you don't turn the engine at all. If facing the front of your bike, to the left of the cam sprocket, on the cam itself, you will see a dot that should line up with a arrow on that bearing cap. This is your timing mark.


    Just get a piece of paper and make sure you write down the valve number, if it's intake or exhaust, and the shim number. The number will be on the bottom side of the shim.Then use the chart to get the right size. There is a slot on the side of the bucket that the shim is sitting in. I used a small jewlers screwdriver to push through that slot to pry up a bit on the shim to get it out. It has a little bit of suction with the oil holding it there. After you put in the right shims, put your cams back in matching up those dots, torque to spec, and you're done. Sorry about the huge picture.

    Good luck.

    Tod
    Last edited by trbig; 09-22-2006, 05:36 AM.
    Try your hardest to be the kind of person your dog thinks you are.

    You can live to be 100, as long as you give up everything that would make you want to live to be 100!

    Current bikes:
    '06 Suzuki DR650
    *'82 XJ1100 with the 1179 kit. "Mad Maxim"
    '82 XJ1100 Completely stock fixer-upper
    '82 XJ1100 Bagger fixer-upper
    '82 XJ1100 Motor/frame and lots of boxes of parts
    '82 XJ1100 Parts bike
    '81 XS1100 Special
    '81 YZ250
    '80 XS850 Special
    '80 XR100
    *Crashed/Totalled, still own

    Comment


    • #3
      huh, ok thanks for the input. Although I thought the clearences got larger as the top got worn down.

      Comment


      • #4
        Although I thought the clearences got larger as the top got worn down.
        Nope, rarely any wear at the top... ever. Hardened steel... cam and shims. Which is why shops, when do valve adjustments usually don't charge for the shims they replace. They just put the old ones in a box and swap them with the ones from the next guy's valve adjustment.
        Place the shims in with the size lettering faceing downward, so it's not worn off by the cam lobes as they rotate.
        If the lettering is gone, get a cheap digital caliper from Harbor Fright to measure it's thickness.
        Like it was mentioned... over time, and usage, the valves seat up further in the head, reducing the clearance between the shim and the cam. The only times I've encountered too much clearance, was due to rust or carbon on the face of the valve, or a deformed/bent valve staying open.
        "Damn it Jim, I'm a doctor, not a mechanic!' ('Bones' McCoy)

        Comment


        • #5
          Thanks for the info. I still have good compression... three cylinders with 150 and one with 165 (but this was with a half warm bike). But the clearence has gotten real tight meaning the valves have worn. If they are still sealing is it bad that they are worn or is it no prob to just replace the shims?

          Also were's the best place to get them
          Thanks

          Comment


          • #6
            By worn, I mean that they have settled in better/further. The contact surfaces of the valve and seat are still good... They have worn together to seal better, and the valve seats, due to the constrant 'hammerin' the valves give them, have seated them selves up a little further in the head(my theory). All normal wear... which is why the need for periodic valve clearance adjustments.
            Also were's the best place to get them
            Most bike shops will swap them out for free,(They'll take yours, and give you what you need in exchange) or at least they should. Every one has machines that run the same diameter shims(29mm), so availabiltiy isn't the issue.
            What may be be an issue, (at least for me) is the size that you may need. Common valve shim sizes, such as 2.45mm through 2.75mm are the ones most commonly used, and they have plenty o' dem lying about the shop. If you need shims like 2.20mm, or a 3.10mm, the shop may only have one or two on hand, and may not be happy to part with them, for as soon as they do... in comes a valve job on a paying bike and they now don't have the odd shim fer it.
            "Damn it Jim, I'm a doctor, not a mechanic!' ('Bones' McCoy)

            Comment


            • #7
              ah ok thx, was going to buy the tool but instead read up in the manual and it seems easy enough just to take out the cams. Got to replace the chain anyway, though I guess you want the cams on for that... hmm

              Comment


              • #8
                Replace the chain with or without the cams in, bu tie that chain SECURELY to the frame above the opening. Woe be to the fool who drops the chain down into the crankcase! After you install the new chain and peen the ends of the new pin in it, slip the cams through the loop in the chain (Engine on "T" mark) and put it back together, lining up the cam marks to the caps, then torque the caps. MAKE SURE THE CHAIN IS AROUND THE CRANK SPROCKET AT THE BOTTOM. Stick the chain onto the cam sprockets, one at a time, and screw back onto the cams. It may take a little fooling with to get the sprocket into the right tooth and still screw into the cam, but it's pretty easy.
                When cutting the old chain, tie it up first, and try to keep the metal shavings out of the motor best you can. I think Pro would recommend you use gas-soaked rags stuffed into the top to catch the hot sparking metal bits...

                Tod
                Try your hardest to be the kind of person your dog thinks you are.

                You can live to be 100, as long as you give up everything that would make you want to live to be 100!

                Current bikes:
                '06 Suzuki DR650
                *'82 XJ1100 with the 1179 kit. "Mad Maxim"
                '82 XJ1100 Completely stock fixer-upper
                '82 XJ1100 Bagger fixer-upper
                '82 XJ1100 Motor/frame and lots of boxes of parts
                '82 XJ1100 Parts bike
                '81 XS1100 Special
                '81 YZ250
                '80 XS850 Special
                '80 XR100
                *Crashed/Totalled, still own

                Comment


                • #9
                  I think Pro would recommend you use gas-soaked rags stuffed into the top to catch the hot sparking metal bits...
                  As my garage was dimly-lit, (as am I), it made perfect sense to me. Burning rags make excellent 'trouble lights', and one can toss them around the garage as needed, such as when one moves from workplace to workbench.
                  An alternative method, though it doesn't have the illuminating effects and flashy sparks, is to tie the cam chain in two spots with baling wire to the frame, and slice it in the middle with bolt cutters or a heavy pair of dykes.
                  (Use the pair of dykes that are commonly referred to as "side cutters", as the other dykes... sure, they can do the task well, but afterwards, they go upstairs, flop themselves on your couch and watch Rosie O'Donnell all night)
                  "Damn it Jim, I'm a doctor, not a mechanic!' ('Bones' McCoy)

                  Comment


                  • #10
                    Anytime you fiddle with the cam chain, the bike should be vertical. If not, the hanging slack chain can come off of the crank sprocket. That can be a real pain to straighten out...or maybe that was just my own sad story!
                    Skids (Sid Hansen)

                    Down to one 1978 E. Stock air box with K&N filter, 81H pipes and carbs, 8500 feet elevation.

                    Comment


                    • #11
                      A very good point, Skids....not often mentioned.
                      "Damn it Jim, I'm a doctor, not a mechanic!' ('Bones' McCoy)

                      Comment


                      • #12
                        Skids, I have the same sad story. I had put the cams back in to time, tensioner in, and rotated the crank to check the timing like it says in the book. I was concentrating on watching the crank go around, and didn't notice that the cams hadn't moved. The chain was around the crank, but not the sprocket. I didn't feel anything really while rotating the crank, so it takes very little pressure to bend lots of expensive valves!

                        Tod
                        Try your hardest to be the kind of person your dog thinks you are.

                        You can live to be 100, as long as you give up everything that would make you want to live to be 100!

                        Current bikes:
                        '06 Suzuki DR650
                        *'82 XJ1100 with the 1179 kit. "Mad Maxim"
                        '82 XJ1100 Completely stock fixer-upper
                        '82 XJ1100 Bagger fixer-upper
                        '82 XJ1100 Motor/frame and lots of boxes of parts
                        '82 XJ1100 Parts bike
                        '81 XS1100 Special
                        '81 YZ250
                        '80 XS850 Special
                        '80 XR100
                        *Crashed/Totalled, still own

                        Comment

                        Working...
                        X