Announcement

Collapse
No announcement yet.

A Project Begins....Again!!

Collapse
X
 
  • Filter
  • Time
  • Show
Clear All
new posts

  • #16
    Carbs are cleaned and mounted. While I wait for the baffle to come in for the exhaust, I decided to move to the front end of the bike.

    I knew the headlight was not a factory piece, and I knew the wiring was not in the headlight bucket. So I was not surprised that it needed a good thorough cleaning of the connectors. I was surprised to find the headlight was made by Vetter!


    Is that out of a fairing? Or did Vetter make these separately? Interestingly enough, the lamp itself is marked to be a sealed beam, well, it is not sealed. The lens is completely loose of the housing.

    Now, before I go any further, I want to state that I consider the Local XSive I bought the bike from a friend. He is one of the founding members of the SWOXS group. I know he took the best care of this bike that he knew how to. Which is why I bore some of you with the day to day details of my progress on this bike. To educate those who need it, or just to amuse those who have been through it themselves and enjoy a laugh at someone else enduring the same.

    Next the wiring, I did find one connector broken. It is the one for the key switch, on the switch side. I have a spare key switch, but it is the three wire switch, so I can't use its connector. Will need to replace that connector.
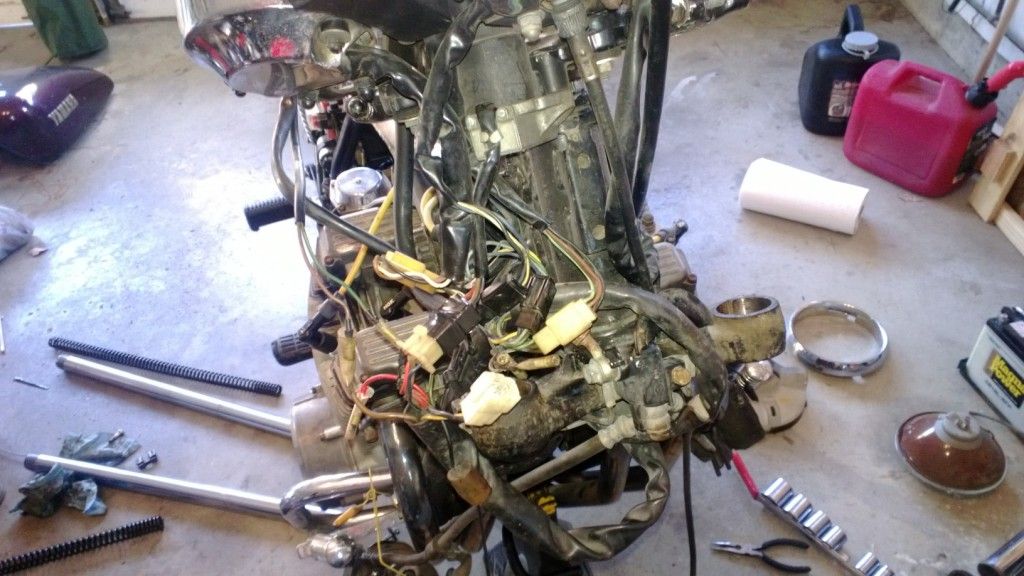


    On to the steering head bearings. Now, for those of you who consider this work beyond your abilities, or just figure it can wait till you need a new tire, or for whatever reason have not checked or repacked the grease in your bearings, do it.....do it NOW!

    I was so glad I checked this on this bike. I did not get pictures, well, because I was handling grease and crud and did not want that on my camera. First, getting the double locking nuts off was a complete PITA. Almost broke a plumbers drain wrench trying to move the thing. Ended up putting a screw driver to one of the slots and pounding it more than I ever thought it would take. Once I got the assembly apart, I found the bottom bearing looked like it could use some new grease, and the race cleaned up good. The top however...wow..I have never seen grease that looked like dried up baked on fruit before. The top bearing would barely move. The race I thought was pitted with rust from looking and feeling it. After alot of cleaning though the race was fine, it was all dired up grease on it. The bearing also freed up and felt good. So, new grease packed into the cleaned bearings, new grease on the races, and a good cleaning of the triple trees, not in that order. then reassembled.

    Now to the forks. Again, change your fork oil PLEASE!! I suspected these forks had not been cleaned or the oil changed in quite some time, and I believe I was correct. The oil that came out looked like river mud. So, time to disassemble the forks for a good thorough cleaning.
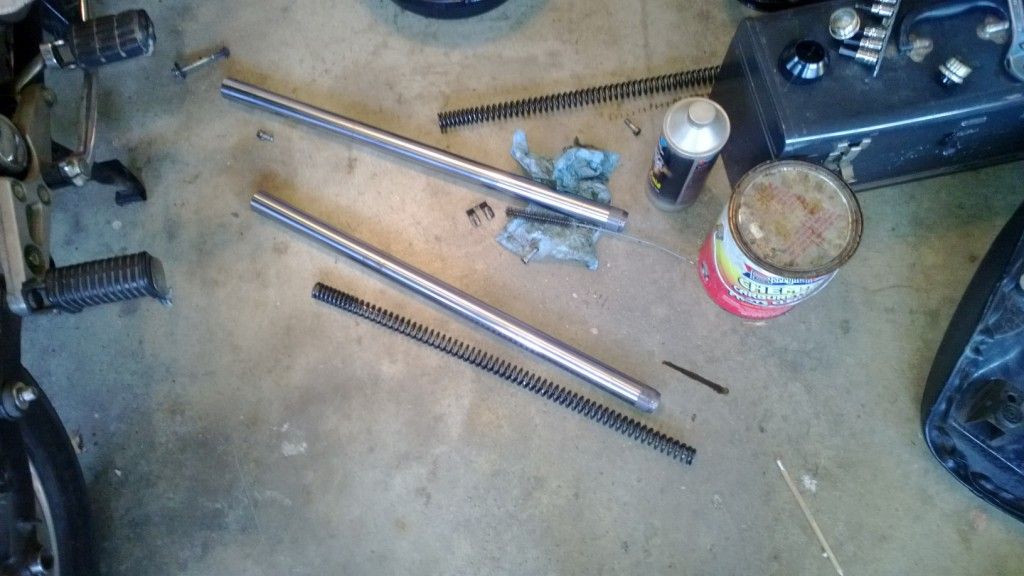

    Yes, I did completely disassemble the forks, There is a tech-tip on replacing fork seals that gives a good description on how to do that if you need help. It is really pretty simple! As for the lowers...they are a work in progress..
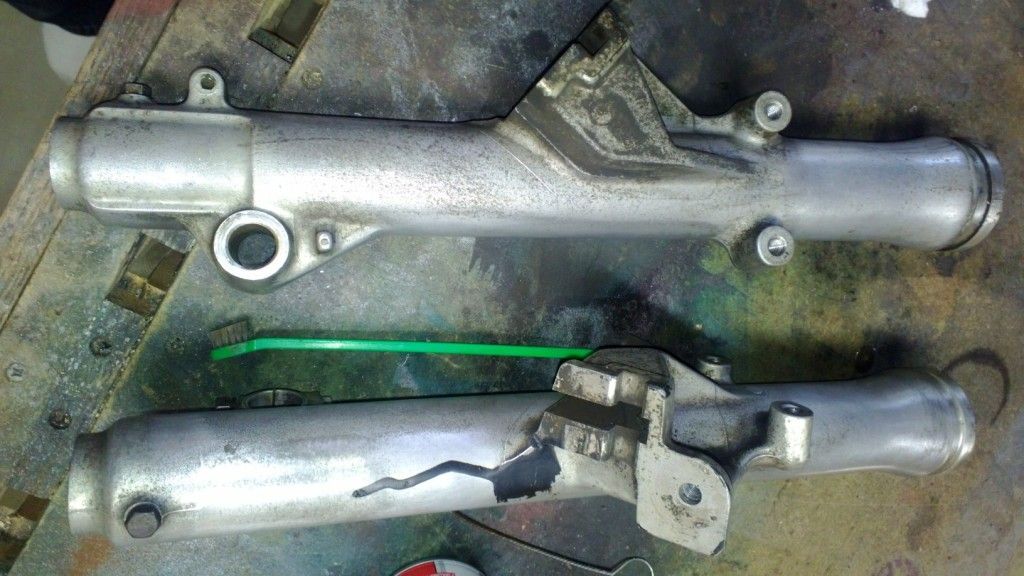

    And yes, if you need to paint your calipers, please, remove them from the forks to do it. Even if you do not pull the brake line because you do not want to bleed the system, remove them from the forks! I will have more time in cleaning these fork lowers than in the rest of the front end work combined most likely.

    Well, probably will not get much done today. Hope to get it fired up before the end of the weekend.
    Last edited by DGXSER; 11-22-2012, 08:56 AM.
    Life is what happens while your planning everything else!

    When your work speaks for itself, don't interrupt.

    81 XS1100 Special - Humpty Dumpty
    80 XS1100 Special - Project Resurrection


    Previously owned
    93 GSX600F
    80 XS1100 Special - Ruby
    81 XS1100 Special
    81 CB750 C
    80 CB750 C
    78 XS750

    Comment


    • #17
      Don now's your chance to polish those forks:. By the time you get done with this project it's going to be in better condition than the SH
      Comment


      • #18
        That is kind of my plan Doug, to polish the forks. But first I have to get back to aluminum in some places. I have washed with detergent soap and water, as well as sprayed and brushed with carb cleaner to get to where they are now.
        Life is what happens while your planning everything else!

        When your work speaks for itself, don't interrupt.

        81 XS1100 Special - Humpty Dumpty
        80 XS1100 Special - Project Resurrection


        Previously owned
        93 GSX600F
        80 XS1100 Special - Ruby
        81 XS1100 Special
        81 CB750 C
        80 CB750 C
        78 XS750

        Comment


        • #19
          So today I learned that an angle die grinder takes ALOT of freakin air!!! MY tried and true air compressor and tank was no match for a die grinder. I got the HF little angle grinder to use with the pads to polish up the lower fork pieces. Well, after half a day of polish for 10 minutes, wait 15 for the compressor to recover, I am about down to using very high grit sanding paper.

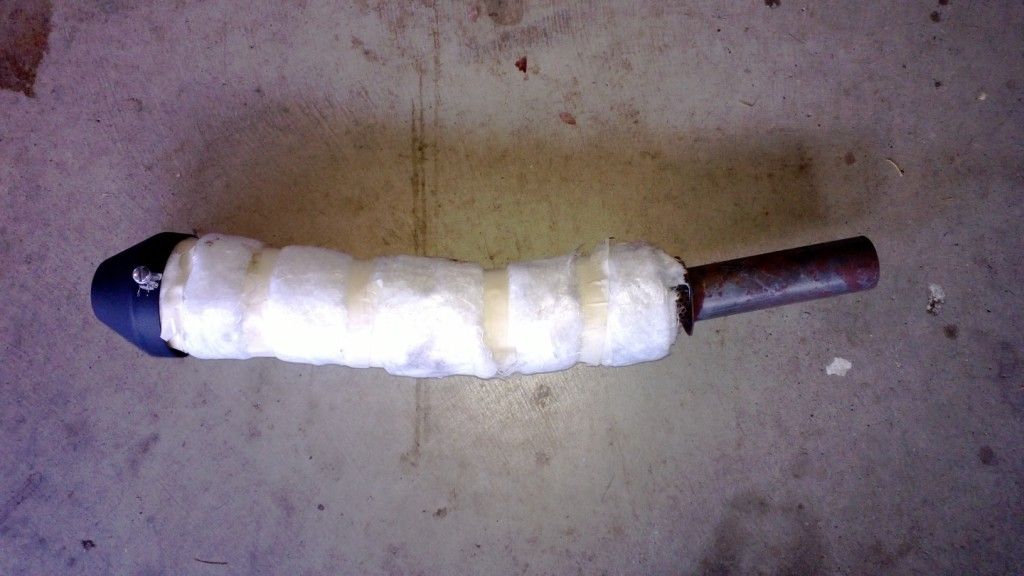
          So I was very very happy to be distracted by the mail man who came bearing gifts....ok...a package I paid for...but it had THIS!!!!


          Thats right, a genuine stock factory Kerker baffle for my exhaust!!!

          Only, it was not exactly the right one for it. Turned out, it was not the correct angle on the bend, and a little long, with the inlet tube a little larger. I ended up cutting the inlet tube and about an inch or so of the perfed metal off, and putting on the inlet tube from the busted setup. Took it to the local muffler shop and the guy threw a few tacks on it for me for $5. Then I used my personal mass to correct the bend to match the muffler shell. So, I now have a baffled and functional Kerker header and muffler!!! Woohooo!

          Now all I should need is a battery and I can hear the old girl fire up!
          Life is what happens while your planning everything else!

          When your work speaks for itself, don't interrupt.

          81 XS1100 Special - Humpty Dumpty
          80 XS1100 Special - Project Resurrection


          Previously owned
          93 GSX600F
          80 XS1100 Special - Ruby
          81 XS1100 Special
          81 CB750 C
          80 CB750 C
          78 XS750

          Comment


          • #20
            Originally posted by DGXSER View Post
            So today I learned that an angle die grinder takes ALOT of freakin air!!! MY tried and true air compressor and tank was no match for a die grinder. I got the HF little angle grinder to use with the pads to polish up the lower fork pieces. Well, after half a day of polish for 10 minutes, wait 15 for the compressor to recover, I am about down to using very high grit sanding paper...
            If you're running the die grinder on unregulated air or at max high pressure, try reducing pressure. That will slow the grinder down some, but may give a bit longer 'run time'....
            Fast, Cheap, Reliable... Pick any two

            '78E original owner - resto project
            '78E ???? owner - Modder project FJ forks, 4-piston calipers F/R, 160/80-16 rear tire
            '82 XJ rebuild project
            '80SG restified, red SOLD
            '79F parts...
            '81H more parts...

            Other current bikes:
            '93 XL1200 Anniversary Sportster 85RWHP
            '86 XL883/1200 Chopper
            '82 XL1000 w/1450cc Buell, Baker 6-speed, in-progress project
            Cage: '13 Mustang GT/CS with a few 'custom' touches
            Yep, can't leave nuthin' alone...

            Comment


            • #21
              Steve, turning it down did not help much, but it did help a little.

              Well, I got both forks far enough that I was able to move on to a 3" polishing wheel in my electric drill, along with some Mothers Mag and Aluminum polish. Which brough them to a really nice shine. I will get pics after I get the front end back together. Still need fork oil, and for the paint to dry completely on the fork cover. It was to far gone to refinish the chrome, so I opted to paint it black.

              Had an interesting day with batteries. Went to Wally world and got one of their Everstart batteries. Got home, started filling the cells and ran out of acid before I got all the cells filled, only 5 of 6. So I took the battery back, looked at the other N18LA3 batteries they had, and they had the same 1100cc acid with them. So I skipped the wally world battery and went for Meijer. Now, interestingly enough, I went to check the acid in their N18LA3 battery and inside the box on the shelf is an old used battery! So I go for the next one back and it has the new kit in it. Took both to the register, informed them they had a used battery in their box. And bought the new battery. Fortunately, this one provided success. So I now have a charged battery on the bike.

              This allowed me to turn the bike over, and I added some starter fluid to hear it run. And run she did, for a few seconds anyway. And all four cylinders were firing!! So I have a runner.

              Hopefully, tomorrow I can get the fork oil and reassemble the front end.
              Life is what happens while your planning everything else!

              When your work speaks for itself, don't interrupt.

              81 XS1100 Special - Humpty Dumpty
              80 XS1100 Special - Project Resurrection


              Previously owned
              93 GSX600F
              80 XS1100 Special - Ruby
              81 XS1100 Special
              81 CB750 C
              80 CB750 C
              78 XS750

              Comment


              • #22
                Yep, I've seen the same thing with those Walmart batteries, gotta open up the box and check everything out first before buying .
                2H7 (79) owned since '89
                3H3 owned since '06

                "If it ain't broke, modify it"

                Comment


                • #23
                  Originally posted by DGXSER View Post
                  So today I learned that an angle die grinder takes ALOT of freakin air!!! MY tried and true air compressor and tank was no match for a die grinder. - - -
                  >
                  Hi Don,
                  air tools that run continuously, die grinders, drills, polishers, sanders etc. are gonna need at least a 10CFM compressor to work full time.
                  As you have discovered, smaller than that and you join the whizz and wait crowd.
                  Using a regulator don't help much, neither, you swap waiting for the pressure to rebuild for steady state tool stalling and that's even worse.
                  The only answer is to get a bigger compressor.
                  Alas, once you have the bigger compressor you will become addicted to collecting air tools.
                  BTDT.
                  Fred Hill, S'toon
                  XS11SG with Spirit of America sidecar
                  "The Flying Pumpkin"

                  Comment


                  • #24
                    Fred, yes a bigger compressor and tank would be needed really. But that is not in my near future space or money wise. I ended up mounting a 3" cotton wheel to the drill and using it to wrap up the polishing work.

                    Almost have the front end completed, need to find a 4 plug electrical connector for the key switch. Geezer is out of them, and the little thing I got from Radio Shack was useless. Local bike shops are closing Sunday and Mondays over winter, so no fork oil till later tonight. Lots of fun stuff to be done yet.
                    Life is what happens while your planning everything else!

                    When your work speaks for itself, don't interrupt.

                    81 XS1100 Special - Humpty Dumpty
                    80 XS1100 Special - Project Resurrection


                    Previously owned
                    93 GSX600F
                    80 XS1100 Special - Ruby
                    81 XS1100 Special
                    81 CB750 C
                    80 CB750 C
                    78 XS750

                    Comment


                    • #25
                      Got the electrical connector on order, new oil in the forks, and all but the headlight and key switch back together on the front end.

                      Also pulled the swing arm and greased its bearings. I got a little nervous, when I removed the bearing seal on the drive shaft side I found a piece of metal in there. Almost like a piece of stripped thread, round but also flat looking. And when I pulled the bearing, I found another piece like it. However, the race looked fine, and the bearing looked good so I have no idea where the metal came from.

                      Tonight I replaced the FD and MD oils, although I did find the stuff I drained out looked as clean and new as the new I was putting in. Oh well, I know for sure it is done.

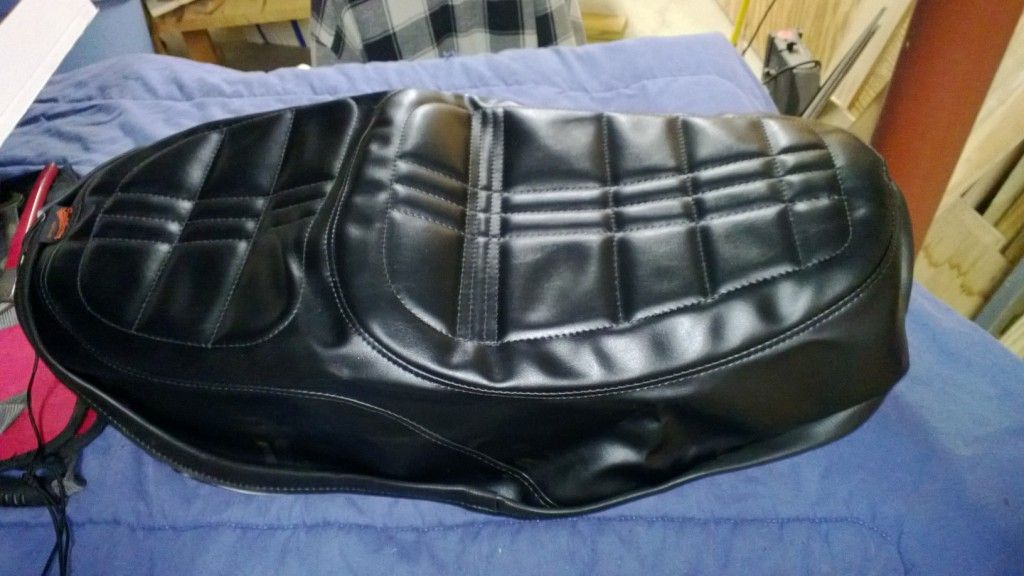
                      I also got my Saddleman Seat Cover today! It sures looks purty!!! Need to get some upholstery glue. Then I can start the process of installing the new cover. I might just keep this seat and put the one from my SH on this bike!
                      Life is what happens while your planning everything else!

                      When your work speaks for itself, don't interrupt.

                      81 XS1100 Special - Humpty Dumpty
                      80 XS1100 Special - Project Resurrection


                      Previously owned
                      93 GSX600F
                      80 XS1100 Special - Ruby
                      81 XS1100 Special
                      81 CB750 C
                      80 CB750 C
                      78 XS750

                      Comment


                      • #26
                        So here is the seat and its transformation. Saddleman cover came in the mail, I laid it out on the seat....


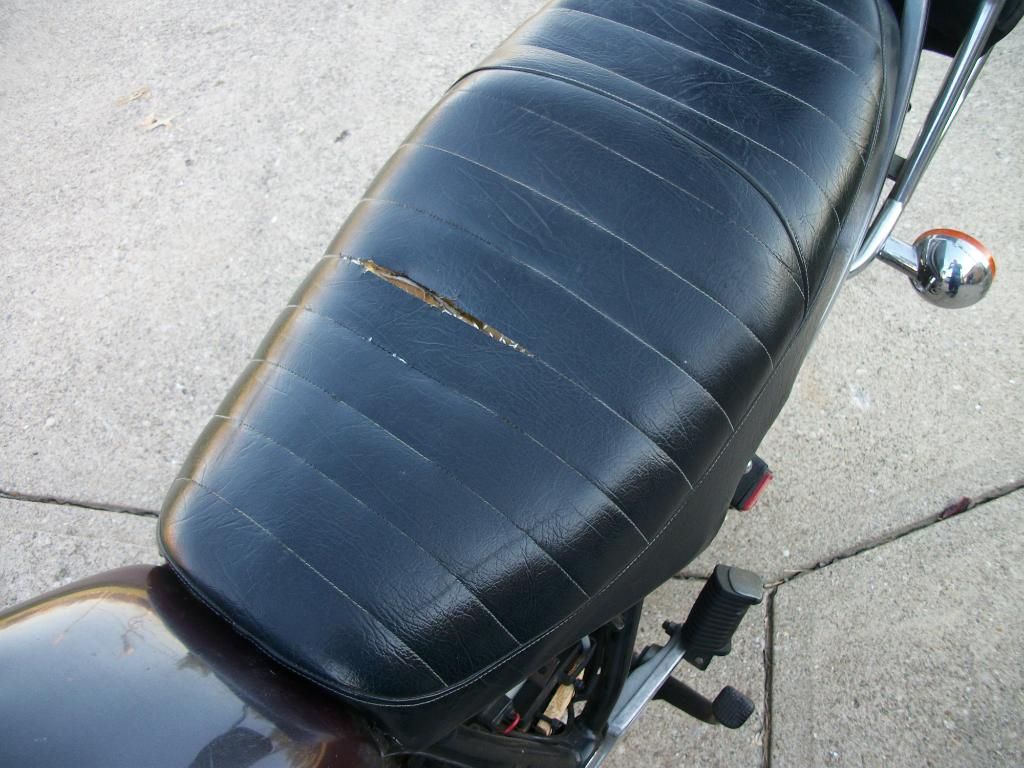
                        Now for reminder, here is the old seat...


                        As usual, no upholstery folks are going to lose their jobs to me. But not to bad for a first timer. Only took me two tries to get it on correctly. First time I laid it out then glued it down lightly, only glue on one side. Started in the front then pulled the middle sides and worked my way each direction. got to the back and did not have enough material to pull it over the back to the clips.

                        So had to pull it all back off, and try again. And here is the finished product after installing the Saddleman cover....twice...
                        Life is what happens while your planning everything else!

                        When your work speaks for itself, don't interrupt.

                        81 XS1100 Special - Humpty Dumpty
                        80 XS1100 Special - Project Resurrection


                        Previously owned
                        93 GSX600F
                        80 XS1100 Special - Ruby
                        81 XS1100 Special
                        81 CB750 C
                        80 CB750 C
                        78 XS750

                        Comment


                        • #27
                          That looks freakin' awesome Don, nice job!
                          2H7 (79) owned since '89
                          3H3 owned since '06

                          "If it ain't broke, modify it"

                          Comment


                          • #28
                            Originally posted by bikerphil View Post
                            That looks freakin' awesome Don, nice job!
                            Hi Don,
                            Two thumbs up. Looks excellent
                            Phil (the other one
                            1981 XS1100 H Venturer ( Addie)
                            1983 XJ 650 Maxim
                            2004 Kawasaki Concours. ( Black Bear)

                            Comment


                            • #29
                              Alright, I'm sold. My SG seat has a small rip in it and because of my budget (SWMBO) cost is always an issue. Maybe I can get a little more foam in there cause mine seems a little hard.
                              Hi, my name is George & I'm a twisty addict!

                              80G (Green paint(PO idea))
                              The Green Monster
                              K&N A/F, TC's fuse block, '81 oil cooler, TC's homemade 4-2 w/Mac Mufflers, Raptor 660 ACCT
                              Got him in '04.
                              bald tire & borrowing parts

                              80SG (Black w/red emblems & calipers)
                              Scarlet
                              K&N A/F, TC's fuse block, WJ5, Shoei bags, Raptor 660 ACCT.
                              Got her in '11
                              Ready for the twisties!

                              81H (previously CPMaynard's)
                              Hugo
                              Full Venturer, Indigo Blue with B/W painted tank.
                              Cold weather ride

                              Comment


                              • #30
                                Thanks for the compliments Phil....and Phil!!

                                George, shipping and all the seat cover was maybe $70. Considering what folks sell a used seat for, not a bad price to get this one back in shape. The cover that was on it was a previous replacement cover, obviously not the factory cover. The foam had been damaged before as there was a piece of filler foam stuck / glued in. I left the piece in there, it was a pretty good fit. The directions from saddleman say up to a 1/2" imperfection will be taken care of by the membrane under their seat material.

                                The other issues I had to deal with was that the plastic molding around the egde of the metal pan was missing in one spot. I chose to apply several layers of duct tape to ease the edge of the metal so it would not push through the material. I also had about 1/3 of one sides metal "clips" (The V shaped metal cut out of the pan used to mount the cover) that had snapped off. So I used the pop rivet method in that area. Drill a hole in the seat pan, pull the seat over, and poke a pop rivet through both and pull it up. The seat cover comes with directions that explain using this technique. Worked out pretty well.
                                Life is what happens while your planning everything else!

                                When your work speaks for itself, don't interrupt.

                                81 XS1100 Special - Humpty Dumpty
                                80 XS1100 Special - Project Resurrection


                                Previously owned
                                93 GSX600F
                                80 XS1100 Special - Ruby
                                81 XS1100 Special
                                81 CB750 C
                                80 CB750 C
                                78 XS750

                                Comment

                                Working...
                                X