Announcement

Collapse
No announcement yet.

Gas Tank Vinegar bath

Collapse
X
 
  • Filter
  • Time
  • Show
Clear All
new posts

  • Gas Tank Vinegar bath

    So this last season I dropped the bike and put a dent in it so when I got the opportunity to paint everything on the bike I decided to use a spare tank from the shed...the only problem was the thick layer of rust in it. So here is what I did in experimenting and what I messed up and maybe what I did right

    1st Attempt:
    So I started off this journey doing what all the sites say to do...I counted out 100 bolts of many a varying size and dropped them in. I spent 30 minutes rolling them around in side the tank knocking the larger pieces of rust off. This seemed to do the job nicely. To get the bolts all out I attached an earth magnet to a screw driver and went fishing through the gas level port. This worked out pretty well and I was able to fish them all out. Word to the wise...make sure they can all be picked up by your magnet BEFORE you put them all in...luckily the few that wouldn't come out I was able to reach in and fish them out. This method also picked up a lot of the larger particles of rust. I also have a shop vac (our last regular vacuum we retired) that helped get most of the piles of dust out. I finished up by going outside with the air compressor and blew what I could out of the tank.

    2nd attempt:
    So I have read a bunch of articles on how to get the rust out...and the cheapest of the bunch seems to be using vinegar. So I cut up a pop can and threw some sealant on it and bolted it down to the open holes...I left it on my work bench and dumped 3 gallons of vinegar into the tank. My number one suggestion at this point is to do this initial process IN THE BATHTUB!!! what seemed like a good seal lasted for maybe an hour. And I happened to fill it up right before I went to bed. So guess what your house smells like when two gallons of vinegar drain onto your bench...then on to the floor? They smell like the wrath of a wife. At this point I'm left with a gallon still in the tank. So I made the best of it and cut some 1/8th inch thick plastic and made some gaskets and sealed her up properly. At this point life was hectic so I left what was in there for several days before I checked on it. I looked in and the rust was all still in there. but something awesome happened when I closed the lid and shook the tank violently. Almost all of the rust broke up inside of the tank. It was the first time I had seen real metal from the inside of the tank. So I proceeded to do this for several days. Then I emptied it and let it dry.

    Here is the downside to how I did it...the surface rust came back quickly and within a couple days looked ugly in there. So I did some more research and have begun again.

    3rd Attempt:
    This time around I started in the bathtub. I'm happy to report she is holding strong. I have moved the tanks so she is perched above 5 gallon kitty litter buckets just in case. From my research I have found out that I need to use baking soda to neutralize the vinegar before I empty the tank. And because I want to balance the PH I looked up the science on it and if you fill the tank with 5 gallons of vinegar you need to put in 132 grams of baking soda to swing it dead center. Also keep in mind that is the required amount if you are using the distilled 5% cleaning vinegar. After that I will rinse it out with water. Then use two gallons of 90% rubbing alcohol to get rid of any water still in there. Once that is done I will attempt the hair dryer technique or something similar.

    More to come as I do this process. And I also ordered POR-15 to seal the tank. Which should be here by the time this process is done.
    And I am 25 hours in to the 3rd attempt at this point.
    79F with two parts bikes (78E and a 79F). Ran it for the first season all the way through the summer. more work to do this Spring!

  • #2
    Thanks for the process and let us know how the finial product comes out.
    wingnut
    81 SH (Daily Ride)
    81 650XJ (Brother in laws bike, Delivered)
    81 650XJ Jane Doe (Son's Ride)
    82 750XJ Project bike (Son in law's future ride)
    81 XS 400

    No man has a natural right to commit aggression on the equal rights of another; and this is all from which the laws ought to restrain him.”

    A government big enough to give you everything you want, is strong enough to take everything you have.

    Thomas Jefferson

    Comment


    • #3
      I did the electrolysis in addition to using a box of "sharp pan head framing screws 7x7/16". I was looking for bee bees. But everyone was sold out so I used the screws with great success. I think it really got into the areas nuts and bolts can't get to. Keep us posted on your results.
      Tim
      1979 xs1100sf black.
      1973 Harley fx.
      2005 Honda 450x.

      Comment


      • #4
        Can't agree more, this is perfect timing for me, just got a rusty Venturer tank so I'll be watching carefully.
        Steve R

        '80 SG
        "Fred" -- TC fuse box, stock airbox/exhaust/jets, SS brake lines, Windjammer V fairing, Cibie headlight lens, TKAT fork brace, Showa rear shocks, MikesXS emulators

        Former bikes:

        1973 Yamaha 125 Enduro (brother's but I 'borrowed' it a lot, usually after midnight)
        1978 XS400E Red
        1981 XS850 Special (Stingo)

        Comment


        • #5
          My preferred techniques

          I have been successful using electrolysis (using washing soda) for removing the really heavy rust. It seems to get about 80% of the 'impossible' rust.

          For the lighter rust, I have been using BB's and Evaporust. I put in a gallon of Evaporust in with a whole can of BB's and shake it every hour for a weekend. Gets it down to the clean metal.

          I gave up rinsing out the Evaporust with water, because the rust starts coming back instantly. Instead I rinse with mineral spirits (paint thinner). I rinse it many times by shaking the mineral spirits out into a dishpan, then letting rust settle out for a few minutes, then reusing the mineral spirits over and over again to get our the rust particles.

          I don't like idea of putting in a liner because I am afraid of peeling. I prefer to keep my tanks full, and make sure I ride enough to keep the gas relatively fresh.
          -Mike
          _________
          '79 XS1100SF 20k miles
          '80 XS1100SG 44k miles
          '81 XS1100H Venturer 35k miles
          '79 XS750SF 17k miles
          '85 Honda V65 Magna ~7k miles
          '84 Honda V65 Magna 48k miles (parts bike)
          '86 Yamaha VMAX 9k miles

          Previous: '68 Motoguzzi 600cc + '79 XS750SF 22k miles +'84 Honda V65

          Comment


          • #6
            +1 on evaporust

            I also have found evaporust to work well. It derusts right down to nice clean metal. But the trick is to avoid the bare metal flash rust which happens very quickly after rinsing. Follow the instructions carefully. After rinsing with water and drying with hot air quickly, rinse with acetone to remove all remaining moisture. Then begin the sealing process immediately. I used red-kote sealer. (which is acetone friendly).

            On another tank that I did not want to seal, after rinsing, I found that sloshing around a little seafoam inside the tank just enough to coat it, prevented the flashrust. 2 cycle oil would probably work as well.
            Bob's Bikes:
            79SF, Military theme bike

            Bob's websites:
            https://projectxs11.wordpress.com
            https://rucksackgrunt.com

            Bob's Books:
            "
            Project XS11"
            "Rucksack Grunt"
            "Jean's Heroic Journey"


            Bob's Parts:
            For Sale Here.

            Comment


            • #7
              Mike, how do you seal the holes and which hole did you use to flush, drain, etc? Thanks

              Originally posted by Radioguylogs View Post
              I have been successful using electrolysis (using washing soda) for removing the really heavy rust. It seems to get about 80% of the 'impossible' rust.

              For the lighter rust, I have been using BB's and Evaporust. I put in a gallon of Evaporust in with a whole can of BB's and shake it every hour for a weekend. Gets it down to the clean metal.

              I gave up rinsing out the Evaporust with water, because the rust starts coming back instantly. Instead I rinse with mineral spirits (paint thinner). I rinse it many times by shaking the mineral spirits out into a dishpan, then letting rust settle out for a few minutes, then reusing the mineral spirits over and over again to get our the rust particles.

              I don't like idea of putting in a liner because I am afraid of peeling. I prefer to keep my tanks full, and make sure I ride enough to keep the gas relatively fresh.
              Steve R

              '80 SG
              "Fred" -- TC fuse box, stock airbox/exhaust/jets, SS brake lines, Windjammer V fairing, Cibie headlight lens, TKAT fork brace, Showa rear shocks, MikesXS emulators

              Former bikes:

              1973 Yamaha 125 Enduro (brother's but I 'borrowed' it a lot, usually after midnight)
              1978 XS400E Red
              1981 XS850 Special (Stingo)

              Comment


              • #8
                Masonite

                Bergman:

                I made plates out of markerboard Masonite to cover the petcock holes and gas sensor hole. I happened to have it laying around from another project. I bonded cork gasket material to the Masonite. This sounds like more work than it really is. I used a piece of paper and held it over the petcock holes, and rubbed a pencil over the paper to make a stencil for cutting the Masonite. I think I used the gas sensor plate itself as template for that Masonite plate.

                It took about 15 minutes to make all the plates to cover all three holes.

                I used the original fasteners to hold the plates on the tank.

                FYI The Masonite does eventually start to swell from absorbing fluid after several cycles, but the job is done before it becomes a problem. You might find a better material. I have plenty of the markerboard Masonite material. PM me if you want some.

                I put the Evaporust and the paint thinner in though the gas cap. I drained it out by removing the petcock covers for each rinse cycle. You have to shake the tank a lot to get out all of the fluid. I completed each rinse cycle in about 5 minutes.

                Hope it helps.

                I'll be doing my "Bagger Project" tank in a few weeks. It has some noticeable rust in the tank, but less than the last 3 tanks I did!
                -Mike
                _________
                '79 XS1100SF 20k miles
                '80 XS1100SG 44k miles
                '81 XS1100H Venturer 35k miles
                '79 XS750SF 17k miles
                '85 Honda V65 Magna ~7k miles
                '84 Honda V65 Magna 48k miles (parts bike)
                '86 Yamaha VMAX 9k miles

                Previous: '68 Motoguzzi 600cc + '79 XS750SF 22k miles +'84 Honda V65

                Comment


                • #9
                  First Update

                  First off, thank you for the encouragement, and the additional information on tank clean up!

                  Update: So i have been shaking the tank each evening and then cracking the top to see the results.
                  27 hours in I saw a little bit of flake but for the most part the "flash rust" as Ranger_xs1100 had stated was almost entirely gone.
                  50 hours in I noticed that I was getting floaters at the top but it was still visible inside the tank.
                  74 hours in the floaters are heavy and the vinegar is cloudy. I can barely see through it to the metal. I think I may drain it tomorrow and inspect inside the tank to see if its done...last thing I want to do is leave it all in there to long.

                  on a side note I have read on other threads on other sites where people are leaving it in their tanks for up to 2 weeks to make sure it is really clean.
                  79F with two parts bikes (78E and a 79F). Ran it for the first season all the way through the summer. more work to do this Spring!

                  Comment


                  • #10
                    Thanks, Mike. I found some scratched-up flexiglass that should do the trick, off to get some gasket material.

                    I may still try the vinegar way, however, it seems that a gallon of Evaporust isn't THAT much more expensive than 6+ gallons of vinegar, and I can re-use it--the quart that I have is getting pretty cruddy. The rust inside this tank isn't bad, not flaking, so hoping it won't be a long process. I do have all winter, though!

                    I am going to start a thread on it, as I'm trying to figure out if I want to try to imitate the Venturer Indigo Blue (I saw somewhere that a Toyota color is not too far off, and there are decals from Speed and Sport) or just paint it black.

                    First the inside, though.

                    Steve
                    Originally posted by Radioguylogs View Post
                    Bergman:

                    I made plates out of markerboard Masonite to cover the petcock holes and gas sensor hole. I happened to have it laying around from another project. I bonded cork gasket material to the Masonite. This sounds like more work than it really is. I used a piece of paper and held it over the petcock holes, and rubbed a pencil over the paper to make a stencil for cutting the Masonite. I think I used the gas sensor plate itself as template for that Masonite plate.

                    It took about 15 minutes to make all the plates to cover all three holes.

                    I used the original fasteners to hold the plates on the tank.

                    FYI The Masonite does eventually start to swell from absorbing fluid after several cycles, but the job is done before it becomes a problem. You might find a better material. I have plenty of the markerboard Masonite material. PM me if you want some.

                    I put the Evaporust and the paint thinner in though the gas cap. I drained it out by removing the petcock covers for each rinse cycle. You have to shake the tank a lot to get out all of the fluid. I completed each rinse cycle in about 5 minutes.

                    Hope it helps.

                    I'll be doing my "Bagger Project" tank in a few weeks. It has some noticeable rust in the tank, but less than the last 3 tanks I did!
                    Steve R

                    '80 SG
                    "Fred" -- TC fuse box, stock airbox/exhaust/jets, SS brake lines, Windjammer V fairing, Cibie headlight lens, TKAT fork brace, Showa rear shocks, MikesXS emulators

                    Former bikes:

                    1973 Yamaha 125 Enduro (brother's but I 'borrowed' it a lot, usually after midnight)
                    1978 XS400E Red
                    1981 XS850 Special (Stingo)

                    Comment


                    • #11
                      Bonus!

                      Originally posted by Bergman16 View Post
                      Thanks, Mike. I found some scratched-up flexiglass that should do the trick, off to get some gasket material...

                      ...I am going to start a thread on it, as I'm trying to figure out if I want to try to imitate the Venturer Indigo Blue (I saw somewhere that a Toyota color is not too far off, and there are decals from Speed and Sport) or just paint it black.

                      First the inside, though.

                      Steve
                      Steve: The cover plates for de-rusting the inside come in handy when painting the outside too! (dual purpose)
                      -Mike
                      _________
                      '79 XS1100SF 20k miles
                      '80 XS1100SG 44k miles
                      '81 XS1100H Venturer 35k miles
                      '79 XS750SF 17k miles
                      '85 Honda V65 Magna ~7k miles
                      '84 Honda V65 Magna 48k miles (parts bike)
                      '86 Yamaha VMAX 9k miles

                      Previous: '68 Motoguzzi 600cc + '79 XS750SF 22k miles +'84 Honda V65

                      Comment


                      • #12


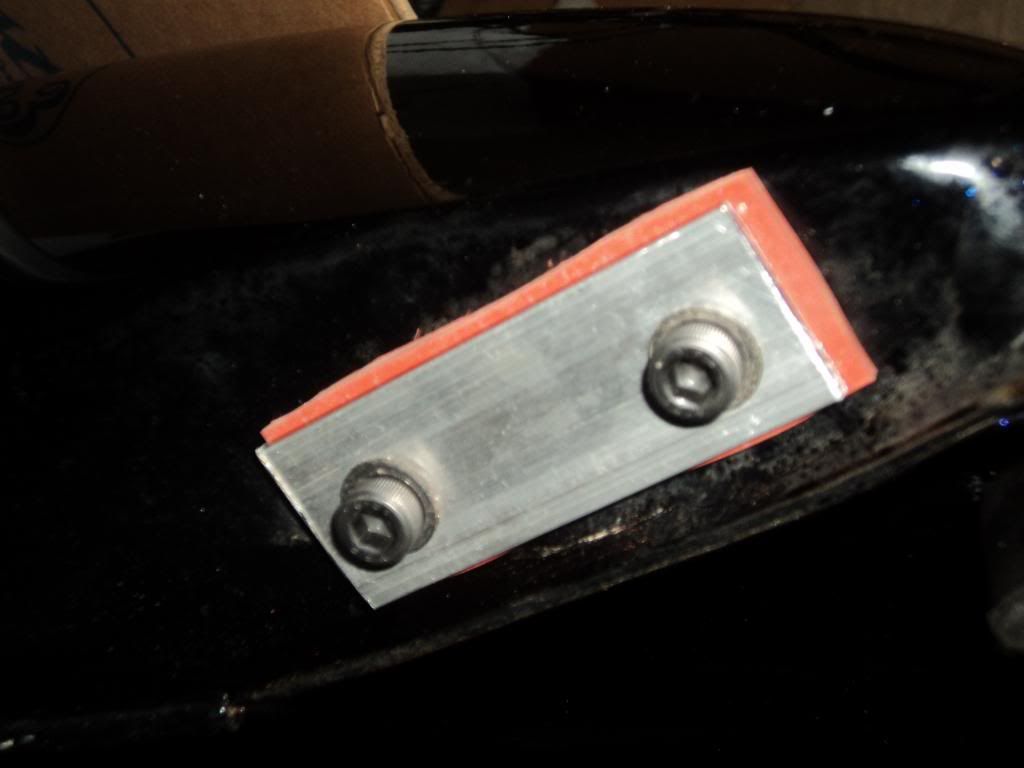
                        This is how I covered the petcock hole. It's cut from aluminum bar stock and a sheet of rubber from the hardware store.
                        Marty (in Mississippi)
                        XS1100SG
                        XS650SK
                        XS650SH
                        XS650G
                        XS6502F
                        XS650E

                        Comment


                        • #13
                          Marty, that is exactly how to block off one side when running the single petcock mod. The aluminium bar works perfectly.
                          2H7 (79) owned since '89
                          3H3 owned since '06

                          "If it ain't broke, modify it"

                          Comment


                          • #14
                            rinsing tank with mineral spirits

                            Mineral spirits as a rinse caused (I think) my liner not not adhere properly. I used the Caswells product. Caswells was good on two other tanks where I used something else.
                            Skids (Sid Hansen)

                            Down to one 1978 E. Stock air box with K&N filter, 81H pipes and carbs, 8500 feet elevation.

                            Comment


                            • #15
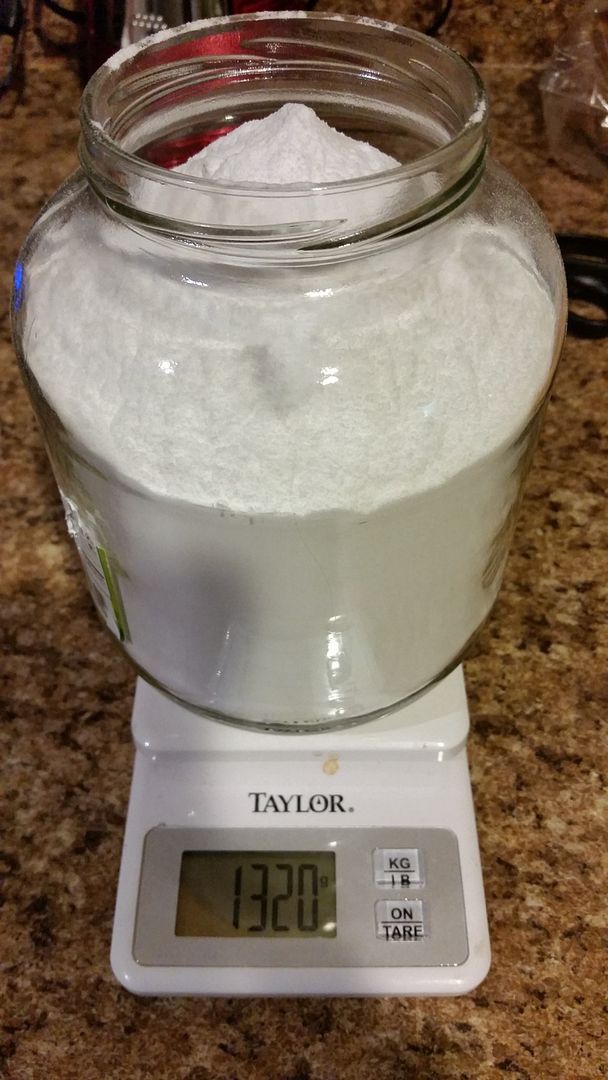
                              *CORRECTION* It should be 1320 grams of baking soda NOT 132 I filled a pickle jar for reference


                              It doesn't look like any of the rust is holding onto the inside of the tank anymore. And I have 5 more days till my liner gets here >.< I tried looking around town and couldn't find anyone that stocked it. Can hardly wait!
                              79F with two parts bikes (78E and a 79F). Ran it for the first season all the way through the summer. more work to do this Spring!

                              Comment

                              Working...
                              X